Table of Contents
Advertisement
Quick Links
Advertisement
Table of Contents

Related Manuals for SIG RASCAL EP-49


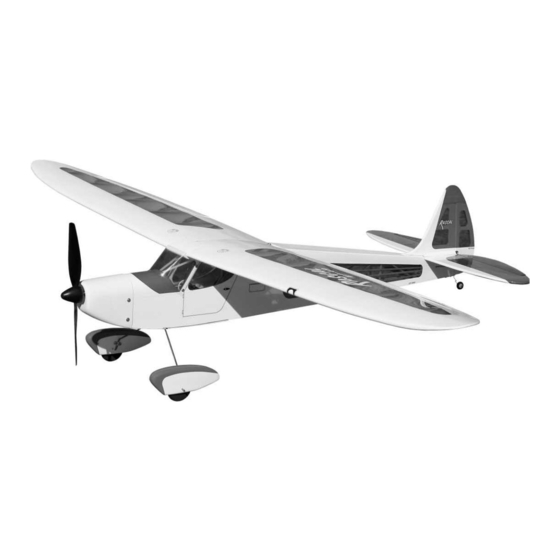
Summary of Contents for SIG RASCAL EP-49
- Page 2 Airplane" section of this manual for more details. the case, there is no need to be alarmed. The covering is not de- fective! Your RASCAL EP-49 was covered in a part of the world BATTERY CHARGER (not supplied): FOR SAFETY AND...
-
Page 3: Required Tools
1 bag ❑ (1) SIG 2410-09 Brushless Outrunner Electric Motor with 18 amp ESC and Rubber Spinner 1 bag ❑ (1) SIG 8-1/2 x 8 EP Propeller, with Brass Hex Nut & Aluminum Sleeve 1 bag ❑ (1) RASCAL EP-49 Decal Sheet NOTE: “PWA”... - Page 4 ❑ 1) For maximum strength, we recommend using SIG Epoxy At the rear, align the wing carefully on the fuselage, and then use the metal M3 x 18mm PWA Bolt to secure the wing in place on Glue for joining the wing panels in this step.
- Page 5 SIG CA Debonder. down into the servo mount opening and through the wing. You e) Repeat this process to mount the other aileron control horn.
- Page 6 To allow enough time to pushrod on the other side of the wing. properly align the stabilizer, we recommend using slow drying SIG Epoxy Glue for this step. NOTE: Later, when you turn on your full radio system for the first a) First mount the wing onto the fuselage.
- Page 7 If any glue oozes out onto the covering, it can be easily removed with SIG CA Debonder. ❑ 11) Note that the fin and rudder are hinged together, but the hinges are not glued.
- Page 8 ELEVATOR & RUDDER HOOKUP For this section you will need the Fuselage, (2) Servos, (2) Long Formed Wire Pushrods, and (2) Nylon Pushrod Keepers. ❑ 16) Mount the elevator and rudder servos in the fuselage, using the screws that came with the servos. a) Begin by positioning the servos in place in the plywood servo tray built into the fuselage.
-
Page 9: Main Landing Gear
c) Use a pair of pliers to firmly grasp the pushrod wire at the mark just made, and then bend the plain end of the wire 90 DOWNWARDS (so that the pushrod wire comes into the control horn from the top - see photo below). Make the bend as sharp as possible. - Page 10 c) Remove the wheel pants from the axles. Drill .046” dia. (3/46” or #56 bit) pilot holes completely through the wheel pant wall and the plywood pad inside, at the marks just made. ❑ 22) Assemble the wheel pants and wheels simultaneously onto their axles, using the M2 x 5.5mm screws provided.
-
Page 11: Receiver & Battery Installation
14 of this manual. There is plenty of room inside the Rascal EP-49 fuselage to ac- commodate practically any balance situation. The battery pack... -
Page 12: System Tests
The slots are spaced 3/8" apart. You can use a RASCAL EP-49. The following control travel measurements are Dremel® tool, or a simple hobby knife to make the slots. Finish recommended for your initial test flights of the airplane. -
Page 13: Mounting The Propeller & Spinner
MOUNTING THE PROPELLER & SPINNER ❑ 40) Locate the Propeller with Brass Hex Nut and Aluminum Sleeve, plus the rubber Spinner from the kit contents. a) Remove the front M3 lock nut and the washer from the motor shaft. Then thread the Brass Hex Nut that came with the propeller onto the motor shaft. - Page 14 EP-49 is at the rear limit of the balance range. The simplest way to check the balance of your RASCAL EP-49 is to place a finger- tip, one on each side of the fuselage, at the main spar location on the bottom of the wing.
-
Page 15: First Test Flight
This is especially true at lower flight altitudes. A good flight in- factors, you will most likely find that the RASCAL EP-49 can easily structor will climb your model to an altitude that gives him a good cruise in level flight at 1/2 to 3/4-throttle setting. -
Page 16: Customer Service
The user shall determine the suitability of the product for his or her AMA WEB SITE: www.modelaircraft.org intended use and shall assume all risk and liability in connection therewith. If you like the Rascal EP-49, take a look at its “sister ship” - the Kadet EP-42B!
Need help?
Do you have a question about the RASCAL EP-49 and is the answer not in the manual?
Questions and answers