Table of Contents
Advertisement
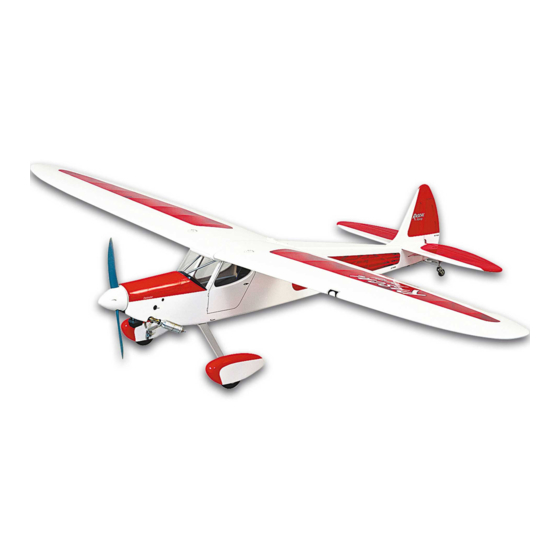
RASCAL FORTY ARF ASSEMBLY MANUAL
INTRODUCTION:
SIG's RASCAL FORTY ARF represents the classic good looks
and lines of yesterday's private aircraft designs with performance
that meets and even exceeds today's standards. The RASCAL
FORTY is unlike any .40 size high-wing design available and offers
flight characteristics that are equally unusual for such aircraft. The
airplane is not just easy to fly, it's almost immediately "comfortable"
to most R/C pilots. The look is decidedly from the "Golden Era" of
aviation and yet the RASCAL FORTY ARF looks right at home on
any modern flight line!
The RASCAL FORTY ARF has a lot more going for it than just its
good looks. Its performance is as remarkable as its appearance.
High speed is impressive and low speed is awesome and what
goes on in between is just about as much fun as you can handle.
The RASCAL FORTY could easily fill the role of a trainer and then
be flown as your second airplane. Set the control throws at the
suggested beginning movements, throttle back and learn to fly
with a truly honest, gentle airplane. When you get through basic
training and comfortable with the requisite take-offs, landings, and
basic flight maneuvers, dial-up the control throws a little to enjoy a
very aerobatic airplane. Inside and outside loops, rolls, inverted
flight, snap maneuvers, great spins, and even knife-edge flight are
all in the RASCAL FORTY flight envelope. Landings and take-offs
are just about the smoothest you'll ever experience, even when
compared to tricycle landing gear equipped aircraft. As the saying
goes, "real pilots fly tail-draggers".
The RASCAL FORTY ARF kit has been engineered to get you into
the air quickly as possible with an R/C model that will truly last.
The airframe has been expertly built and covered with AeroKote
This material is both rugged and easy to repair. The covering trim
scheme is totally unique and also offers good visibility and
orientation in the air.
The two-piece wing allows convenient
transportation in the smallest of vehicles.
This assembly manual has been specifically sequenced to get
your RASCAL FORTY ARF assembled and into the air very
quickly. We strongly suggest that you read through the manual first
to get familiar with the various parts and their assembly
sequences. The proper assembly and flying of this aircraft is your
responsibility. If you are new to the sport/hobby of radio control,
we urge you to seek the assistance of a qualified person to help
you assemble this model airplane. If you do not understand a
R
™
.
1
particular assembly step or sequence, do not guess - find
qualified help and use it.
RADIO EQUIPMENT:
The RASCAL FORTY ARF requires a standard 4-channel radio
system and five standard servos. We have used and can highly
recommend both the Airtronics™‚ RD-6000 Sport system and the
Hitec™ Flash 4X system. Both of these very affordable and
reliable radio systems offer all the features you'll need for this and
the many other R/C aircraft in your future. For reference, this
assembly manual shows the installation of the Airtronics™‚
RD-6000 Sport radio system with Airtronics™‚ #94102 standard
servos. In addition, you will need two aileron 24" servo lead
extensions and an aileron servo Y-harness for connection to the
receiver.
ENGINE SELECTION:
Engine choices for the RASCAL FORTY ARF are many. Keep in
mind that the airplane has been designed to be light, producing a
very favorable wing loading.
aerodynamically clean.
performance when using the recommended engine sizes. Over-
powering this model is totally unnecessary and not at all
recommended.
We've found that the RASCAL FORTY ARF really comes into
its own when flown with 4-stroke engines in the .40 - .52
displacement range. We've test flown the RASCAL FORTY with
virtually every available 4-stroke engine in this range with
outstanding results. The airplane just seems to fly wonderfully with
4-stroke engines. It just looks and sounds "right" with a 4-stroke in
the nose.
2-stroke engines also fly this airplane very nicely. Any plain-
bearing or bearing equipped .36, .40, or .46 sport engine would be
a good choice. For example, a great choice would be the Irvine .40
engine. Like all Irvine engines, the .40 is powerful, reliable, and
quiet. Whatever engine you choose, take the time to carefully
break it in according to the manufacturer's instructions. A good
running, reliable engine is a minimum requirement for the
enjoyment of this or any R/C model aircraft.
COVERING MATERIAL:
Your RASCAL FORTY ARF has been professionally covered using
AeroKote
™
. This material is well known for its ease of application,
light weight, and consistency of color. If you live in a dry climate,
you may notice that some wrinkles might develop after removing
the covered parts from their plastic bags. This is perfectly normal
The design is also relatively
These two factors result in great
Advertisement
Table of Contents

Related Manuals for SIG RASCAL FORTY


Summary of Contents for SIG RASCAL FORTY
- Page 1 ENGINE SELECTION: The RASCAL FORTY ARF has a lot more going for it than just its Engine choices for the RASCAL FORTY ARF are many. Keep in good looks. Its performance is as remarkable as its appearance.
-
Page 2: Required Tools
“creep”, making them unsightly. This is especially true with the inventory the parts in your kit. Note that the hinges for the rudder RASCAL FORTY inset trim scheme. You must also be careful and fin are in place in the bag containing these two parts. The when using a heat iron or heat gun when working around the rudder/fin hinges are not glued in place yet. - Page 3 HARDWARE: For the following steps you will need two standard aileron servos, two 24” servo extensions and a Dual Servo “Y” Harness for your 4 each #2 x 6mm (1/4”) Phillips/Washer Head Screws - particular radio system. Aileron Mounting Block Attachment 8 each #2 x 8mm (5/16”) Phillips/Washer Head Screws - Aileron Hatch Mounting 8 each M2 x 20mm (3/4”) Phillips Head Bolts -...
- Page 4 2) The aileron servos are now mounted to the molded plastic 4) Plug a 24” servo extension lead into each servo plug and servo hatch covers. Begin by installing the rubber grommets and secure the connection with plastic tape. Reach into the aileron brass eyelets, (supplied with your radio system), into each servo.
-
Page 5: Fuel Tank Assembly
6) From the kit contents locate two nylon control horns, four molded fairing in the servo tray, at 90 to the servo. Take off and reposition the output arm as needed to achieve this. With these M2 x 3/4” Phillips Head bolts and two wire aileron pushrods two issues addressed, install and tighten the servo output arm (threaded at one end, “Z”-bend at the other end). -
Page 6: Engine And Fuel Tank Installation
- typical .40 - .46 2-strokes and typical .40 - .52 4-strokes. The basic design of the RASCAL FORTY calls for mounting the engine inverted in the nose. Over the years there have been... - Page 7 throttle in the low position. Allow muffler manifold pressure from the tank vent line to get fuel to the carburetor. Avoid “choking” fuel through the line by placing your finger over the carburetor. With properly broken-in engines, these procedures should work perfectly every time.
- Page 8 be made with a 9/64” dia. drill bit. pair of pliers transfer the marks to the outside of the fuselage. Grip the pin tightly with the pliers, align the pin with the marks on the inside of the engine compartment and push it through the fuselage side and covering.
- Page 9 XLFS .52AR 4-stroke, (to more easily install this particular engine, we reversed the carburetor position 180 on the intake manifold). The engine compartment in the Rascal Forty will accept virtually any make of 4-stroke engines in .40 to .52 c.i. sizes.
- Page 10 (temporarily mounting the spinner backplate to the engine and using 1/16” scrap balsa “spacers” makes this accurate). Slide the aluminum motor mount rails against each side of the engine case, making sure the engine is centered at the front. With the engine and aluminum mounts in this position, lightly tighten the four motor mount bolts to hold the aluminum rails in place.
- Page 11 and progressively enlarge it to accept the needle valve body the factory. However, the exposed wood edges of the muffler and through the fuselage and into the carburetor. The finished hole needle valve openings should now be coated to make them fuel should be just a little larger than the diameter of the needle valve proof as well.
- Page 12 Locate the white SIG spinner assembly from the kit contents. This spinner is easy to install, lends a great look to your finished RASCAL FORTY ARF and is ready to use with typical APC propellers for engines in the size range for this model! Start by choosing the correct adapter ring for your particular engine.
- Page 13 When the epoxy has set, remove the wing from the fuselage. 4) From the kit contents, locate the bag containing the pre- assembled SIG tailwheel assembly. Note that the bottom rear of the fuselage has a plywood hardpoint beneath the covering for mounting the tailwheel bracket.
-
Page 14: Radio Installation
Aluminum Landing Gear, Fiberglass Wheel Pants, 2-3/4” Diameter in place, use two M3 x 10mm (3/8”) bolts with M3 split ring Main Wheels and the following hardware: washers to secure the pant to the landing gear leg. Check the wheel for free rotation. Repeat this procedure with the remaining 2 each M4 x 40mm (1-9/16”) Phillips/Washer Head Axle Bolts wheel pant. -
Page 15: Pushrod Installation
servo opening. The rudder servo fits into the left rear servo tailwheel bracket. We made a simple wire hook from a straight pin opening and the throttle servo fits into the forward opening. and attached it to the forward screw holding the bracket in place. Position the throttle servo with its output arm on the correct side We then used a rubber band to anchor the antenna along the for connecting to the throttle pushrod. - Page 16 thread it in place - simple!) pushrod. Re-insert the pushrod into its tube housing from the servo compartment. Connect the metal link to the servo output arm and attach the arm to the servo in the neutral position. Thread the remaining metal link onto the exposed end of the stud at the rear of the fuselage.
- Page 17 I. 2-STROKE THROTTLE PUSHRODS: The throttle pushrod for typical 2-stroke engines is the traditional push-pull type, cut to length, with metal control links at each end. a) From the kit contents, locate the 16” length of inner nylon pushrod tubing, two M2 x 7/8” threaded studs and two metal control links.
- Page 18 DECAL APPLICATION: the total movement of any servo. EPA can be used to adjust the movement of the throttle servo as required. The decals supplied with your RASCAL FORTY ARF kit are high quality Mylar ® with an extremely aggressive adhesive. These are not die-cut decals and must be removed from the sheet with a hobby knife and a sharp #11 blade or sharp scissors.
-
Page 19: Center Of Gravity
If you have carefully followed the assembly instructions in this far as 3-7/8” without any trouble. However, moving the C.G. further manual, test flying your new RASCAL FORTY ARF should be a lot back tends to make the elevators more sensitive. Remember that of fun. - Page 20 With a little elevator input, we have even been able to knife edge the RASCAL FORTY very effectively. Landing the RASCAL FORTY ARF is typically a pleasure. We...
- Page 21 R AS CA L F O R T Y A R F N OT E S...
-
Page 22: Academy Of Model Aeronautics
SIG MANUFACTURING COMPANY, INC. is totally committed to your success in both assembling and flying the RASCAL FORTY ARF kit. Should you encounter any problem building this kit or discover any missing or damaged parts, please feel free to contact us by mail or telephone.
Need help?
Do you have a question about the RASCAL FORTY and is the answer not in the manual?
Questions and answers