Table of Contents
Advertisement
Quick Links
Match Throw
FPB-G16RBSMT/N
FPB-19RBSMT/N
FPB-G25RBSMT/N
FPB-25RBSMT/N
FPB-14SBSMT/N
FPB-20SBSMT/N
FPB-26SBSMT/N
FPB-32SBSMT/N
Outdoor Match Throw & Manual Spark Fire Pits
Installation and Operating Instructions
IF YOU CANNOT READ OR UNDERSTAND THESE INSTALLATION INSTRUCTIONS DO
NOT ATTEMPT TO INSTALL OR OPERATE THIS APPLIANCE
This fire pit requires a minimum 18-square inches (per side) of cross ventilation.
Failure to provide proper ventilation can void the warranty.
PLEASE RETAIN THIS MANUAL FOR FUTURE REFERENCE
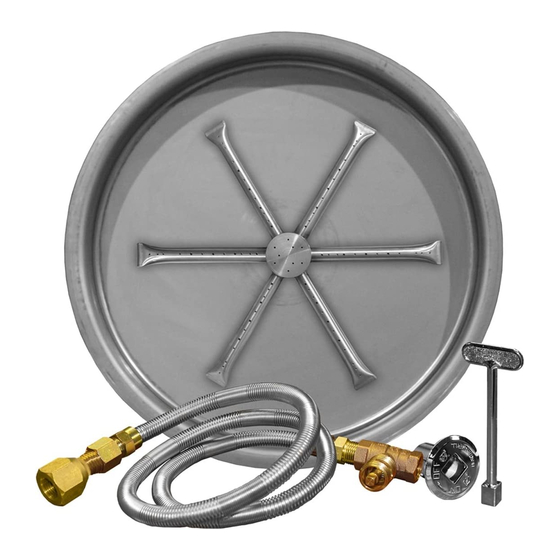
MODELS
Description
16" Round G90 Black Pan & Spur
19" Round Stainless Pan & Spur
25" Round G90 Black Pan & Spur
25" Round Stainless Pan & Spur
14" Square Stainless Pan & Spur
20" Square Stainless Pan & Spur
26" Square Stainless Pan & Spur
32" Square Stainless Pan & Spur
INSTALLTION PRECAUTION:
Warning: For Outdoor Use Only
Manual Spark
FPB-G16RBSMSI/N
FPB-19RBSMSI/N
FPB-G25RBSMSI/N
FPB-25RBSMSI/N
FPB-14SBSMSI/N
FPB-20SBSMSI/N
FPB-26SBSMSI/N
Not Available
Advertisement
Table of Contents

Related Manuals for Firegear FPB-G16RBSMT/N


Summary of Contents for Firegear FPB-G16RBSMT/N
- Page 1 MODELS Match Throw Description Manual Spark FPB-G16RBSMT/N 16” Round G90 Black Pan & Spur FPB-G16RBSMSI/N FPB-19RBSMT/N FPB-19RBSMSI/N 19” Round Stainless Pan & Spur FPB-G25RBSMT/N FPB-G25RBSMSI/N 25” Round G90 Black Pan & Spur FPB-25RBSMT/N FPB-25RBSMSI/N 25” Round Stainless Pan & Spur...
- Page 2 !"#$%& )"&*+#,-+#+.(!%,/"00"&! 1234,56673589:,958,6;<=>9:,95;?<8,@<8<A3=:, B2392,254,8<,<=<;C, D438E,3F,38,58,:897<4:=,4659:,958,G377,H<>C, #:I:;,>4:,F234,56673589:,38,58,:897<4:=,4659:, 4>92,54,5,95@6:;J,F:8FJ,95;,<;,2<@:C, !"#$%& '"&#(#$ "#!$%&!'()**!+,'-! .%!/%0!'0%1)!%1!&')!+,'%*2/)!%1!%03)1! #*,((,4*)!5,6%1'!,/7!*28&27'!2/!03)! 5292/20$!%#!032'!%1!%03)1!,66*2,/9):! 1. Shut off gas to the appliance. ;/!<=>9$*2/7)1!/%0!9%//)90)7!#%1!&')! 2. Extinguish any open flame. '3,**!/%0!4)!'0%1)7!2/!03)!5292/20$!%#!032'! %1!,/$!%03)1!,66*2,/9):! 3. If odor continues, keep away from the appliance and immediately call your gas supplier or fire department.
-
Page 3: Table Of Contents
"#$%&!#&$'!()!*+&!,(-$'!+..%(+)/$&0!+)'!12$!.-3'#/1&!3,!/345#&1(3)!3,!&#/2!,#$%&0!/3)1+()! /2$4(/+%&!6)37!13!12$!81+1$!3,!9+%(,3-)(+!13!/+#&$!/+)/$-0!5(-12!'$,$/1&!+)':3-!312$-!-$.-3'#/1(;$! 2+-4<!=2(&!7+-)()*!(&!(&&#$'!.#-&#+)1!13!9+%(,3-)(+!>$+%12!?!8+,$1@!93'$!8$/<ABACD<E! TABLE OF CONTENTS Specifications Preparation for Non-Conbustible Structure Hard Piping to Fire Pit Cross Ventilation Requirements High Elevation Installation into an Approved Enclosure Requirements Installing Key Valve & Piezo Ignitor Typical Installation Drawings Installing Battery in Piezo Ignitor Ignitor Alignment Installation of Lava Rock/Media Operation... - Page 4 Most fire pits are equipped for Natural gas (NG) however, if you are considering converting to LP gas use the guidelines below for proper tank storage. REMOTE PROPANE / LP GAS ENCLOSURES INSTALLATION GUIDELINES If this fire pit is permanently connected to a gas piping •...
-
Page 5: Specifications
SPECIFICATIONS Model: Model: Min/Max Match Throw Manual Spark Pan Depth Install Opening Inside Pan Ground Level FPB-G16RBSMSI/N FPB-G16RBSMT/N 2.500” 16.5”/17.25” 15.875” 8” FPB-G25RBSMSI/N FPB-G25RBSMT/N 2.500” 25”/25.5” 23.875” 8” FPB-19RBSMSI/N FPB-19RBSMT/N 2.625” 19.25”/21.5” 19” 8” FPB-25RBSMSI/N FPB-25RBSMT/N 2.625” 25.25”/27.5” 25” 8”... -
Page 6: Preparation For Non-Conbustible Structure
WARNING: Proper clearances from combustible, construction and materials must be maintained from all sides, top and bottom of this appliance. This appliance should never be placed on any combustible surface. This appliance should never be placed under any combustibles closer then 96-inches. This appliance should never be placed closer than 36-inches from any side to any combustible construction or materials (See fig. -
Page 7: Installation Into An Approved Enclosure
INSTALLATION OF FIRE PIT INTO AN APPROVED ENCLOSURE REQUIREMENTS 1. Only non-combustible materials should come in direct contact with any part of the Fire Pit. Underneath area should be non-combustible as well. 2. Only use ¾” gas supply line to the Fire Pit. Based on the selection of the fire pit size, the proper brass fittings should be used to ensure a proper installation. -
Page 8: Typical Installation Drawings
Non-Combustible Fire Pit Pan Fire Pit Enclousure Key Valve Shut-O Gas Supply NOTE: Gas supply shut-off and flex line to the key valve are not supplied. Non- Combustible Wall Material Securing Tab Piezo Ignitor Non- Piezo Wires Combustible Wall Material Self-Securing Junction Box Securing Tab... -
Page 9: Installing Battery In Piezo Ignitor
INSTALLATION OF BATTERY INTO PIEZO IGNITOR (Manual Spark Ignition only) Module Red Button Cap Plastic Mounting Nut Fig. 7 Piezo ignitor battery installation. Fig. 6 Piezo ignitor cap. Unscrew (counter-clockwise) the piezo ignitor module red button cap and the plastic mounting nut. Slide the module on the back side of the module cover plate and secure with the plastic mounting nut. -
Page 10: Operation
OPERATION CAUTION: Children and adults should be alerted to the hazards on high surface temperatures and should stay away to avoid burns or clothing ignition. Young children should be carefully supervised when they are in the area of the appliance. WARNING: Do not use this appliance if any part has been under water. -
Page 11: Replacement Parts
REPLACEMENT PARTS Side View Burning Spur Fire Pits REV. 5-14-13 Page 10... -
Page 12: Replacement Parts List
REPLACEMENT PARTS Qty. Item Description Part Number Pan-G90R16 16-inch G90 Round Galvanized Black Burner Pan ST3-100-1024 19-inch Round Stainless Burner Pan 25-inch G90 Round Galvanized Black Burner Pan Pan-G90R25 25-inch Round Stainless Burner Pan ST3-100-1025 14-inch Square Stainless Burner Pan OD-FPPAN/14x14 20-inch Square Stainless Burner Pan OD-FPPAN/20x20... -
Page 13: Fire Pit Maintenance/ Trouble Shooting
FIRE PIT MAINTENANCE 1. The Fire Pit should be inspected and cleaned before initial use at least annually by a qualified field service person. 2. Any component that is found faulty must be replaced with an approved component. 3. Any tampering or modifying with the Fire Pit is dangerous and voids all warranties. 4. - Page 14 OPTIONAL ACCESSORIES The following accessories are available from your local firegear dealer/distributor. Each accessory comes with a separate installation manual. Read each instruction thoroughly before installing. Stainless lid for 19” or 25” round fire Lava Stones 1” to 2” size. (20lbs.) LP regulator with 3/8”...
-
Page 15: Warranty
LIMITED WARRANTY Skytech II, Inc. (firegear Outdoors) hereby warrants to he Owner must provide a bill of sale, cancelled check, or payment record to verify purchase date the ORIGINAL PURCHASER of this Fire Pit System, that it will be free from material and workman- and establish warranty period.
Need help?
Do you have a question about the FPB-G16RBSMT/N and is the answer not in the manual?
Questions and answers