Table of Contents
Advertisement
Quick Links
Download this manual
See also:
User Manual
Advertisement
Table of Contents

Related Manuals for Kramer WP-110XL


Summary of Contents for Kramer WP-110XL
- Page 1 K R A ME R E LE CT R O N IC S L TD . USER MANUAL MODEL: WP-110xl UXGA Data Line Transmitter P/N: 2900-300294 Rev 3...
-
Page 3: Table Of Contents
Loading the Default EDID Technical Specifications Figures Figure 1: WP-110xl UXGA/Data Line Transmitter Figure 2: Connecting the WP-110xl UXGA/Data Line Transmitter Figure 3: Ground Connection Figure 4: TP PINOUT Figure 5: WP-110xl US Wall Plate Figure 6: WP-110xl EU Wall Plate... -
Page 4: Introduction
Introduction Welcome to Kramer Electronics! Since 1981, Kramer Electronics has been providing a world of unique, creative, and affordable solutions to the vast range of problems that confront video, audio, presentation, and broadcasting professionals on a daily basis. In recent years, we have redesigned and upgraded most of our... -
Page 5: Getting Started
Avoid interference from neighboring electrical appliances that may adversely influence signal quality Position your Kramer WP-110xl away from moisture, excessive sunlight and dust This equipment is to be used only inside a building. It may only be connected to other equipment that is installed inside a building. -
Page 6: Safety Instructions
STP cable. There are different levels of STP cable available, and we advise you to use the best quality STP cable that you can afford. Our non-skew-free cable, Kramer BC-STP is intended for analog signals where skewing is not an issue. -
Page 7: Overview
TP-126xl, (for 250m range), or the PT-120, TP-120, TP-120-od, TP-122, TP-122N, TP-122-od, TP-124, TP-124-od and the TP-124, (for 100m range). The WP-110xl comes in three models: the WP-110xl 69mm US version and the two WP-110xl 80/86mm European versions. More specifically, the WP-110xl features: ... -
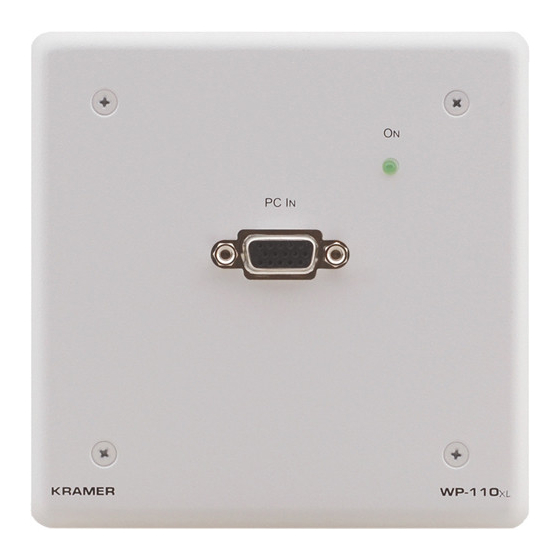
Page 8: Figure 1: Wp-110Xl Uxga/Data Line Transmitter
Figure 1: WP-110xl UXGA/Data Line Transmitter Feature Function PC IN 15-pin HD connector Connects to the computer graphics source ON LED Lights green when powered on +12V/GND Terminal Block Connects to the 12V DC power supply LINE OUTPUT RJ-45 Connector... -
Page 9: Connecting And Installing The Wp-110Xl
3. Connect the 12V DC power supply to the 12V and GND terminals taking care to observe the correct polarity. 4. Install the WP-110xl into a suitable wall box or rack mount. 5. Connect a computer graphics source (for example, a PC) to the PC IN 15-pin HD connector. -
Page 10: Grounding The Wall Plate
Figure 3. Insert the M3x6 screw (with the two toothed lock washers and ring-tongue terminal in place) into the grounding screw hole on the rear of the WP-110xl and tighten the screw. Item... -
Page 11: Wiring The Tp Line Out Rj-45 Connector
This section defines the TP pinout, using a straight pin-to-pin cable with RJ-45 connectors. Figure 4: TP PINOUT EIA /TIA 568B Wire Color Orange / White Orange Green / White Blue Blue / White Green Brown / White Brown WP-110xl - Connecting and Installing the WP-110xl... -
Page 12: Capturing The Edid
PCB assembly. 2. Using a short cable (for example, Kramer model number C-MGM/MGM-1), connect the PC IN input 15-pin HD connector on the WP-110xl to the 15-pin HD connector of the display and turn the display on. 3. Connect the 12V DC power adapter to the power terminal block (see Figure 1) on the WP-110xl and connect the adapter to the mains electricity. -
Page 13: Loading The Default Edid
2. Do not connect a display to the PC IN input 15-pin HD connector. 3. Connect the 12V DC power adapter to the power terminal block (see Figure 1) on the WP-110xl and connect the adapter to the mains electricity. 4. Press the EDID capture button (item 1 on Figure 5... -
Page 14: Figure 6: Wp-110Xl Eu Wall Plate
Figure 6: WP-110xl EU Wall Plate WP-110xl - Capturing the EDID... -
Page 15: Technical Specifications
2 gang Europe: 15.2cm x 3.5cm x 8.0/8.6cm (5.98" x 1.4" x 3.15/3.39", W, D, H) WEIGHT: 0.14kg (0.31lbs) approx. ACCESSORIES: Power supply 19” rack adapters for EU and US wall plates; Kramer OPTIONS: on-wall boxes Specifications are subject to change without notice at http://www.kramerelectronics.com WP-110xl - Technical Specifications... - Page 17 For the latest information on our products and a list of Kramer distributors, visit our Web site where updates to this user manual may be found. We welcome your questions, comments, and feedback. Web site: www.kramerelectronics.com E-mail: info@kramerel.com SAFETY WARNING...
Need help?
Do you have a question about the WP-110XL and is the answer not in the manual?
Questions and answers