Kramer WP-20 Quick Start Manual
Hide thumbs
Also See for WP-20:
- User manual (81 pages) ,
- Quick start manual (2 pages) ,
- User manual (76 pages)
Table of Contents
Advertisement
Quick Links
Scan for full manual
Step 1: Check what's in the box
WP-20
Wall plate
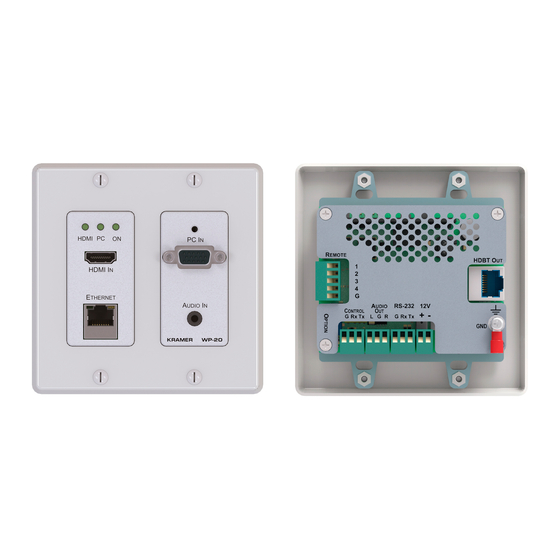
Step 2: Get to know your WP-20
US Version
#
Feature
1
HDMI™ LED
2
PC Graphics LED
3
ON LED
4
RESET Button
5
PC IN Input Connector
6
HDMI IN Input Connector
7
ETHERNET RJ-45 Connector
8
AUDIO IN 3.5mm Mini Jack
WP-20 Quick Start
WP-20 Quick Start Guide
This guide helps you install and use your
Go to
www.kramerav.com/downloads/WP-20
upgrades are available.
1 Power supply (12V DC)
Function
When HDMI is selected:
Lights orange when external audio is selected.
Lights green when embedded audio is selected.
LED is off when HDMI is not selected.
When PC input is selected:
Lights orange when external audio is selected.
Lights green when there is no audio.
LED is off when the PC input is not selected
The LED indicates the following:
Lights green – power is provided by a power adapter.
Lights orange – power is provided by PoE.
Short press to reset the device.
Long press (5 seconds) to reset the device to factory default parameters.
Connect to the PC graphics source (for example, a laptop).
Connect to an HDMI source (for example, a Blu-ray disk player).
Connect to the Ethernet LAN.
Connect to the unbalanced, stereo audio source (for example, the audio output of the
laptop).
WP-20
for the first time.
to download the latest user manual and check if firmware
1 Quick start guide
EU / UK Version
P/N: 2 9 0 0 - 3 0 0 9 1 9 QS
Rev: 6
Advertisement
Table of Contents

Related Manuals for Kramer WP-20


Summary of Contents for Kramer WP-20
- Page 1 Step 1: Check what’s in the box WP-20 Wall plate 1 Power supply (12V DC) 1 Quick start guide Step 2: Get to know your WP-20 US Version EU / UK Version Feature Function HDMI™ LED When HDMI is selected: Lights orange when external audio is selected.
- Page 2 The terms HDMI, HDMI High-Definition Multimedia Interface, and the HDMI Logo are trademarks or registered trademarks of HDMI Licensing Administrator, Inc. Step 3: Connect inputs Always switch OFF the power on each device before connecting it to your WP-20. RJ-45 Pinout:...
- Page 3 Mount the device in a suitable wall box. We recommend opening all holes in the walls of the box to assist in cooling the WP-20. Step 7: Connect outputs Step 8: Operate WP-20 Operate WP-20 via Protocol 3000 Default IP Parameters Parameter Values...
- Page 4 Operate WP-20 via Remote contact-closure switches Operate WP-20 via Web Page Feature Function Short press – Input toggle Input selection / Long press – Adjusts the VGA VGA phase shift switch phase shift Step-in switch Activates the step-in function if relevant Short press –...
Need help?
Do you have a question about the WP-20 and is the answer not in the manual?
Questions and answers