Advertisement
Scan for full manual
Step 1: Check what's in the box
WP-871xr HDMI 4K Line Transmitter
1 Power adapter (with open DC head) and cord
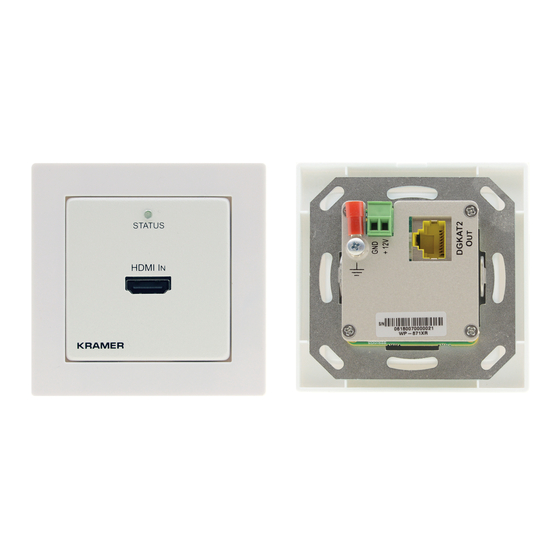
Step 2: Get to know your WP-871xr
#
Feature
TM
1
HDMI
IN Connector
2
STATUS LED
3
Ring Tongue Terminal Grounding
Screw
4
Power Supply 2-pin Terminal Block
Connector
5
DGKat-2.0 OUT RJ-45 Connector
The terms HDMI, HDMI High-Definition Multimedia Interface, and the HDMI Logo are trademarks or registered trademarks of HDMI Licensing Administrator, Inc.
WP-871xr Quick Start
WP-871xr Quick Start Guide
This guide helps you install and use your WP-871xr for the first time.
Go to
www.kramerav.com/downloads/WP-871xr
upgrades are available.
Function
Connects to an HDMI source.
Lights green when power is connected to the device.
Lights blue when powered and both active source and acceptor are detected.
Connect to grounding wire (optional).
To Connect to a power supply (if required). Connect GND to GND, +12V to +12V.
Connect to the DGKat-2.0 IN connector on the using CAT 6A cable.
to download the latest user manual and check if firmware
1 Quick start guide
Frame (or frame set) and faceplate
P/N: 2 9 0 0 - 3 0 1 0 6 1 QS
Rev: 2
Advertisement
Table of Contents

Related Manuals for Kramer WP-871xr


Summary of Contents for Kramer WP-871xr
- Page 1 WP-871xr Quick Start Guide This guide helps you install and use your WP-871xr for the first time. Go to www.kramerav.com/downloads/WP-871xr to download the latest user manual and check if firmware Scan for full manual upgrades are available. Step 1: Check what’s in the box...
- Page 2 Compression Setup ON (right) – For future use. Step 3: Install the WP-871xr Insert the device into the in-wall box (note that first you need to connect the DGKAT 2.0 cable and power) and connect the parts as shown in the illustrations below:...
- Page 3 Step 5: Connect the power Connect the 12V power adapter to the remote device (for example, PT-872xr) or to WP-871xr if needed, and plug the power supply into the mains electricity. This device provides power to its counterpart via DGKat 2.0. Each device can provide or accept power over cable (PoC) via DGKat 2.0.
- Page 4 Compliance HDMI 2.0, HDCP 2.2, HDR 10 Reach Extension We recommend that you use Kramer shielded cables to achieve optimum extension ranges. High Compression Level Up to 60m (200ft) at 4K@60Hz (4:4:4) Up to 70m (230ft) at 4K@60Hz (4:2:0) or full HD (1080p...
Need help?
Do you have a question about the WP-871xr and is the answer not in the manual?
Questions and answers