Table of Contents
Advertisement
Advertisement
Table of Contents

Related Manuals for Infopia Element Neo


Summary of Contents for Infopia Element Neo
-
Page 2: Important Information
® Dear Element NEO Blood Glucose Monitoring System Owner, ® Thank you for choosing the Element NEO Blood Glucose Monitoring System. This manual contains everything you need to know about your new glucometer and how it works. Please take a moment to read the instructions carefully. We understand that self-testing of blood glucose level provides a way to control your ®... -
Page 3: Table Of Contents
Test Principle Table of Contents Table of Contents 1. Learning the System 1. Learning the System ® Element NEO blood glucose test strip is the bio-sensor which has been made by the Intended use of blood glucose test meter--------------------------------------------------- 3 Intended use of blood glucose test meter--------------------------------------------------- 3 FAD-dependent glucose dehydrogenase(enzyme). -
Page 4: Learning The System Intended Use Of Blood Glucose Test Meter
® Learning the System Element NEO Kit Contents Intended use of Blood Glucose test meter The Element ® NEO test meter is used with Element ® NEO test strip for the measurement of glucose in fresh whole blood samples(Capillary and/or venous). It should not be used for the diagnosis or screening of diabetes or for the testing of new born babies. -
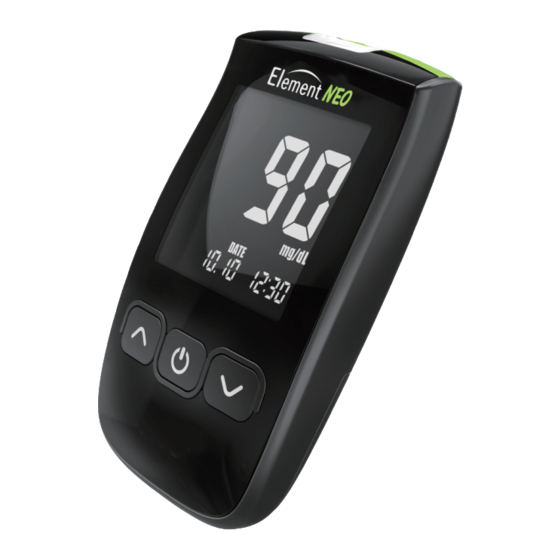
Page 5: Element ® Neo Meter
Element ® NEO Meter Element ® NEO Meter Display Test Strip Port: Low Battery Warning Symbol ® Insert the Element NEO test strip Alarm Symbol Display Screen: Troubleshooting Symbol Displays your test results, symbols, and messages. Power/Enter Button: Delete Results Power the meter on/off, prompts memory data and acts as an “Enter”... -
Page 6: Element ® Neo Test Strip
® Element NEO Test Strip Before Testing Apply Blood WARNING To reduce the chance of infection: 1. Lancing device and lancets should NOT be shared with others. 2. Always use a new lancet and a new blood glucose test strip. 3. -
Page 7: Setting Your Meter
Setting Your Meter ® The Element NEO Meter has a wide variety of functions to choose. From the setup mode you can turn activity/meal flags, set the date/time, designate three unique averages, and set up to five daily alarms. Temperature Unit Alarm on/off Number of days for average... -
Page 8: Auto-Coding Function
Auto-coding Function LED Function ® When inserting Element NEO glucose test strip (starting measuring process), LED light will turn on for 10 seconds. After the test result displays, LED light will last for 10 ® 1. Element NEO has automatic code recognition function seconds. -
Page 9: Performing A Glucose Control Solution Test
1.Check the expiration date before performing a control Performing a Glucose Control Solution Test solution test. Do not use if expired. Please note the expiration date marked on the control solution bottle. ® Element NEO control solution contains a known amount of glucose that reacts with ®... - Page 10 For example only Follow-up Action If you are using the normal control solution, according to this particular vial of strips, your 1. Check your meter and test strips with the glucose control solution. meter should show a number between 80 and 120. 2.
-
Page 11: Performing Your Test Testing Blood - Preparation
COMPONENTS Performing Your Test Clear Tip Testing Blood - Preparation Ejection System Sliding Barrel Lancing device is a convenient medical tool for collecting capillary blood samples for glucose monitoring or other tests which require one or two drops of blood. Being a more advanced lancing device, it provides ultimate safety and comfort for obtaining blood samples. -
Page 12: Performing A Blood Test With Your Fingertip
Performing a blood test with your fingertip Step 2 To obtain a suitable blood samples Step 1 • Before obtaining a blood sample, wash your hands with warm, clean water and soap. Dry hands completely before testing. Firmly insert the test strip into the meter test port in the direction of arrow on test strip (arrow up). - Page 13 Step 3 4. Put the lancing tip back and twist it tightly. • Applying Blood • Correct 5. To adjust the depth setting: Completely Filled Correct Use strength level 1-2 for soft skin, 3 for average skin, 4-5 for thick or calloused skin. •...
-
Page 14: Test Strip Ejector Function
Step 4 Test Strip Ejector Function • After the beeping sound, test Disposing of your test strip will begin automatically, and 1. Once the test is complete, push the test strip forward to your results will appear in 5 remove the test strip from the meter seconds. -
Page 15: Reviewing Your Results
Reviewing your results with activated user ID Reviewing Your Results ® Pressing the button once and the User ID option will The Element NEO meter stores up to 365 test results in its built-in memory, along with the appear the LCD screen. average glucose level for the number of days, which you had preset the glucose test meter After entering the user ID mode, use ▲... -
Page 16: Alternate Site Test
Ventral palm/Dorsal hand Alternative Site Test Choose a fleshy area on the palm, below your thumb or pinky finger. Select a spot without any visible veins and Upper Arm away from any deep lines. This may cause your blood sample to smear. Forearm Dorsal Hand Ventral Palm... -
Page 17: Lancing Device Clear Tip Is Used For Alternate Site Testing
5. Continue to hold the lancing device and gradually To ensure accurate results when lancing your arm increase pressure for several seconds. (forearm or upper arm), or palm (ventral palm or dorsal hand), clean the test site with soap and water. Make sure there is no cream or lotion on the test site. -
Page 18: Caring For Your Element ® Neo System Cleaning Your Meter And Maintenance
® ® Storage of your Element NEO System Caring for Your Element NEO System To prevent the meter and test strips from getting dirt, dust or other contaminants, please Cleaning your meter and maintenance wash and dry your hands thoroughly before use Blood glucose test meter : Meter Storage Your blood glucose test meter does not require special maintenance or cleaning. -
Page 19: Transferring Your Result Data
2. Store test strips in their original vial only. Do not mix the test strips in new vials or in This is sold separately. any other container. * Please use the exclusive USB cable provided by infopia. 3. Immediately replace the vial cap and close tightly after removing any test strips from the vial. -
Page 20: Battery Installation
Battery Installation Dispose of meter and batteries Dispose of meter: The low battery icon will appear in the upper left corner of the LCD display to alert The meter must be disposed of according to the local regulations concerning the disposal of electrical you when the battery power is running low, which is an indication that a new battery are and electronic equipment. -
Page 21: Trouble-Shooting
Contact your authorized representative or customer support User applied the blood Wait for the meter to display the blinking center of Infopia Co.,Ltd., if the problem continues. sample before the LCD icon before applying your blood sample. - Page 22 Infopia tative or customer support at Infopia Co., Ltd. Co., Ltd. Glucose test meter Insufficient amount of...
-
Page 23: Warranty
96 X 56 X 24 (mm) Weight 58±1g (Including batteries) Service Information Infopia Co.,Ltd. has trained specialists to help you 24 hours a day, 7 days a week, and 365 Power Source 3V (Coin Battery, CR2032 X 2EA) days a year. -
Page 24: Symbol Reference
Symbol Reference Symbol Description Consult Instructions for use Use By date This product fulfills the requirements of Directive 98/79/EC on in vitro diagnostic medical devices Attention, See Instructions for use For In Vitro Diagnostic Use Batch code Do not reuse Serial number Date of Manufacture Manufacturer...
Need help?
Do you have a question about the Element Neo and is the answer not in the manual?
Questions and answers