Kodak SCAN STATION 100 User Manual
Kodak scanner user manual
Hide thumbs
Also See for SCAN STATION 100:
- User manual (80 pages) ,
- Maintenance manual (2 pages) ,
- Guia de instalação (1 page)
Table of Contents
Advertisement
Quick Links
Download this manual
See also:
Maintenance Manual
Advertisement
Table of Contents

Related Manuals for Kodak SCAN STATION 100


Summary of Contents for Kodak SCAN STATION 100
- Page 1 Scan Station 100 User’s Guide A-61544...
- Page 2 OCR recognition technologies by I.R.I.S. (C) 1989-2005, I.R.I.S. (Image Recognition Integrated Systems), All Rights Reserved...
-
Page 3: Table Of Contents
Contents 1 Introduction ..........1-1 2 Basic Use of the Scan Station . - Page 4 3 Installing and Using the Configuration Organizer ....3-1 4 Administrative Functions ........4-1 5 Maintenance .
-
Page 5: Introduction
Designed as a walk-up capture station that requires minimal user training, the Kodak Scan Station 100 is quite possibly the easiest to use capture device found in the general office environment today. The Scan Station 100 is a standalone solution, requiring no host PC or application software. -
Page 6: Features At A Glance
• Rotating turret for ease-of-use and ergonomic operation • Handles mixed paper sizes and paper types in the same batch • Special document feeder handles plastic cards • Kodak Perfect Page technology automatically adjusts image quality settings for every page • Automatically deskews and crops document images •... -
Page 7: Types Of Users
Types of users Important concepts A-61544 April 2006 While there are many possible uses for the Kodak Scan Station 100, most users will fall into one of the following categories depending on what they want to do. • Walk-up user... - Page 8 File Output Types The Kodak Scan Station 100 offers you a choice of saving the images of your paper documents to these industry-standard file types. • TIFF – Tagged Image File Format. These images can be either color, grayscale or black-and-white.
-
Page 9: Safety Information
• Remove all other loose objects from the area that could be drawn into the machine. • Follow the recommended Kodak cleaning procedures. Do not use air, liquid or gas spray cleaners. These cleaners only displace the dust, dirt or debris to another location within the Scan Station, which could cause the Scan Station to malfunction. -
Page 10: Safety And Regulatory Agency Approvals
TUV us CFR 47 Part 15 Subpart B FCC Class A • The Kodak Scan Station 100 is designed to meet worldwide environmental requirements. • Guidelines are available for the disposal of consumable items that are replaced during maintenance or service; follow local regulations or contact Kodak locally for more information. -
Page 11: Acoustic Emission
Acoustic emission Power system EMC statements United States European Union Japan A-61544 April 2006 Maschinenlärminformationsverordnung – 3, GSGV Der arbeitsplatzbezogene Emissionswert beträgt <70 db(A). [Machine Noise Information Ordinance — 3, GSGV The operator-position noise emission value is <70 dB(A).] Power System Connection This product is also designed for Norwegian IT power system with phase-to-phase voltage 230V. -
Page 12: Taiwan
Taiwan Peoples Republic of China 此为A级产品,在生活环境中品可能会造成无线电干扰。在这种情况下,可能需要 用户对其干扰采取切实可行的措施 Korean WARNING: This is a Class A product. In a domestic environment this product may cause radio interference in which case the user may be required to take adequate measures. WARNING: This is a Class A product. In a domestic environment this product may cause radio interference in which case the user may be required to take adequate measures. -
Page 13: What's In The Box
What’s in the box A-61544 April 2006 Before you begin open the box and check the contents: • Kodak Scan Station 100 • Input tray • Output tray • Special document feeder • Power cord bundle • Feed module • Portable USB flash drives •... -
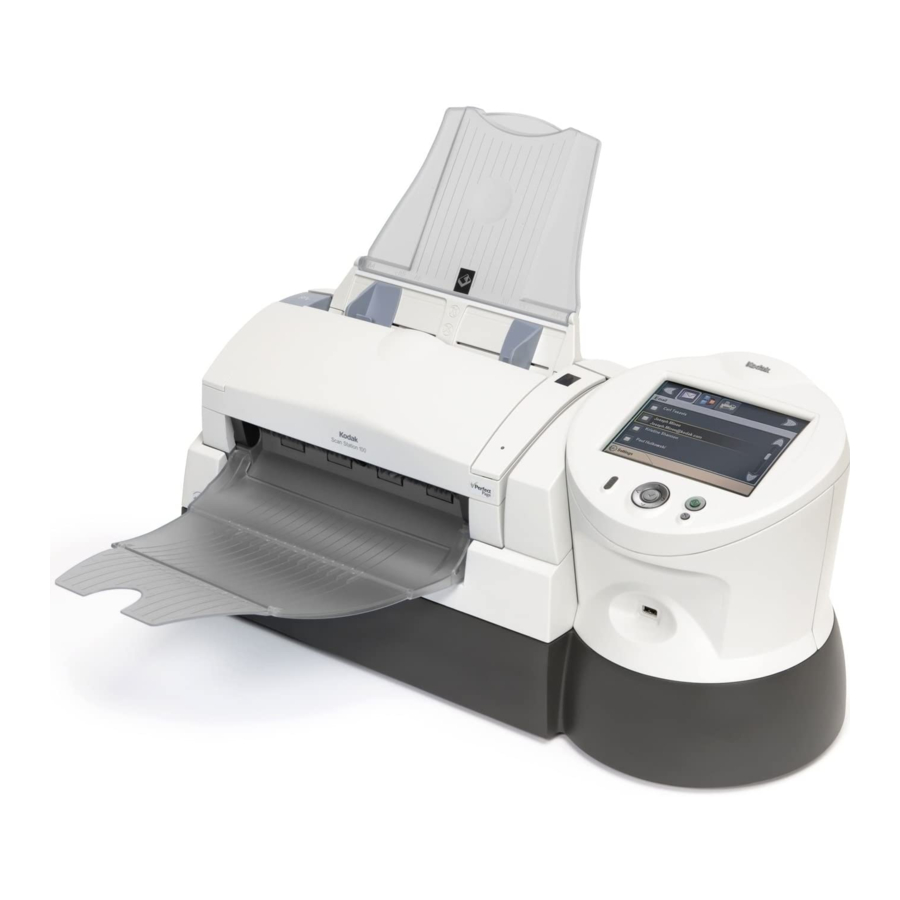
Page 14: Scan Station Components
Scan Station components 1-10 The Kodak Scan Station 100 consists of a scanner, control panel and touch screen. Front view Input tray — holds up to 50 documents in place. Function window — displays 1 through 9 or an “E” indicating Error. - Page 15 A-61544 April 2006 11 Cover release button — press this button to open the cover for maintenance and clearing documents. 12 Side Guides — may be adjusted to accommodate document size. Control Panel Following is a description of the buttons on the control panel and how to use them.
- Page 16 1-12 Inside view Feed module — provides smooth document feeding and separation of various sizes, thicknesses and textures of documents. Imaging guides — for optimum image quality, keep the imaging guides clean. There are two guides - one upper and one lower. Rollers —...
-
Page 17: Unpacking And Setting Up The Scan Station
Attaching the input tray A-61544 April 2006 Carefully unpack the Scan Station 100 and place it on a clean, dry and level surface. Locate and attach the power cord and network cable. Then attach the input and output trays. Make sure the Scan Station cover is closed. -
Page 18: Attaching The Output Tray And Special Document Feeder
Attaching the output tray and special document feeder Powering up the Scan Station 1-14 1. Locate the output tray holes on the Scan Station. 2. Insert the pin on the left side of the output tray/special document feeder in the hole, then press the ribbed button on the right side of the output tray/special document feeder and insert the pin in the hole on the right side of the Scan Station. -
Page 19: Glossary Of Terms
A high threshold value produces a darker image, and can be used to help pick up faint images. The Kodak Scan Station 100 has two ways (iThresholding and ATP) of dynamically detecting and adjusting image quality by choosing the correct threshold value for each document. -
Page 20: Basic Use Of The Scan Station
2 Basic Use of the Scan Station Document preparation Other points about paper types A-61544 April 2006 This chapter describes how a walk-up user can easily send documents using the Scan Station. It can be as simple as placing your documents in the input tray, selecting a destination and pressing the Go button. -
Page 21: Turning The Scan Station On And Off
Turning the Scan Station on and off Adjusting the input and output trays • Press the power switch on the back of the Scan Station to On (I). Wait for the Scan Station to complete the self-test. When completed, the green indicator on the Scan Station remains on and constant. -
Page 22: Using The Control Panel And Touch Screen
A-61544 April 2006 The Kodak Scan Station 100 provides a touch screen and control panel for easy access and operation. You can use either the touch screen, control panel, or a combination of both. For the purpose of this manual, actions referred to in the procedures are explained by using the touch screen, except for feeding your documents, which is triggered by pressing the Go button. -
Page 23: Scan Station Touch Screen
Scan Station touch screen The interface on the Scan Station touch screen has two main screens or modes. The button in the lower left-hand corner is labeled either Settings or Exit and toggles between the two screens: Destination mode and Settings mode. •... - Page 24 A-61544 April 2006 • Settings mode this is the other screen the Scan Station will display. - Top of the screen: icons are displayed depicting the various types of settings than can be changed. With these settings you can change the way your scanned document will look, change the file format in which it is saved, improve the image quality of the scanned pages, all before the document is scanned and delivered to the final destination(s).
- Page 25 Top portion of the Destination mode screen Use the left and right arrows to scroll through the icons displayed at the top of the screen. NOTE: More than 5 icons can exist along the top portion of the screen. Use the left and right arrow buttons to display additional icons. Icon Left arrow —...
- Page 26 For example, the Processing icon and one of the other three icons below will appear when you are sending an email: Processing Success Failure Cancelled Middle portion of the Destination mode screen When you select an output destination, the middle of the screen will show a listing of destinations of that type.
- Page 27 Bottom of the Destination mode screen The button on the bottom of the screen allows you to toggle from the Destination mode to the Settings mode. The icons at the top of the screen will change depending on where you are in Settings mode or Destination mode.
-
Page 28: Basic Operation
Basic operation A-61544 April 2006 Whether you are scanning documents to be sent to an email address(es), printer(s), a network share or a USB flash drive, basic operating procedures are the same regardless of the selected output device. This information applies to all procedures outlined in this chapter. •... -
Page 29: Scanning Documents With The Default Settings
Scanning documents with the default settings 2-10 This may be the most common use of the Scan Station. To scan one or more documents: 1. Place the documents in the input tray. For more information, refer to the section entitled, “Basic operation”. 2. - Page 30 A-61544 April 2006 • To save the documents to a network share, select the Network Share icon and then select the desired folder from the list. When a document has been sent to a network folder, it will be saved in a directory at the root of the Network Share and will be named for the exact date and time you sent the document.
- Page 31 2-12 If you want to change these settings, cancel the job and go back to the Destination mode and set your session the way you want it. • To scan immediately, select the green Go/Scan button again. • To stop the scan, select the Cancel button. As the Scan Station begins to feed and process the documents, a Status screen will be displayed.
-
Page 32: Customizing Settings For Your Scan Session
Customizing settings for your scan session A-61544 April 2006 After you have setup your Destination settings, you can also change the default image processing settings. Following is a summary of each of these settings. To change one or more settings, access the Settings mode, select the setting you want to change (i.e., Resolution, File Type, etc.). - Page 33 2-14 Icon Threshold: converts grayscale images to black and white. Values range from 1 to 255. A low threshold value produces a lighter image and can be used to subdue backgrounds and subtle unneeded information. A high threshold value produces a darker image and can be used to help pick up faint images.
-
Page 34: Changing The Scan As Option
Changing the Scan As option A-61544 April 2006 Scan As — three input options are available: Color, Grayscale, and Black and White. • If you choose Black and White, the Black and White screen will be displayed allowing you to choose either Best (iThresholding) or Normal (ATP). -
Page 35: Changing The File Type
Typically, a TIFF file has a .tif file extension. If you are scanning multiple pages or sides, the Scan Station creates a single multiple-page file. Input Type — the Kodak Scan Station 100 scan both sides of a document in one pass. Select One-sided or Two-sided documents. A-61544 April 2006... -
Page 36: Changing The Resolution
Changing the resolution Changing the document type A-61544 April 2006 Resolution (dots per inch) — allows you to select the scanning resolution. 300 dpi is optimal for creating PDF files. Choices are: 75, 100, 150, 200, 240, 300, 400, and 600. Document Type —... -
Page 37: Changing The Contrast And Threshold Values
Changing the contrast and threshold values 2-18 Black and White Adjustment — allows you to change the Contrast and Threshold values. This option is only available if your output is black-and-white. • Contrast adjusts the difference between black-and-white, thereby making an image sharper or softer. -
Page 38: Specifying The Number Of Copies To Print
Specifying the number of copies to print A-61544 April 2006 Copies for Printing — select the number of copies (1-99) to print. NOTE: To scroll through the list faster, press and hold the Up or Down arrow keys on the control panel. 2-19... -
Page 39: Usb Flash Drive
USB flash drive to load your preferred settings. Using the USB flash drive and the Kodak Scan Station 100 Configuration Organizer, you can create and store your preferred Scan Station settings and destinations. When you... - Page 40 A-61544 April 2006 The user interface screen will change, showing additional icons at the top of the Destination mode screen. Each of these icons have a small human figure on them, indicating they are your personal destinations. 3. Load your document(s). 4.
- Page 41 2-22 If you want to change these settings, then cancel the job and go back to the Settings mode and set your session the way you want it. • To scan immediately, select the green Go/Scan button again. • To stop the scan, select the Cancel button. As the Scan Station begins to feed and process the documents, a Status screen will be displayed.
-
Page 42: Installing And Using The Configuration Organizer
3 Installing and Using the Configuration Organizer Before you begin A-61544 April 2006 The Kodak Scan Station 100 uses configuration files to determine which destinations to display and what default settings to use when sending documents. The tool you can use to create these configuration files is the Kodak Scan Station 100 Configuration Organizer. -
Page 43: Installing The Software
Installing the software 1. Insert the CD. The installation software starts up automatically. 2. Click Next. The License Agreement window will be displayed. A-61544 April 2006... - Page 44 3. Read the license agreement and click I Agree. 4. Enter your name and company information and click Next. 5. If necessary, click Browse to specify a different location to install the files. Click Next. The installation process will begin. When finished, the Installation Completed window will be displayed.
-
Page 45: Configuration Files
Configuration files A configuration file is a group of custom settings that, as a frequent user, you can bring with you each time you use the Scan Station. For example, the configuration file could include a personal email address book. You can also set up defaults for settings you use all the time. For example, you may always scan documents to be sent to the same network folder. -
Page 46: Configuration Organizer Window
Configuration Organizer window A-61544 April 2006 After you install the Kodak Scan Station Configuration Organizer on your PC, the Configuration Organizer icon is placed on your desktop. • Double-click on the icon to start the Configuration Organizer. The Configuration Organizer window will be displayed. -
Page 47: File Menu
File menu Edit menu The File menu provides these options: Reset — reverts to the last saved version of the configuration file. Save — saves the changes to the configuration file. Open — opens an existing configuration file. Administrator — accesses the Configuration Organizer Administrator mode. -
Page 48: Layout Menu
Layout menu User menu Help menu A-61544 April 2006 The Layout menu provides these options: Moves Group Left — moves the selected group left one position. Moves Group Right — moves the selected group right one position. Moves Item Up — moves the selected item up one position in the list. Moves Item Down —... -
Page 49: Toolbar
Toolbar Modifying a configuration file The Toolbar provides quick access to commonly used features. The toolbar is always displayed and you cannot add, delete or move toolbar buttons. Icon Description Saves the configuration file to the USB flash drive Creates a new item Renames the item Deletes the selected item Moves the selected item up one... - Page 50 A-61544 April 2006 4. When the configuration file settings are displayed, add, remove, or rename destination groups and items, as desired. See the next section, “Managing your destination groups” for more information and procedures. 5. If desired, change one or more settings. The current settings appear at the bottom of the window.
-
Page 51: Managing Your Destination Groups
Managing your destination groups Adding an email group and addresses 3-10 This section provides procedures for managing your destination groups (e.g., email, USB flash drive, network). In addition, information and procedures are included for importing your personal email address book. If you want to add an address to an email group that already exists, skip to step 2. -
Page 52: Renaming An Email Group
Renaming an email group A-61544 April 2006 By default, when you add an email group, the group is named E-mail. To rename an email group: 1. Select the email group that you want to rename and select Edit>Rename Group. The Rename Group dialog box will be displayed. -
Page 53: Deleting An Email Group
Deleting an email group 3-12 If you delete an email group, all email addresses within the email group will be deleted as well. 1. Select the email group you want to delete. 2. Select Edit>Delete Group. The following message will be displayed: 3. -
Page 54: Importing An Email Address Book
Importing an email address book A-61544 April 2006 CSV (comma separated value) files are data files that represent database information. Each row contains individual data values that are separated by a comma. Each comma found on a line of text represents a column of data from the original database. - Page 55 3-14 Many email client applications will automatically export the column headings as the first row of data. When using the Configuration Organizer, the Import Email Addresses dialog box provides you with the ability to “skip first row” of data. Some email applications will also export the data with additional quote characters surrounding the data.
- Page 56 A-61544 April 2006 To import your email address book: 1. In the Configuration Organizer window, select the email group you want to import your email address book to, and then select Edit>Import Emails. The Import Email Addresses dialog box will be displayed.
-
Page 57: Adding A Usb Flash Drive Folder Group
Adding a USB flash drive folder group 3-16 To add a folder to your USB flash drive: 1. In the Configuration Organizer window, select Edit>Add Group>Flash Drive Folder. An icon is added to the list box on the Configuration Organizer change. 2. -
Page 58: Renaming A Flash Drive Group
Renaming a flash drive group Deleting a flash drive group A-61544 April 2006 By default, when you add a flash drive group, the group is named Flash Drive. 1. Select the flash drive group that you want to rename and select Edit>Rename Group. -
Page 59: Setting Up A Flash Drive Password
Setting up a flash drive password 3-18 You may want to set up a password that will prevent unauthorized access to the current configuration file. When a password is assigned, the Scan Station or Configuration Organizer will prompt the user for this number before accessing the information in the file. -
Page 60: Adding A Network Group
Adding a network group A-61544 April 2006 If you want to add a folder to a network group that already exists, skip to step 2. 1. In the Configuration Organizer window, select Edit>Add Group> Network folder. An icon is added to the list box on the Configuration Organizer window. -
Page 61: Renaming A Network Group
Renaming a network group 3-20 By default, when you add a network group, the group is named Network. 1. Select the network group that you want to rename and select Edit>Rename Group. The Rename Group dialog box will be displayed. 2. -
Page 62: Deleting A Network Group
Deleting a network group A-61544 April 2006 To delete an network group: 1. Select the network group you want to delete. All network folders within the selected group will be deleted. 2. Select Edit>Delete Group. The following message will be displayed: 3. -
Page 63: Adding A Printer Group
Adding a printer group 3-22 Adding a printer is an Administrator function. 1. If you are using the Configuration Organizer, select File>Administrator. 2. Access the Destination mode. 3. Select Edit>Add Group>Printer. An icon is added to the list box on the Configuration Organizer window. -
Page 64: Testing Your Configuration File
Testing your configuration file A-61544 April 2006 Once you have created the configuration file, added any destinations you want, selected your preferred device settings and setup a password, save and test the file. 1. Select File>Save. The Save Configuration To dialog box will be displayed. -
Page 65: Administrative Functions
4 Administrative Functions Managing Scan Station access A-61544 April 2006 This chapter is intended for those who have the responsibility of setting up the system and network settings. A series of advanced parameters must be setup before you can use the Scan Station. -
Page 66: Advanced Network Configuration
Advanced network configuration Accessing Administrator mode The following list describes changes that can be made that will enhance the usability of the Scan Station in the corporate network environment. Most of these changes require more advanced network administration knowledge and should only be performed by a network administrator. The administrator can: •... -
Page 67: Icon Descriptions
Icon descriptions A-61544 April 2006 Following is a list of the icons you will find when you are setting Administrative functions. In addition to these icons, the image processing icons can also be accessed and setup. For a description of the image processing icons, see Chapter 2, “Customizing settings for your scan session”. -
Page 68: Virtual Keypad/Keyboard
Virtual keypad/ keyboard The virtual keypad or keyboard is displayed with many of the Administrative setup options. If you are using the virtual keypad/keyboard from the Configuration Organizer, it is easier to enter information using your PC keypad or keyboard, than selecting numbers and letters as you would if you were using the touch screen on the Scan Station. -
Page 69: Keyboard/Keypad Icons
Keyboard/keypad icons A-61544 April 2006 Virtual keyboard — allows you to enter alphabetic information. Use the Backspace/Delete key to clear the entry fields. Following is an example of one of the virtual keyboards that can be displayed. Other virtual keyboards may have additional options, e.g., uppercase, lowercase, etc. -
Page 70: Language Settings
Language settings 1. If you are using the Configuration Organizer, select File> Administrator. The Administrator icons appear with the other settings icons at the top of the Settings mode window. The Language listing is displayed by default (this window also appears on the touch screen the first time you power up the Scan Station). -
Page 71: Device Settings
Device settings A-61544 April 2006 1. Select the Device icon. A list of devices will be displayed. 2. If you want to change the device name, select Device Name. The keyboard will be displayed. Enter the new name and click Done. 3. -
Page 72: Ip Address Settings
IP Address settings 1. Click the IP Address icon to display the IP Address screen. 2. If your network uses dynamic IP addresses, select Automatic (DHCP). 3. If your network uses static IP addresses, select Static (IPv4). NOTES: • If all the Static IP Address options are not displayed, use the Up and Down arrows to display all options. -
Page 73: Email Settings
Email settings A-61544 April 2006 If your company networking requires the following settings, enter these values: 5. Select Subnet Mask and enter the mask. 6. Select Default Gateway and enter the gateway address. 7. Select Preferred DNS Server and enter the server address. 8. - Page 74 4-10 4. To enter the email server as an IP address, select IPv4 and enter the address on the displayed keypad and click Done. 5. Select Maximum Attachment Size. The following window will be displayed. 6. Select the size (0 to 99 MB in 1 MB increments). When you have made your selection, the main E-mail window will be redisplayed.
-
Page 75: Time Settings
Time settings A-61544 April 2006 1. Select the Time icon. The Time window will be displayed. 2. Select Time Zone and select your time zone. 3. Select Daylight Saving and select Automatically Adjust or No Adjustment. 4. Select Clock and select either a 12 Hour or 24 Hour time format. 5. -
Page 76: Date Settings
Date settings 4-12 NOTE: If the Calendar icon is not displayed, click the right arrow on the toolbar at the top of the main Configuration Organizer screen. 1. Select the Date icon. The Date window will be displayed. 2. Select Separator and select the desired separator symbol. 3. -
Page 77: Updating Your Scan Station Settings
Updating your Scan Station settings A-61544 April 2006 When you have saved your administrative configuration on your flash drive, you can take these settings to a Scan Station and update the Scan Station with these settings. 1. Insert your USB flash drive in the USB port on the Scan Station. 2. - Page 78 4-14 7. By default, all listed groups will be selected for update, therefore, unselect the group(s) you do not want to update. There are four types of updates: Replace, Move, Add, and Delete. • Replace: this is when a group is in the same position in the flash drive configuration file as it is in the device configuration file, but the two lists are not the same (e.g., adding item to the list).
-
Page 79: Maintenance
Scan Station. IMPORTANT: Use only non-flammable cleaners such as those provided through Kodak Parts Services. Do not use household cleaners. Do not use cleaners in confined areas, use with adequate ventilation. -
Page 80: Cleaning The Rollers
Cleaning the rollers Cleaning the feed module 1. With a roller cleaning pad, wipe the feed roller from side to side. Rotate the feed rollers to clean the entire surface. IMPORTANT: The roller cleaning pad contains sodium lauryl ether sulfate which can cause eye irritation. Refer to the MSDS for more information. -
Page 81: Cleaning The Imaging Guides
Cleaning the imaging guides A-61544 April 2006 1. Remove dust and debris from this area by using a Staticide wipe or a small brush. Be careful not to scratch the imaging guides when cleaning. IMPORTANT: Staticide wipes contain isopropanol which can cause eye irritation and dry skin. -
Page 82: Replacement Procedures
Replacement procedures Replacing the feed module The feed module and USB connector are the only parts that are customer-replacement. Degradation of feeder performance, multiple feeds, stoppages, etc. indicate a need to change the feed module. Certain paper types such as carbonless paper or newsprint, or failure to clean regularly, and/or use of non-recommended cleaning solvents can shorten the feed module life. -
Page 83: Replacing The Usb Connector
Replacing the USB connector A-61544 April 2006 The USB connector may need periodic replacement due to extended use which may be detectable due to repeated flash drive errors. Before changing the USB connector, be sure the USB flash drive itself is not defective. - Page 84 5. Open the clamps on the ribbon cable and disconnect the ribbon cable from the button control panel. 6. Rotate the turret about 45 degrees. 7. Loosen the two screws (about 3 turns) on the attachment plate. 8. Remove the turret side cover. A-61544 April 2006...
- Page 85 A-61544 April 2006 9. Unplug the USB cable. 10. Remove the screws from the USB connector and remove it. 11. Attach the new USB cable to the connector and tighten the screws. 12. Connect the USB cable. 13. Slide the turret side cover back into place. Be sure the attachment plate is seated properly.
-
Page 86: Supplies And Consumables
Contact your Scan Station supplier to order supplies. Description Kodak Feed Module Kodak Digital Science Roller Cleaning Pads Kodak Scan Station Portable USB Drive, 64 MB (5-Pack) Kodak Scan Station Portable USB Drive, 128 MB (5-Pack) USB Replacement Connector Staticide Wipes for Kodak Scanners NOTE: Items and catalog numbers are subject to change. -
Page 87: Appendix A Specifications
Appendix A Specifications Recommended daily Up to 1000 pages per day volume Output resolutions 75, 100, 150, 200, 240, 300, 400 and 600 dpi Illumination Fluorescent (cold cathode) Throughput speeds Black-and-white/grayscale: up to 25 ppm/50 ipm at 200 dpi (portrait, letter-size) Color: up to 25 ppm/40 ipm at 200 dpi Scanning technology Dual CCD, 600 dpi optical resolution... -
Page 88: Appendix B Troubleshooting
Appendix B Troubleshooting Indicator lights and error codes Clearing a document A-61544 April 2006 Occasionally you may encounter a situation with your Scan Station where it may not function properly. Refer to the information in this chapter to help you resolve the situation before calling Technical Support. -
Page 89: Problem Solving
Black lines appear on the scanned document Use the chart below as a guide to check possible solutions to problems you may encounter when using the Kodak Scan Station 100. Possible Solution Make sure that: • the power cord is plugged securely into the back of wall outlet. - Page 90 A-61544 4/2006 © Eastman Kodak Company, 2006 EASTMAN KODAK COMPANY Document Imaging Rochester, New York 14650 www.kodak.com/go/docimaging Kodak is a trademark of Eastman Kodak Company.