Table of Contents
Advertisement
Advertisement
Chapters
Table of Contents

Related Manuals for Dell SonicWall SRA 4200


Summary of Contents for Dell SonicWall SRA 4200
- Page 1 SRA 6.0 Administrator’s Guide...
- Page 2 Policy™, SonicWALL Aventail™ Advanced EPC™, SonicWALL Clean VPN™, SonicWALL Clean Wireless™, SonicWALL Global Response Intelligent Defense (GRID) Network™, SonicWALL Mobile Connect™, SonicWALL SuperMassive™ E10000 Series, and all other SonicWALL product and service names and slogans are trademarks of Dell Inc. 2012 – 11 P/N 232-002120-00 Rev.
-
Page 3: Table Of Contents
Resource Type Support ..........80 Integration with Dell SonicWALL Products ....... . 81 Typical Deployment . - Page 4 System > Status Overview ..........84 Registering Your SRA Appliance from System Status .
- Page 5 Configuring WINS Settings ......... . . 120 Network >...
- Page 6 Chapter 7 NetExtender Configuration ....... . . 191 NetExtender > Status ..........192 NetExtender >...
- Page 7 Configuring High Availability Settings ........231 Enabling Interface Monitoring .
- Page 8 Log > Categories ............349 Log >...
-
Page 9: Chapter 1 About This Guide
Chapter 1 About This Guide The Dell SonicWALL SRA Administrator’s Guide provides network administrators with a high- level overview of Dell SonicWALL SRA technology, including activation, configuration, and administration of the Dell SonicWALL SRA management interface and the Dell SonicWALL SRA appliance. - Page 10 10 | SRA 6.0 Administrator’s Guide...
-
Page 11: Chapter 2 Sra Overview
Chapter 2 SRA Overview This chapter provides an overview of the Dell SonicWALL SRA technology, concepts, basic navigational elements and standard deployment guidelines. This chapter includes the following sections: “Overview of Dell SonicWALL SRA” section on page 11 • “Concepts for Dell SonicWALL SRA” section on page 18 •... -
Page 12: Sra Virtual Appliance
The elements of basic VMware structure must be implemented prior to deploying the SRA Virtual Appliance. For detailed information about deploying the SRA Virtual Appliance, see the Dell SonicWALL SRA Virtual Appliance Getting Started Guide, available at: http://www.sonicwall.com/us/support/3893.html SRA Software Components SRA appliances provide clientless identity-based secure remote access to the protected internal network. -
Page 13: Sra Hardware Components
The SRA network extension client, NetExtender, is available through the SRA Web portal via an ActiveX control on Windows or using Java on MacOS or Linux systems. It is also available through stand-alone applications for Windows, Linux, and MacOS platforms. The NetExtender standalone applications are automatically installed on a client system the first time the user clicks the NetExtender link in the Virtual Office portal. -
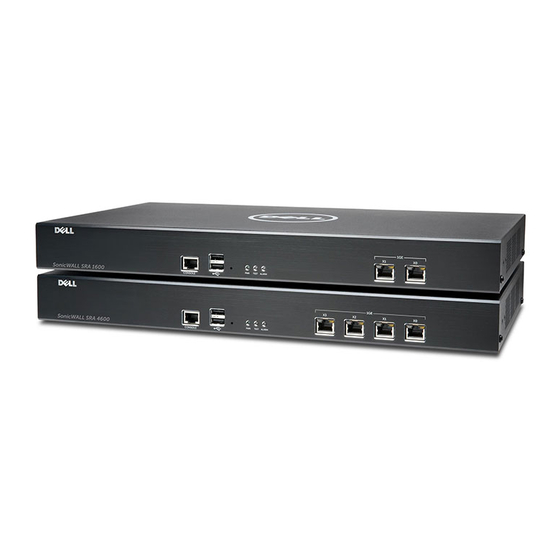
Page 14: Sra 4600 Front And Back Panels Overview
SRA 4600 Front and Back Panels Overview Figure 1 SRA 4600 Front and Back Panels Alarm LED Console Port: Provides Test LED X0: Gigabit Ethernet serial access to console Default management port. Power LED messages. Provides connectivity between Reset Button the SRA and your gateway. -
Page 15: Sra 1600 Front And Back Panels Overview
SRA 1600 Front and Back Panels Overview Figure 2 SRA 1600 Front and Back Panels Alarm LED Console Port: Provides Test LED X0: Gigabit Ethernet serial access to console Default management port. Power LED messages. Provides connectivity between Reset Button the SRA and your gateway. -
Page 16: Sra 4200 Front And Back Panels Overview
SRA 4200 Front and Back Panels Overview Figure 3 SRA 4200 Front and Back Panels Table 5 SRA 4200 Front Panel Features Front Panel Feature Description Console Port RJ-45 port, provides access to console messages with serial connec- tion (115200 Baud). Provides access to command line interface (for future use). -
Page 17: Sra 1200 Front Panel Overview
SRA 1200 Front Panel Overview Figure 4 SRA 1200 Front Panel Table 7 SRA 1200 Front Panel Features Front Panel Feature Description Console Port RJ-45 port, provides access to console messages with serial connec- tion (115200 Baud). Provides access to command line interface (for future use). -
Page 18: Concepts For Dell Sonicwall Sra
Concepts for Dell SonicWALL SRA This section provides an overview of the following key concepts, with which the administrator should be familiar when using the SRA appliance and Web-based management interface: “Encryption Overview” section on page 18 • “SSL Handshake Procedure” section on page 19 •... -
Page 19: Ssl Handshake Procedure
SSL Handshake Procedure The following procedure is an example of the standard steps required to establish an SSL session between a user and an SRA gateway using the SRA Web-based management interface: When a user attempts to connect to the SRA appliance, the user’s Web browser sends Step 1 information about the types of encryption supported by the browser to the appliance. - Page 20 When addresses contain contiguous sequences of 16-bit blocks set to zeros, the sequence can be compressed to ::, a double-colon. For example, the link-local address of 2008:0:0:0:B67:89:ABCD:1234 can be compressed to 2008::B67:89:ABCD:1234. The multicast address 2008:0:0:0:0:0:0:2 can be compressed to 2008::2. The IPv6 prefix is the part of the address that indicates the bits of the subnet prefix.
- Page 21 NetExtender When a client connects to NetExtender, it can get an IPv6 address from the SRA appliance if the client machine supports IPv6 and an IPv6 address pool is configured on the SRA. NetExtender supports IPv6 client connections from Windows systems running Vista or newer, and from Linux clients.
-
Page 22: Browser Requirements For The Sra Administrator
Application Offloading An administrator can assign an IPv6 address to an application server used for application offloading, and can use this address to access the server. Browser Requirements for the SRA Administrator The following Web browsers are supported for the SRA Web-based management interface and the user portal, Virtual Office. -
Page 23: Portals Overview
Portals Overview The SRA appliance provides a mechanism called Virtual Office, which is a Web-based portal interface that provides clients with easy access to internal resources in your organization. Components such as NetExtender, Secure Virtual Assist, and bookmarks to file shares and other network resources are presented to users through the Virtual Office portal. - Page 24 Both application offloading and HTTP(S) bookmarks use an HTTP(S) reverse proxy. A reverse proxy is a proxy server that is deployed between a remote user outside an intranet and a target Web server within the intranet. The reverse proxy intercepts and forwards packets that originate from outside the intranet.
- Page 25 To support Web applications not currently supported by HTTP/HTTPS bookmarks. • Application Offloading does not require URL rewriting, thereby delivering complete application functionality without compromising throughput. To authenticate ActiveSync Application Offloading technology, which delivers Web • applications using Virtual Hosting and Reverse Proxy. ActiveSync authentication does not require URL rewriting in order to deliver the Web applications seamlessly.
- Page 26 Note In SRA 6.0, Application Offloading supports authentication for ActiveSync. ActiveSync is a protocol used by a mobile phone’s email client to synchronize with an Exchange server. The Administrator can create an offloading portal and set the application server host to the backend Exchange server.
- Page 27 Supported Applications When using application offloading or HTTP(S) bookmarks to access applications for Web- based clients, full feature sets are accessible to users. SRA 6.0, application offloading and HTTP(S) bookmarks provide enhanced application support for the following software applications: Sharepoint Server 2007 •...
-
Page 28: Cross Domain Single Sign-On
For example, if the backend application has a hard-coded IP address and scheme within URLs as follows, Application Offloading must rewrite the URL. <a href="http://1.1.1.1/doAction.cgi?test=foo"> This can be done by enabling the Enable URL Rewriting for self-referenced URLs setting for the Application Offloading Portal, but all the URLs may not be rewritten, depending on how the Web application has been developed. - Page 29 ActiveSync is managed through the Portals > Offloading > Security Settings page: To configure ActiveSync authentication, clear the Disable Authentication Controls check box to display the authentication fields. Select the Enable ActiveSync authentication check box and then type the default domain name. The default domain name will not be used when the domain name is set in the email client’s setting.
- Page 30 In the SRA appliance, create an offloading portal with the name webmail. Step 1 Set the Scheme to Secure Web (HTTPS). Step 2 Set the Application Server Host to your Exchange server, for example webmail.example.com. Step 3 Set the virtual host name, for example, webmail.example.com. The virtual host name should be Step 4 resolved by the DNS server.
- Page 31 Create a Domain name of webmail.example.com. Set the Active Directory domain and Step 6 Server address to webmail.example.com. Set the Portal name to webmail. Turn on the Android phone, open the Email application, and type your email address and Step 7 password.
- Page 32 If the AD authentication times out, the Setup could not finish message is displayed. Wait about Step 10 20 seconds and try again. You can also check the SRA log to see if the user logged in successfully. You may not encounter this problem if the AD authentication is fast. When the authentication finishes, a security warning appears.
-
Page 33: Network Resources Overview
Network Resources Overview Network Resources are the granular components of a trusted network that can be accessed using the SRA appliance. Network Resources can be pre-defined by the administrator and assigned to users or groups as bookmarks, or users can define and bookmark their own Network Resources. -
Page 34: Telnet (Java)" Section
Telnet (Java) A Java-based Telnet client is delivered through the remote user’s Web browser. The remote user can specify the IP address of any accessible Telnet server and the SRA appliance will make a connection to the server. Communication between the user over SSL and the server is proxied using native Telnet. -
Page 35: Application Protocols Using Rdp" Section
RDP Java – RDP Java is a Microsoft Remote Desktop Protocol that has the advantage of • broad platform compatibility because it is provided in a Java client. The RDP Java client runs on Windows, Linux, and Mac computers, and supports full-screen mode. On Windows clients, SRA appliances support many advanced options. -
Page 36: Microsoft Outlook Web Access" Section
RDP Java – Uses the Java-based RDP client to connect to the terminal server, and to automatically invoke an application at the specified path (for example, C:\programfiles\microsoft office\office11\winword.exe) RDP ActiveX – Uses the ActiveX-based RDP client to connect to the terminal server, and to automatically invoke an application at the specified path (for example, C:\programfiles\wireshark\wireshark.exe). -
Page 37: Windows Sharepoint Services" Section
Improved keyboard shortcuts • Ability to forward meeting requests • Notifications on navigation pane • Ability to add to contacts • Ability to pick names from address book • Ability to set maximum number of messages displayed in views • Support for bi-directional layout for Arabic and Hebrew •... -
Page 38: Lotus Domino Web Access" Section
Report Center • For features that rely on Windows Sharepoint Services-compatible client programs, SRA 5.5 Reverse Proxy does not support the client integration capabilities of Sharepoint. Single sign-on is supported only for basic authentication. Only forms-based authentication and basic authentication schemes are supported Lotus Domino Web Access The SRA appliance reverse proxy application supports for Domino Web Access 8.0.1, 8.5.1, and 8.5.2 includes the following features:... -
Page 39: Snmp Overview
The NetExtender connection uses a Point-to-Point Protocol (PPP) connection. In SRA 5.5 and higher, NetExtender capabilities include the Dell SonicWALL Mobile Connect app for Apple iPhone, iPad, and iPod Touch. Mobile Connect enables secure, mobile connections to private networks protected by Dell SonicWALL security appliances. - Page 40 On Linux systems, the installer creates a desktop shortcut in /usr/share/NetExtender. This can be dragged to the shortcut bar in environments like Gnome and KDE. NetExtender is compatible with the following Dell SonicWALL appliances: SRA 4600/1600 •...
- Page 41 Windows XP, Windows 7, Windows Server 2003, Windows Server 2008 R2. • NetExtender may work properly on other Linux distributions, but they are not officially supported by Dell SonicWALL. Note The Mobile Connect application is now available for iOS 4.3 or higher and Android 4.0 or higher.
- Page 42 Client Routes NetExtender client routes are used to allow and deny access to various network resources. Client routes can also be configured at the user and group level. NetExtender client routes are also configured on the Edit User and Edit Group windows. The segmentation of client routes is fully customizable, allowing the administrator to specify any possible permutation of user, group, and global routes (such as only group routes, only user routes, group and global routes, user, group, and global routes, etc.).
-
Page 43: Two-Factor Authentication Overview
(the user’s password). Dell SonicWALL’s implementation of two-factor authentication partners with two of the leaders in advanced user authentication: RSA and VASCO. Beginning in SRA 5.5, two RADIUS servers can be used for two-factor authentication, allowing users to be authenticated through the Web portal or with an SRA client such as NetExtender or Secure Virtual Assist. - Page 44 SRA platforms. VASCO Data Security delivers reliable authentication through the use of One Time Password technology. VASCO IdentiKey combined with Dell SonicWALL SRA and firewall VPN appliances creates an open-market approach delivered through VASCO IdentiKey technology. VASCO IdentiKey allows users to utilize the VASCO DIGIPASS concept that uses One Time Passwords that are assigned for time segments that provide easy and secure SRA remote access.
- Page 45 Two-Factor Authentication Login Processes This section provides examples of the two-factor authentication login prompts when using Web login and NetExtender. With Web login, the Username and Password fields are used to enter the first-stage credentials. When prompting the user to input the challenge code, the message “Please enter the M.ID PIN:”...
-
Page 46: One Time Password Overview
The SRA One Time Password feature is a two-factor authentication scheme that utilizes one- time passwords in addition to standard user name and password credentials, providing additional security for Dell SonicWALL SRA users. The SRA One Time Password feature requires users to first submit the correct SRA login credentials. - Page 47 SMTP server to allow relaying from the SRA appliance to the external domain. For information about how to configure Microsoft Exchange to support SRA One Time Password, see the Dell SonicWALL SRA One Time Password Feature Module, available online http://www.sonicwall.com/us/Support.html...
-
Page 48: End Point Control Overview
Refer to the “” section on page 421 for a more detailed list of SMS email formats. Note These SMS email formats are for reference only. These email formats are subject to change and may vary. You may need additional service or information from your provider before using SMS. -
Page 49: Secure Virtual Assist Overview
Dell SonicWALL SRA 4600/4200/1600/1200 and Virtual Appliance platforms. Configuring End Point Control Perform the following tasks to configure EPC: Image the appliance with 6.0 firmware, as explained in the Dell SonicWALL SRA Getting Step 1 Started Guide. -
Page 50: What Is Secure Virtual Assist
What is Secure Virtual Assist? Secure Virtual Assist is an easy to use tool that allows SRA users to remotely support customers by taking control of their computers while the customer observes. Providing support to customers is traditionally a costly and time consuming aspect of business. Secure Virtual Assist creates a simple to deploy, easy to use remote support solution. - Page 51 There are two sides to a Secure Virtual Assist session: the customer view and the technician view. The customer is the person requesting assistance on their computer. The technician is the person providing assistance. A Secure Virtual Assist session consists of the following sequence of events: The technician launches Secure Virtual Assist from the SRA Virtual Office.
-
Page 52: Launching A Secure Virtual Assist Technician Session
Secure Virtual Access Secure Virtual Access, as part of the larger Secure Virtual Assist feature, allows technicians to gain access to systems outside the LAN of the SRA appliance, such as their personal systems. After downloading and installing a client from the portal page for Secure Virtual Access mode, the personal system will appear only on that technician’s Secure Virtual Assist support queue, within the SRA management interface. - Page 53 A pop-up window asks if you would like to install Secure Virtual Assist as a standalone client. Step 5 Click Yes to save the application. A shortcut will be added to your desktop and a link to the application will be added to the program list on your Start Menu. Click No to launch Secure Virtual Assist without saving the application for future use.
-
Page 54: Performing Secure Virtual Assist Technician Tasks
The Secure Virtual Assist standalone application launches. Step 8 The technician is now ready to assist customers. Step 9 Performing Secure Virtual Assist Technician Tasks To get started, the technician logs into the SRA appliance and launches the Secure Virtual Assist application. - Page 55 Customers who launch Secure Virtual Assist from an email invitation can only be Note assisted by the technician who sent the invitation. Customers who manually launch Secure Virtual Assist can be assisted by any technician. Enter the customer’s email address in the Customer E-mail field. Step 2 Optionally, enter Technician E-mail to use a different return email address than the default Step 3...
- Page 56 Refresh - R Refreshes the display of the customer’s computer. • File Transfer - Launches a window to transfer files to and from the customer’s computer. • See the “Using the Secure Virtual Assist File Transfer” section on page 57 for more information.
- Page 57 Request Full Control Technicians can request full control of a customer’s desktop, allowing them to reboot the system, delete files, or over-write files on the customer’s computer without the customer being repeatedly prompted for permission. Select Request Full Control under the Commands menu to issue a request that will appear on the customer’s desktop.
-
Page 58: Enabling A System For Secure Virtual Access
When deleting or over-writing files, the customer is warned and must give the Note technician permission unless the technician has elected Request Full Control and the customer has confirmed. New folder creates a new folder in the selected directory. • Rename renames the selected file or directory. - Page 59 Access system should no longer attempt to connect to the support queue and should display an error message. Note For tasks and information on using Secure Virtual Assist as an end-user, refer to the Dell SonicWALL SRA User’s Guide. SRA Overview | 59...
-
Page 60: Web Application Firewall Overview
Web applications are tracked by OWASP, an open source community that focuses its efforts on improving the security of Web applications. Dell SonicWALL SRA Web Application Firewall protects against these top ten, defined in 2007 as follows:... - Page 61 SRA appliance. The portal must be configured as a virtual host. It is possible to disable authentication and access policy enforcement for such an offloaded host. If authentication is enabled, a suitable domain needs to be associated with this portal and all Dell SonicWALL advanced authentication features such as One Time Password, Two-factor Authentication, and Single Sign-On apply to the offloaded host.
- Page 62 Web Application Firewall is secure and can be used in various areas, including financial services, healthcare, application service providers, and e-commerce. Dell SonicWALL SRA uses SSL encryption to encrypt data between the Web Application Firewall and the client. Dell SonicWALL SRA also satisfies OWASP cryptographic storage requirements by encrypting keys and passwords wherever necessary.
- Page 63 Application offloading avoids URL rewriting, which improves the proxy performance and functionality. There are several benefits of integrating Web Application Firewall with Dell SonicWALL SRA appliances. Firstly, identity-based policy controls are core to Web Application Firewall and this is easily achievable using SSL VPN technology.
-
Page 64: How Are Signatures Used To Prevent Attacks
Reference vulnerabilities, the Web Application Firewall feature uses a black list of signatures that are known to make Web applications vulnerable. New updates to these signatures are periodically downloaded from a Dell SonicWALL signature database server, providing protection from recently introduced attacks. -
Page 65: How Is Cross-Site Request Forgery Prevented
The Web Application Firewall process is outlined in the following flowchart. In the case of a blocked request, the following error page is returned to the client: This page is customizable under Web Application Firewall > Settings in the SRA management interface. -
Page 66: How Is Information Disclosure Prevented
CSRF protection is provided for anonymous mode as well. If CSRF protection is enabled, then an idle timeout set to the global idle timeout is enforced for anonymous access. If the session times out, an error message is displayed, forcing the user to revisit the site in a new window. If authentication is enforced for the portal, then the user is redirected to the login page for the portal. -
Page 67: How Are Broken Authentication Attacks Prevented
How are Slowloris Attacks Prevented? Slowloris attacks can be prevented if there is an upstream device, such as a Dell SonicWALL SRA security appliance, that limits, buffers, or proxies HTTP requests. Web Application Firewall uses a rate-limiter to thwart Slowloris HTTP Denial of Service attacks. -
Page 68: How Does Cookie Tampering Protection Work
An example is shown below: Two tables are dynamically generated in the PCI compliance report to display the status of each PCI requirement. The format of the table is shown in the example below: The first column describes the PCI requirement. The second column displays the status of the PCI requirement under current Web Application Firewall settings. - Page 69 This feature is found on the Web Application Firewall > Settings page. This page contains the following options: Portals – A list of all application offloading portals. Each portal will have its own setting. The item Global is the default setting for all portals. Tamper Protection Mode –...
-
Page 70: How Does Application Profiling Work
How Does Application Profiling Work? The administrator can configure application profiling on the Web Application Firewall > Rules page. Application profiling is performed independently for each portal and can profile multiple applications simultaneously. After selecting the portal, you can select the type of application content that you want to profile. You can choose HTML/XML, Javascript, CSS, or All, which includes all content types such as images, HTML, and CSS. -
Page 71: Navigating The Sra Management Interface
If a rule chain has already been generated from a URL profile in the past, then the rule chain will be overwritten only if the Overwrite existing Rule Chains for URL Profiles check box is selected. When you click the Generate Rules button, the rules are generated from the URL profiles. -
Page 72: Management Interface Introduction
192.168.200.x/24 subnet, such as 192.168.200.20. For help with setting up a static IP address on your computer, refer to the Dell SonicWALL SRA Getting Started Guide for your model. For configuring the SRA appliance using the Web-based management interface, a... -
Page 73: Navigating The Management Interface
Note The number and duration of login attempts can be controlled by the use of the SRA auto- lockout feature. For information on configuring the auto-lockout feature, refer to the “Configuring Login Security” section on page 104. When you have successfully logged in, you will see the default page, System > Status. Note If the default page after logging in is the Virtual Office user portal, you have selected a domain with user-only privileges. - Page 74 Figure 5 System > Status Page Location Navigation Bar Status Bar Main Window The following is a sample configuration window: Section Title Button Drop-down Menu Text Box Field Name List Box Check Box For descriptions of the elements in the management interface, see the following sections: “Status Bar”...
-
Page 75: Status Bar
Status Bar The Status bar at the bottom of the management interface window displays the status of actions executed in the SRA management interface. Accepting Changes Click the Accept button at the top right corner of the main window to save any configuration changes you made on the page. - Page 76 Table 10 Navigation Buttons in the Log View Page Navigation Button Description Find Allows the administrator to search for a log entry containing the content specified in the Search field. The search is applied to the element of the log entry specified by the selection in the drop-down list. The selections in the drop-down list correspond to the elements of a log entry as designated by the column headings of the Log >...
-
Page 77: Navigation Bar
Submenu Action System Status View status of the appliance. Licenses View, activate, and synchronize licenses with the Dell SonicWALL licensing server for Nodes and Users, Secure Virtual Assist, and ViewPoint. Time Configure time parameters. Settings Import, export, and store settings. - Page 78 Submenu Action Configure the appliance to resolve domain names. Routes Set default and static routes. Host Resolution Configure network host name settings. Network Objects Create reusable entities that bind IP addresses to services. Portals Portals Create a customized landing page to your users when they are redirected to the SRA appliance for authentication.
-
Page 79: Deployment Guidelines
Configure settings for the log environment. Categories Select event categories to be logged. ViewPoint Configure Dell SonicWALL ViewPoint server for reporting. Virtual Office N/A Access the Virtual Office portal home page. Deployment Guidelines This sections provides information about deployment guidelines for the SRA appliance. This... -
Page 80: Support For Numbers Of User Connections
“Support for Numbers of User Connections” section on page 80 • “Resource Type Support” section on page 80 • “Integration with Dell SonicWALL Products” section on page 81 • “Typical Deployment” section on page 81 • “Two-armed Deployment” section on page 82 •... -
Page 81: Integration With Dell Sonicwall Products
Dell SonicWALL network security appliance, such as a NSA 4500. This method of deployment offers additional layers of security control plus the ability to use Dell SonicWALL’s Unified Threat Management (UTM) services, including Gateway Anti-Virus, Anti- Spyware, Content Filtering and Intrusion Prevention, to scan all incoming and outgoing NetExtender traffic. -
Page 82: Two-Armed Deployment
Two-armed Deployment The SRA appliances also support two-armed deployment scenarios, using one external (DMZ or WAN side) interface and one internal (LAN) interface. However, two-armed mode introduces routing issues that need to be considered before deployment. The SRA appliance does not route packets across interfaces, as there are IP tables rules preventing that, and therefore cannot be used as a router or default gateway. -
Page 83: Chapter 3 System Configuration
Chapter 3 System Configuration This chapter provides information and configuration tasks specific to the System pages on the SRA Web-based management interface, including registering your SRA appliance, setting the date and time, configuring system settings, system administration and system certificates. This chapter contains the following sections: “System >... -
Page 84: System > Status Overview
System > Status Overview The System > Status page provides the administrator with current system status for the SRA appliance, including information and links to help manage the SRA appliance and Dell SonicWALL Security Services licenses. This section provides information about the page display and instructions to perform the configuration tasks on the System >... -
Page 85: Registering Your Sra Appliance From System Status
System Status” section on page To register your appliance on MySonicWALL from the System > Licenses page and allow the appliance to automatically synchronize registration and license status with the Dell SonicWALL server, see the “Registering the SRA Appliance from System > Licenses” section on page... - Page 86 Before You Register Verify that the time, DNS, and default route settings on your Dell SonicWALL SRA are correct before you register your appliance. These settings are generally configured during the initial SRA appliance setup process. To verify or configure the time settings, navigate to the System >...
- Page 87 If you are not logged into the Dell SonicWALL SRA management interface, log in with the Step 1 username admin and the administrative password you set during initial setup of your SRA appliance (the default is password). For information about configuring the administrative password, refer to the Dell SonicWALL SRA Getting Started Guide.
-
Page 88: Configuring Network Interfaces
Note Initial registration of the unit is required for the License Manager to work. The System > Licenses page provides a link to activate, upgrade, or renew Dell SonicWALL Security Services licenses. From this page in the SRA management interface, you can manage all the Dell SonicWALL Security Services licenses for your SRA appliance. - Page 89 The Security Services Summary table lists the number of Nodes/Users licenses and the available and activated security services on the SRA appliance. The Security Service column lists all the available Dell SonicWALL Security Services and upgrades available for the security appliance. The Status column indicates if the security service is activated (Licensed), available for activation (Not Licensed, or for Spike License, Inactive), or no longer active (Expired).
-
Page 90: Registering The Sra Appliance From System > Licenses
The information listed in the Security Services Summary table is updated from the Dell SonicWALL licensing server every time the SRA appliance automatically synchronizes with it (hourly), or you can click the Synchronize button to synchronize immediately. Note If the licenses do not update after a synchronize, you may need to restart your SRA appliance. - Page 91 Enter a descriptive name for your SRA appliance in the Friendly Name field. Step 3 Under Product Survey, fill in the requested information and then click Submit. The display Step 4 changes to inform you that your Dell SonicWALL SRA is registered. Click Continue. Step 5 System Configuration | 91...
-
Page 92: Activating Or Upgrading Licenses
After registration, some network environments require the SRA appliance to be Note offline so that it is unable to connect to the Dell SonicWALL licensing server. In this mode, the appliance will still honor the valid licenses; however, timed-based licenses may not be valid. - Page 93 To activate a free trial, click Try next to the service that you want to try. The page explains that Step 3 you will be guided through the setup of the service, and that you can purchase a Dell SonicWALL product subscription at any time during or after the trial. Click Continue, and follow the setup instructions.
- Page 94 New License Key # field(s), and then click Submit. After completing the activation or upgrading process, click Synchronize to update the Step 6 appliance license status from the Dell SonicWALL licensing server. Rebooting the appliance will also update the license status. Using a Spike License...
- Page 95 connected users exceeds your normal user license. The Spike License stays active until either the number of users decreases back to your normal licensed amount or the Spike License expires. To activate or stop a Spike License, perform the following steps: Purchase your Spike License from MySonicWALL and import it to the appliance, as described Step 1 “Activating or Upgrading Licenses”...
-
Page 96: System > Time
Whenever you activate and then stop a Spike License, the number of days for which Note it is valid decreases by one, even if fewer than 24 hours have elapsed. If it remains active for several days, a day will be subtracted after each 24 hour period. System >... -
Page 97: Setting The Time
NTP Settings The NTP Settings section allows the administrator to set an update interval (in seconds), an NTP server, and two additional (optional) NTP servers. Setting the Time To configure the time and date settings, navigate to the System > Time page. The appliance uses the time and date settings to timestamp log events and for other internal purposes. -
Page 98: System > Settings
Navigate to the System > Time page. Step 1 Select the Automatically synchronize with an NTP server check box. Step 2 In the NTP Settings section, enter the time interval in seconds to synchronize time settings with Step 3 the NTP server in the Update Interval field. If no period is defined, the appliance will select the default update interval, 3600 seconds. -
Page 99: Managing Configuration Files
On a virtual appliance, the System > Settings page allows for settings management, but does not provide any firmware management, because the SRA Virtual Appliance is itself a software image. Figure 12 System > Settings Page - Virtual Appliance Settings The Settings page provides buttons to import settings and export settings, and allows the administrator to encrypt the settings file. - Page 100 Exporting a Backup Configuration File Exporting a backup configuration file allows you to save a copy of your configuration settings on your local machine. You may then save the configuration settings or export them to a backup file and import the saved configuration file at a later time, if necessary. The backup file is called sslvpnSettings-serialnumber.zip by default, and includes the contents shown in the following figure.
-
Page 101: Managing Firmware
Importing a Configuration File You may import the configuration settings that you previously exported to a backup configuration file. To import a configuration file, perform the following steps: Navigate to the System > Settings page. Step 1 To import a backup version of the configuration, click Import Settings. The Import Settings Step 2 dialog box is displayed. -
Page 102: System > Administration
Creating a Backup To create a system backup of the current firmware and settings, click the Create Backup button. The backup may take up to two minutes. When the backup is complete, the Status at the bottom of the screen will display the message “System Backup Successful.” Downloading Firmware To download firmware, click the download icon next to the Firmware Image version you... -
Page 103: System > Administration Overview
System > Administration Overview This section provides the administrator with information about and instructions to perform the configuration tasks on the System > Administration page. The System > Administration page allows the administrator to configure login security, Web management settings, SNMP settings, and GMS settings. -
Page 104: Configuring Login Security
Login Security The Login Security section provides a way to configure administrator/user lockout for a set period of time (in minutes) after a set number of maximum login attempts per minute. Web Management Settings The Web Management Settings section allows the administrator to set the default page size for paged tables and the streaming update interval for dynamically updated tables in the management interface. -
Page 105: Configuring Web Management Settings
Click the Accept button to save your changes. Step 8 Enabling GMS Management The Dell SonicWALL Global Management System (GMS) is a Web-based application that can configure and manage thousands of Dell SonicWALL internet security appliances, including global administration of multiple site-to-site VPNs from a central location. -
Page 106: System > Certificates
Navigate to System > Administration. Step 1 Select the Enable GMS Management check box. Step 2 Type the host name or IP address of your GMS server in the GMS Host Name or IP Address Step 3 field. Type the port number of your GMS server in the GMS Syslog Server Port field. The default for Step 4 communication with a GMS server is port 514. -
Page 107: Certificate Management
Server Certificates The Server Certificates section allows the administrator to import and configure a server certificate, and to generate a CSR (certificate signing request). A server certificate is used to verify the identity of the SRA appliance. The appliance presents its server certificate to the user’s browser when the user accesses the login page. -
Page 108: Generating A Certificate Signing Request
Generating a Certificate Signing Request In order to get a valid certificate from a widely accepted CA such as RapidSSL, Verisign, or Thawte, you must generate a Certificate Signing Request (CSR) for your SRA appliance. To generate a certificate signing request, perform the following steps: Navigate to the System >... -
Page 109: Importing A Certificate
Click the configure icon for the certificate. The Edit Certificate window is displayed, showing Step 1 issuer and certificate subject information. From the Edit Certificate window, you may view the issuer and certificate subject information. Step 2 On self-signed certificates, type in the Web server host name or IP address in the Common Step 3 Name field. -
Page 110: Adding Additional Ca Certificates
Note Private keys may require a password. Adding Additional CA Certificates You can import additional CA certificates for use with chained certificates, for example, when the issuing CA uses an intermediate (chained) signing certificate. To import a CA certificate file, upload a PEM-encoded, DER-encoded, or PKCS #7 (.p7b) file. - Page 111 The following figure shows the System > Monitoring page. Figure 16 System > Monitoring Page Monitoring Graphs The four monitoring graphs can be configured to display their respective data over a period of time ranging from the last hour to the last month. Table 13 Monitoring Graph Types.
-
Page 112: Setting The Monitoring Period
Setting The Monitoring Period To set the monitoring period, select one of the following options from the Monitor Period drop-down list in the System > Monitoring page: Last 30 Seconds • Last 30 Minutes • Last 24 Hours • Last 30 Days •... -
Page 113: Downloading The Tech Support Report
Tech Support Report Downloading a Tech Support Report records system information and settings that are useful to Dell SonicWALL Technical Support when analyzing system behavior. To download the Tech Support report, click Download Report under Tech Support Report. For information about configuration tasks related to the Tech Support Report section, refer to the “Downloading the... -
Page 114: System > Restart
products and shows product name, serial, firmware, ROM version, and asset number (user defined). The rest of the MIBs are standard SNMP MIBs including SNMPv2-MIB and All SNMP MIB-2, or you can select ALL MIBs. Ping6 and Traceroute6 are meant for use with IPv6 addresses and networks. If the IP Address/Name to Target field is displayed, type an IP address or domain name you Step 3 wish to attempt to reach. -
Page 115: Chapter 4 Network Configuration
Chapter 4 Network Configuration This chapter provides information and configuration tasks specific to the Network pages on the SRA Web-based management interface. Network tasks for the SRA appliance include configuring network interfaces, DNS settings, routes, and host resolution. This chapter contains the following sections: “Network >... -
Page 116: Network > Interfaces Overview
Network > Interfaces Overview The Network > Interfaces page allows the administrator to configure the IP address, subnet mask and view the connection speed of physical network interface ports on the SRA appliance. Figure 18 Network > Interfaces Page Configuring Network Interfaces The Network >... - Page 117 Navigate to the Network > Interfaces page and click the configure icon next to the interface Step 1 you want to configure. In the Edit Interfaces dialog box on the SRA appliance, type an unused static IP address in Step 2 the IP Address field.
-
Page 118: Network > Dns
Note If you select a specific link speed and duplex mode, you must force the connection speed and duplex from the connected networking device to the Dell SonicWALL security appliance as well. For the Management options, if you want to enable remote management of the SRA appliance Step 6 from this interface, select the supported management protocol(s): HTTP, HTTPS, and/or Ping. -
Page 119: Configuring Hostname Settings
For SRA appliances supporting connections from Apple iPhones, iPads, or other iOS devices using Dell SonicWALL Mobile Connect, the DNS Domain is a required field. This DNS domain is set on the VPN interface of the iPhone/iPad after the device makes a connection to the appliance. -
Page 120: Configuring Wins Settings
For example, your host name is SonicPRS and the usa.n.sonicwall.com and rsc.sonicwall.com DNS suffixes are added to the search list. The first suffix will be appended to SonicPRS to make the FQDN (SonicPRS.usa.n.sonicwall.com), which will be used in name resolution. If the name is not resolved, the next suffix in the search list will be used (SonicPRS.rsc.sonicwall.com).This process continues until the name is resolved or all suffixes have been tried. -
Page 121: Network > Routes Overview
The Network > Routes page allows the administrator to assign a default gateway and interface, and to add and configure static routes. For more information on default or static routes, refer to the Dell SonicWALL SRA Getting Started Guide for your appliance model. Figure 20 Network >... -
Page 122: Configuring Static Routes For The Appliance
Navigate to the Network > Routes page. Step 1 In the Default IPv4 Gateway field, type the IP address of the firewall or other gateway device Step 2 through which the SRA appliance connects to the network. This address will act as the default route for the appliance. -
Page 123: Network > Host Resolution
Network > Host Resolution This section provides an overview of the Network > Host Resolution page and a description of the configuration tasks available on this page. “Network > Host Resolution Overview” section on page 123 • “Configuring Host Resolution” section on page 123 •... -
Page 124: Network > Network Objects
In the Add Host Name window, in the IP Address field, type the IP address that maps to the Step 3 hostname. In the Host Name field, type the hostname that you want to map to the specified IP address. Step 4 Optionally, in the Alias field, type a string that is the alias for the hostname. -
Page 125: Adding Network Objects
File Transfer Protocol (FTP) • Telnet, Secure Shell version 1 (SSHv1) / Secure Shell version 2 (SSHv2) • File Shares (CIFS) • Citrix Portal (Web Access) • Port or port range settings are available for all services, allowing the administrator to configure a port range (such as 80-443) or a port number (80) for a Network Object. - Page 126 If you just created a network object, the Edit Network Object screen is displayed as soon as you clicked Accept. The Edit Network Object shows the network object name and the service associated with it. It also contains an address list that displays existing addresses mapped to the network object. To change the service, select the desired service from the Service drop-down list and then click Step 2 Update Service.
- Page 127 IPV6 Address - A single IPv6 address. – IPV6 Network - A range of IPv6 addresses. – Type in the appropriate information pertaining to the object type you have selected. Step 2 For the IP Address object type, type an IP address in the IP Address field. –...
- Page 128 128 | SRA 6.0 Administrator’s Guide...
-
Page 129: Chapter 5 Portals Configuration
Chapter 5 Portals Configuration This chapter provides information and configuration tasks specific to the Portals pages on the SRA Web-based management interface, including configuring portals, assigning portals, and defining authentication domains, such as RADIUS, NT Domain, LDAP, and Active Directory. This chapter contains the following sections: “Portals >... -
Page 130: Portals > Portals Overview
Portals > Portals Overview The Portals > Portals page allows the administrator to configure a custom portal for the SRA Portal login page as well as the portal home page. Figure 23 Portals > Portals page Portal Settings The Portal Settings section allows the administrator to configure a custom portal by providing the portal name, portal site title, portal banner title, login message, virtual host/domain name and portal URL. -
Page 131: Adding Portals
Legacy Portals The home page is displayed in an IFRAME--internal HTML frame. • The width of the iframe is 542 pixels, but since there is a 29 pixel buffer between the • navigation menu and the content, the available workspace is 513 pixels. You can upload a custom HTML file which will be displayed below all other content on the •... -
Page 132: Configuring General Portal Settings
If enforced, client source uniqueness prevents multiple connections from a user with the same client source address when connecting with a Dell SonicWALL client (NetExtender, Mobile Connect, Virtual Assist etc.). This prevents a user from consuming multiple licenses when a user reconnects after an unexpected network interruption. - Page 133 Only alphanumeric characters, hyphen (-), and underscore (_) are accepted in the Note Portal Name field. If other types of characters or spaces are entered, the portal name will be truncated before the first non-alphanumeric character. Enter the title for the Web browser window in the Portal Site Title field. Step 4 To display a banner message to users before they login to the portal, enter the banner title text Step 5...
-
Page 134: Configuring The Home Page
Enforcing Client Source Uniqueness Client source uniqueness, when enforced, prevents multiple connections from a user with the same client source address when connecting with a Dell SonicWALL client (NetExtender, Mobile Connect, Virtual Assist etc.). This prevents a user from consuming multiple licenses when a user reconnects after an unexpected network interruption. - Page 135 To configure the home page, perform the following tasks: Navigate to the Portals > Portals page. Step 1 Click the Add Portal button or the configure button next to the portal you want to configure. The Step 2 Add Portal or Edit Portal screen displays. Click the Home Page tab.
- Page 136 Certificate Button security certificate. Certificate import is only available for Internet Explorer on Windows 2000 and XP. Show Dell SonicWALL Displays Dell SonicWALL copyright footer on portal. If unchecked, copyright footer the footer is not shown. Show “Tips/Help” Displays a sidebar in the portal with tips and help links. This option sidebar is not available when the Legacy Look &...
- Page 137 Enabling NetExtender to Launch Automatically in the User Portal NetExtender can be configured to start automatically when a user logs into the user portal. You can also configure whether or not NetExtender is displayed on a Virtual Office portal. To configure NetExtender portal options, perform the following steps: Navigate to Portals >...
-
Page 138: Configuring Per-Portal Virtual Assist Settings
Configuring Per-Portal Virtual Assist Settings The administrator can enable Secure Virtual Assist on a per-portal basis. The Virtual Assist tab in the Add Portal screen provides almost the same configuration options for this portal as are offered by the global Secure Virtual Assist > Settings page. To configure the Virtual Assist settings for this portal, perform the following steps: Navigate to Portals >... -
Page 139: Configuring Virtual Host Settings
For the fields with a drop-down list, do one of the following: Step 10 Select Use Global Setting to apply the global setting to this portal. • Select Enable to enable the option for this portal, no matter what the global setting is. •... - Page 140 Select a specific Virtual Host Interface for this portal if using IP based virtual hosting. Step 5 If your virtual host implementation uses name based virtual hosts — where more than one hostname resides behind a single IP address — choose All Interfaces from the Virtual Host interface.
-
Page 141: Adding A Custom Portal Logo
The Custom Logo Settings section allows the administrator to upload a custom portal logo and to toggle between the default Dell SonicWALL logo and a custom uploaded logo. You must add the portal before you can upload a custom logo. In the Add Portal screen, the Logo tab does not have an option to upload a custom logo. -
Page 142: Portals > Application Offloading
For instance, in an organization certain guest users may need Two-factor or Client Certificate authentication to access Outlook Web Access (OWA), but are not allowed to access OWA public folders. If authentication is enabled, multiple layers of Dell SonicWALL advanced authentication features such as One Time Password, Two-factor Authentication, Client Certificate Authentication and Single Sign-On can be applied on top of each other for the offloaded host. -
Page 143: Configuring An Http/Https Application Offloading Portal
HTTP(S) bookmarks or Application Offloading. Further information about configuring specific backend Web applications is available in the Dell SonicWALL SRA Application Offloading and HTTP(S) Bookmarks feature module, available under Support on www.sonicwall.com. Configuring an HTTP/HTTPS Application Offloading Portal To offload a Web application and create a portal for it, perform the following steps: Navigate to Portals >... - Page 144 On the General tab, enter a descriptive name in the Portal Name field. See the “Configuring Step 2 General Portal Settings” section on page 132 for more instructions for configuring the fields on this tab. On the Offloading tab, select the Enable Load Balancing check box for load balancing among Step 3 offloaded application servers.
- Page 145 Select the Automatically Login check box to configure Single Sign-On settings. Step 12 For automatic login using SSO, select one of the following radio buttons: Step 13 Use SSL-VPN account credentials – allow login to the offloaded application using the •...
-
Page 146: Configuring Generic Ssl Offloading
If authentication is disabled for this portal, you have the option to Enable HTTP access for this Step 16 Application Offloaded Portal. This feature is useful for setting up offloading in trial deployments. Click Accept. You are returned to the Portals > Portals page where you will see the Web Step 17 application listed as an Offloaded Web Application under Description. - Page 147 To configure generic SSL offloading: Navigate to Portals > Portals and click the Offload Web Application button. The Add Portal Step 1 screen opens. The screen contains the Offloading tab, used specifically for application offloading configuration. On the Offloading tab, select Generic (SSL Offloading) as the Scheme. Step 2 Enter the IP address of the portal which will listen for incoming SSL requests in the Local IP Step 3...
-
Page 148: Portals > Domains
When completed, SSL Offloading portals are displayed in the list of portals on the Portals > Portals page. Note that the Virtual Host Settings column shows the Local IP:port --> Application Server IP:port as well as (SSL) if ‘Enable SSL for Backend Connections’ is enabled. Verification and Considerations for Generic SSL Offloading To view the SSL Offloading portal in action, point it to a backend web server and use a current Internet browser to view the SSL offloaded site, using the format <Local IP:port>... -
Page 149: Viewing The Domains Table
Client digital certificate requirements (optional) • One-time passwords (optional) • Figure 24 Portals > Domains Page Viewing the Domains Table All of the configured domains are listed in the table in the Portals > Domains window. The domains are listed in the order in which they were created. You can reverse the order by clicking the up/down arrow next to the Domain Name column heading. -
Page 150: Adding Or Editing A Domain
Adding or Editing a Domain You can add a new domain or edit an existing one from the Portals > Domains page. To add a domain, click the Add Domain button to display the Add Domain window. To edit an existing domain, click the Configure icon to the right of the domain you wish to edit. The interface provides the same fields for both adding and editing a domain, but the Authentication Type and Domain Name fields cannot be changed when editing an existing domain. -
Page 151: Adding Or Editing A Domain With Local User Authentication
Note To apply a portal to a domain, add a new domain and select the portal from the Portal Name drop-down list in the Add Domain window. The selected portal will be applied to all users in the new domain. Domain choices will be displayed in the login page of the Portal that was selected. -
Page 152: Adding Or Editing A Domain With Active Directory Authentication
Verify partial DN in subject - Use the following variables to configure a partial DN that will • match the client certificate: User name: %USERNAME% – Domain name: %USERDOMAIN% – Active Directory user name: %ADUSERNAME% – Wildcard: %WILDCARD% – Optionally select the One-time passwords check box to enable the One-time password Step 7 feature. - Page 153 If adding the domain, select Active Directory from the Authentication type drop-down list. Step 2 The Active Directory configuration fields will be displayed. If adding the domain, enter a descriptive name for the authentication domain in the Domain Step 3 Name field.
- Page 154 This option allows the SRA administrator to configure a domain that allows SRA admin privileges to all users logging into that domain. Dell SonicWALL recommends adding filters that allow administrative access only to those users who are in the correct group. You can do so by editing the domain on the Users >...
- Page 155 Read-only Administrator – Users logging into this domain are treated as read-only • administrators and can view all information and settings, but cannot apply any changes to the configuration. These users are presented with the admin login page. Click Accept to update the configuration. Once the domain has been added, the domain will be Step 15 added to the table on the Portals >...
-
Page 156: Adding Or Editing A Domain With Ldap Authentication
Adding or Editing a Domain with LDAP Authentication To configure a domain with LDAP authentication, perform the following steps: Click Add Domain or the Configure icon for the domain to edit. The Add Domain or Edit Step 1 Domain window is displayed. If adding the domain, select LDAP from the Authentication Type menu. - Page 157 Do not include quotes (“”) in the LDAP BaseDN field. Note Enter the common name of a user that has been delegated control of the container that user Step 6 will be in along with the corresponding password in the Login Username and Login Password fields.
- Page 158 This option allows the SRA administrator to configure a domain that allows SRA admin privileges to all users logging into that domain. Dell SonicWALL recommends adding filters that allow administrative access only to those users who are in the correct group. You can do so by editing the domain on the Users >...
-
Page 159: Adding Or Editing A Domain With Nt Domain Authentication
Adding or Editing a Domain with NT Domain Authentication To configure a domain with NT Domain authentication, perform the following steps: On the Portals > Domains page, click Add Domain or the Configure icon for the domain to edit. Step 1 The Add Domain or Edit Domain window is displayed. -
Page 160: Adding Or Editing A Domain With Radius Authentication
Select the Auto-assign groups at login check box to assign users to a group when they log in. Step 9 Users logging into NT domains are automatically assigned in real time to SRA groups based on their external NT group memberships. If a user’s external group membership has changed, their SRA group membership automatically changes to match the external group membership. - Page 161 If adding the domain, enter a descriptive name for the authentication domain in the Domain Step 3 Name field. This is the domain name users will select in order to log into the SRA appliance portal. Select the proper Authentication Protocol for your RADIUS server. Choose from PAP, CHAP, Step 4 MSCHAP, or MSCHAPV2.
-
Page 162: Configuring Two-Factor Authentication
“Two-Factor Authentication Overview” section on page Dell SonicWALL’s implementation of two-factor authentication either uses two separate RADIUS authentication servers, or partners with two of the leaders in advanced user authentication: RSA and VASCO. If you are using RSA, you must have the RSA Authentication Manager and RSA SecurID tokens. - Page 163 The following sections describe how to configure the supported third-party authentication servers: “Configuring the RSA Authentication Manager” section on page 163 • “Configuring the VASCO IdentiKey Solution” section on page 167 • Configuring the RSA Authentication Manager The following sections describe how to configure the RSA Authentication Manager version 6.1 to perform two-factor authentication with your SRA appliance: “Adding an Agent Host Record for the SRA Appliance”...
- Page 164 Select Communication Server in the Agent type window. Step 5 By default, the Enable Offline Authentication and Enable Windows Password Integration Step 6 options are enabled. Dell SonicWALL recommends disabling all of these options except for Open to All Locally Known Users. Click OK. Step 7...
- Page 165 Click Add. The Add RADIUS Client window displays. Step 3 Enter a descriptive name for the SRA appliance. Step 4 Enter the IP address of the SRA in the IP Address field. Step 5 Enter the shared secret that is configured on the SRA in the Shared secret field. Step 6 Click OK and close the RSA RADIUS Manager.
- Page 166 When you purchase RSA SecurID tokens, they come with an XML file that contains information Step 2 on the tokens. Navigate to the token XML file and click Open. The token file is imported. The Import Status window displays information on the number of tokens imported to the RSA Step 3 Authentication Manager.
- Page 167 Give the user their RSA SecurID Authenticator and instructions on how to log in, create a PIN, Step 11 and user the RSA SecurID Authenticator. See the Dell SonicWALL SRA User Guide for more information. Configuring the VASCO IdentiKey Solution The VASCO IdentiKey solution works with SRA 5.0 or higher.
-
Page 168: Step 2
Click the Add Client Route button to select the correct Client Routes for the authenticated remote users accessing the private networks via the SRA connection. The client route corresponds with the subnet connected to the X0 (LAN) interface of the Dell SonicWALL NSA or TZ firewall. -
Page 169: Configuring A Policy On Vasco Identikey
Configuring a Policy on VASCO IdentiKey Follow these steps to add a new policy in the VASCO Identikey Web Administration interface: Log in to the Vasco Identikey Web Administration window. Step 1 Click the Policies tab and select Create. Step 2 There are policies available by default, and you can also create new policies to suit Note your needs... -
Page 170: Portals > Custom Logo
When a user is assigned to a DIGIPASS, a confirmation message will pop up. Verifying Two-Factor Authentication To test the two-factor authentication SRA connectivity with VASCO IdentiKey: Connect your PC on the WAN (X1) interface of the Dell SonicWALL firewall by pointing your Step 1 browser to its IP address. -
Page 171: Portals > Load Balancing
Portals > Load Balancing This section provides an overview of the Portals > Load Balancing page and a description of the configuration tasks available on this page. “Portals > Load Balancing Overview” section on page 171 • “Configuring a Load Balancing Group” section on page 172 •... -
Page 172: Configuring A Load Balancing Group
Balancing Members and also take up the load of the Security Services. The Load Balancer in the previous two scenarios is essentially a dummy proxy without the load of any Security Services to burden it. Load Balancing Settings The following table lists Portals > Load Balancing configuration options. Additional per-group configuration options are described in the “Configuring a Load Balancing Group”... - Page 173 Adding a New Load Balancing Group In the Portals > Load Balancing page, click the Add Group button. The New Load Balancing Step 1 Group configuration information displays. Enter a friendly LB Group Name for this load balancing group. Step 2 Select a load balancing method from the LB Method drop-down list.
- Page 174 It is important to ensure that the same member receives all cookies to keep the user Note authenticated. However, for improved performance in certain situations, all backend members may be able to accept the session cookies of all users. In this case, the administrator may decide to turn off Session persistence.
- Page 175 Adding New Members to a Load Balancing Group To add members to a new or existing load balancing group: When editing or adding a group from the Portals > Load Balancing page, click the Add Step 1 Member button. The Load Balancing Member screen displays. Enter a Member Name to uniquely identify this member within the Load Balancing Group.
- Page 176 176 | SRA 6.0 Administrator’s Guide...
-
Page 177: Chapter 6 Services Configuration
Chapter 6 Services Configuration This chapter provides information and configuration tasks specific to the Services pages on the SRA Web-based management interface, including configuring settings, bookmarks, and policies for various application layer services, such as HTTP/HTTPS, Citrix, RDP, and VNC. This chapter contains the following sections: “Services >... - Page 178 The Services > Settings page allows the administrator to configure various settings related to HTTP/HTTPS, Citrix, Global Portal character sets, and one-time passwords. HTTP/HTTPS Service Settings Administrators can take the following steps to configure HTTP/HTTPS Service Settings: The Enable Content Caching check box is selected by default. Administrators may disable the Step 1 check box if they choose to do so.
- Page 179 Citrix Service Settings The administrator needs to host the Citrix clients on a local Web server and have the SRA download these clients from there. For example, place the following Citrix Receiver clients on the Web server: For ActiveX: Receiver for Windows 3.0 – CitrixReceiver.exe •...
-
Page 180: Services > Bookmarks
In the One Time Password Format drop-down list, select one of the following three options: Step 3 Characters – Only alphabetic characters will be used when generating the one-time • password. Characters and Numbers – Alphabetic characters and numbers will be used when •... - Page 181 Adding or Editing a Bookmark To add a bookmark, navigate to the Services > Bookmarks screen within the management interface and select the Add Bookmark... button. The Add Bookmark window opens. Complete the following steps to add a service bookmark: Use the Bookmark Owner drop-down menu to select whether the bookmark is owned as a Step 1 Global Bookmark, a Local Domain group bookmark, or a bookmark assigned to an individual...
- Page 182 Some services can run on non-standard ports, and some expect a path when connecting. Depending on the choice in the Service field, format the Name or IP Address field like one of the examples shown in the following table. Service Type Format Example for Name or IP Address Field RDP - ActiveX...
- Page 183 Service Type Format Example for Name or IP Address Field File Shares Host\Folder\ server-3\sharedfolder\ Host\File server-3\inventory.xls FQDN\Folder server-3.company.net\sharedfolder\ FQDN\File server-3company.net\inventory.xls IP\Folder\ 10.20.30.4\sharedfolder\ 10.20.30.4\status.doc IP\File Note: Use backslashes even on Linux or Mac com- puters; these use the Windows API for file sharing. Citrix IP Address 172.55.44.3...
- Page 184 Select the Login as console/admin session check box to allow login as console or – admin. Login as admin replaces login as console in RDC 6.1 and newer. Select the Enable wake-on-LAN check box to enable waking up a computer over the –...
- Page 185 Virtual Network Computing (VNC) In the Encoding drop-down menu, select the desired encoding transfer format. – Optionally, if available, use the Compression Level drop-down menu to select the – desired compression level for data. Optionally, if available, select the JPEG image file quality level using the JPEG Image –...
- Page 186 Secure Shell version 2 (SSHv2) Optionally select the Automatically accept host key check box. – If using an SSHv2 server without authentication, such as a Dell SonicWALL firewall, – you can select the Bypass username check box. Click OK to update the configuration. Once the configuration has been updated, the new user Step 5 bookmark will be displayed in the Services >Bookmarks window.
-
Page 187: Services > Policies
Services > Policies The Services > Policies page within the Web-based management interface provides a single interface for viewing service policies and access to configure policies for users and groups. Adding a Policy To add a policy, navigate to the Services > Policies screen within the management interface and select the Add Policy... - Page 188 Follow the appropriate step below depending on your selection in the Apply Policy To menu. Step 3 IP Address - If your policy applies to a specific host, enter the IP address of the local host • machine in the IP Address field. Optionally enter a port range (for example, 4100-4200) or a single port number into the Port Range/Port Number field.
-
Page 189: Editing A Policy
Editing a Policy To edit a service-related policy, navigate to the Services > Policies screen. Click on the pencil icon in the Configure column. A new Edit Policy window will open with the bookmark’s current configuration. Make all desired adjustments and select Accept. The edited bookmark will still display in the Services >... - Page 190 190 | SRA 6.0 Administrator’s Guide...
-
Page 191: Chapter 7 Netextender Configuration
39. For information about using or installing the NetExtender, NetExtender Mobile, or NetExtender Android clients, see the latest Dell SonicWALL SRA User’s Guide, available on the Secure Remote Access pages of the Dell SonicWALL Support Web site at: http://www.sonicwall.com/us/Support.html This chapter contains the following sections: “NetExtender >... -
Page 192: Netextender > Status
NetExtender > Status This section provides an overview of the NetExtender > Status page and a description of the configuration tasks available on this page. “NetExtender > Status Overview” section on page 192 • “Viewing NetExtender Status” section on page 192 •... -
Page 193: Netextender > Client Settings
NetExtender > Client Settings This section provides an overview of the NetExtender > Client Settings page and a description of the configuration tasks available on this page. “NetExtender > Client Settings Overview” section on page 193 • “Configuring the Global NetExtender IP Address Range” section on page 193 •... -
Page 194: Configuring Global Netextender Settings
Select a range that falls within your existing DMZ subnet. For example, if your DMZ uses • the 192.168.50.0/24 subnet, and you want to support up to 30 concurrent NetExtender sessions, you could use 192.168.50.220 to 192.168.50.250, providing they are not already in use. -
Page 195: Netextender > Client Routes
Note With group access policies, all traffic is allowed by default. This is the opposite of the default behavior of Dell SonicWALL Unified Threat Management (UTM) appliances, where all inbound traffic is denied by default. If you do not create policies for your SRA appliance, then all NetExtender users may be able to access all resources on your internal network(s). -
Page 196: Netextender User And Group Settings
policy for a specific service (for example RDP) will take precedence over a policy that applies to all services. User policies take precedence over group policies and group policies take precedence over global policies, regardless of the policy definition. A user policy that allows access to all IP addresses will take precedence over a group policy that denies access to a single IP address. - Page 197 Navigate to the Users > Local Users page. Step 1 Click on the configure icon for the user you want to edit. The Edit User window is Step 2 launched. Click on the Nx Settings tab. Step 3 Configuring User Client IP Address Range To configure a user client IP address range: To configure an IPv4 address range for this user, enter the beginning of the range in the Client Step 1...
- Page 198 Configuring User DNS Settings To configure custom NetExtender DNS settings for a user: In the Primary DNS Server field, type in the IP address of the main DNS server. Step 1 In the Secondary DNS Server field, optionally type the IP address of the backup DNS server. Step 2 In the DNS Domain field, type the domain for the DNS servers.
- Page 199 Configuring User NetExtender Routes To configure user NetExtender routes: To add a NetExtender client route that will only be added to this user, click the Nx Routes tab Step 1 in the Edit User Settings window. Add Client Route button. Step 2 Type the IPv4 or IPv6 address of the trusted network to which you would like to provide access Step 3...
-
Page 200: Configuring Group-Level Netextender Settings
Configuring Group-Level NetExtender Settings Multiple range and route support for NetExtender enables network administrators to easily segment groups and users without the need of configuring firewall rules to govern access. This user segmentation allows for granular control of access to the network—allowing users access to necessary resources while restricting access to sensitive resources to only those who require it. - Page 201 Configuring Group DNS Settings To configure custom NetExtender DNS settings for a group: In the Primary DNS Server field, type in the IP address of the main DNS server. Step 1 In the Secondary DNS Server field, optionally type the IP address of the backup DNS server. Step 2 In the DNS Domain field, type the domain for the DNS servers.
- Page 202 Configuring Group NetExtender Routes To configure NetExtender client routes: To add a NetExtender client route that will only be added to this user, click the Nx Routes tab Step 1 in the Edit User Settings window. To add a NetExtender client route that will only be added to users in this group, click the Add Step 2 Client Route button.
-
Page 203: Chapter 8 End Point Control
Note When the EPC feature is active other features may run slower due to the increased traffic handled by the appliance. Perform the following tasks to configure EPC: Image the appliance with 6.0 firmware, as explained in the Dell SonicWALL SRA 6.0 Getting Step 1 Started Guide. -
Page 204: End Point Control > Device Profiles
End Point Control > Device Profiles Create device profiles to configure authentication guidelines for users or groups of users based on various global, group, or user attributes. For example, you can select groups that use an Antivirus program or users with a specific Windows version. Two kinds of profiles are available: Allow profiles and Deny profiles. -
Page 205: Users > Local Groups > Edit Epc Settings
On the End Point Control > Device Profiles page, click Add Device Profile. The Add Device Step 1 Profile page is displayed. Figure 30 End Point Control > Add Device Profile In the Name field, type the name that will be used to identify the profile. Step 2 In the Description field, optionally type a brief description of the profile that will help identify Step 3... - Page 206 Navigate to the Users > Local Groups page and click the Edit button for the Global group Step 1 or a local group to be configured for EPC. When the Edit Local Group page appears, click the EPC tab. Use the EPC tab to enable or Step 2 disable EPC for the group, select how to handle authentication requests from unsupported clients, and to add or remove device profiles.
- Page 207 To configure EPC for a local group, select Use global setting or Custom Setting from the Recurring EPC drop-down list. If you select Use global setting, the local group inherits the EPC settings from the Global group. If you select Custom Setting, the Check endpoint at login and Check endpoint at login and every x minutes thereafter prompts are displayed and you can configure EPC, as explained for the Global group.
-
Page 208: Users > Local Users > Edit Epc Settings
Users > Local Users > Edit EPC Settings After creating device profiles, assign them to the local users. Device profiles can be Allow profiles and Deny profiles. Allow profiles identify attributes of the client’s network that must be present before a user is authenticated, and Deny profiles identify attributes of the network that cannot be present. - Page 209 EPC is not currently supported for mobile clients such as iOS, Android, and WinMobile. In the Step 5 Enable Mobile Client Login field, set the default action to Enabled to allow logins or Disabled to block logins from these clients when EPC is enabled. In the Recurring EPC section, configure when EPC checks should be conducted.
-
Page 210: End Point Control > Settings
Click the Accept button to save your changes. Step 9 Figure 34 End Point Control - Add or Remove Device Profiles for Local User End Point Control > Settings EPC is globally enabled or disabled on the End Point Control > Settings page. When EPC is disabled, it is disabled at the global, group, and user level. -
Page 211: End Point Control > Log
End Point Control > Log The End Point Control > Log page lists all client logins blocked by EPC. This log can be searched, filtered, e-mailed, and exported. Figure 36 End Point Control Log Use this page to perform the following functions: Click Export Log to save a zip file containing the full text of all logged sessions. - Page 212 212 | SRA 6.0 Administrator’s Guide...
-
Page 213: Chapter 9 Secure Virtual Assist Configuration
Assist pages on the Dell SonicWALL SRA Web-based management interface. Secure Virtual Assist is an easy to use tool that allows Dell SonicWALL SRA users to remotely support customers by taking control of their computers while the customer observes. Providing support to customers is traditionally a costly and time consuming aspect of business. -
Page 214: Secure Virtual Assist > Status
Secure Virtual Assist > Status The Secure Virtual Assist > Status page displays a summary of current active requests, including the customer name, the summary of their issue they provided, the status of the Virtual Assist session, and which technician is assisting the customer. For the technician, the page displays the portal, domain, and status. -
Page 215: General Settings
General Settings To configure Virtual Assist general settings, perform the following tasks: Navigate to the Secure Virtual Assist > Settings page. Step 1 To require customers to enter a password before being allowed to access Virtual Assist, enter Step 2 the password in the Assistance Code window. -
Page 216: Request Settings
Request Settings To configure Virtual Assist request settings, perform the following tasks: On the Secure Virtual Assist > Settings page, click the Request Settings tab at the bottom Step 1 of the page. To have Virtual Assist requests timeout after a certain amount of time, enter a value in the Step 2 Expire Ticket field. -
Page 217: Notification Settings
Notification Settings To configure Virtual Assist notification settings, perform the following tasks: On the Secure Virtual Assist > Settings page, click the Notification Settings tab at the Step 1 bottom of the page. To automatically email support technicians when a customer logs in to the Virtual Assist queue, Step 2 enter the technicians’... -
Page 218: Customer Portal Settings
Log > Settings page. An accurate technician email address will also allow blocked email notification to the technician in deployments where a third-party email filter may block emails sent to the customer without providing an error to the Virtual Assist client. Customer Portal Settings To customize the appearance of the Virtual Assist customer portal, perform the following tasks: On the Secure Virtual Assist >... -
Page 219: Restriction Settings
Show FAQ and Tour - Displays links to the Secure Virtual Assist FAQ and tour on the • customer request page. Tip Message On Top - Customizes the text that is displayed above the Secure Virtual • Assist link. Tip Message On Bottom - Customizes the text that is displayed below the Secure Virtual •... -
Page 220: Secure Virtual Assist > Log
Adding an Address to Restriction Settings To add an IP address or network to the Deny or Allow list for Virtual Assist restriction settings, perform the following tasks: On the Secure Virtual Assist > Settings page, click the Restriction Settings tab at the Step 1 bottom of the page. -
Page 221: Secure Virtual Assist > Licensing
Click Email Log to send the log to the email address configured on the Log > Settings page. The Search options allow you to filter the log messages. Note that the search is case sensitive. In the drop-down menu, select the field you want to search in. Click Search to only display messages that match the search string. - Page 222 For more information, see the “System > Licenses” section on page To enable Virtual Assist on a portal, go to the Portals > Portals page and click the Configure Step 2 icon for the desired portal. To create a new portal, go to the Portals > Portals page and click the Add Portal button.
-
Page 223: Chapter 10 Secure Virtual Meeting
“Secure Virtual Meeting > Licensing” section on page 227 • For information about using Virtual Meeting, see the Dell SonicWALL SRA 6.0 User Guide. Secure Virtual Meeting > Status The Secure Virtual Meeting > Status page displays a summary of current active meetings and attendees, in addition to upcoming meetings. -
Page 224: Secure Virtual Meeting > Settings
Secure Virtual Meeting > Settings This section describes the Secure Virtual Meeting > Settings page and the configuration tasks available for Virtual Meeting. The Virtual Meeting settings are divided into the following tabs: “General Settings” on page 224 • “Notification Settings” on page 225 •... - Page 225 In the Allow joining before start time field, select the number of minutes that Participants will Step 5 be allowed to join a meeting before it starts. Select 0 if Participants will be allowed to join a meeting at any time, but you may want to consider that a license is in use from the time a Participant enters the lobby.
-
Page 226: Secure Virtual Meeting > Log
In the Invitation Message field type the text you want to include in the body of the Virtual Step 2 Meeting e-mail invitation. The body may include variables. Move the mouse pointer over the icon to the right of this field to display possible variables. Secure Virtual Meeting >... -
Page 227: Secure Virtual Meeting > Licensing
Secure Virtual Meeting > Licensing This section provides an overview of the Secure Virtual Meeting > Licensing page and a description of the configuration tasks available on this page. Licensing Overview Secure Virtual Meeting is part of the Secure Virtual Assist package. Multiple Virtual Meetings and Virtual Assist sessions can occur simultaneously. - Page 228 228 | SRA 6.0 Administrator’s Guide...
-
Page 229: Chapter 11 High Availability Configuration
High Availability Configuration This chapter provides information and configuration tasks specific to the High Availability page on the Dell SonicWALL SRA management interface. High Availability allows two identical SRA 4200 or two SRA 4600 appliances to provide a reliable, continuous connection to the public Internet. The two SRA appliances are deployed at the same time and connected together, and are called a High Availability Pair (HA Pair). -
Page 230: Configuring High Availability
Configuring High Availability High Availability (HA) requires one SRA 4200 or 4600 configured as a primary device and an identical SRA configured as a backup device. The HA connection between two SRA appliances is in an Active/Passive state. The High Availability > Settings page provides the settings for configuring High Availability. See the following sections for configuration information: “Physical Connectivity”... -
Page 231: Physical Connectivity
Connect the X3 interfaces of the two appliances together with a CAT 5E or better cable to Step 3 ensure a gigabit connection. Dell SonicWALL recommends that you backup and download the settings for both Note SRA devices at this stage. -
Page 232: Enabling Interface Monitoring
Repeat Step 1 through Step 7 on the backup unit. Step 9 When you click the Accept button, the backup device will become IDLE and you will no longer be able to access it with its IP address. The primary device is now Active with the same settings it had before the HA configuration. -
Page 233: Synchronizing Firmware
When configured, the LAN and WAN connection status is detected and displayed in the High Availability Status section at the top of the page. To configure network monitoring: On the High Availability > Settings page under Network Monitoring Address, type the LAN IP Step 1 address into the LAN Monitoring Address field. - Page 234 When settings are changed, clicking the Accept button synchronizes settings. Does the HA configuration for SRA 4200 or 4600 devices differ from the HA configuration of Dell SonicWALL firewall devices? Yes. HA configuration on a firewall is very different. Along with other items, firewall HA is also available in Active/Active state and can be assigned a virtual IP address.
-
Page 235: Chapter 12 Web Application Firewall Configuration
“Verifying and Troubleshooting Web Application Firewall” section on page 284 • Licensing Web Application Firewall Dell SonicWALL SRA Web Application Firewall must be licensed before you can begin using it. You can access the MySonicWALL Web site directly from the SRA management interface to obtain a license. - Page 236 To view license details and obtain a license on MySonicWALL for Web Application Firewall, perform the following steps: Log in to your Dell SonicWALL SRA appliance and navigate to Web Application Firewall > Step 1 Licensing. If Web Application Firewall is not licensed, click the System > Licenses link. The System >...
- Page 237 Type your MySonicWALL credentials into the fields, and then click Submit. The Product Survey Step 4 page is displayed. Fill out the survey and then click Submit. The System > Licenses page is displayed. Step 5 Web Application Firewall Configuration | 237...
- Page 238 Click Try to start a 30 day free trial, or click Activate to subscribe to the service for 1 year. The Step 6 screen below is displayed after selecting the free trial. Click Synchronize to view the license on the System > Licenses page. Step 7 Web Application Firewall is now licensed on your SRA appliance.
-
Page 239: Configuring Web Application Firewall
Application Firewall service and signature database, and displays the license status and expiration date. The Synchronize button allows you to download the latest signatures from the Dell SonicWALL online database. You can use the Download button to generate and download a PCI compliance report file. - Page 240 Application Firewall > Settings page. If this automatic update option is enabled, the Apply button disappears from the Web Application Firewall > Status screen as soon as the new signatures are automatically applied. To synchronize the signature database with the Dell SonicWALL online database server, click Step 3 Synchronize. The timestamp is updated.
- Page 241 Downloading a PCI Compliance Report To download a PCI DSS 6.5/6.6 compliance report, perform the following steps: Navigate to Web Application Firewall > Status. Step 1 Click the Download button. Step 2 In the File Download dialog box, click Open to create the PCI report as a temporary file and Step 3 view it with Adobe Acrobat, or click Save to save the report as a PDF file.
-
Page 242: Configuring Web Application Firewall Settings
Configuring Web Application Firewall Settings The Web Application Firewall > Settings page allows you to enable and disable Web Application Firewall on your SRA appliance globally and by attack priority. You can individually specify detection or prevention for three attack classes: high, medium, and low priority attacks. This page also provides configuration options for other Web Application Firewall settings. - Page 243 attacks. You can also clear the global Enable Web Application Firewall check box to temporarily disable Web Application Firewall without losing any of your custom configuration settings. You can enable automatic signature updates in the General Settings section, so that new signatures are automatically downloaded and applied when available.
- Page 244 To configure global exclusions, perform the following steps: On the Web Application Firewall > Settings page, expand the General Settings section. Step 1 Click the Global Exclusions button. Step 2 In the Edit Global Exclusions page, the action you set overrides the signature group settings Step 3 for the resources configured on these host pages.
- Page 245 Configuring Intrusion Prevention Error Page Settings To configure the error page to use when intrusions are detected, perform the following steps: Expand the Intrusion Prevention Error Page Settings section. Step 1 In the Intrusion Prevention Response drop-down list, select the type of error page to be Step 2 displayed when blocking an intrusion attempt.
- Page 246 To configure the settings for CSRF protection, perform the following steps: Expand the Cross-Site Request Forgery (CSRF/XSRF) Protection section. Step 1 In the Portals drop-down list, select the Application Offloading portal to which these CSRF Step 2 protection settings will apply. To make these CSRF settings the default for all portals, select Global.
- Page 247 Configuring Cookie Tampering Protection Settings Cookie tampering protection is configured independently for each Application Offloading portal. To configure the settings for cookie tampering protection, perform the following steps: Expand the Cookie Tampering Protection section. Step 1 In the Portals drop-down list, select the Application Offloading portal to which these cookie Step 2 tampering protection settings will apply.
- Page 248 To add one or more already-detected cookies to the Exclusion List, select the desired cookies Step 9 in the Detected Cookies list, holding the Ctrl key while clicking multiple cookies, and then click the < Add button to add them to the Exclusion List. To remove cookies from the Exclusion List, select the cookies to be removed and then click Step 10 the Remove button.
- Page 249 To configure information disclosure protection: Expand the Information Disclosure Protection section. The table contains a row for each Step 1 possible pattern or representation of a social security number or credit card number that Web Application Firewall can detect in the HTML response. Select the Enable Credit Card/SSN Protection check box.
-
Page 250: Configuring Web Application Firewall Signature Actions
Below the table, in the Block sensitive information within HTML pages text box, type Step 5 confidential text strings that should not be revealed on any Web site protected by Web Application Firewall. This text is case insensitive, can include any number of spaces between the words, but cannot include wildcard characters. - Page 251 You can also revert back to using the global settings for the signature group to which this signature belongs without losing the configuration details of existing exclusions. On the Web Application Firewall > Settings page, global settings must be set to either Prevent All or Detect All for the Signature Group to which the specific signature belongs.
- Page 252 The Performance Optimization option allows you to disable some relatively less severe signatures that significantly affect the performance of certain Web applications. These signatures are identified by the Dell SonicWALL signature team and the list is pushed out to SRA appliances. When you select the Enable Performance Optimization check box, these signatures are disabled for Web Application Firewall.
- Page 253 To configure one or more hosts with an exclusion from inspection for a signature, or to configure custom handling when Web Application Firewall detects a specific signature for one or more hosts, perform the following steps: On the Web Application Firewall > Signatures page, click the Configure button for the Step 1 signature that you wish to change.
-
Page 254: Determining The Host Entry For Exclusions
Reverting a Signature to Global Settings You can revert to using global signature group settings for a signature that was previously configured with an exclusion, without losing the configuration. This allows you to leave the host names in place in case you need to re-enable the exclusion. To revert to using global signature group settings for a signature, perform the following steps: On the Web Application Firewall >... - Page 255 Viewing the Host Entry in a Bookmark You can determine exactly what host name to enter in your exclusion by viewing the configuration details of the bookmark. To view the host entry in a bookmark, perform the following steps: Navigate to the Virtual Office page, and click Show Edit Controls above the list of bookmarks. Step 1 Click the Edit button for the bookmark.
-
Page 256: Configuring Custom Rules And Application Profiling
To view the virtual host domain name in an offloaded application, perform the following steps: Navigate to the Portals > Portals page and click the Configure button next to the offloaded Step 1 application. In the Edit Portal screen, click the Virtual Host tab. Step 2 View the host entry for your exclusion in the Virtual Host Domain Name field. - Page 257 Custom rules created on this page have all the same properties as the signatures that Dell SonicWALL pushes out to Web Application Firewall-enabled appliances. Figure 39 shows the Rules page. Figure 39 Web Application Firewall > Rules Page Web Application Firewall Configuration | 257...
- Page 258 To add a rule manually, you create a rule chain and then add rules within it. A rule chain is a collection of rules and includes additional attributes such as the severity rating, name, description, hit counters for rate limiting, and the action to take when the rule chain matches some traffic.
- Page 259 The Web Application Firewall > Monitoring page also shows the activity in the graphs. Figure 42 shows several detected and prevented threats during a 12 hour period. For more information about the Monitoring page, see “Using Web Application Firewall Monitoring” on page 274.
- Page 260 To configure application profiling and automatically generate rules: Navigate to the Web Application Firewall > Rules page. Step 1 Under Application Profiling, select one or more portals with the application(s) to be profiled Step 2 from the Portals drop-down list. Use Shift+click or CTRL+click to select multiple portals. For Content Types, select the type of content to be profiled: Step 3 All –...
- Page 261 During profiling, the SRA records inputs and stores them as URL profiles. The URL profiles are listed as a tree structure on the Web Application Firewall > Rules page in the Application Profiling section. After a period of time adequate to record inputs from normal application use, click End Step 5 Profiling to stop the profiling process.
- Page 262 Configuring Rule Chains You can add, edit, delete and clone rule chains. Example rule chains (with Rule Chain ID greater than 15000) are available in the management interface for administrators to use as reference. These cannot be edited or deleted. You can view the rules associated with the rule chain by clicking its Edit Rule Chain icon under Configure.
- Page 263 The Disabled option allows you to temporarily deactivate a rule chain without deleting its configuration. In the Description field, type a short description of what the rule chain will match or other Step 5 information. Select a category for this threat type from the Category drop-down list. This field is for Step 6 informational purposes, and does not change the way the rule chain is applied.
- Page 264 Correcting Misconfigured Rule Chains Misconfigured rule chains are not automatically detected at the time of configuration. When a misconfiguration occurs, the administrator must log in and fix or delete the bad rules. Note If any rules or rule chains are misconfigured, the appliance will not enforce any custom rules or rule chains.
- Page 265 Configuring Rules in a Rule Chain You can add, edit, delete and clone rules. A rule is a condition that is checked against inbound or outbound HTTP(S) traffic. Each rule chain can have one or more rules configured, and must have at least one rule before it can be used.
-
Page 266: About The Tips/Help Sidebar
The following sections provide detailed information about rules: “About the Tips/Help Sidebar” on page 266 • “About Variables” on page 266 • “About Operators” on page 268 • “About Advanced Operations” on page 269 • “Example Use Cases for Rules” on page 270 •... - Page 267 Table 17 on page 267 describes the available variables. Table 17 Variables for Use in Rules Variable Name Collection Description Host Refers to the host name or the IP address in the Host header of an HTTP request. This typically refers to the host part of the URL in the address bar of your browser.
-
Page 268: About Operators
Variable Name Collection Description Response Header Refers to the collection of all HTTP(S) response header names for Names the current request. To match against some aspect of the entire list of response header names, leave the selection field empty. To match against a particular header name, specify the name of the header in the selection field to the right of the colon. -
Page 269: About Advanced Operations
About Advanced Operations Advanced operations are applied to input identified by the selected variables before the input is matched against the specified value. For instance, the String Length operation is used to compute the length of the matched input and use it for comparison. Some of the advanced operations are used to thwart attempts by hackers to encode inputs to bypass Web Application Firewall rules. -
Page 270: Example Use Cases For Rules
Operation Description URL Decode Use the URL Decode operation to decode URL encoded strings in the input. URL Decode (Unicode) Use the URL Decode (Unicode) operation to handle %uXXXX encoding. URL encoding is used to safely transmit data over the Internet when URLs contain characters outside the ASCII character set. - Page 271 The action for the rule chain would be set to Prevent. Figure 44 shows the rule chain for this example. Figure 44 Example Rule Chain – Blocking Bad Logins Example – Positive Security Model: Blocking a Form Submission with Unwanted Parameters This rule chain blocks a form submission if the form has a request parameter other than formId or if the value of formId contains more than 4 digits.
- Page 272 The second rule checks if the value contained by the Parameter Value: formId variable – matches the regular expression ^\d{1,4}$ which matches anything that consists of 1 to 4 digits. The Not inversion check box is selected to change the rule to match anything that does not consist of 1 to 4 digits.
-
Page 273: Deleting A Rule
Example – Using String Length and URL Decode with Parameter Values:ID Comparing against a decoded input allows the administrator to use the String Length operation to check the length of the input against the matching variable. For example, if a Web application ID parameter should not be more than four characters, the administrator could select Parameter Values in the Variable field, enter ID in the selection field, click + to add the variable and selected item to the rule, enter 4 in the Value field, select >... -
Page 274: Using Web Application Firewall Monitoring
To delete a variable, select it in the large text box and click the Minus button Select a string or arithmetic operator from the Operators drop-down list. To perform the inverse Step 6 operation, select the Not check box. In the Value field, type in the value to be compared with the selected variable(s) in the scanned Step 7 HTTP(S) input. - Page 275 To use the control buttons: Select the Local tab. The active tab name is displayed in red or pink, while the inactive tab Step 1 name is blue. The control buttons act on the page that is currently displayed. To turn streaming on or off, click the indicator next to Streaming Updates.
- Page 276 Figure 45 shows a 24 hour period of Web server activity. Figure 45 Web Server Status For Last 24 Hours Figure 46 shows a 60 minute period of Web server activity. Figure 46 Web Server Status For Last 60 Minutes Monitoring Detected and Prevented Threats On the Local tab below the Web server status graphs, the Web Application Firewall >...
- Page 277 Figure 47 shows the number and severities of threats detected and prevented over the last 21 days. Figure 47 Threats Over Last 21 Days When displaying the top 10 threats graph with Perspective set to Signature, hovering your mouse pointer over the signature ID causes a tooltip to appear with details about the threat. Figure 48 Threat Details Tooltip Viewing Threats in List Format...
- Page 278 Detected & Prevented table. To display details about a threat, click on the threat. The details include the following: Step 2 URL – The URL to the Dell SonicWALL knowledge base for this threat • Category – The category of the threat •...
- Page 279 Changing Perspective For the Top 10 Threats graph, you can select the following display options from the Perspective drop-down list: Signature – The name of each threat shown is listed at the left side of the graph. • Severity – High, medium, and low severity threats are displayed using color coding. •...
- Page 280 Monitoring on the Global Tab The Global tab displays statistics and graphs for threats reported by all SRA appliances with Web Application Firewall enabled. Graphs are displayed for WAF Threats Detected & Prevented. Using the Control Buttons The control buttons are displayed at the top of the page. They control the statistics that are displayed on this page.
- Page 281 You can change the time frame displayed in both graphs by selecting one of the following options from the Monitoring Period drop-down list: Last 12 Hours • Last 14 Days • Last 21 Days • Last 6 Months • Figure 50 shows the number and severities of threats detected and prevented over the last 21 days.
-
Page 282: Using Web Application Firewall Logs
Using Web Application Firewall Logs The Web Application Firewall > Log page provides a number of functions, including a flexible search mechanism, and the ability to export the log to a file or email it. The page also provides a way to clear the log. Clicking on a log entry displays more information about the event. See the following sections: “Searching the Log”... -
Page 283: Viewing Log Entry Details
Controlling the Log Pagination To adjust the number of entries on the log page and display a different range of entries, perform the following steps: On the Web Application Firewall > Log page, enter the number of log entries that you want on Step 1 each page into the Items per Page field. -
Page 284: Verifying And Troubleshooting Web Application Firewall
To export or email the log, perform the following steps: To export the log contents, click the Export button in the top right corner of the Step 1 Web Application Firewall > Log page. The File Download dialog box is displayed. In the File Download dialog box, do one of the following: Step 2 To open the file, click Open. - Page 285 <num> rules Signature database download was successful. The new database contains <num> number of rules. A rule is an internal property which will be used by Dell SonicWALL to determine how many signatures were downloaded. Note You can select the Apply Signature Updates Automatically option on the Web Application Firewall >...
- Page 286 after a successful download. After the database has been successfully applied, all of the signatures within the new database can be found on the Web Application Firewall > Signatures page. WAF signature database has been updated • The signature database update was applied after the administrator clicked on the Apply button on the Web Application Firewall >...
-
Page 287: Chapter 13 Users Configuration
Users Configuration This chapter provides information and configuration tasks specific to the Users pages on the Dell SonicWALL SRA Web-based management interface, including access policies and bookmarks for the users and groups. Policies provide you access to the different levels of objects defined on your SRA appliance. -
Page 288: Access Policies Concepts
Displays an icon that enables the administrator to log the user out of the appliance. Access Policies Concepts The Dell SonicWALL SRA Web-based management interface provides granular control of access to the SRA appliance. Access policies provide different levels of access to the various network resources that are accessible using the SRA appliance. -
Page 289: Users > Local Users
Policy 3: A Permit rule has been configured to allow FTP access to the predefined network • object, FTP Servers. The FTP Servers network object includes the following addresses: 10.0.0.5 - 10.0.0.20. and ftp.company.com, which resolves to 10.0.1.3. Assuming that no conflicting user or group policies have been configured, if a user attempted to access: An FTP server at 10.0.0.1, the user would be blocked by Policy 1 •... -
Page 290: Removing A User
Local Users The Local Users section allows the administrator to add and configure users by specifying a user name, selecting a domain and group, creating and confirming password, and selecting user type (user, administrator, or read-only administrator). Note Users configured to use RADIUS, LDAP, NT Domain or Active Directory authentication do not require passwords because the external authentication server will validate user names and passwords. -
Page 291: Editing User Settings
When logging into the portal, the user name is not case-sensitive, but the password Note and domain are case-sensitive. From the User Type drop-down list, select a user type option. The available user types are Step 7 User, Administrator, or Read-only Administrator. If the selected group is in a domain that uses external authentication, such as Active Directory, RADIUS, NT Domain or LDAP, then the Add User window will close and the new user will be added to the Local Users list. - Page 292 Description Login Policies Enables you to create user login policies, including policies for specific source IP addresses and policies for specific client browsers. You can disable the user’s login, require One Time Passwords, and specify cli- ent certificate enforcement. Enables you to configure End Point Control profiles used by local groups.
- Page 293 Single sign-on (SSO) in the SRA appliance supports the following applications: RDP - Active X • RDP - Java • • HTTP • HTTPS • CIFS • Note SSO cannot be used in tandem with two-factor authentication methods. To modify general user settings, perform the following tasks: In the left-hand column, navigate to the Users >...
- Page 294 Disabled: Select this option to disable single sign-on for bookmarks. – SSO modification controls provide enhanced security and can prevent or allow users Note to utilize different login credentials. With SSO enabled, the user’s login name and password are supplied to the backend server for many of the services. For Fileshares, the domain name that the user belongs to on the device is passed to the server.
- Page 295 For SRA appliances supporting connections from Apple iPhones, iPads, or other iOS devices using Dell SonicWALL Mobile Connect, the DNS Domain is a required field. This DNS domain is set on the VPN interface of the iPhone/iPad after the device makes a connection to the appliance.
- Page 296 Use group setting - Take the action specified by the group setting. See “Editing Group • Settings” section on page 316. Enabled - Enable this action for the user. Overrides the group setting. • Disabled - Disable this action for all members of the group. Overrides the global setting. •...
- Page 297 To add a user access policy, perform the following steps: On the Policies tab, click Add Policy. The Add Policy window is displayed. Step 1 In the Apply Policy To drop-down list, select whether the policy will be applied to an individual Step 2 host, a range of addresses, all addresses, a network object, a server path, or a URL object.
- Page 298 IPv6 Address - If your policy applies to a specific host, enter the IPv6 address of the local • host machine in the IPv6 Address field. Optionally enter a port range (for example, 4100- 4200) or a single port number into the Port Range/Port Number field. See “Adding a Policy for an IPv6 Address”...
- Page 299 Adding a Policy for an IP Address Range In the Apply Policy to field, click the IP Address Range option. Step 1 Define a name for the policy in the Policy Name field. Step 2 Type a starting IP address in the IP Network Address field. Step 3 Type a subnet mask value in the Subnet Mask field in the form 255.255.255.0.
- Page 300 Type the server path in the Server Path field. Step 8 From the Status drop-down list, select Allow or Deny. Step 9 For information about editing policies for file shares, for example, to restrict server Note path access, refer to “Adding a Policy for a File Share”...
- Page 301 Define a name for the policy in the Policy Name field. Step 6 In the Service drop-down list, choose either Web (HTTP) or Secure Web (HTTPS). Step 7 In the URL field, add the URL string to be enforced in this policy. Step 8 In addition to standard URL elements, the administrator may enter port, path and Note...
- Page 302 Navigate to Users > Local Users. Step 1 Click the configure icon next to the user you want to configure. Step 2 Select the Policies tab. Step 3 Click Add Policy... Step 4 In the Apply Policy To field, click the IPv6 Address option. Step 5 Define a name for the policy in the Policy Name field.
- Page 303 To define user bookmarks, perform the following steps: In the Edit User Settings window, click the Bookmarks tab. Step 1 Click Add Bookmark. The Add Bookmark window displays. Step 2 When user bookmarks are defined, the user will see the defined bookmarks from the SRA Virtual Office home page.
- Page 304 Some services can run on non-standard ports, and some expect a path when connecting. Depending on the choice in the Service field, format the Name or IP Address field like one of the examples shown in the following table. Table 22 Bookmark Name or IP Address Formats by Service Type Service Type Format...
- Page 305 Service Type Format Example for Name or IP Address Field File Shares Host\Folder\ server-3\sharedfolder\ Host\File server-3\inventory.xls FQDN\Folder server-3.company.net\sharedfolder\ FQDN\File server-3company.net\inventory.xls IP\Folder\ 10.20.30.4\sharedfolder\ IP\File 10.20.30.4\status.doc Note: Use backslashes even on Linux or Mac com- puters; these use the Windows API for file sharing. Citrix IP Address 172.55.44.3...
- Page 306 For the specific service you select from the Service drop-down list, additional fields may appear. Use the following information for the chosen service to complete the building of the bookmark: Terminal Services (RDP - ActiveX) or Terminal Services (RDP - Java) Note If you create a bookmark using the Terminal Services (RDP - ActiveX) service type, then when you click on that bookmark while using a browser other than Internet Explorer, the service is automatically switched to Terminal Services (RDP - Java).
- Page 307 To see local printers show up on your remote machine (Start > Settings > Control Panel > Printers and Faxes), select Redirect Ports as well as Redirect Printers. Select the check boxes for any of the following additional features for use in this bookmark session: Display connection bar, Auto reconnection, Desktop background, Bitmap caching, Menu/window animation, Visual styles, or Show window contents while dragging/resizing.
- Page 308 Select Restricted Colors (256 Colors) for more efficiency with slightly less depth of – color. Select Reverse Mouse Buttons 2 and 3, to switch the right-click and left-click buttons. – Select View Only if the user will not be making any changes on the remote system. –...
- Page 309 Secure Shell version 2 (SSHv2) Optionally select the Automatically accept host key check box. – If using an SSHv2 server without authentication, such as a Dell SonicWALL firewall, – you can select the Bypass username check box. Click Accept to update the configuration. Once the configuration has been updated, the new Step 6 user bookmark will be displayed in the Edit Local User window.
- Page 310 Creating a Citrix Bookmark for a Local User Citrix support requires Internet connectivity in order to download the ActiveX or Java client from the Citrix Web site. Citrix is accessed from Internet Explorer using ActiveX by default, or from other browsers using Java. Java can be used with IE by selecting an option in the Bookmark configuration.
- Page 311 To configure custom SSO credentials, and to configure Single Sign-On for Forms-based Authentication (FBA), perform the following steps: Create or edit a HTTP(S), RDP, File Shares (CIFS), or FTP bookmark as described in “Adding Step 1 or Editing User Bookmarks” section on page 302.
- Page 312 Configuring Login Policies The Login Policies tab provides configuration options for policies that allow or deny users with specific IP addresses from having login privileges to the SRA appliance. To allow or deny specific users from logging into the appliance, perform the following steps: Navigate to the Users >...
- Page 313 To require the use of one-time passwords for the specified user to log into the appliance, select Step 6 the Require one-time passwords check box. Enter the user’s email address into the E-mail address field to override any address provided Step 7 by the domain.
-
Page 314: Users > Local Groups
Configuring End Point Control for Users To configure the End Point Control profiles used by a local user, perform the following steps: Navigate to the Users > Local Users page. Step 1 Click the configure icon next to the user to be configured for EPC. The Edit Local User window Step 2 is displayed. -
Page 315: Deleting A Group
Primary groups - Used to assign simple policies, such as timeouts and the ability to add/edit bookmarks. Advanced policies, such as URL or network object policies, may come from primary or additional groups. Additional Groups - Multiple additional groups may be assigned, but in the case of conflicting policies, the primary group will take precedence over any additional groups. -
Page 316: Editing Group Settings
Editing Group Settings To edit the settings for a group, click the configure icon in the row for the group that you wish to edit in the Local Groups table on the Users > Local Groups page. The Edit Group Settings window contains six tabs: General, Portal, NxSettings, NxRoutes, Policies, and Bookmarks. - Page 317 Under Single Sign-On Settings, select one of the following options from the Use SSL-VPN Step 4 account credentials to log into bookmarks drop-down menu: Use Global Policy: Select this option to use the global policy settings to control single sign- •...
- Page 318 Disabled – Disable this portal feature for this group. • Because Mobile Connect acts as a NetExtender client when connecting to the appliance, the setting for NetExtender also controls access by Mobile Connect users. To allow users in this group to add new bookmarks, select Allow from the Allow user to add Step 5 bookmarks drop-down menu.
- Page 319 For SRA appliances supporting connections from Apple iPhones, iPads, or other iOS devices using Dell SonicWALL Mobile Connect, the DNS Domain is a required field. This DNS domain is set on the VPN interface of the iPhone/iPad after the device makes a connection to the appliance.
- Page 320 Prohibit saving of user name & password - Do not allow caching of the user name and • password for members of the group. Group members will be required to enter both user name and password when starting NetExtender. Overrides the global setting. Click Accept.
- Page 321 Enabling Group NetExtender Client Routes To enable global NetExtender client routes for groups that are already created, perform the following steps: Navigate to Users > Local Groups. Step 1 Click the configure icon next to the group you want to configure. Step 2 In the Edit Local Group page, select the Nx Routes tab.
- Page 322 Navigate to Users > Local Groups. Step 1 Click the configure icon next to the group you want to configure. Step 2 In the Edit Local Group page, select the Policies tab. Step 3 On the Policies tab, click Add Policy. The Add Policy screen is displayed. Step 4 Define a name for the policy in the Policy Name field.
- Page 323 IPv6 Address - If your policy applies to a specific host, enter the IPv6 address of the local • host machine in the IPv6 Address field. Optionally enter a port range (for example, 4100- 4200) or a single port number into the Port Range/Port Number field. IPv6 Address Range - If your policy applies to a range of addresses, enter the beginning •...
- Page 324 Select Allow or Deny from the Status drop-down list. Step 9 Click Accept. Step 10 Configuring Group Bookmarks SRA appliance bookmarks provide a convenient way for SRA users to access computers on the local area network that they will connect to frequently. Group bookmarks will apply to all members of a specific group.
- Page 325 Terminal Services (RDP - ActiveX) or Terminal Services (RDP - Java) If you create a bookmark using the Terminal Services (RDP - ActiveX) service Note type, then when you click on that bookmark while using a browser other than Internet Explorer, the service is automatically switched to Terminal Services (RDP - Java).
- Page 326 background, Bitmap caching, Menu/window animation, Visual styles, or Show window contents while dragging/resizing. In the Remote Audio drop-down list, select Play on this computer, Play on remote computer, or Do not play. If the client application will be RDP 6 (Java), you can select any of the following options as well: Dual monitors, Font smoothing, Desktop composition, or Remote Application.
- Page 327 Citrix Portal (Citrix) Optionally select HTTPS Mode to use HTTPS to securely access the Citrix Portal. – Optionally, select Always use Java in Internet Explorer to use Java to access the – Citrix Portal when using Internet Explorer. Without this setting, a Citrix ActiveX client or plugin must be used with IE.
- Page 328 Secure Shell version 2 (SSHv2) Optionally select the Automatically accept host key check box. – If using an SSHv2 server without authentication, such as a Dell SonicWALL firewall, – you can select the Bypass username check box. Click Accept to update the configuration. Once the configuration has been updated, the new Step 7 group bookmark will display in the Edit Local Group page.
-
Page 329: Group Configuration For Ldap Authentication Domains
Note The Microsoft Active Directory database uses an LDAP organization schema. The Active Directory database may be queried using Kerberos authentication (the standard authentication type; this is labeled “Active Directory” domain authentication in the Dell SonicWALL SRA management interface), NTLM authentication (labeled NT Domain authentication in the SRA management interface), or using LDAP database queries. - Page 330 To add an LDAP attribute for a group so that a user will have a bookmark assigned when entering the Virtual Office environment, perform the following steps: Navigate to the Portals > Domains page and click Add Domain to display the Add New Step 1 Domain window.
- Page 331 On the General tab, you may optionally fill out one or multiple LDAP Attribute fields with the Step 13 appropriate names where name=value is the convention for adding a series of LDAP attributes. To see a full list of LDAP attributes, refer to the Dell SonicWALL LDAP Attribute document. Users Configuration | 331...
- Page 332 As a common example, fill out an attribute field with the memberOf= attribute which can bundle the following common variable types: CN= - the common name. DN= - the distinguished name. DC= - the domain component. You need to provide quote delimiters around the variables you bundle in the memberOf line. You separate the variables by commas.
-
Page 333: Group Configuration For Active Directory, Nt And Radius Domains
Example of LDAP Users and Attributes If a user is manually added to a LDAP group, then the user setting will take precedence over LDAP attributes. For example, an LDAP attribute “ is defined for group Group1 and an objectClass= Person”... - Page 334 When a user logs in, the SRA appliance will validate with the appropriate Active Directory, RADIUS, or NT server that the user is authorized to login. If the user is authorized, the SRA appliance will check to see if a user exists in the SRA appliance database for users and groups. If the user is defined, then the policies and bookmarks defined for the user will apply.
- Page 335 The RADIUS Groups tab allows the administrator to enable user access to the SRA appliance based on existing RADIUS group memberships. By adding one or more RADIUS groups to an SRA group, only users associated with specified RADIUS group(s) are allowed to login. To add a RADIUS group, perform the following steps: In the Users >...
-
Page 336: Creating A Citrix Bookmark For A Local Group
Creating a Citrix Bookmark for a Local Group To configure a Citrix bookmark for a user, perform the following tasks: Navigate to Users > Local Groups. Step 1 Click the configure icon next to the group you want to configure. Step 2 In the Edit Group Settings window, select the Bookmarks tab. -
Page 337: Edit Global Settings
Edit Global Settings To edit global settings, perform the following steps: Navigate to either the Users > Local Users or Users > Local Groups window. Step 1 Click the configure icon next to Global Policies. The Edit Global Settings window is Step 2 displayed. - Page 338 To set a client IPv6 address range, enter a beginning IPv6 address in the Client IPv6 Address Step 10 Range Begin field and an ending IPv6 address in the Client IPv6 Address Range End field. In the Exit Client After Disconnect drop-down list, select Enabled or Disabled. Step 11 In the Uninstall Client After Exit drop-down list, select Enabled or Disabled.
-
Page 339: Edit Global Policies
Select one of the following services from the Service drop-down list: Terminal Services (RDP Step 32 - ActiveX), Terminal Services (RDP - Java), Virtual Network Computing (VNC), Citrix Portal (Citrix), Web (HTTP), Secure Web (HTTPS), File Shares (CIFS), File Transfer Protocol (FTP), Telnet, Secure Shell Version 1 (SSHv1), or Secure Shell Version 2(SSHv2). - Page 340 If your policy applies to a range of IPv4 addresses, select the IP Address Range option • from the Apply Policy To drop-down list and enter the IPv4 network address in the IP Network Address field and the subnet mask in the Subnet Mask field. If your policy applies to a specific IPv6 host, select the IPv6 Address option from the Apply •...
-
Page 341: Edit Global Bookmarks
Edit Global Bookmarks To edit global bookmarks, perform the following steps: Navigate to either the Users > Local Users or Users > Local Groups page. Step 1 Click the configure icon next to Global Policies. The Edit Global Policies window is displayed. Step 2 Click Add Bookmark. - Page 342 342 | SRA 6.0 Administrator’s Guide...
-
Page 343: Chapter 14 Log Configuration
Chapter 14 Log Configuration This chapter provides information and configuration tasks specific to the Log pages on the SRA Web-based management interface. This chapter contains the following sections: “Log > View” section on page 343 • “Log > Settings” section on page 347 •... -
Page 344: Log > View Overview
Log > View Overview The Log > View page allows the administrator to view the SRA event log. The event log can also be automatically sent to an email address for convenience and archiving. Figure 55 Log > View The Log > View page displays log messages in a sortable, searchable table. The SRA appliance can store 250 Kilobytes of log data or approximately 1,000 log messages. -
Page 345: Viewing Logs
Column Description Destination The Destination IP address shows the name or IP address of the server or service associated with the event. For example, if a user accessed an intranet Web site through the SRA portal, the corresponding log entry would display the IP address or Fully Qualified Domain Name (FQDN) of the Web site accessed. -
Page 346: Emailing Logs
The SRA appliance can store 250 Kilobytes of log data or approximately 1,000 log messages. Logs are displayed in a sortable, searchable table. The appliance can alert you of events, such as a successful login or an exported configuration. Alerts can be immediately emailed, either to an email address or to an email pager. -
Page 347: Log > Settings
Log > Settings This section provides an overview of the Log > Settings page and a description of the configuration tasks available on this page. “Log > Settings Overview” section on page 347 • “Configuring Log Settings” section on page 348 •... -
Page 348: Configuring Log Settings
Event Logging and Alerts The Event Logging and Alerts section allows the administrator to configure email alerts by specifying the email address for logs to be sent to, the mail server, mail from address, and the frequency to send alert emails. You can schedule a day and hour at which to email the event log, or schedule a weekly email, or send the email when the log is full. -
Page 349: Configuring The Mail Server
Configuring the Mail Server In order to receive notification email and to enable to the One Time Password feature, it is imperative that you configure the mail server from the Log > Settings page. If you fail to configure your mail server prior to using the One Time Password feature, you will receive an error message: For information about configuring the One Time Password feature, refer to “One Time... -
Page 350: Log > Viewpoint
The Log > ViewPoint page allows the administrator to add the SRA appliance to a ViewPoint server for installations that have Dell SonicWALL ViewPoint available, or are managed by the Dell SonicWALL Global Management System (GMS) appliance management software. This feature requires a ViewPoint license key. -
Page 351: Log > Analyzer
The Log > Analyzer page allows the administrator to add the SRA appliance to an Analyzer server for installations that have Dell SonicWALL Analyzer available, or are managed by the Dell SonicWALL Global Management System (GMS) version 7.0 or higher appliance management software. -
Page 352: Adding An Analyzer Server
Adding an Analyzer Server This feature requires an Analyzer license key. To add the SRA appliance to an Analyzer server and enable Analyzer reporting on your SRA appliance, complete the following steps: Navigate to the Log > Analyzer page in the SRA Web management interface. Step 1 If you are using Analyzer for the first time on this appliance or if you do not have a Note... -
Page 353: Chapter 15 Virtual Office Configuration
Virtual Office Configuration This chapter provides information and configuration tasks specific to the Virtual Office page on the Dell SonicWALL SRA Web-based management interface. Virtual Office This section provides an overview of the Virtual Office page and a description of the configuration tasks available on this page. -
Page 354: Using The Virtual Office
The Virtual Office option launches the Virtual Office user portal in a separate Web browser window. The Virtual Office is a portal that users can access in order to create and access bookmarks, file shares, NetExtender sessions, Secure Virtual Assist, and Secure Virtual Meeting. - Page 355 • For detailed configuration information about the Virtual Office user portal and these Note tasks, refer to the Dell SonicWALL SRA User’s Guide, available on the Secure Remote Access pages of the Dell SonicWALL support Web site at http:// www.sonicwall.com/us/Support.html.
- Page 356 356 | SRA 6.0 Administrator’s Guide...
-
Page 357: Online Help Button
Appendix A Online Help This appendix describes how to use the Online Help on the Dell SonicWALL SRA Web-based management interface. This appendix also contains information about context-sensitive help. Online Help Button The Online Help button is located in upper right corner of the SRA management interface. - Page 358 358 | SRA 6.0 Administrator’s Guide...
-
Page 359: Cisco Pix Configuration For Sra Appliance Deployment
Dell SonicWALL recommends updating the PIX’s OS to the most recent version if your PIX can support it. This document was validated on a Cisco PIX 515e running PIX OS 6.3.5 and is the recommended version for interoperation with a SRA appliance. -
Page 360: Method One - Sra Appliance On Lan Interface
the recommended PIX OS version. Because of this, the HTTP/S management interface must be deactivated. To deactivate the HTTP/S management interface, issue the command ‘clear http’. Note If you have a separate static WAN IP address to assign to the SRA appliance, you do not have to deactivate the HTTP/S management interface on the PIX. - Page 361 Issue the command ‘static (inside,outside) tcp x.x.x.x https 192.168.100.2 https netmask Step 14 255.255.255.255 0 0’ (replace x.x.x.x with the WAN IP address of your PIX) Issue the command ‘access-group sslvpn in interface outside’ Step 15 Exit config mode and issue the command ‘wr mem’ to save and activate the changes. Step 16 From an external system, attempt to connect to the SRA appliance using both HTTP and Step 17...
-
Page 362: Method Two - Sra Appliance On Dmz Interface
timeout sip-disconnect 0:02:00 sip-invite 0:03:00 timeout uauth 0:05:00 absolute aaa-server TACACS+ protocol tacacs+ aaa-server TACACS+ max-failed-attempts 3 aaa-server TACACS+ deadtime 10 aaa-server RADIUS protocol radius aaa-server RADIUS max-failed-attempts 3 aaa-server RADIUS deadtime 10 aaa-server LOCAL protocol local ntp server 192.43.244.18 source outside prefer no snmp-server location no snmp-server contact snmp-server community SF*&^SDG... - Page 363 Connect to the PIX’s management CLI via console port, telnet, or SSH and enter configure Step 8 mode. Issue the command ‘clear http’ to shut off the PIX’s HTTP/S management interface. Step 9 Issue the command ‘interface ethernet2 auto’ (or whatever interface you will be using) Step 10 Issue the command ‘nameif ethernet2 dmz security4’...
- Page 364 fixup protocol tftp 69 names access-list sslvpn permit tcp any host 64.41.140.167 eq www access-list sslvpn permit tcp any host 64.41.140.167 eq https access-list dmz-to-inside permit ip 192.168.200.0 255.255.255.0 192.168.100.0 255.255.255.0 access-list dmz-to-inside permit ip host 192.168.200.1 any pager lines 24 logging on logging timestamp logging buffered warnings...
-
Page 365: Linksys Wrt54Gs
Port Range Start The starting port number used by the application Port Range End The ending port number used by the application Protocol The Dell SonicWALL SRA application uses TCP IP Address 192.168.1.10 The IP address assigned to the SRA appliance. Enable... - Page 366 If the WatchGuard’s management interface is already configured to accept HTTPS on port 443 Step 2 you will need to change the port in order to be able to manage both the Dell SonicWALL SRA and WatchGuard appliances. Navigate to Administration > System Security.
-
Page 367: Netgear Fvs318
In the left-hand navigation menu, Navigate to Firewall > Incoming. Step 6 For the HTTPS Service, set Filter to Allow and enter the WAN IP of the SRA appliance Step 7 (192.168.100.2) in the Service Host field. Click the Submit button at the bottom of the page. Step 8 Your Watchguard Firebox X Edge is now ready for operations with the SRA appliance. - Page 368 To create a service definition, enter the following information: Step 6 Name HTTPS Type TCP/UDP Start Port Finish Port Navigate to Ports in the left-hand navigation. Step 7 Click the Add button. Step 8 Select HTTPS from the Service Name drop-down list. Step 9 Select ALLOW always in the Action drop-down list.
-
Page 369: Netgear Wireless Router Mr814 Ssl Configuration
Netgear Wireless Router MR814 SSL configuration This guide assumes that your NetGear Wireless Router is configured with an IP of 192.168.100.1 and your SRA appliance is configured with an IP of 192.168.100.2. Navigate to Advanced > Port Management in the left-hand index of your Netgear Step 1 management interface. -
Page 370: Check Point Air 55
Check Point AIR 55 Setting up an SRA Appliance with Check Point AIR 55 The first thing necessary to do is define a host-based network object. This is done under the file menu “Manage” and “Network Objects”. Figure 57 Check Point Host Node Object Dialog Box Note The object is defined as existing on the internal network. -
Page 371: Static Route
Next, select the NAT tab for the object you have created. Figure 58 Check Point NAT Properties Dialog Box Here you will enter the external IP address (if it is not the existing external IP address of the firewall). The translation method to be selected is static. Clicking OK will automatically create the necessary NAT rule shown below. - Page 372 Finally, a traffic or policy rule is required for all traffic to flow from the Internet to the SRA appliance. Figure 60 Check Point Policy Rule Window Again, should the SRA appliance be located on a secure segment of the Check Point firewall, a second rule allowing the relevant traffic to flow from the SRA appliance to the internal network will be necessary.
-
Page 373: Importing Ca Certificates On Windows
Appendix C Use Cases This appendix provides the following use cases: “Importing CA Certificates on Windows” on page 373 • “Creating Unique Access Policies for AD Groups” on page 377 • Importing CA Certificates on Windows Two certificates are imported in this use case, a goDaddy certificate and a server certificate. See the following sections: “Importing a goDaddy Certificate on Windows”... - Page 374 Double-click the certificate file and select the Details tab. Step 2 Click Copy to File. The Certificate Export Wizard launches. Step 3 In the Certificate Export Wizard, click Next. Step 4 Select Base-64 encoded X.509 (.CER) and then click Next. Step 5 In the File to Export screen, type the file name in as goDaddy.cer and then click Next.
- Page 375 In the Completing the Certificate Export Wizard screen, verify the path and format and then click Step 7 Finish. Click OK in the confirmation dialog box. Step 8 The certificate is exported in base-64 encoded format. You can view it in a text editor. In the SRA management interface, navigate to System >...
-
Page 376: Importing A Server Certificate On Windows
In the Additional CA Certificates section, click Import CA Certificate. The Import Certificate Step 10 window appears. In the Import Certificate window, click Browse and navigate to the goDaddy.cer file on your Step 11 Windows system and double-click it. Click Upload. The certificate will be listed in the Additional CA Certificates table. Step 12 Navigate to System >... -
Page 377: Creating Unique Access Policies For Ad Groups
SRA group with both Administrators and Engineering because it matches more of his own AD groups. The goal of this use case is to show that Dell SonicWALL SRA firmware supports group-based access policies by configuring the following: Allow Acme Group in Active Directory to access the 10.200.1.102 server using SSH •... -
Page 378: Creating The Active Directory Domain
“Adding the SSHv2 PERMIT Policy” on page 382 • “Adding the OWA PERMIT Policies” on page 383 • “Verifying the Access Policy Configuration” on page 384 • Creating the Active Directory Domain This section describes how to create the SRA Local Domain, SNWL_AD. SNWL_AD is associated with the Active Directory domain of the OWA server. -
Page 379: Adding A Global Deny All Policy
Adding a Global Deny All Policy This procedure creates a policy that denies access to the OWA resources to all groups, except groups configured with an explicit Permit policy. The SRA default policy is Allow All. In order to have more granular control, we add a Deny All policy here. -
Page 380: Creating Local Groups
Creating Local Groups This procedure creates Local Groups that belong to the SNWL_AD domain on the SRA appliance. We create one local group for each Active Directory group. Adding the Local Groups Navigate to the Users > Local Groups page and click Add Group. The Add Local Group Step 1 window appears. - Page 381 In this procedure we will edit each new local group and associate it with the corresponding Active Directory Group. Click the Configure button in the Acme_Group row. The Edit Group Settings window Step 1 appears. In the Edit Group Settings window, click the AD Groups tab. Step 2 On the AD Groups tab, click the Add Group button.
-
Page 382: Adding The Sshv2 Permit Policy
In the Edit Active Directory Group window, select Mega Group from the Active Directory Step 9 Group drop-down list and then click Edit. Mega Group is listed in the Active Directory Groups table on the AD Groups tab. In the Edit Group Settings window, click OK. Step 10 On the Users >... -
Page 383: Adding The Owa Permit Policies
Adding the OWA PERMIT Policies In this section, we will add two OWA PERMIT policies for both Mega_Group and IT_Group to access the OWA service using Secure Web (HTTPS). This procedure creates a policy for the SRA Local Group, Mega_Group, and results in OWA access for members of the Active Directory group, Mega Group. -
Page 384: Verifying The Access Policy Configuration
In the Add Policy window, select URL Object in the Apply Policy To drop-down list. Step 9 In the Policy Name field, enter the descriptive name, OWA exchweb. Step 10 In the Service drop-down list, select Secure Web (HTTPS). Step 11 In the URL field, enter the URL of the target application, 10.200.1.10/exchweb. - Page 385 Test Result: Try Acmeuser Access Acmeuser logs into the SNWL_AD domain. The Users > Status page shows that acmeuser is a member of the local group, Acme_Group. Acmeuser can access SSH, as expected. Use Cases | 385...
- Page 386 Acmeuser tries to access to other resources like OWA 10.200.1.10, but is denied, as expected. Test Result: Try Megauser Access Megauser logs into the SNWL_AD domain. The Users > Status page shows that megauser is a member of the local group, Mega_Group. 386 | SRA 6.0 Administrator’s Guide...
- Page 387 Megauser can access OWA resources, as expected. Megauser tries to access SSH, but is denied, as expected. Test Result: Try Ituser Access Ituser logs into the SNWL_AD domain. The Users > Status page shows that ituser is a member of the local group, IT_Group. Use Cases | 387...
- Page 388 Ituser can access SSH to 10.200.1.102, as expected. Ituser can access OWA resources, as expected. 388 | SRA 6.0 Administrator’s Guide...
- Page 389 Appendix D NetExtender Troubleshooting This appendix contains a table with troubleshooting information for the Dell SonicWALL SRA NetExtender utility. Table 27 NetExtender Cannot Be Installed Problem Solution NetExtender cannot be Check your OS Version, NetExtender only supports installed. Win2000 or above, Mac OS X 10.5 or above with Apple Java 1.6.0_10 or above, and Linux OpenSUSE in addition...
- Page 390 NetExtender Connection Entry Cannot Be Created Problem Solution NetExtender connection Navigate to Device Manager and check if the Dell entry cannot be created. SonicWALL SRA NetExtender Adapter has been installed successfully. If not, delete the adapter from the device list, reboot the machine and install NetExtender again.
- Page 391 Table 29 Problem Solution NetExtender cannot connect. Navigate to Device Manager and check if the Dell SonicWALL SRA NetExtender Adapter has been installed successfully. If not, delete the adapter from the device list, reboot the machine and install NetExtender again.
- Page 392 392 | SRA 6.0 Administrator’s Guide...
- Page 393 Appendix E FAQs This appendix contains FAQs about the SRA appliance. This appendix contains the following sections: “Hardware FAQ” on page 396 • What are the hardware specs for the SRA 1600 and SRA 4600? – What are the hardware specs for the SRA 1200 and SRA 4200? –...
- Page 394 Once I install the NetExtender is it uninstalled when I leave my session? – How do I get new versions of NetExtender? – How is NetExtender different from a traditional IPSec VPN client, such as Dell – SonicWALL’s Global VPN Client (GVC)? Is NetExtender encrypted? –...
- Page 395 What is the most common deployment of the SRA appliances? – Why is it recommended to install the SRA appliance in one-port mode with a Dell – SonicWALL security appliance? Is there an installation scenario where you would use more than one interface or install –...
-
Page 396: Hardware Faq
Can I allow only certain Active Directory users access to log into the SRA appliance? – Does the HTTP(S) proxy support the full version of Outlook Web Access (OWA – Premium)? Why are my RDP sessions dropping frequently? – Can I create my own services for bookmarks rather than the services provided in the –... - Page 397 Power Supply SRA 1600: Internal, 100-240Vac, 50-60Mhz SRA 4600: Internal, 100-240Vac, 50-60Mhz Max Power Consumption SRA 1600: 47 W SRA 4600: 50 W Total Heat Dissipation SRA 1600: 158 BTU SRA 4600: 171 BTU Dimensions SRA 1600: 17.00 x 10.13 x 1.75 in (43.18 x 25.73 x 4.45 cm) SRA 4600: 17.00 x 10.13 x 1.75 in (43.18 x 25.73 x 4.45 cm) Weight SRA 1600: 9.5 lbs (4.3 kg)
- Page 398 Flash Memory SRA 1200: 1 GB SRA 4200: 1 GB Power Supply SRA 1200: Internal SRA 4200: Internal Max Power Consumption SRA 1200: 53 W SRA 4200: 75 W Total Heat Dissipation SRA 1200: 181 BTU SRA 4200: 256 BTU Dimensions SRA 1200: 17.00 x 10.125 x 1.75 in (43.18 x 25.70 x 4.45 cm) SRA 4200: 17.00 x 10.125 x 1.75 in (43.18 x 25.70 x 4.45 cm)
-
Page 399: Digital Certificates And Certificate Authorities Faq
What operating system do the SRA appliances run? Answer: The appliance runs Dell SonicWALL’s own hardened Linux distribution. Can I put multiple SRA appliances behind a load-balancer? Answer: Yes, this should work fine as long as the load-balancer or content-switch is capable of tracking sessions based upon SSL Session ID persistence, or cookie-based persistence. - Page 400 Web browsers are programmed to issue a warning if the above three conditions are not met precisely. This security mechanism is intended to ensure end-to-end security, but often confuses people into thinking something is broken. If you are using the default self-signed certificate, this error will appear every time a Web browser connects to the SRA appliance.
- Page 401 I get this message below when I log into my SRA appliance using Firefox 3.0 – what do I Answer: Much like the errors shown above for Internet Explorer, Firefox 3.0 has a unique error message when any certificate problem is detected. The conditions for this error are the same as for the above Internet Explorer errors.
- Page 402 I get the warning below when I log into my SRA using Firefox 3.5 – what do I do? Answer: This is the Firefox 3.5 warning message when any certificate problem is detected. The conditions for this error are the same as for the above Internet Explorer errors. To get past this screen, click the arrow next to I Understand the Risks to expand the section, then click the Add Exception button that appears.
- Page 403 Accepting a non- trusted certificate does not have anything to do with the level of encryption negotiated during the SSL handshake. However, Dell SonicWALL tested digital certificates from www.rapidssl.com, which are inexpensive, work fine in the SRA appliance, and do not require the background check that other Certificate Authorities require during the purchase process.
- Page 404 Are wild card certificates supported? Answer: Yes. What CA’s certificates can I use with the SRA appliance? Answer: Any CA certificate should work if the certificate is in X509v3 format, including Verisign, Thawte, Baltimore, RSA, etc. Does the SRA appliance support chained certificates? Answer: Yes, it does.
- Page 405 Are PKCS#7 (chained certs) or PKCS#12 (key and cert PFX container) supported on the SRA appliance? Answer: No, neither one is currently supported. Dell SonicWALL is investigating supporting these in a future release. Does the SRA appliance support client-side digital certificates? Answer: Yes, client certificates are enforced per Domain or per User on the Users >...
-
Page 406: Netextender Faq
NetExtender clients actually appear as though they are on the internal network – much like the Virtual Adapter capability found in Dell SonicWALL’s Global VPN Client. You will need to dedicate one IP address for each active NetExtender session, so if you expect 20 simultaneous NetExtender sessions to be the maximum, create a range of 20 open IP addresses. - Page 407 This feature is useful in environments where the SRA appliance is deployed in tandem with a Dell SonicWALL security appliance running all UTM services, as it will allow you to scan all incoming and outgoing NetExtender user traffic for viruses, spyware, intrusion attempts, and content filtering.
- Page 408 Answer: Yes, you can configure the Microsoft Terminal Server to use encrypted RDP- based sessions, and use HTTPS reverse proxy. What is the PPP adapter that is installed when I use the NetExtender? Answer: This is the transport method NetExtender uses. It also uses compression (MPPC). You can elect to have it removed during disconnection by selecting this from the NetExtender menu.
-
Page 409: General Faq
Why is it required that an ActiveX component be installed? Answer: NetExtender is installed via an ActiveX-based plug-in from Internet Explorer. Users using Firefox browsers may install NetExtender via an XPI installer. NetExtender may also be installed via an MSI installer. Download the NetExtender MSI installer from mysonicwall.com. - Page 410 DFS shares.DFS file shares on a stand-alone root are not affected by this Microsoft restriction. Does the SRA appliance have a SPI firewall? Answer: No. It must be combined with a Dell SonicWALL security appliance or other third- party firewall/VPN device. Can I access the SRA appliance using HTTP? Answer: No, it requires HTTPS.
- Page 411 Network pages. Can I create site-to-site VPN tunnels with the SRA appliance? Answer: No, it is only a client-access appliance. If you require this, you will need a Dell SonicWALL TZ series or NSA series security appliance.
- Page 412 Answer: Yes, the SRA 4600, 4200, 1600, and 1200 have a simple CLI when connected to the console port. The SRA Virtual Appliance is also configurable with the CLI. The Dell SonicWALL SRA 6.0 CLI allows configuration of only the X0 interface on the Dell SonicWALL SRA appliances or SRA Virtual Appliance.
- Page 413 Are the SRA 4600/4200/1600/1200 appliances fully supported by GMS or Analyzer? Answer: You need SonicOS SRA 1.5.0.3 or higher for basic management by Dell SonicWALL GMS; SonicOS SRA 2.1 or higher is required for SRA Reporting in Dell SonicWALL GMS or ViewPoint.
- Page 414 Answer: Prior to 2.5 firmware: No, the appliance can only by managed using the X0’s IP address. With 2.5 firmware and later, yes, you can manage on any of the interface IP addresses. Can I allow only certain Active Directory users access to log into the SRA appliance? Answer: Yes.
- Page 415 Answer: In SRA 3.5 and earlier releases, the HTTP proxy does not support Windows Authentication (formerly called NTLM). Only anonymous or basic authentication is supported. Why do Java Services, such as Telnet or SSH, not work through a proxy server? Answer: When the Java Service is started it does not use the proxy server.
- Page 416 416 | SRA 6.0 Administrator’s Guide...
-
Page 417: Command Line Interface
The CLI utility remedies this by allowing basic configuration of the network settings when deploying the SRA Virtual Appliance. Note The Dell SonicWALL SRA 6.0 CLI allows configuration of only the X0 interface on the SRA 4600/4200/1600/1200 or SRA Virtual Appliance. - Page 418 sslvpn login: admin Password: password If the incorrect password is entered, the login prompt is displayed again. If the correct password is entered, the CLI is launched. For hardware and virtual appliances, basic system information and network settings are displayed along with the main menu, as in the example below: System Information Model: SRA 4200...
- Page 419 If a field is not filled out, the prior value is retained, allowing you to change only a single field. After each field has been prompted, the new network settings are shown and a confirmation message is given for the user to review and verify the changes before applying them.
- Page 420 Restarting SSL-VPN services...please wait. Stopping SMM: [ Stopping Firebase :[ Stopping FTP Session:[ Stopping HTTPD: [ Cleaning Apache State: [ Stopping Graphd :[ Cleaning Temporary files..Starting SMM: [ Starting firebase: [ Starting httpd: [ Starting ftpsession: [ Starting graphd: [ Restart completed...returning to main menu...
- Page 421 Appendix G SMS Email Formats This section provides a list of SMS (Short Message Service) formats for worldwide cellular carriers. Find the correct format for your carrier from the list below, using your own phone number before the @ sign. Note These SMS email formats are for reference only.
- Page 422 Carrier SMS Format CZECH EuroTel 4085551212@sms.eurotel.cz CZECH Paegas 4085551212@sms.paegas.cz Chennai Skycell / Airtel 4085551212@airtelchennai.com Chennai RPG Cellular 4085551212@rpgmail.net Comviq GSM Sweden 4085551212@sms.comviq.se Corr Wireless Communications 4085551212@corrwireless.net D1 De TeMobil 4085551212@t-d1-sms.de D2 Mannesmann Mobilefunk 4085551212@d2-message.de DT T-Mobile 4085551212@t-mobile-sms.de Delhi Airtel 4085551212@airtelmail.com Delhi Hutch 4085551212@delhi.hutch.co.in Dobson-Cellular One...
- Page 423 Carrier SMS Format Kyivstar (Kiev Ukraine only) 4085551212@sms.kyivstar.net Kyivstar 4085551212@smsmail.lmt.lv Kolkata Airtel 4085551212@airtelkol.com Latvia Baltcom GSM 4085551212@sms.baltcom.lv Latvia TELE2 4085551212@sms.tele2.lv 4085551212@smsmail.lmt.lv Madhya Pradesh Airtel 4085551212@airtelmail.com Maharashtra Idea Cellular 4085551212@ideacellular.net MCI Phone 408555121 @mci.com Meteor 4085551212@mymeteor.ie Metro PCS 4085551212@mymetropcs.com Metro PCS 4085551212@metorpcs.sms.us MiWorld 4085551212@m1.com.sg...
- Page 424 Carrier SMS Format Primco 4085551212@primeco@textmsg.com Primtel 4085551212@sms.primtel.ru Public Service Cellular 4085551212@sms.pscel.com Punjab Airtel 4085551212@airtelmail.com Qwest 4085551212@qwestmp.com Riga LMT 4085551212@smsmail.lmt.lv Rogers AT&T Wireless 4085551212@pcs.rogers.com Safaricom 4085551212@safaricomsms.com Satelindo GSM 4085551212@satelindogsm.com Simobile (Slovenia) 4085551212@simobil.net Sunrise Mobile 4085551212@mysunrise.ch Sunrise Mobile 4085551212@freesurf.ch SFR France 4085551212@sfr.fr SCS-900 4085551212@scs-900.ru Southwestern Bell...
- Page 425 Carrier SMS Format Vodafone Japan 4085551212@pc.vodafone.ne.j Vodafone Japan 4085551212@h.vodafone.ne.jp Vodafone Japan 4085551212@t.vodafone.ne.jp Vodafone Spain 4085551212@vodafone.es Vodafone UK 4085551212@vodafone.net West Central Wireless 4085551212@sms.wcc.net Western Wireless 4085551212@cellularonewest.com SMS Email Formats | 425...
- Page 426 426 | SRA 6.0 Administrator’s Guide...
-
Page 427: Contact Information
GNU General Public License (GPL) Source Code Dell SonicWALL will provide a machine-readable copy of the GPL open source on a CD. To obtain a complete machine-readable copy, send your written request, along with a certified check or money order in the amount of US $25.00 payable to "Dell SonicWALL, Inc." to: General Public License Source Code Request Dell SonicWALL, Inc. -
Page 428: Limited Hardware Warranty
This Limited Warranty is not transferable and applies only to the original end user of the product. Dell SonicWALL and its suppliers' entire liability and Customer's sole and exclusive remedy under this limited warranty will be shipment of a replacement product. -
Page 429: End User Licensing Agreement
SUPPLIERS HAVE BEEN ADVISED OF THE POSSIBILITY OF SUCH DAMAGES. In no event shall Dell SonicWALL or its suppliers' liability to Customer, whether in contract, tort (including negligence), or otherwise, exceed the price paid by Customer. The foregoing limitations shall apply even if the above-stated warranty fails of its essential purpose. - Page 430 ACCEPTANCE AND AGREEMENT WITH THE TERMS AND CONDITIONS HEREIN. NOTWITHSTANDING THE FOREGOING, THIS AGREEMENT SHALL NOT SUPERSEDE ANY OTHER SIGNED AGREEMENT BETWEEN YOU AND SONICWALL THAT EXPRESSLY GOVERNS THE SONICWALL PRODUCT. "Product" means the SonicWALL labeled hardware and related documentation ("Hardware") and/or proprietary SonicWALL labeled software, firmware and related documentation ("Software") purchased by the end user of the product either directly from SonicWALL or a Reseller (“Customer”).
- Page 431 Products and/or Customer’s services for MSP Customers. “Affiliate” means any legal entity controlling, controlled by, or under common control with a party to this Agreement, but only for so long as such control relationship exists. (d) Evaluation License. If the Software is provided by SonicWALL or a Reseller at no charge for evaluation purposes, then Section 1(a) above shall not apply to such Software and instead Customer is granted a nonproduction License to use such Software and the associated documentation solely for Customer’s own internal evaluation purposes for an evaluation period...
- Page 432 maintenance and support obligations in respect to the SonicWALL Products regardless of whether the warranty, maintenance or support issue is caused in whole or in part by the Third Party Software provided by SonicWALL with the Product. (g) Updates/Upgrades. If Customer purchases or otherwise is eligible to receive a SOFTWARE update or upgrade, you must be properly licensed to use the Product identified by SonicWALL as being eligible for the update/ upgrade in order to install and use the SOFTWARE update/ upgrade.
-
Page 433: Limitation Of Liability
Documentation applicable to the Software and the License purchased (“Limited Warranty”). Except as may indicated otherwise in writing by SonicWALL, the Warranty Period for Hardware is one year from the date of registration of the Hardware Product (or if sooner, seven days after initial delivery of the Hardware Product to Customer), and the applicable warranty period for Software is ninety days from the date of registration of the Software Product (or if sooner, seven days after initial delivery/download) of the Software Product to/by Customer. - Page 434 AGGREGATE AMOUNT RECIEVED BY SONICWALL IN RESPECT OF THE PRODUCTS AND/OR SERVICES PURCHASED BY CUSTOMER AFFECTED BY THE MATTER GIVING RISE TO THE CLAIM. (FOR MAINTENANCE SERVICES OR A PRODUCT SUBJECT TO RECURRING FEES, THE LIABILITY SHALL NOT EXCEED THE AMOUNT RECEIVED BY SONICWALL FOR SUCH MAINTENANCE SERVICE OR PRODUCT PURCHASED BY CUSTOMER DURING THE TWELVE (12) MONTHS PRECEDING THE CLAIM).
- Page 435 hereunder shall require the assignment/transfer of all copies of the applicable Software along with a copy of this Agreement, the assignee must agree to all terms and conditions of this Agreement as a condition of the assignment/transfer, and the License(s) held by the transferor Customer shall terminate upon any such transfer/assignment.
- Page 436 436 | SRA 6.0 Administrator’s Guide...
- Page 437 File Shares - Dell SonicWALL's network file browsing feature on the SRA appliance. This uses the Web browser to browse shared files on the network.
- Page 438 438 | SRA 6.0 Administrator’s Guide...
- Page 439 | 439...