NEC UNIVERGE SV9500 User Manual
Hide thumbs
Also See for UNIVERGE SV9500:
- User manual (263 pages) ,
- User manual (95 pages) ,
- Reference sheet (2 pages)
Table of Contents
Advertisement
Advertisement
Table of Contents

Related Manuals for NEC UNIVERGE SV9500


Summary of Contents for NEC UNIVERGE SV9500
- Page 1 DT830G USER’S GUIDE NWD-172905-001 ISSUE 2.0 2015 JUNE...
- Page 2 NEC Corporation reserves the right to change the specifications, functions, or features, at any time, without notice. NEC Corporation has prepared this document for use by its employees and customers. The information contained herein is the property of NEC Cor- poration and shall not be reproduced without prior written approval from NEC Corporation.
- Page 3 WARNING For Customers in Australia Telephone receivers produce magnetic fields that can attract small metallic objects such as pins or staples. To avoid injury, do not place the handset where such objects can be picked up.
- Page 4 The Terms and Conditions of Software Customers shall use the software embedded in DT830G pursuant to the terms and conditions of software license agreement of the UNIVERGE SV9500 communi- cation server (SLA). The software contains certain third party open source soft- ware components which are provided under the terms and conditions designated at http://www.bcom.nec.co.jp/soft-license/DT800_OSS.html.
-
Page 5: Table Of Contents
TABLE OF CONTENTS 1.INTRODUCTION FACE LAYOUT..................TECHNICAL SPECIFICATIONS ............KEYS AND PARTS................PHONE START UP AND MENU SCREEN .......... SHORTCUT MENU ................SOFT KEYS..................MULTI-WINDOW .................. POP-UP WINDOWS................2.INSTALLATION PROCEDURE INSTALLING/REMOVING LINE KEY CARD........ADJUSTING ANGLE OF TILT LEG............CONNECTING AC ADAPTER.............. CONNECTING LAN CABLE.............. - Page 6 MULTILINE APPEARANCE ..............112 TO HOLD A CALL ................113 TO PLACE A CALL ON EXCLUSIVE HOLD ........114 TO TRANSFER A CALL ............... 114 TO ORIGINATE A CALL USING SELECTIVE DIALING (DYNAMIC DIAL PAD, PRESET DIAL) ..........115 ONE-TOUCH SPEED CALLING KEYS..........116 SPEED CALLING - STATION/GROUP ..........
- Page 7 TO DELETE ALL DATA................ 193 TO DELETE SPECIFIC DATA.............. 194 6.CALL HISTORY OPERATION TO VIEW CALL HISTORY..............196 TO MAKE A CALL FROM CALL HISTORY.......... 197 TO ADD CALL HISTORY DATA TO DIRECTORY ......199 TO EDIT DIRECTORY DATA FROM CALL HISTORY ......201 TO DELETE ALL DATA................
- Page 8 MENU LIST MENU LIST FOR DT830G (ITZ-12/24CG-3)........244 MENU LIST FOR DT830G (ITZ-12/24DG-3)........257 WEB PROGRAMMING TO LOGIN..................... 268 TO LOGOUT..................270 HOW TO OPERATE................272...
-
Page 9: Face Layout
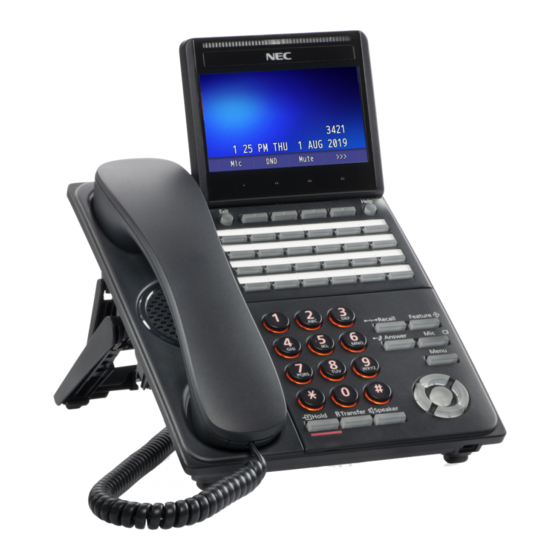
NTRODUCTION FACE LAYOUT DT830G (CG): ITZ-12CG-3 Recall Feature Answer Menu Redial HOLD Transfer Speaker... - Page 10 DT830G (DG): ITZ-12DG-3 Recall Feature Answer Menu Redial HOLD Transfer Speaker...
- Page 11 DT830G (CG): ITZ-24CG-3 Recall Feature Answer Menu Redial HOLD Transfer Speaker...
- Page 12 DT830G (DG): ITZ-24DG-3 Recall Feature Answer Menu Redial HOLD Transfer Speaker...
-
Page 13: Technical Specifications
TECHNICAL SPECIFICATIONS ITEM ITZ-12CG-3/ITZ-12CG-3P/ITZ-24CG-3A ITZ-12DG-3/ITZ-12DG-3P/ITZ-24DG-3A Display (LCD) 4.3 inch Color (16777216 colors) TFT, with Backlight 3.8 inch Gray Scale (8 gradations) FSTN, with Backlight Programmable Key 12 keys (24 keys) Fixed Feature Key 10 keys (including Menu button and Cursor key) Backlight Display and Digit Key (lit for 10 seconds when operating) Soft Key... -
Page 14: Keys And Parts
KEYS AND PARTS (1) Call Indicator Lamp The lamp at the top corner of DT830G Display flashes when a call terminates to the terminal. Also, when you use Voice Mail service, the Lamp lights when a message has been left. (2) LCD (Liquid Crystal Display) Color LCD (ITZ-12/24CG-3) and gray scale LCD (ITZ-12/24DG-3). - Page 15 8) Feature Key (b) Redial To activate features such as terminal setup, and to (Last Number Call, Speed Calling-Station/Group) program One-Touch Speed Dial Keys. Press this key to activate redial feature. Press Redial and scroll back through numbers that have (9) Mic Lamp been dialed.
- Page 16 (13) Speaker Key To control the built-in speaker which can be used for: Hands-Free dialing/monitoring. LED on key lights when the key is active. * All standard IP versions include support for full duplex hands-free mode. All TDM and IP enabled versions are half duplex hands-free mode.
-
Page 17: Phone Start Up And Menu Screen
PHONE START UP AND MENU • STARTING UP THE PHONE (without a home URL registered) SCREEN • Desktop screen is displayed after the phone The screen that is displayed right after starting up the is started. phone depends on whether you start up the phone by using an XML application without its home URL The Desktop screen that is displayed on your phone registered or with its home URL registered. - Page 18 Desktop screen (ITZ-12/24DG-3) • Press to display the menu screen. Menu Cursor icon The screen displayed as Portal icon is Desk- Status icon top screen. Menu screen (ITZ-12/24CG-3) Ken Kobus [31313 ] 7:25 MON 11 MAY 2015 Mic NoDist >>>...
- Page 19 • STARTING UP THE PHONE (with a • Press to display the menu screen. Menu home URL registered) The screen displayed as the Portal icon is the screen of the XML application that is registered as • The phone automatically accesses the home the home URL.
- Page 20 • MENU SCREEN MENU/ICON DESCRIPTION From , you can use various application fea- Menu tures such as Directory and History. (1) History To view Call History; the history data stored in the server (system) memory (see CALL HISTORY) and [ITZ-12/24CG-3] that stored in the memory of the telephone, such as the histories of missed calls, dialed numbers, and...
- Page 21 MENU/ICON DESCRIPTION MENU/ICON DESCRIPTION (5) Phone/ When you select the Phone icon, a When the home URL is not Portal pop-up screen is displayed on an registered, Phone screen icon is XML application screen. (For displayed. (9) Phone icon details, see POP-UP WINDOWS.
- Page 22 • STARTING UP XML APPLICATION STEP 2: XML application will start up. DT830G has an XML browser function. You can display the information of XML application installed in an external server onto the LCD of DT830G and use Ubiquitous Tourist various services in collaboration with the XML application.
-
Page 23: Shortcut Menu
SHORTCUT MENU Shortcut Menu FEATURE DESCRIPTION The LCD displays icons when there are missed calls or new voice mails. You can open shortcut menu by Access history of Missed Calls. The icon Missed Calls pressing Enter . You can also check missed calls disappears after checking the history. - Page 24 • STATUS ICONS FEATURE ICON DESCRIPTION The LCD displays icons in the icon information area when there are missed calls or new voice mails. You This icon appears when the Encryption can check the status at a glance, and access the conversation is encrypted.
-
Page 25: Soft Keys
SOFT KEYS • DISPLAY SAMPLES Soft Keys provide a set of functions on the LCD that Soft Keys on DT830G provide a set of functions on the adapts to the changing state of the telephone. LCD that adapts to the changing state of the telephone. IDLE Patterns and names of Soft Keys to be displayed are Note... - Page 26 • HOW TO USE SOFT KEYS This section provides some sample operations of BUSY features using Soft Keys. BUSY 2000 Example 1: DO NOT DISTURB 7:25 AM MON 11 MAY 2015 CallBack CallWait >>> ● Setting DO NOT DISTURB Push >>> STEP 1: Press NoDist.
- Page 27 STEP 4: Dial the station number to be transferred to, and you will hear a service set tone (SST). NoDist CANCEL 7:25 AM MON 11 MAY 2015 NoDist >>> TRANSFER 7:25 AM MON 11 MAY 2015 Example 2: CALL FORWARDING (BUSY LINE) >>>...
- Page 28 ● Canceling CALL FORWARDING (BUSY LINE) STEP 1: Press SPEAKER, and the speaker lamp turns on red. CF-Busy starts flashing. You will hear a dial tone. 7:25 AM MON 11 MAY 2015 CF-Busy STEP 2: Press CF-Busy, and you will hear a service set tone (SST).
-
Page 29: Multi-Window
MULTI-WINDOW [ITZ-12/24DG-3] DT830G can display multiple windows at a time. As it is possible to launch multiple applications History Portal simultaneously, you can switch the displays quickly. If Directory Hotel you receive an incoming call while displaying an Service application screen, you can operate line keys without Setting Restaurant exiting other applications first. - Page 30 ● Normally, only the Portal icon is displayed on the ● When you launch an XML application, the icon of the Desktop screen right after the phone is set up. application appears to the right of the Portal icon on the Desktop screen.
- Page 31 • SWITCHING LOCAL APPLICATIONS ● You can launch up to four XML applications including the Portal window. The service icons of the running Local applications such as History, Directory, and applications are displayed from the left in order of Setting are displayed in one window. their launch.
- Page 32 ● Normally, only the Portal icon is displayed on the ● Select a desired local application from icons to Desktop screen right after the phone is set up. launch the application or setting Menu. [ITZ-12/24CG-3] [ITZ-12/24CG-3] Setting History Directory Setting History Directory 7:25 MON 11 MAY 2015...
- Page 33 ● If you stop operating the local application without ex- iting the application and press Menu, History icon is If you select a local application by using a One-Touch added to the right of the Portal icon. This icon shows key while launching other local application, new local application is not running.
- Page 34 • LAUNCHING THE FIFTH APPLICATION ● Application exit screen is displayed. Currently run- You can launch up to four XML applications including ning XML application icons excluding the Portal are Portal at a time. If you try to launch a fifth application, displayed.
- Page 35 • ICON DISPLAY AT XML APPLICATION ● The icon for the application you quit disappears from UPDATE the menu screen. The newly running application icon The service icons displayed on the menu screen are is added to the right. reduced screen images of actual XML application screens.
-
Page 36: Pop-Up Windows
POP-UP WINDOWS [ITZ-12/24DG-3] If there is an incoming call while the phone is displaying an XML application, or a local application such as History Portal History or Directory, a telephone service window Directory appears as a pop-up window. Hotel Service [ITZ-12/24CG-3] Setting NEW icon... - Page 37 • LAUNCHING A POP-UP WINDOW • EXITING A POP-UP WINDOW There are several ways to display a pop-up window as A pop-up window closes when; listed below. • is pressed to display the menu screen. Menu • the phone goes on-hook. A procedure how to display a pop-up window is set at installation.
-
Page 38: Installing/Removing Line Key Card
NSTALLATION ROCEDURE • TO INSTALL KEY SET UNIT (LINE KEY When you remove the line key panel, you will see an PANEL AND LINE KEY CARD) overlay (line key card) with key cutouts on the programmable key pad. You can use this card to label STEP 1: Align the holes in the line key card with the the programmable keys for quick access to features or buttons on the telephone. -
Page 39: Adjusting Angle Of Tilt Leg
ADJUSTING ANGLE OF TILT LEG • TO LOWER TILT LEG STEP 1: Turn the telephone set upside down. The angle of the tilt leg can be adjusted in four levels. STEP 2: While lifting the center of the stopper, push the tilt leg in the direction of the arrow. -
Page 40: Connecting Ac Adapter
CONNECTING AC ADAPTER CONNECTING LAN CABLE STEP 1: Insert an AC adapter plug into the connector STEP 1: Prepare 10 BASE-T/100 BASE-T/TX of the AC adapter (AC-L UNIT) on the back of 1000BASE-T cables (Straight) for connecting telephone. the telephone to network devices such as HUB, PoE Switch. -
Page 41: Installing Directory Card
INSTALLING DIRECTORY CARD An optional directory card (also known as an abbreviated dialing table) can be attached to the telephone sets. The directory card can be used to record often dialed numbers or other important information. To remove the directory card, pinch both sides of the Note directory card holder inward until the tabs release and pull the holder out of the grooves. -
Page 42: Terminal Setup
ERMINAL ETUP • TO ADJUST RINGER TONE This chapter describes operating procedures for STEP 1: Press during ringing. (Up) (Down) terminal settings. Various terminal settings such as display, sounds, password, and language are available. 7:26 AM MON 11 MAY 2015 SETUP WITH UP/DOWN KEY RING •... -
Page 43: Display Enlarged Characters
DISPLAY ENLARGED CHARAC- • Enlarged Characters (2nd line) TERS 31313 This feature enables to display characters height as a 7:25 AM MON 11 MAY 2015 double height size for the terminal information on the NoDist >>> LCD. The indication of enlarged characters is available for 2nd line or 3rd line on the LCD. -
Page 44: Setup With Feature Key
SETUP WITH FEATURE KEY • SELECT DIAL MODE You can select one pattern from Normal, Dynamic Dial • MICROPHONE ON/OFF Pad or Preset Dial to originate a call. STEP 1: LED on shows the status of the built- When only Dynamic Dial Pad is activated: in microphone. - Page 45 When only Preset Dial is activated: When both Dynamic Dial Pad and Preset Dial are activated: To Set/Reset Preset Dial To Set Dial Mode STEP 1: Press . The LCD displays: Feature STEP 1: Every time are pressed, Dial Feature Mode switches.
-
Page 46: Setup With Menu Key
SETUP WITH MENU KEY • Ringing Line Pickup To Set Preset Answer • TO ENABLE/DISABLE OFF-HOOK STEP 1: Press lamp lights red. RINGING Feature Feature The procedure below shows how to enable/disable Off- STEP 2: Press Answer lamp goes off, and Feature hook ringing. - Page 47 STEP 3: Select Incoming Call. STEP 5: To disable/enable the off-hook ringing, Select an item by one of the following operations. choose Disable or Enable. • Highlight an item by using or UP/DOWN soft key, Select an item by one of the following operations. and press or OK.
- Page 48 • TO SET RINGING OF HEADSET [User Setting] The procedure below shows how to enable/disable the ringing of headset. Incoming Call Talk STEP 1: Display the Menu screen, and select Setting. Display Change Password STEP 2: Select User Setting. Security Select an item by one of the following operations.
- Page 49 [Setting] STEP 5: To disable/enable the ringing of headset, choose Disable or Enable. User Setting Select an item by one of the following operations. Download • Highlight an item by using or UP/DOWN soft key, Data Backup/Restore and press or OK. •...
- Page 50 STEP 6: Select a desired tone type. You can preview [Incoming Call] designated ringer tone. Ring Volume Select an item by one of the following operations. • Highlight an item by using or UP/DOWN soft key, Offhook Ring and press or OK.
- Page 51 Frequency (Hz) You can set ringer tone for the telephone set here. Menu Item Remarks Ringer Tone type can be set for "Name", "Group" and "Telephone set". The ringer Tone type set for "Name" has higher priority than the types set for "Group" and Tone Type 8 1100 Envelope...
- Page 52 • TO SET ILLUMINATION PATTERN FOR CALL INDICATION LAMP [User Setting] The procedure below shows how to set the illumination Incoming Call pattern (color of Call Indicator Lamp). Talk Display Change Password STEP 1: Display the Menu screen, and select Setting. Security STEP 2: Select User Setting.
- Page 53 STEP 5: Select External Call when setting the illu- [External Call] mination pattern for external calls. Select Internal Call when setting the illumination Automatic pattern for internal call. Disable Select an item by one of the following operations. Green • Highlight an item by using or UP/DOWN soft key, and press or OK.
- Page 54 • TO ENABLE/DISABLE RTP ALARM [User Setting] Incoming Call The procedure below shows how to enable/disable Talk RTP alarm. Display STEP 1: Display the Menu screen, and select Setting. Change Password Security STEP 2: Select User Setting. Peripherals Select an item by one of the following operations. Usability •...
- Page 55 • TO ENABLE/DISABLE DTMF TONE STEP 5: Select Automatic, Disable or able (see the following table). The procedure below shows how to enable/disable Select an item by one of the following operations. DTMF Tone. • Highlight an item by using or UP/DOWN soft key, and press or OK.
- Page 56 STEP 5: Select Automatic, Disable or [User Setting] able (see the following table). Incoming Call Select an item by one of the following operations. • Highlight an item by using or UP/DOWN soft key, Talk and press or OK. Display •...
- Page 57 • TO SET KEY TOUCH TONE [User Setting] The procedure below shows how to set Key Touch Incoming Call Tone. Key Touch Tone is a tone generated when the Talk digit keys are pressed while DT830G is off-hook. Display Change Password STEP 1: Display the Menu screen, and select Setting.
- Page 58 STEP 5: Select Automatic, No Tone, Tone Voice. Select an item by one of the following operations. • Highlight an item by using or UP/DOWN soft key, and press or OK. • Press , and press or OK. [Key Touch Tone] Automatic No Tone Tone...
- Page 59 • TO SET MUSIC ON HOLD [User Setting] The procedure below shows how to set Music on Hold Incoming Call to be heard by DT830G user. Talk Display STEP 1: Display the Menu screen, and select Setting. Change Password Security STEP 2: Select User Setting.
- Page 60 STEP 5: Select a desired Music on Hold. You can pre- view the designated Music on Hold. Choose Default when the default data (Min- uet) is used as Music on Hold. Choose Down- load when a downloaded data is used as Music on Hold.
- Page 61 • TO SET CALENDER FORMAT [User Setting] The following explains how to set the time display Incoming Call pattern on the LCD. Talk Display This setting is available for the following conditions. Note Change Password • SV9500 V2 or later •...
- Page 62 STEP 5: Select Calender Format. Menu Item Meaning Select an item by one of the following operations. • Highlight an item by using or UP/DOWN soft key, 0 Automatic Follows the setting on the system. and press or OK. 1 Type 1 7:25 AM MON 23 MAR 2015 •...
- Page 63 • TO SET TIME FORMAT [User Setting] Determines whether time is displayed with a 12-hour or Incoming Call 24-hour clock format. Talk Display This setting is available for Time Display only. Call Log Note feature displays the time in 24-hour format regardless Change Password of this setting.
- Page 64 STEP 5: Select Time Format. [Calender Format] Menu Item Meaning Calender Format Follows the setting on the Automatic Time Format system (default). 12 hour Indication 12-hour clock 24 hour Indication 24-hour clock When selecting Automatic or not performing this time Note format setting, 12-hour clock is automatically applied.
- Page 65 • TO ENABLE/DISABLE VOLUME LEVEL DISPLAY [User Setting] Incoming Call Determines whether or not to display the following Talk volume levels: handset receiver volume, speaker Display volume, ringer tone volume and LCD contrast. Change Password Security STEP 1: Display the Menu screen, and select Setting. Peripherals Usability STEP 2: Select...
- Page 66 STEP 5: Make a selection from the following list. Select an item by one of the following operations. • Highlight an item by using or UP/DOWN soft key, and press or OK. • Press , and press or OK. [Local Volume] Automatic Disable Enable...
- Page 67 • TO SET SCREEN SAVER • Press [User Setting] Screen Saver works after the telephone is idle for a certain period of time. The Screen Saver will be Incoming Call displayed from XML server when the XML server is Talk available.
- Page 68 STEP 5: Choose Screen Saver Mode. The enabled item is highlighted. Select an item by one of the following operations. • Highlight an item by using or UP/DOWN soft key, STEP 7: The display goes back to the Screen Saver and press or OK.
- Page 69 • TO SET BRIGHTNESS OF BACKLIGHT [User Setting] The following explains how to set the brightness level Incoming Call of the LCD backlight. Talk Display Note Backlight feature is optional. Change Password Security STEP 1: Display the Menu screen, and select Setting. Peripherals Usability STEP 2: Select...
- Page 70 STEP 5: Select a desired brightness level. Select an item by one of the following operations. • Highlight an item by using or UP/DOWN soft key, and press or OK. • Press , and press or OK. [Back Light] Level 1 (Bright) Level 2 Level 3 Level 4 (Dark)
- Page 71 • TO CHANGE CHARACTER SIZE [User Setting] The following explains how to change the displayed Incoming Call character size on the LCD. Talk Display STEP 1: Display the Menu screen, and select Setting. Change Password Security STEP 2: Select User Setting. Peripherals Select an item by one of the following operations.
- Page 72 STEP 5: Choose either “Standard” or “Small”. Select an item by one of the following operations. • Highlight an item by using or UP/DOWN soft key, and press or OK. • Press , and press or OK. [Font Size] Standard Small ...
- Page 73 • TO SET A LANGUAGE [User Setting] The following explains how to set a language to be Incoming Call displayed on LCD. Talk Display STEP 1: Display the Menu screen, and select Setting. Change Password Security STEP 2: Select User Setting. Peripherals Select an item by one of the following operations.
- Page 74 OK. • Press the digit key of desired number, and press or OK. For example, press to select Spanish. [Language] Automatic Japanese NEC English NEC Portuguese NEC Spanish NEC French German Italian Back Default setting is Automatic. When selecting Automatic, follow the setting on the System.
- Page 75 • TO SET WALLPAPER [User Setting] The following explains how to set wallpaper. Incoming Call Talk Note Display ITZ-12/24DG-3 does not support the wallpaper setting. Change Password Security STEP 1: Display the Menu screen, and select Setting. Peripherals Usability STEP 2: Select User Setting.
- Page 76 STEP 5: Select Wallpaper. The enabled item is highlighted. Select an item by one of the following operations. When choosing Download, the wallpaper file must be • Highlight an item by using or UP/DOWN soft key, Note downloaded in advance. If there is no downloaded file, and press or OK.
- Page 77 • TO SET CHARACTER FONT COLOR [User Setting] The following explains how to set the displayed character color on the LCD. Incoming Call Talk Font characters are displayed at LCD 4-line display Display Note area. Change Password Note ITZ-12/24DG-3 does not support Font Color setting. Security Peripherals STEP 1: Display the Menu screen, and select Setting.
- Page 78 STEP 5: Select Font Color. STEP 6: Select a desired color. Select an item by one of the following operations. Select an item by one of the following operations. • Highlight an item by using or UP/DOWN soft key, • Highlight an item by using or UP/DOWN soft key, and press or OK.
- Page 79 The color of the character corresponds to an actual dis- play color on the screen of the color selection. Default setting is Color 2. The enabled item is highlighted. Table of Font Color Color Name RGB code 0x000000 Color 1 0x000080 Color 2 0x0000FF...
- Page 80 • TO SET TURN OFF DISPLAY STEP 3: Select Display. Select an item by one of the following operations. The Turn off Display works after the telephone is idle for • Highlight an item by using or UP/DOWN soft key, a certain period of time.
- Page 81 STEP 5: Select Turn Off Display. STEP 7: Select Disable, Enable or App pri- Select an item by one of the following operations. ority. • Highlight an item by using or UP/DOWN soft key, Select an item by one of the following operations. and press or OK.
- Page 82 • TO SET BACKLIGHT FADE CONTROL [Turn Off Display] The following explains how to set Backlight Fade Turn Off Display Mode Control. When you set Backlight Fade Control as “Enable”, you can turn on/off the LCD smoothly. Wait Time Wait Time STEP 1: Display the Menu screen, and select Setting.
- Page 83 STEP 3: Select Display. • Highlight an item by using or UP/DOWN soft key, and press or OK. Select an item by one of the following operations. • Press • Highlight an item by using or UP/DOWN soft key, and press or OK.
- Page 84 • TO CHANGE PASSWORD • Highlight an item by using or UP/DOWN soft key, and press or OK. To change an existing password, follow the procedure • Press below. This password is used for the following occasions. [User Setting] Incoming Call •...
- Page 85 STEP 5: Enter the new password. STEP 7: When the password entry completes suc- After entering the new password, press cessfully, the display changes as follows. Set. Press or OK. [Change Password] [Password] Old Pass **** Complete. New Pass Retry Pass Cancel STEP 6: Enter the new password again.
- Page 86 [Password] When using AC adapter, plug and unplug the AC adapter after disconnecting the LAN cable connected to Can’t repeat the previous the terminal. Also, when you connecting/disconnecting the LAN cable, be sure not to confuse the cable for LAN password.
- Page 87 STEP 3: Select Peripherals. STEP 5: Make sure that Remove is specified. Select an item by one of the following operations. Press , or OK. • Highlight an item by using or UP/DOWN soft key, and press or OK. [USB Memory] •...
- Page 88 • TO SET USABILITY STEP 7: When “Remove complete!” is displayed, The procedure below shows how to set the operation of Press or OK, and remove the USB de- Help key while pop-up window is displayed. vice from the terminal. [Remove] STEP 1: Display the Menu screen, and select Setting.
- Page 89 STEP 5: Choose a desired mode of Help key. [User Setting] Select an item by one of the following operations. • Highlight an item by using or UP/DOWN soft key, Incoming Call and press or OK. Talk • Press , and press or OK.
- Page 90 • TO RESET TELEPHONE SETTINGS [User Setting] The following explains how to clear the personal data Talk off the telephone. Display Change Password STEP 1: Display the Menu screen, and select Setting. Security Peripherals STEP 2: Select User Setting. Usability Select an item by one of the following operations.
- Page 91 STEP 5: When the password entry completes suc- cessfully, the display changes as follows. Press or OK to clear the personal data off the telephone. [Setting Reset] Are you sure? Back When the password entry ends in failure, the following error message is issued.
- Page 92 • TO DOWNLOAD A FILE STEP 3: Select Download. Select an item by one of the following operations. You can download files for Music on Hold, Ringer Tone, • Highlight an item by using or UP/DOWN soft key, Directory and Wallpaper. and press or OK.
- Page 93 STEP 5: Choose a protocol used by the server which STEP 6: The display goes back to the Download stores the download file. Menu screen. Select an item by one of the following operations. When FTP is selected here, go to the •...
- Page 94 STEP 8: Select User ID. STEP 10:The display goes back to the FTP Settings Select an item by one of the following operations. screen. Select Password. • Highlight an item by using or UP/DOWN soft key, Select an item by one of the following operations. and press or OK.
- Page 95 STEP 11:Enter a password. STEP 13:Enter the directory where the download file is Enter a password by pressing digit keys, and stored. press or OK. After entering the directory, press or OK. [Password] [Folder] Input a password. Input a folder name. Back Back For details on character entry method, see...
- Page 96 STEP 15:Select Download Address. STEP 16:Enter an IP address of the FTP/TFTP server Select an item by one of the following operations. which stores the download file. • Highlight an item by using or UP/DOWN soft key, For example, to set the IP address of and press or OK.
- Page 97 STEP 18:The display goes back to the Download [Download Files] Menu screen. Select Download Files. Hold Music Select an item by one of the following operations. • Highlight an item by using or UP/DOWN soft key, Ring Tone and press or OK.
- Page 98 - When downloading a file for Directory, the default file name is “Directory.csv”. [Hold Music] Input a file name. [Directory] Input a file name. MOH.wav Directory.csv Cancel Exec File Format Maximum Size Cancel Exec -law 8kHz/s wav. under 32 seconds µ...
- Page 99 For details on character entry method, see HOW TO If you change the encrypted file into the unencrypted INPUT CHARACTERS. file, press NoEnc. To delete an entered character, press BK. - When downloading a file for Wallpaper, the default file name is “WallPaper.bmp”. STEP 23:Press or Exec to start the downloading process.
- Page 100 STEP 25:The display goes back to the Download Files screen by Exit. When the downloading process ends in failure, "Down- Note loading Failed!" is displayed on the LCD. Check to see the following and retry. Check Points Actions Download file is not Place the download file in placed in the specified the specified directory.
- Page 101 • TO BACKUP PERSONAL SETTINGS [Setting] You can backup personal settings of DT830G to FTP/ User Setting TFTP server. To back up the setting data, the DT830G Download needs to be connected to the network that has FTP Data Backup/Restore (TFTP server).
- Page 102 STEP 5: Choose a protocol used by the destination [Backup/Restore] server. Select an item by one of the following operations. Data Backup • Highlight an item by using or UP/DOWN soft key, Data Restore and press or OK. Server Address •...
- Page 103 or OK. [User ID] [Password] Input a user ID. Input a password. Back Back For details on character entry method, see HOW TO INPUT CHARACTERS. For details on character entry method, see HOW TO INPUT CHARACTERS. STEP 10:The display goes back to the FTP Settings STEP 12:The display goes back to the FTP Settings screen.
- Page 104 STEP 13:Enter the destination directory of the FTP/ • Highlight an item by using or UP/DOWN soft key, and press or OK. TFTP server. • Press After entering the directory, press or OK. [Backup/Restore] [Folder] Data Backup Input a folder name. Data Restore Server Address Protocol...
- Page 105 STEP 18:The display goes back to the Backup/Re- A maximum of 20 characters ("0-9", "A-Z", "a-z", "*", Note store screen. Select Data Backup. "#", ".", "-" or "_") can be entered as a file name. Select an item by one of the following operations. When changing the default file name, press BK once to •...
- Page 106 STEP 20:Press or Exec to start the data backup. STEP 22:The display goes back to the Backup/Re- While making a backup copy, the LCD displays store screen by Exit. “Uploading...”, and when the data backup suc- ceeded, LCD displays “Upload Complete!”. If the When the data backup ends in failure, "Upload Failed!"...
- Page 107 • TO RESTORE PERSONAL SETTINGS [Setting] User can restore the personal settings of DT830G. To download the backup file to the telephone, the DT830G User Setting needs to be connected to the network that has FTP Download (TFTP server). Data Backup/Restore For details on the XML service, contact the System Note Administrator.
- Page 108 STEP 5: Choose a protocol used by the server which [Backup/Restore] stores the backup file. Select an item by one of the following operations. Data Backup • Highlight an item by using or UP/DOWN soft key, Data Restore and press or OK.
- Page 109 [Password] [User ID] Input a user ID. Input a password. Back Back For details on character entry method, see HOW TO For details on character entry method, see HOW TO INPUT CHARACTERS. INPUT CHARACTERS. STEP 10:The display goes back to the FTP Settings STEP 12:The display goes back to the FTP Settings screen.
- Page 110 STEP 13:Enter the directory where the backup file is • Highlight an item by using or UP/DOWN soft key, and press or OK. stored. • Press Enter the directory and press or OK. [Backup/Restore] [Folder] Data Backup Input a folder name. Data Restore Server Address Protocol...
- Page 111 STEP 17:The display goes back to the Backup/Re- A maximum of 20 characters ("0-9", "A-Z", "a-z", "*", Note store screen. Select Data Restore. "#", ".", "-" or "_") can be entered as a file name. Select an item by one of the following operations. When changing the default file name, press BK once to •...
- Page 112 STEP 19:Press or Exec to start restoring the back- up data to the telephone. While downloading the backup data, the LCD dis- plays “Downloading...” first and “Saving...”. Be sure not to turn OFF the DT830G while "Saving..." Note is displayed on the LCD. STEP 20:After the downloading process is complete, the display changes as follows: Download Complete!
-
Page 113: Basic Operation
ASIC PERATION This chapter describes the following basic operation of DT830G. • TO LOGIN • TO LOGOUT • TO MAKE AN EXTERNAL CALL • TO MAKE AN INTERNAL CALL • TO ANSWER AN EXTERNAL CALL • TO ANSWER AN INTERNAL CALL •... -
Page 114: To Login
TO LOGIN 1:25 PM MON 11 MAY 2015 STEP 1: When login mode is activated, the telephone NoDist >>> prompts for Login ID and Password. Time/Feature Activity TO LOGOUT Information Area of LCD Login ID : STEP 1: Press the preassigned Logout on the termi- Password nal. -
Page 115: To Make An External Call
TO MAKE AN EXTERNAL CALL Dialed Code + Number When dialed telephone number is registered in Per- 9XXXXXXXXX sonal Directory, the corresponding name information 1:25 PM MON 11 MAY 2015 will be displayed on LCD while you are hearing a ring- Pickup CF-All >>>... -
Page 116: To Make An Internal Call
TO MAKE AN INTERNAL CALL • When dialed number is not registered in Personal Direc- tory When dialed station number is registered in Personal Dialed Code Directory, the corresponding name information will be Elapsed Time + Number displayed on LCD while you are hearing a ringback 00:05 tone or are engaged in a conversation. - Page 117 STEP 2: Dial a desired station number. Display indi- • When dialed station number is not registered in Personal Directory cates the dialed number. Dialed Station Number (while hearing a ringback tone) 31314 • When dialed station number is registered in Personal Di- 1:25 PM MON 11 MAY 2015 rectory NoDist...
-
Page 118: To Answer An External Call
TO ANSWER AN EXTERNAL CALL • When caller ID is not received Trunk Trunk When calling party telephone number is registered in Type Number Personal Directory, the corresponding name informa- tion will be displayed on LCD while you are hearing a 1:25 PM MON 11 MAY 2015 ringing tone or are engaged in a conversation. -
Page 119: To Answer An Internal Call
TO ANSWER AN INTERNAL CALL • When caller ID is not received Trunk Elapsed Trunk The following procedure explains how to answer an Time Type Number internal call routed to My Line of the telephone. 00:05 1:25 PM MON 11 MAY 2015 When calling station number is registered in Personal Directory, the corresponding name information will be NoDist... -
Page 120: Multiline Appearance
MULTILINE APPEARANCE STEP 3: Lift the handset to answer the call. (while in a conversation) This feature allows you to accommodate the lines • When calling station number is registered in Personal Di- (other telephone’s station number) other than My Line rectory: on the Programmable Line/Feature Keys. -
Page 121: To Hold A Call
TO HOLD A CALL • IF UNANSWERED STEP 1: While engaged in a Two-party call: STEP 1: After preprogrammed time, Automatic Recall is initiated. STEP 2: Press to hold the call in progress. HOLD STEP 2: Call Indicator lamp flashes and the user Held Station Number hears Automatic Recall Ringer. -
Page 122: To Place A Call On Exclusive Hold
TO PLACE A CALL ON EXCLUSIVE TO TRANSFER A CALL HOLD STEP 1: During a conversation, press . Re- Transfer ceive Special Dial Tone. The first party is This feature allows a user to place a call on hold and to placed on hold and hears the music on hold. -
Page 123: To Originate A Call Using Selective Dialing (Dynamic Dial Pad, Preset Dial)
TO ORIGINATE A CALL USING Preset Dial SELECTIVE DIALING STEP 1: Enter desired telephone number (Digit Keys (DYNAMIC DIAL PAD, PRESET 0-9, *, and #). DIAL) STEP 2: The dialed number appears on the top of LCD. Dynamic Dial Pad Input Dial Number STEP 1: Enter desired telephone number (Digit Keys 2000... -
Page 124: One-Touch Speed Calling Keys
ONE-TOUCH SPEED CALLING KEYS STEP 4: Press again to save the number. Feature lamp goes off. • TO MAKE A CALL Feature STEP 1: Press the desired One-Touch Speed Call- SPEED SET ing key. 1:25 PM MON 11 MAY 2015 NoDist >>>... - Page 125 One-Touch Speed Calling key for feature access: One-Touch Speed Calling key may be used as a fea- NEC BNET ture key by storing the feature access code. The fea- tures may be programmed on a system basis by the ...
- Page 126 Character Code For Name Information of One-Touch Speed Calling Key Uppercase Alphabetical Characters DIGIT & ’...
- Page 127 Uppercase European Characters DIGIT À È Ì Ñ Ù Á É Í Ò Ú Â Ê Î Ó Û Ã Ë Ï Ô Ü Ä Õ Å Ö & Æ Œ Ç Ø ¿ ¡ * The shaded area indicates the characters which cannot be entered.
- Page 128 Lowercase European Characters DIGIT à è ì ñ ù á é í ò ú â ê î ó û ã ë ï ô ü ä õ å ö & æ œ ç ø ¿ ¡ * The shaded area indicates the characters which cannot be entered.
-
Page 129: Speed Calling - Station/Group
SPEED CALLING - STATION/GROUP STEP 4: Dial the destination telephone number. 0471821111 When Redial feature is enabled at installation, Last Number Redial feature and Speed Calling features Note 1:25 PM MON 11 MAY 2015 using (Redial) key are not available. For details, >>>... -
Page 130: Speed Calling - System
ONE-TOUCH SPEED CALLING SET- SPEED CALLING - SYSTEM TING USING • TO SET SPEED CALLING - SYSTEM SPD SET SOFT KEY (ONE-TOUCH SPEED CALLING KEY) You can add, edit, or delete a One-Touch Speed STEP 1: Press lamp lights red. Feature Feature Calling key using programmable Line/Feature Key or... - Page 131 To Replace the Existing Data Assigned to STEP 3: Enter the desired phone number (up to 32 a One-Touch Speed Calling Key with New digits can be registered). Data Using SPD Set Key 08211XX STEP 1: Press the SPD Set. Cancel Clear >>>...
-
Page 132: To Edit The Registered Data
TO EDIT THE REGISTERED DATA One-Touch Speed Calling during the registration opera- To Enter the Phone Number tion. Also, pressing any other key (Exit, SPD Set, or Note Cancel) cancels the setting. In that case, the terminal STEP 1: Locate the cursor (underscore) with ← / → operates in accordance with the pressed operation key. - Page 133 To Enter Pause To Delete the Entered Character STEP 1: Press Pause soft key (this soft key is dis- STEP 1: Place the cursor (underscore) in front of the played pressing >>> soft key twice). desired character (in this example, “2” is de- leted) with ←...
- Page 134 To Delete the Phone Number Data key. Push Speed Calling Key STEP 1: Press Delete soft key (this soft key is dis- 1:25 PM MON 11 MAY 2015 played pressing >>> soft key twice). SPD Set NoDist 1234567890_ STEP 3: The phone number already registered is dis- Pause Delete >>>...
-
Page 135: Redial
REDIAL To Switch the Registering One-Touch Speed Calling Keys Using SPD Set Key When Redial feature is enabled at installation, Last STEP 1: Press the SPD Set key. Number Redial feature and Speed Calling features Note using (Redial) key are not available. For details, contact the system administrator. - Page 136 • To Delete a Call Record from the Out- • To Delete All Records from the Outgo- going Call History ing Call History STEP 1: Press . The user hears Dial tone STEP 1: Press . The user hears Dial tone (Redial) (Redial) and the last number dialed is displayed.
-
Page 137: Last Number Redial
VOICE CALL LAST NUMBER REDIAL Using Feature Key When Redial feature is enabled at installation, Last Number Redial feature and Speed Calling features Note STEP 1: Lift handset. using (Redial) key are not available. For details, contact the system administrator. STEP 2: Dial desired station number. -
Page 138: Three-Party Conference
THREE-PARTY CONFERENCE VOICE MAIL SYSTEM To Set STEP 1: While Station A and Station B are engaged in a Two-party connection, Station A presses STEP 1: Press Feature Transfer STEP 2: Press (Enter) Station A hears Special Dial Tone. Station B hears the music on hold. STEP 3: Dial desired “Voice Mail System”... -
Page 139: Do Not Disturb
DO NOT DISTURB To Set STEP 1: Press NoDist when the telephone is in idle state (on hook). NoDist SET 1:25 PM MON 11 MAY 2015 NoDist With Soft Key operation, "NoDist" flashes when set. To Cancel STEP 1: Press flashing NoDist. NoDist CANCEL 1:25 PM MON 11 MAY 2015 NoDist... -
Page 140: How To Input Characters
HOW TO INPUT CHARACTERS This section explains how to enter characters on the text input screen such as Name or User ID, etc. • Character Entry Mode When entering characters from the telephone set, the following three modes are available: uppercase alphabet- ical character, lowercase alphabetical character and numeric character. - Page 141 To display the SubMenu screen, press HELP or Option while the text input screen is displayed. Also, the follow- ing operations are available from the SubMenu screen. SubMenu Change-word Word-case Word-width Delete Copy Paste Space Return Overwrite/Insert Cancel Submenu Items Descriptions Change character entry mode between uppercase alphabeti- Change-word...
- Page 142 • Character Code List <Character Code For English (1/2)> DIGIT CASE 10th 11th 12th 13th SHIFT “ [SP]...
- Page 143 <Character Code For English (2/2)> 10th 11th 12th 13th 14th 15th 16th 17th 18th 19th 20th & " Note 21th 22th 23th 24th 25th 26th 27th 28th 29th 30th < > Used as a case shift key. Shifts the characters between alphabetical and numeric. Note Note: is the same for European languages other than English, including Russian and Turkish.
- Page 144 <Character Code For Russian> DIGIT CASE 10th 11th 12th 13th 14th 15th SHIFT ¿ ¡ & Б В Г а б в г Д Е Ё Ж З д е ё ж з И Й К Л и й к л...
- Page 145 <Character Code For Turkish> DIGIT CASE 10th 11th 12th 13th 14th 15th SHIFT ¿ ¡ & Ç ç Ğ İ ğ Ö ö Ş Ş Ü ü [SP] Note: is the same for English. Refer to the <Character Code For English (2/2)>.
- Page 146 <Character Code For European Languages Other Than English> DIGIT CASE 10th 11th 12th 13th 14th 15th SHIFT ¿ ¡ & À Á Â Ã Ä Å Æ Ç à á â ã ä å æ ç È É Ê Ë è...
- Page 147 <Number Code> DIGIT CASE 10th 11th 12th 13th 14th 15th SHIFT & ‘ Used as a case shift key. Shifts the characters between alphabetical and numeric. Note: * When entering password, “0-9”, “*” and “#” are available. “#” is entered by pressing “*”...
- Page 148 • Character Entry Method STEP 3: Press or OK on the SubMenu to go (Enter) As an example of character entry method, the fol- back to the text input screen. lowing shows how to enter “Ken Kobus”. STEP 1: Press twice to enter “K”.
- Page 149 STEP 5: Press once to enter a space. STEP 7: Press or OK on the SubMenu to go (Enter) back to text input screen. [Name] [Name] Input a name. Input a name. Option Back Option Back STEP 6: Press HELP or Option to display SubMenu STEP 8: Press twice to enter “K”.
- Page 150 STEP 9: Press HELP or Option to display SubMenu STEP 11:Enter “obus” by using digit keys. screen, and select Word-case to switch Press three times to enter “o”. the text input mode from lowercase to upper- Press twice to enter “b“. Press twice to enter “u”.
- Page 151 • To Overwrite Characters STEP 4: Enter new words over existing characters. In this example, “F” is entered. STEP 1: Place the cursor at the left of the characters to be overwritten. [Name] [Name] Input a name. Input a name. ABFDE ABCDE Option...
- Page 152 • To Copy and Paste Characters target characters by using (Left-cursor) and press Start. STEP 1: While characters which you want to copy are [Copy] displayed, press HELP or Option. Input a name. [Name] Input a name. ABCDE Start Back ABCDE STEP 4: Place the cursor at the end point of the target Option...
- Page 153 [Name] [Name] Input a name. Input a name. CDABCDE ABCDE Option Option Back Back STEP 6: On the SubMenu screen, select Paste and press or OK. (Enter) (Right-cursor) (or press SubMenu Change-word Word-case Word-width Delete Copy Paste Space Cancel STEP 7: The copied characters “CD”...
-
Page 154: Security Mode
SECURITY MODE To make a call of VOICE CALL is available DT830G has a Security mode which prevents toward a called party in the Security mode. When a called party activates the Security mode with Note unauthorized access and information leakage from leaving its MIC to ON, the called party can converse terminal. - Page 155 • TO UNLOCK THE TELEPHONE STEP 1: Display the Password Entry screen by either of the following operations. • Press any key while the screen saver is Password Error. activated. Retry? • Press Security while the screen saver is activated. Cancel After a third attempt (if incorrect password is entered three times consecutively), the following error message...
-
Page 156: Emergency Call
EMERGENCY CALL The user can make a call to only the predetermined number. When telephone numbers other than the pre- The user can make a call to a predetermined Note determined emergency number are dialed, the follow- emergency telephone number while the telephone is ing message appears (after a few seconds, the display goes back to ”Dial Emergency Number Only”... -
Page 157: Phonebook
To Search And Make A Call Phonebook and Local Phonebook. System Phonebook Example: To Search For “NEC BNET”. System Phonebook is used on a system basis. Up to 12000/60000 entries are available per system. The STEP 1: Press Pbook while Station is in Idle state. - Page 158 Ex. To enter “NEC”: Press twice to enter “N”. Press twice to enter “E“. STEP 5: The registered Phonebook data for “NEC Press three times to enter “C“. BNET” appears. From this screen, you can make a call by going off-hook or pressing...
- Page 159 Example: limit, press or More to display the last 17 characters/digits of the name/telephone number. DT830G Station A registers “NEC” as new name and its Example: Telephone Number. Name Suzuki Taro(JapanSumida) 24 characters ...
- Page 160 Clr. Press twice to enter “N”. Press twice to enter “E“. STEP 6: “NEC” and its telephone number has been Press three times to enter “C“. added into Local Phonebook. Two seconds later, the display returns to Local Phonebook Add name: screen.
- Page 161 Name: NEC ABIKO Number: XXXXXXXX1 More DOWN >>> STEP 3: Enter a name (in this example, “NEC” is en- tered) and press OK. (If no ap- (Enter) propriate data exists, the message “Entry not STEP 5: The registered data for “NEC BNET” ap- found!”...
- Page 162 To Edit An Entry Edit Name: Example: >>> To Modify Name “Home” to “House” and Telephone Number “0123456789” to “0123456712”. STEP 5: Enter “use” by using digit keys. After the mod- ification has completed, press OK soft STEP 1: Press >>> twice while the target Phonebook key.
- Page 163 STEP 6: The following number edit screen appears. STEP 1: Press >>> soft key twice while the target Name: House Phonebook data is displayed. Number: 0123456789 Search: NEC ABIKO Name: NEC ABIKO Number: 0123456789 STEP 7: Press Clr soft key twice to erase “89”.
- Page 164 To Add A Prefix To Telephone Number To delete an entered character, press or Clr. The procedure shown below is available in Local Phonebook. STEP 4: The prefix is added in front of the telephone Example: number. Once the prefix is added, Pref soft To add a prefix “0184”...
- Page 165 Available Characters In Local Phonebook The following tables show available characters in Local Phonebook. UPPERCASE CHARACTER Digit Code À È Ì Ñ Ù Á É Í Ò Ú Â Ê Î Ó Û Ã Ë Ï Ô Ü...
- Page 166 LOWERCASE CHARACTER Digit Code à è ì ñ ù á é í ò ú â ê î ó û ä ë ï ô ü “ å õ æ ö ç SP: Blank Space...
-
Page 167: Call History
CALL HISTORY displayed. There are two types of Call History features. One is the 1:03 PM MON 11 MAY 2015 history data that is stored in the system memory, and AAAAA the other is the history data that is stored in the memory 31300 of the telephone (see 6.CALL HISTORY... - Page 168 To Make A Call From Call History example, “012345” is entered. After entering the prefix, press or OK. (Enter) STEP 1: Display the history data of the target party. 12:55 PM MON 11 MAY 2015 Prefix Number Input BBBBB Number: 51500 P.Book >>>...
- Page 169 100 records. If exceeding 100 records at this point, the error message shown below appears. Press OK to go back to the previous display. Directory is full. STEP 2: Enter a desired name, and press OK. (In this example, “NEC ABIKO” is entered.) Add name: NEC ABIKO >>>...
- Page 170 (Upper-case character) <<< -Eu-l STEP 3: The telephone number stored on the call his- tory is displayed. The telephone number can be changed if necessary. Press OK to add the displayed data to Local Phonebook. Name :NEC ABIKO Number :31300...
-
Page 171: To Add New Data
IRECTORY PERATION This chapter explains Personal Directory of DT830G. [Directory] By using Personal Directory, you can make a call with Personal simple operation. System Personal Directory function can register up to 500 Corporate entries (four telephone numbers per entry). You can add/view/edit/delete these entries. - Page 172 STEP 3: Select Edit. STEP 4: Select Name. Select an item by one of the following operations. Select an item by one of the following operations. • Highlight an item by using or UP/DOWN soft key, • Highlight an item by using , and press and press or OK.
- Page 173 STEP 5: Enter a name to be registered in directory. STEP 6: The display goes back to the Edit screen. Se- lect Group. Enter a name by using digits keys. After entering the Select an item by one of the following operations. name, press or OK.
- Page 174 STEP 9: Enter a telephone number to be registered in [Group Select] directory. Enter a telephone number by using digits keys. After Default entering the telephone number, press or Next. Colleagues VIPs [Tel #1] Family Friends Input a Telephone number. Group 6 Group 7 Group 8...
- Page 175 Selectable categories are as follows: [Priority Flag] Category ICON Disable Enable Company Mobile Voice Mail Home Prev Others STEP 12:The display goes back to the Edit screen again. Select Company Name. Select an item by one of the following operations. STEP 11:Choose either Disable or Enable.
- Page 176 STEP 14:The display goes back to the Edit screen. Se- [Edit] lect Ring Tone. Ken Kobus Select an item by one of the following operations. • Highlight an item by using , and press Colleagues or OK. 31300 • Press Tel #2 Tel #3 [Edit]...
- Page 177 [Edit] [Ring Tone] Illumination Automatic Default Tone Type 1 Tone Type 2 Tone Type 3 Tone Type 4 Tone Type 5 Tone Type 6 Save Back Back STEP 17:Select a desired color of the Call Indication lamp. You can set ringer tone for calls routed from the specific name (calling party) here.
- Page 178 STEP 19:If you need to assign a memory number man- You can set illumination type for calls routed from the ually, select Memory ID on the screen of specific name (calling party) here. Illumination type can Note the previous step, and enter a desired mem- be set for "Name", "Group"...
-
Page 179: To Change Group Name
TO CHANGE GROUP NAME [Group] STEP 1: Open the Directory screen (see TO ADD Default NEW DATA: STEP1 - STEP3.) Colleagues VIPs STEP 2: On the Directory screen, select Group Family Setting. Friends Select an item by one of the following operations. Group 6 •... -
Page 180: To Find A Registered Data
TO FIND A REGISTERED DATA STEP 5: Enter a new group name. Enter a group name by using digits keys. After entering • To Search by Group Name the group name, press or OK. STEP 1: Open the Directory screen (see TO ADD [Group Name Set] NEW DATA:... - Page 181 STEP 5: Select a target name by pressing [Search] In the following Directory (Name List) screen, you can make a call to the selected party by Group pressing or Call. Name Tel Number If two or more telephone numbers are assigned to Others an entry, a top priority telephone number will be dialed.
- Page 182 STEP 6: To display the detailed data for a specific [Directory] name, press Detail while the name is high- lighted. Search Edit Group Setting If two or more telephone numbers are assigned to an Note entry, a top priority telephone number is automatically Own Number selected when the Detail screen appears.
- Page 183 [Directory] [Name] Abe Ichiro Input a name. Abe Jiro Abe Kentaro Abe Sabro Abe Taro Option Back Detail Option Back A distinction is made between upper case and lower case characters, according as the system settings. For STEP 6: To display the detailed data for a specific Note example, "Ken Kobus"...
- Page 184 • To Search by Telephone Number [Search] STEP 1: Open the Directory screen (see TO ADD Group NEW DATA: STEP1 - STEP3.) Name STEP 2: On the Directory screen, select Search. Tel Number Select an item by one of the following operations. Others •...
- Page 185 STEP 5: Select a target name by pressing [Detail] In the following Directory (Name List) screen, you can make a call to the selected party by Ken Kobus pressing or Call. Colleagues 31300 If two or more telephone numbers are assigned to 0800XXXXXX an entry, a top priority telephone number will be Tel #3...
- Page 186 • To Search by Memory ID [Search] STEP 1: Open the Directory screen (see TO ADD NEW DATA: STEP1 - STEP3.) Group Name STEP 2: On the Directory screen, select Search. Tel Number Select an item by one of the following operations. Others •...
- Page 187 the entered memory number or the number clos- est to the entered number in front. If no data exists in Directory, "No data" is issued on the screen. [Memory ID] STEP 7: To display the detailed data for a specific Input a Memory number.
- Page 188 • To Search by Category [Search] STEP 1: Open the Directory screen (see TO ADD Group NEW DATA: STEP1 - STEP3.) Name STEP 2: On the Directory screen, select Search. Tel Number Select an item by one of the following operations. Others •...
- Page 189 STEP 5: Select a desired category. [Directory] In this example, Company is selected. Select an item by one of the following operations. Abe Kentaro • Highlight an item by using or UP/DOWN soft key, Abe Taro and press or OK. Aikawa Ken •...
- Page 190 [Detail] STEP 3: Select Others. Select an item by one of the following operations. Ken Kobus • Highlight an item by using or UP/DOWN soft key, Colleagues and press or OK. 31300 • Press 0800XXXXXX Tel #3 [Search] Tel #4 Group Name Automatic...
- Page 191 [Directory] STEP 5: Enter a company name. Abe Kentaro After entering the name, Press or OK. Abe Taro Aikawa Ken [Company] John Smith Input a Company name. Julia Ken Kobus Detail Option Back If there is no entry corresponding to the selected Com- Back Option pany, "No data"...
- Page 192 [Detail] STEP 3: Select Others. Select an item by one of the following operations. Ken Kobus • Highlight an item by using or UP/DOWN soft key, Colleagues and press or OK. 31300 • Press 0800XXXXXX Tel #3 [Search] Tel #4 Group Name Automatic...
- Page 193 STEP 4: Select Alphabet. [Alphabet] Select an item by one of the following operations. • Highlight an item by using or UP/DOWN soft key, and press or OK. • Press [Others] Memory ID PQRS Category Company WXYZ Alphabet Back Select Others to find names which begin with a charac- ter other than alphabet such as numerics or symbols.
- Page 194 STEP 6: Select a target name by pressing STEP 7: To display the detailed data for a specific name, press Detail while the name is high- In the following Directory (Name List) screen, lighted. you can make a call to the selected party by pressing or Call.
-
Page 195: To Make A Call From Directory
TO MAKE A CALL FROM DIRECTORY • To Make a Call from Detail Screen STEP 1: Display the Detail screen for a target party While Directory screen is being displayed, you cannot Note (see TO FIND A REGISTERED DATA). make a call by dialing a telephone number. •... - Page 196 STEP 2: Select a target telephone number, and make a call. Select a target telephone number by pressing , and press or Call to or UP/DOWN soft key make a call to the selected number. [Detail] Abe Kentaro Colleagues 31300 0800XXXXXX Tel #3 Tel #4...
-
Page 197: To Add Prefix To Number
TO ADD PREFIX TO NUMBER [User Setting] • To Set Prefix Incoming Call Talk When making a call, a prefix can be added to tele- Display phone numbers to be dialed. Prefixes need to be Change Password set in advance. Security Peripherals STEP 1: Display the Menu screen, and select Setting. - Page 198 STEP 5: Select Prefix 1. A maximum of 10 digits (0-9, * and #) can be set as a Note Select an item by one of the following operations. prefix. • Highlight an item by using or UP/DOWN soft key, and press or OK.
- Page 199 • To Add Prefix When Making A Call If multiple telephone numbers are registered to a target Note party, a call is made to the first priority telephone num- STEP 1: Display the Name List screen for a target ber. party (see TO FIND A REGISTERED DATA).
-
Page 200: To Edit Directory Data
Back STEP 4: On the Edit screen, the detailed data for the STEP 2: Select a target name and display SubMenu. selected name is displayed. Modify the nec- Select a target name by pressing , and press essary data by referring to... -
Page 201: To Delete All Data
TO DELETE ALL DATA STEP 5: After the data is saved, the display changes as follows. STEP 1: Open the Directory screen (see TO ADD DATA). [Edit] STEP 2: Select Delete All. The data is registered at memory number: xx Select an item by one of the following operations. -
Page 202: To Delete Specific Data
TO DELETE SPECIFIC DATA STEP 3: Press or OK to delete all the data. [Directory] STEP 1: Display the Name List screen for a name to Delete All Directory? be deleted (see TO FIND A REGISTERED DATA). [Directory] Abe Ichiro Abe Jiro Abe Kentaro Abe Sabro... - Page 203 STEP 5: After the appropriate directory data is delet- STEP 3: Select Delete One. ed, the display changes as follows: Select an item by one of the following operations. • Highlight an item by using or UP/DOWN soft key, [Directory] and press or OK.
-
Page 204: To View Call History
Select an item by one of the following operations. • Highlight an item by using or UP/DOWN soft Register Call History data to Personal Directory as nec- key, and press or OK. essary. Call History data will be cleared when powering •... -
Page 205: To Make A Call From Call History
TO MAKE A CALL FROM CALL HIS- STEP 3: The history data of the last received call is TORY displayed. If two or more records exist, use or UP/ DOWN soft key to display the next/former records. While the history data is displayed, you cannot make a Note call by dialing a telephone number. - Page 206 STEP 3: To make a call, select Call and press [Missed] or OK. 11/MAY/2015 (MON) 11:00 When making a call from Call History, a prefix can be Ken Kobus added to the dial number. In that case, select 3 Prefix 7205 on the SubMenu (indicated at STEP 2 of CASE 2) to display the Prefix screen.
-
Page 207: To Add Call History Data To Directory
TO ADD CALL HISTORY DATA TO DIRECTORY SubMenu 11:00 Call Ken Kobus STEP 1: Display call history data of a target telephone Directory Add Tel: 7205 number (see TO VIEW CALL HISTORY). Prefix 10:00 The following is an example when history data of Delete One Abe Shintaro a Missed Calls is displayed. - Page 208 STEP 4: Select a category. STEP 5: Choose either Disable or Enable. A maximum of four telephone numbers can be set In this example, Company is selected. Select an item by one of the following operations. to an entry. If Enable is selected here, the tele- •...
-
Page 209: To Edit Directory Data From Call History
TO EDIT DIRECTORY DATA FROM STEP 6: The following Edit screen is displayed. “7205” has been registered to Tel #1. CALL HISTORY “TO ADD NEW DATA” in Directory Operation, and register detailed data (such as name, group, STEP 1: Display call history data of a target telephone etc) to directory. - Page 210 STEP 2: The following SubMenu is displayed. Select STEP 4: Select a search method. Directory Add. TO FIND A REGISTERED DATA for the pro- cedure of the searching method. Select an item by one of the following operations. In this example, Group is selected.
- Page 211 STEP 7: Select a registration destination. In this exam- ple, “7205” will be added to Tel #2. [Group] Default Select an item by one of the following operations. Colleagues • Highlight an item by using or UP/DOWN soft key, VIPs and press or OK.
- Page 212 STEP 8: Select a Category to which the telephone STEP 9: Choose either Disable or Enable. number belongs. A maximum of four telephone numbers can be set to an entry. If Enable is chosen here, the tele- In this example, Company is selected.
-
Page 213: To Delete All Data
TO DELETE ALL DATA STEP 10:The display moves to the Edit screen of Di- rectory. “7205” has been registered to Tel #2. TO EDIT DIRECTORY DATA in Directory STEP 1: Display the Menu screen, and select History. Operation, and edit the data as necessary. STEP 2: Select Delete All. -
Page 214: To Delete Specific Data
TO DELETE SPECIFIC DATA To cancel the data deletion, press or Back soft key. STEP 1: Display the call history data of the target tele- STEP 4: After all history data is deleted, the display phone number referring to TO VIEW CALL changes as follows. - Page 215 STEP 4: After the appropriate call history data is delet- ed, the display changes as follows. Press SubMenu or OK. 11:00 Call Ken Kobus Directory Add Tel: 7205 [Missed] Prefix 10:00 Deleted. Delete One Abe Shintaro Delete All Tel: 7207 ...
-
Page 216: Appendix A Photo Frame Application
APPENDIX A PHOTO FRAME APPLICATION TO LAUNCH PHOTO FRAME APPLI- The Photo Frame application allows the LCD of CATION DT830G to display image files which are loaded from a There are following ways to start Photo Frame USB memory or downloaded from XML server. application. -
Page 217: Display Sample And Key Operations
DISPLAY SAMPLE AND KEY OPER- ATIONS By the aspect ratio of an image file, some portions of the image file may be displayed in black color. Also, when Following shows the display sample and key the size of the image file to be displayed is smaller than operations for Photo Frame application. -
Page 218: How To Use The Photo Frame Application Using Usb Memory
HOW TO USE THE PHOTO FRAME When an image is displayed as a screen saver in a full APPLICATION USING USB screen, Photo Frame application can be closed by MEMORY pressing any keys, and you can go back to the previous screen before launching Photo Frame application. - Page 219 • How to Launch the Photo Frame Appli- cation STEP 1: Insert USB memory to the USB port of the ter- minal. Directory Service Setting History 16:41 MON 22 DEC 2014 31313 Mic NoDist >>> Phone 16:41 MON 11 MAY 2015 NoDist >>>...
- Page 220 Photo Frame application has been launched. • Highlight an item by using or UP/DOWN soft key, and press or OK. • Press [Photo Frame Setting] Sorting Slide Show Peripherals Back • Sort Setting STEP 1: Press Soft Key 4 (the soft key on the far right) STEP 3: Choose File Name.
- Page 221 • To Set Slide Show STEP 3: Choose Slide Show Mode. STEP 1: Press Soft Key 4 (the soft key on the far right) while the Photo Frame application is activat- Select an item by one of the following operations. •...
- Page 222 STEP 4: Choose whether to enable Slide Show Mode or not. STEP 6: Specify interval time. Select an item by one of the following operations. Enter the interval time to switch with digit keys, and • Highlight an item by using or UP/DOWN soft key, press or OK.
- Page 223 • TO REMOVE USB MEMORY [Photo Frame Setting] The following explains how to remove a connected Sorting USB memory from the terminal while the Photo Frame application is activated. Slide Show Peripherals For how to remove the USB memory, you can see also TO SAFELY REMOVE USB DEVICE.
- Page 224 STEP 4: Make sure that Remove is specified. STEP 6: Press or OK. Select an item by one of the following operations. [Photo Frame] • Highlight an item by using, press or OK. Close Photo Frame. • Press [USB Memory] Remove STEP 7: Confirm that the USB icon has disappeared from the screen, and remove the USB device...
-
Page 225: Appendix B Option Devices
APPENDIX B OPTION DEVICES SMART DEVICE INTEGRATION • To use Bluetooth Features Connecting the optional Bluetooth adapter (BCA-Z The Connect key lamp indicates the connection UNIT) to a terminal (DT830G), the terminal can work in status between DT830G and the Bluetooth combination with smart devices (Tablets, mobile vice. - Page 226 • To pair Bluetooth adapter with mobile phone If the terminal and the mobile phone are already paired, the terminal and the mobile phone can be connected Note through Bluetooth only operating with the mobile DT830G and a mobile phone can be connected ...
- Page 227 • To disable Bluetooth feature • Bluetooth connection from DT830G to mobile phone STEP 1: Press the Connect key for several seconds ( more than three seconds when the Blue- Bluetooth connection is manually or automatically tooth feature is ON (the Connect key is turn available between a terminal and a mobile phone...
-
Page 228: Terminal Mode
TERMINAL MODE • Manual Connection STEP 1: Be sure to confirm that Bluetooth connec- For DT830G, there are two types of terminal mode tion is ON (The Connect key lights red). called “Wired Telephone” mode and “Mobile Phone” mode. The terminal starts up on “Wired Telephone” STEP 2: Press the Connect key less than 3 seconds. - Page 229 • To switch the terminal mode Lamp Flashing Indication Mode Status Periods When the Bluetooth connection between DT830G Patterns and a mobile phone is completed, you can switch Mobile Indicates that the Flashing Quick the terminal mode (“Wired Telephone” mode/“Mo- Phone terminal is talking Green...
- Page 230 • To switch between “Wired Telephone” mode and “Mobile Phone” mode When you use this mode for a mobile phone that can Note start immediately a conversation with Type 1, the call STEP 1: Press the Path key when the terminal is in may be on the DT830G.
-
Page 231: Other Features
OTHER FEATURES • To stop music STEP 1: Press the Speaker key while the music • To mute the hands-free microphone sounds. The Speaker key lamp turns off and Hands-free microphone can be enabled/disabled the music stops. If you press the Speaker key by the following procedure while hands-free call is one more time, the music will be played operated in the Mobile Phone mode. -
Page 232: Appendix C Usb Call Recording
APPENDIX C USB CALL RECORDING USB CALL RECORDING NEC recommends a capacity of the recording area of more than 200 MB (50 minutes recordable by linea You can record the voice call data to a USB memory, PCM (16kHz)), and a maximum memory size of record- Note the recorded voice call data can be played later. - Page 233 [DT830G(24DG)] Recording Recordable ICON LED Status Status Time Alternately displayed 00:05 7205 Flashing per second. Less than Orange (1 Ken Kobus 30 minutes second cycle) NoDist >>> Alternately displayed per second. Status Icon USB call recording is stopped/paused The status icons displayed on the LCD while the call recording is executed and the LED status are explained Alternately below.
- Page 234 Recording Recordable Recording Recordable ICON LED Status ICON LED Status Status Time Status Time 30 minutes 30 minutes Lighting Green or more Lighting Red or more Alternately displayed Alternately Flashing displayed per second. Less than per second. Green (1 Flashing Red 30 minutes Less than second cycle)
- Page 235 • To record a call manually The LCD displays the following icons in the History and Menu screen. This section explains the procedure for recording a call manually. The call recording operation is exe- ICON Description cuted by pressing Programmable Feature Key or “USB Record”...
-
Page 236: To Play A Recorded Call
TO PLAY A RECORDED CALL STEP 2: When the conversation finished by going off- hook, the call recording is also finished. • To play a recorded call from Call His- tory • To record a call automatically You can play a recorded call from the call history by When automatic call recording is set, the call re- selecting the Outgoing or... - Page 237 STEP 3: Select the incoming call with the recording icon, and press Option. If the USB memory has no data of the recorded tele- Note phone conversation, or the USB memory is not con- • Highlight an item by using or UP/DOWN soft key, nected to the terminal, an error message appears.
- Page 238 STEP 6: After a tone indicating the start of playback, STEP 7: When the playback of the recorded call has the recorded call will be played. finished, the following message appears. You can control the playback of a recorded call as fol- You can navigate through the recorded calls as follows.
- Page 239 • To play a recorded call from the record- STEP 8: Go on-hook or wait for 3 seconds after the ing list message appears, then, you are back to the incoming call screen. Display the call recording data list, and play a re- corded call from the SubMenu.
- Page 240 The following is the procedure to display the re- (when services other than recording list are regis- cording list. tered) (when no services other than recording list are reg- STEP 1: Display the Menu screen, and select Ser- istered) vice. STEP 1: Display the Menu screen, and select Rec STEP 2: Select Rec List from Service.
- Page 241 • To play a recorded data from the STEP 2: From the SubMenu of the recording list, Se- recording list lect Play. Play Select . After that, press , or OK. This section explains the procedure to play a re- corded data from the recording list.
- Page 242 STEP 4: After a tone indicating the start of playback, the recorded call will be played. [Playing] You can control the playback of a recorded call as fol- 18/MAY/2015 (MON) 11:00 (♪0:10:12) lows: • Press Top to play the call from the beginning 7205 •...
-
Page 243: To Delete A Recorded Call
TO DELETE A RECORDED CALL STEP 2: From the SubMenu of the recording list, se- The recorded call can be deleted by the delete lect Delete One by using or UP/ operation from the recording list. When the recorded DOWN soft key, and press or OK. - Page 244 • To delete all recorded calls from the After that, the following message appears. recording list at a time [Delete One] STEP 1: From the recording list, press Option. Please wait. [Rec List] 18/MAY/2015 (MON) 11:00 7215 18/MAY/2015 (MON) 10:40 7220 18/MAY/2015 (MON) 10:20 7220 18/MAY/2015 (MON) 09:20 7215 12/MAY/2015 (THU) 09:20 7221...
- Page 245 STEP 3: When the following screen appears, press STEP 4: When the following message appears, press or OK. or OK. [All Delete] [All Delete] Deleted. Delete All Recording List? Back STEP 5: After all the recorded data has been deleted from the list, the following message appears.
- Page 246 • To check the free space of USB mem- STEP 2: When the following screen appears, press Option to display SubMenu. This section explains how to check the free space [Rec List] of USB memory. No recording data. (when there is no data in the USB memory) STEP 1: Display the Menu screen, and select Rec List.
- Page 247 STEP 4: The free space of USB memory is displayed. STEP 2: When the following screen appears, press Option to display SubMenu. Press OK to go back to the recording list. [Rec List] [Rec List] 18/MAY/2015 (MON) 11:00 7215 4087/4087 (MB) 18/MAY/2015 (MON) 10:40 7220 18/MAY/2015 (MON) 10:20 7220 18/MAY/2015 (MON) 09:20 7215...
- Page 248 STEP 4: The free space of USB memory is displayed. Press OK to go back to the recording list. [Rec List] 4083/4087 (MB)
-
Page 249: Appendix D Headset Operation
APPENDIX D HEADSET OPERATION ATTACHING THE HEADSET TERMINAL OPERATION USING THE HEADSET Connect the headset to HEADSET connector on the back of the telephone following the procedure below. The following procedure explains how to operate a ter- minal using the headset. While using the headset, the The headset which can be connected to the telephone Note operations equivalent to answering and ending a... -
Page 250: Adusting Headset Ringer Tone Volume
ADUSTING HEADSET RINGER To Answer a Call TONE VOLUME STEP 1: Press the Headset key while the ringing tone is on, and the Headset key lights red. You can adjust the ringer tone volume for a headset in idle/busy status. STEP 2: Press the flashing line key to start a conver- sation with another line. -
Page 251: How To Use The Wireless Headset
HOW TO USE THE WIRELESS To Adjust the Ringer Tone Volume in Idle Status HEADSET STEP 1: Press the Headset key while in idle status to When using Wireless Headset (WT100-EHS-NE switch from headset mode to handset mode, (manufactured by Plantronics)), you can answer a call, and the Headset key lamp turns off. -
Page 252: Menu List
MENU LIST FOR DT830G (ITZ-12/24CG-3) Menu Item Description Menu Press to display the Menu screen. Menu Select this option to view the Call History data. Also, you can add the history History data to the directory. Select this option to access the directory feature. There are the following three types of directory features: Personal Directory, Phonebook and Directory Corporate Directory. - Page 253 Menu List For History Menu Item Description Default Value History 1 Missed Select this option to view the history of missed calls. You can also make a call from this menu. 2 Outgoing Select this option to view the history of outgoing calls. You can also make a call from this menu.
- Page 254 SubMenu Press Option soft key or HELP key while the history data is displayed. Menu Item Description Default Value SubMenu Select this option to make a call to the party currently displayed Call on the history data. 2 Directory Add Select this option to add the party currently displayed on the his- tory data to the personal directory.
- Page 255 Menu List For Directory Menu Item Description Default Value Directory Directory From Menu screen, select Personal. 1 Personal Select this option to view the Directory controlled by the tele- phone. 1 Search Select this option to search the personal directory. 1 Group Select this option to specify a group as a search condition.
- Page 256 Menu Item Description Default Value 2 Edit Select this option to add new data to the personal directory. 1 Name Select this option to enter a name of the target party to be added to the directory. 2 Group Select this option to select a group to which the target party Default belongs.
- Page 257 Menu Item Description Default Value 3 Group Setting Select this option to change a group name. 1. Default 2. Colleagues 3. VIPs Select a desired group name to be changed. 4. Family 5. Friends 6. Group 6 - 20. Group 20 1 Name Select this option to enter a new group name.
- Page 258 Menu List For Setting Menu Item Description Default Value Setting 1 User Setting Select this option to configure the user setting of DT830G. 1 Incoming Call Select this option to set up for incoming calls. 1 Ring Volume Not used. 2 Offhook Ring Select this option to specify whether to use the Off-hook ring- Enable...
- Page 259 Menu Item Description Default Value Note 1 Select this option to set up for the LCD display. 3 Display 1 Calender Format Select this option to set up for calender display format and time display format. 1 Calender Format Select this option to configure the type of calender display Automatic format.
- Page 260 Menu Item Description Default Value 7 Advanced Select this option to set up for the following additional data. 1 Wallpaper Select this option to specify the Home screen background. default (Default/Download) 2 Shortcut Icon Not used. 3 Font Color Select this option to specify the font color for the Time Display/Feature Information Display area.
- Page 261 Menu Item Description Default Value 4 Change Password Select this option to change the password to lock/unlock the 0000 telephone. 5 Security Not used. 6 Peripherals Select this option to setup the usage of the peripheral equip- ment of DT830G. 1.USB Memory Select this option when removing a USB memory from the terminal.
- Page 262 Menu Item Description Default Value 2 Download Set the data required when downloading a file. 1 Download Files Select this option to download files for Music on Hold, ringer tone, Directory and Wallpaper 1 Hold Music Select this option to download a file for Music on Hold. MOH.wav 2 Ring Tone Select this option to download files for ringer tones (Down-...
- Page 263 Menu Item Description Default Value 3 Data Backup/Restore Select this option to set the data required for a file backup/ restore. 1 Data Backup Select this option to specify the file name to be backed up. PersonalData.tgz 2 Data Restore Select this option to specify the file name to be restored.
- Page 264 Setting Menu List For Photo Frame Application. Menu Item Description Default Value 1. Sorting File Name Select this option to view the image files sorted by name in alphabetical order. File Name Date Select this option to view the image files sorted by date of the last update.
-
Page 265: Menu List For Dt830G (Itz-12/24Dg-3)
MENU LIST FOR DT830G (ITZ-12/24DG-3) Menu Item Description Menu Press Menu to display the Menu screen. Select this option to view the Call History data. Also, you can add the history History data to the directory. Select this option to access the directory feature. There are the following three types of directory features: Personal Directory, Phonebook and Directory Corporate Directory. - Page 266 Menu List For History Menu Item Description Default Value History 1 Missed Select this option to view the history of missed calls. You can also make a call from this menu. 2 Outgoing Select this option to view the history of outgoing calls. You can also make a call from this menu.
- Page 267 SubMenu Press Option soft key or HELP key while the history data is displayed. Menu Item Description Default Value SubMenu Select this option to make a call to the party currently displayed Call on the history data. 2 Directory Add Select this option to add the party currently displayed on the his- tory data to the personal directory.
- Page 268 Menu List For Directory Menu Item Description Default Value Directory Directory From Menu screen, select Personal. 1 Personal Select this option to view the Directory controlled by the tele- phone. 1 Search Search the personal directory. Select a group as a search condition. 1 Group 2 Name Select this option to enter the target name as a search condition.
- Page 269 Menu Item Description Default Value 3 Group Setting Select this option to change a group name. 1. Default 2. Colleagues 3. VIPs Select a desired group name to be changed. 4. Family 5. Friends 6. Group 6 - 20. Group 20 1 Name Select this option to enter a new group name.
- Page 270 Menu List For Setting Menu Item Description Default Value Setting 1 User Setting Select this option to configure the user setting of DT830G. 1 Incoming Call Select this option to set up for incoming calls. 1 Ring Volume Not used. 2 Offhook Ring Select this option whether to use the Off-hook ringing.
- Page 271 Menu Item Description Default Value 3 Display Select this option to set up for the LCD display. 1 Calender Format Select this option to set up for calender display format and time display format. 1 Calender Format Select this option to configure the type of calender display Automatic format.
- Page 272 Menu Item Description Default Value 4 Change Password Select this option to change the password to lock/unlock the 0000 telephone. 5 Security Not used. 6 Peripherals Select this option to setup the usage of the peripheral equip- ment of DT830G. 1.USB Memory Select this option to set up for replacing a USB memory from the terminal.
- Page 273 Menu Item Description Default Value 2 Download Set the data required when downloading a file. 1 Download Files Select this option to download files for Music on Hold, ringer tone, Directory and Wallpaper 1 Hold Music Select this option to download a file for Music on Hold. MOH.wav 2 Ring Tone Select this option to download files for ringer tones (Down-...
- Page 274 Menu Item Description Default Value 3 Data Backup/Restore Select this option to set the data required for a file backup/ restore. 1 Data Backup Select this option to specify the file name to be backed up. PersonalData.tgz 2 Data Restore Select this option to specify the file name to be restored.
-
Page 275: Web Programming
ROGRAMMING Web Programming allows you to configure the terminal settings of DT830G from the PC. An web browser (Internet Explorer, etc.) is used to access Web Programming. It is not necessary to install any special application software onto the PC. DT830G and Web Programming PC need to be connected to the same network. -
Page 276: To Login
TO LOGIN Follow the steps below to open the Web Programming. Internet browser STEP 1: Start up on the PC. STEP 2: Enter IP address of the target DT830G on the address toolbar and press Enter key. STEP 3: The Web Programming Login screen appears. Enter a user name (type “USER”) and a password (Note 1), then click button. - Page 277 Note For IP address of DT830G, contact to the System Administrator. When the login screen does not appear, check the LAN connection status and entered IP address. If the Note problem persists, contact the system administrator. STEP 4: The following Web Programming Home screen appears.
-
Page 278: To Logout
TO LOGOUT Follow the steps below to exit the Web Programming. Logout STEP 1: Click button at the lower left of the screen. STEP 2: The confirmation message appears. Click button to log out of Web Programming. - Page 279 Back STEP 3: The display changes as follows. Click button. STEP 4: After the Web Programming Login screen is displayed, close the Internet browser. Note Make sure to perform the logout operation after the data setting of the telephone. When 15 minutes have passed leaving the PC without operation after log in to Web Programming, the user Note is forcibly logged out from the Web Programming.
-
Page 280: How To Operate
HOW TO OPERATE As an example of setting method on the Web Programming, the following explains how to change the ringer tone for external call. Web Programming includes the same menu configuration as "Setting" of DT830G terminal. For details on each menu item, see MENU LIST. - Page 281 Published in Japan 1506-020...