Table of Contents
Advertisement
Quick Links
Advertisement
Table of Contents

Related Manuals for Pitney Bowes ADDRESSRIGHTTM DA900


Summary of Contents for Pitney Bowes ADDRESSRIGHTTM DA900
- Page 1 ™ DA900 AddressRight Printer Operating Guide SV60970-OG Rev. A...
-
Page 2: Fcc Compliance
Inc. and may not be lent, sold, hired out, or made available to others in any form, or be disposed of by way of trade in any form, without the express written consent of Pitney Bowes Inc. The data used in screen examples in this manual are fictitious unless otherwise noted, and are intended solely to document proper use of the software. -
Page 3: Table Of Contents
DA900 Menu Options ... 3-6 Setting Up Your Printer About This Chapter ... 4-2 Choose a Location for the Printer ... 4-2 Unpack the Printer and Check Contents ... 4-2 Remove the Plastic ... 4-3 Remove the Foam ... 4-3 Attach the Side Guides ... - Page 4 Print Test Pieces ... 5-10 Using the DA900 Print Driver About this Chapter ... 6-2 About Envelope Designer™ Plus... 6-2 Making the DA900 the Default Printer ... 6-2 Accessing the Print Driver ... 6-3 The General Tab ... 6-4 Printing Preferences ... 6-5 Advanced Options: Paper Size ...
- Page 5 Intermittent Feeds ... 8-3 Multiple Feeds ... 8-4 Paper Jams in Printer... 8-4 Printing Problems ... 8-4 Printer Does Not Respond to Software ... 8-4 No Print on Media ... 8-5 Print Slanted or Skewed ... 8-6 Non-Uniform Space between Lines ... 8-6 Poor Print Quality ...
- Page 6 B. DA900 Application Notes ... B-1 Fixed-Head Versus Shuttle Head Printers ... B-2 Printheads and Bands ... B-2 Color ... B-4 Unprintable Areas ... B-4 Dual Purpose Ruler ... B-5 Other Printer Characteristics ... B-5 Compatibility Issues ... B-6 Index SV60970-OG Rev. A...
-
Page 7: Introduction
Introduction About Your Printer ... 1-2 What's in this Book? ... 1-3 What Do I Need to Know? ... 1-3 Important Safety Notes ... 1-4... -
Page 8: About Your Printer
• Multiple print speeds for different quality levels • Multi-database capacity • Suitable for use with most text editors, word pro- cessing and mail list programs. Especially recom- mended for use with Pitney Bowes SmartMailer™ and Envelope Designer™ Plus. Printer is a SV60970-OG Rev. A... -
Page 9: What's In This Book
Set Up the Printer Explains how to assemble and connect the printer to your computer. Printer Adjustments Explains how to set up the printer for your job. Using the DA900 Print Driver Explains how to set up the printer driver software. Maintenance Explains how to care for your printer and keep it functioning properly. -
Page 10: What Do I Need To Know
DO NOT remove the ground pin from the line cord. • Avoid using outlets controlled by wall switches; someone could accidently shut your printer off. • DO NOT use an outlet that shares the same circuit with other machines with heavy current demand such as air conditioners, refrigerators, etc. - Page 11 If the machine has been dropped or has otherwise had the covers stressed in any way, report it to Pitney Bowes Service. Keep fingers, loose clothing, jewelry, ties and long hair away from moving parts. To reduce the risk of fire or electrical shock, DO NOT attempt to disassemble this machine.
- Page 12 Introduction Notes SV60970-OG Rev. A...
-
Page 13: Specifications
Specifications Media Requirements ... 2-2 Printer Output... 2-3 Physical Equipment Specifications ... 2-4 Performance Specifications ... 2-4 Environmental Requirements ... 2-4 Computer Requirements ... 2-5 Options ... 2-5... -
Page 14: Media Requirements
The printer's warranty does not cover components damaged through improper use. Any folded material needs to be tabbed. See the figure below. Types of Media The printer can be used with the following types of material: • Envelopes • Booklets-Tabbed •... -
Page 15: Printer Output
It is best to test each new type of media to determine performance levels before beginning the job. If you require fast-drying ink, contact the Pitney Bowes Supply Line See Chapter 8—Supplies and Options. Printer Output Image Area: 3"... -
Page 16: Physical Equipment Specifications
Specifications Physical Equipment Specifications Performance Specifications Environmental Requirements Physical Dimensions: 17" (430mm) H; 25.4" (645mm) W; 21" (535mm) D Weight: 20.7lbs. (45.5kg) with 6 ink car tridges Operator Display: 2 x 24 characters Control Language: PCL5, modified Product Life: 30,000,000 pieces or five years after installation, whichever comes first. -
Page 17: Computer Requirements
Available USB Port. Windows ® XP, 95, 98, NT 4.0 or NT2000 installed. All must operate in a non-networked environment. A 6X CD-ROM drive or better. A 13" monitor capable of 800 x 600 resolution or better. Keyboard and mouse. ™ Printer... - Page 18 Specifications Notes SV60970-OG Rev. A...
-
Page 19: Meet The Da900
Meet the DA900 Printer Printer Components ... 3-2 Control Panel... 3-4 Control Panel Messages ... 3-5 DA900 Menu Options ... 3-6... -
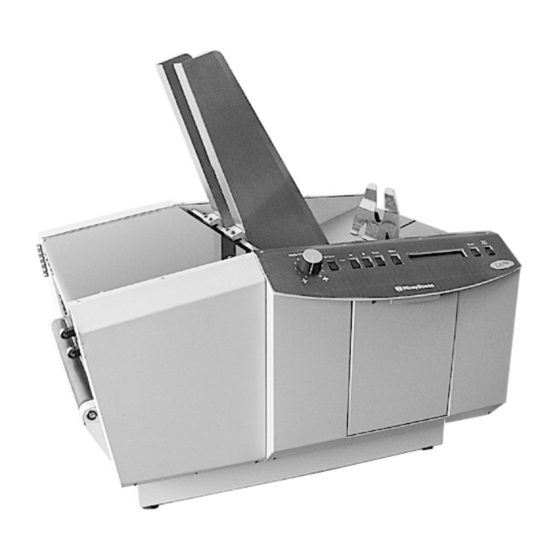
Page 20: Printer Components
Meet the DA900 Printer Printer Components 1. Feed Deck Stack media for printing here. 2. Side Guides Help confine the stack. Adjust to the width of your material plus 1/16" clearance. 3. Separators Adjust to the thickness of your material. The gap... - Page 21 Opens to gain access to the print cartridges and exit rollers. Use the control panel buttons to access printer menus, purge the printheads, and turn the printer on and off line. See the following page for a close-up view and description of panel controls.
-
Page 22: Control Panel
1. Media Thickness Adjustment — Turn knob counterclockwise for thin media, clockwise for thick media. 2. On Line Button — Turns the printer on and off line. When lit, the DA900 is ready to accept data from your computer and begin printing. -
Page 23: Da900 Printer Control Panel Messages
PRINTER ONLINE - The main drive motor is on and waiting for the feeder to be turned on. PRINTING - Both main drive and feeder are on. Printer is feeding media and printing. If no media is in the hopper, the printer shuts down after one half second. -
Page 24: Da900 Menu Options
Meet the DA900 Printer DA900 Menu Options Press Enter to clear Counter. Make sure there is material in the feeder. Press Enter to Stop Purge. Press Enter to Toggle ON/OFF Press Enter to Reset Ink to 100% Press the Menu key to access the Main Menu. - Page 25 Head 4 Uses a Cartridge Enter to use Bulk Ink Head 5 Uses a Cartridge Enter to use Bulk Ink Head 6 Uses a Cartridge Enter to use Bulk Ink SV60970-OG Rev. A DA900 AddressRight™ Printer VX.XX rX pXX 0000 0000 0000...
- Page 26 Meet the DA900 Printer Notes SV60970-OG Rev. A...
-
Page 27: Setting Up Your Printer
6. Install the Ink Cartridges ... 4-4 7. Install the Bulk Ink Cartridge ... 4-6 8. Connect to Your Computer ... 4-8 9. Connect to Power ... 4-9 10. Turn on the Printer ... 4-9 11. Install the Print Driver ... 4-10... -
Page 28: About This Chapter
1. Choose a Good Location 2. Unpack the Printer Your printer is normally installed by your Pitney Bowes Customer Service Representative. We've included these instructions for your convenience in the event you need to move your printer and reinstall it. -
Page 29: Remove The Plastic
3. Remove the Plastic from the Transport Cover 4. Remove the Foam from the Printhead Area SV60970-OG Rev. A DA900 AddressRight Plastic Foam Blocks Printer ™... -
Page 30: Attach The Side Guides
You need a standard #2 Phillips head screwdriver to do this. You can install up to six inkjet cartridges in your printer. Cartridges are held in place by vertical brackets on the inkjet cartridge holder. - Page 31 6. Install the Ink Cartridges (continued) HINT: When you store cartridges outside of the printer overnight, place them in the docking station. For pro- longed storage, 5. With the gold printhead contacts pointing toward the place them in a printhead holder pins, fully insert the cartridge into the covered Tupperware- holder.
-
Page 32: Install The Bulk Ink Cartridge
3. Place bulk ink cartridge on tray. have: • Three Bulk Ink Cartridges • Three Bulk Ink Printheads • Bulk Ink Cartridge Shelf • Three Screws screw holes on the tray with the three screw holes on the bottom rear of the printer. SV60970-OG Rev. A... - Page 33 4. Connect hose attached to bulk ink cartridge to print- head cartridge. Bulk Ink Cartridge (continued) 5. Channel hose attached to bulk ink cartridge to clips on printer as shown. 6. Insert printhead cartridge into holder. SV60970-OG Rev. A DA900 AddressRight Printer ™...
-
Page 34: Connect To Your Computer
Setting Up Your Printer 8. Connect to The printer is equipped with both a USB and parallel port as shown below. You can use either port to establish Your communications between the printer and your computer. Computer 1. If you're using the USB port, plug one end of the USB 2. -
Page 35: Connect To Power
4. Save settings. 9. Connect to 1. Connect the female end of the power cord to the power receptacle located on the right side of the printer as Power shown below. 2. Plug the male end of the power cord into a grounded outlet. -
Page 36: Install The Print Driver
Setting Up Your Printer 11. Install the Follow the installation instructions on the CD-ROM furnished with your printer. Print Driver 4-10 SV60970-OG Rev. A... -
Page 37: Printer Adjustments
Printer Adjustments About this Chapter ... 5-2 1. Set the Separator Gap... 5-2 2. Adjust the Side Guides ... 5-5 3. Adjust the Feed Ramp ... 5-6 4. Adjust for Media Thickness ... 5-7 5. Physically Position the Printheads ... 5-8 6. -
Page 38: About This Chapter
About this Chapter 1. Set the Separator To print a job, you must set up the printer for the job and make print selections from the software. This chapter explains how to: • Adjust the printer to accommodate the width, height, thickness and weight of your material •... - Page 39 3. Raise the four separators to their up and locked position. (Use the two center separators for narrow media and all Separator Always print a test piece after making any of the adjust- ments in this chapter. SV60970-OG Rev. A DA900 AddressRight Printer ™...
- Page 40 Separator HINT: Never run stapled or paper- clipped media through your printer. 4. Using the ruler as a guide, center the media for this print job under the separators and lower them to rest on the media. 5. Move the locking lever up to lock the separators in place.
-
Page 41: Adjust The Side Guides
Place one piece of media on the feeder table and adjust the Side Guides side guides to the width of the media plus 1/16". Always print a test piece after making any of the adjustments in this chapter. SV60970-OG Rev. A DA900 AddressRight Printer ™... -
Page 42: Adjust The Feed Ramp
Printer Adjustments 3. Adjust the 1. Always fan (aerate) your media before placing it on the Feed Ramp 2. Place your stack of media on the input area of the feed 3. Adjust the feed ramp so that it lifts the back of the stack feed deck. -
Page 43: Adjust For Media Thickness
SV60970-OG Rev. A DA900 AddressRight Media Thickness Dial Setting 0.004 to 1/32" 1/32 to 1/8" 1/8 to 1/4" 1/4 to 3/8" Printer ™ 0 to 2 2 to 3 3 to 7 7 to 10... -
Page 44: Physically Position The Printheads
Printer Adjustments 5. Physically Before your printer can print your media, you must position the printheads to match their positions on the template you Position the have designed. Printheads To position the printheads: 1. Open the cover. 2. Check that the printheads have the correct color car- 3. -
Page 45: Adjust The Upper Exit Rollers
To adjust the upper exit rollers: 1. Loosen the locking knob on the printhead holder assem- bly. 2. Slide printheads 1 and 6 to where you want them. 3. Tighten the locking knob. SV60970-OG Rev. A DA900 AddressRight Printer ™... -
Page 46: Print Test Pieces
Pieces 1. Make sure your material conforms to our published speci- 2. Turn the printer on and wait for the Printer Offline prompt 3. Press the Test Print button on the printer control panel. 4. Press Enter. The envelope feeds and a sample address 5. - Page 47 Print Driver About this Chapter ... 6-2 About Envelope Designer™ Plus ... 6-2 Making the DA900 the Default Printer ... 6-2 Accessing the Print Driver ... 6-3 The General Tab ... 6-4 Printing Preferences ... 6-5 Advanced Options: Paper Size ... 6-6 Advanced Options: Head Adjustment ..
-
Page 48: Using The Da900 Print Driver
1. From the Start Menu, select Settings. 2. Click on Printers. 3. Right Click on the Pitney Bowes DA900 icon. 4. Click on Set as Default Printer. A check mark appears next to the Pitney Bowes DA900 icon. -
Page 49: Accessing The Print Driver
1. From the Start Menu, select Settings. Driver 2. Click on Printers. 3. Right Click on the Pitney Bowes DA900 icon. 4. Click on Properties. The Printer Properties dialog box If you're running Envelope Designer Plus, you can select certain print driver options from within the program. To do 1. -
Page 50: The General Tab
Using the DA900 Print Driver The General This is the printer properties window as it appears in the Windows 2000, XP and NT environments. The window displays information about your printer and allows you to enter its location and any comments. -
Page 51: Printing Preferences
A very few applications, such as small, square envelopes might require a landscape orientation. Once you've made your selection, click on OK to confirm Click on Advanced... to make additional printer settings. The window shown on the next page displays. SV60970-OG Rev. A DA900 AddressRight ™... -
Page 52: Advanced Options: Paper Size
Using the DA900 Print Driver Advanced Options: Paper Size Use this option to select the media size you're running. Once you've made your selection from the list box, click OK to confirm it. SV60970-OG Rev. A... -
Page 53: Advanced Options: Head Adjustment
Note the location of the printhead bands relative to the ruler displayed in the envelope template. and graphic elements. value for the appropriate printhead(s). Continue to ad- just in small increments and repeat tests until align- ment is satisfactory. ™ Printer... -
Page 54: Advanced Options: Print Quality
Using the DA900 Print Driver Advanced Options: Print Quality The settings in this dialog box determine print quality. • 150 dpi is equivalent to draft quality • 300 dpi is equivalent to near letter quality • 600 dpi is equivalent to letter quality The higher the resolution setting and the slower the belt speed, the sharper the print quality. -
Page 55: Advanced Options: Feed Delay
The feed delay option allows you to insert a "pause" be- tween envelope feeds. In other words, the delay increases the gap between envelopes as they exit the printer. The pause allows you to check print quality or lessen the pos- sibility of jams as printed envelopes are stacking. -
Page 56: Advanced Options: Inverted Printing
• You want to feed envelopes flap first. This ap- proach can solve envelope nesting problems when using a power stacker. • The printer heads cannot reach the far end of an oversized envelope. With inverted printing se- lected, feed envelopes backwards (rotate 180 de- grees and feed flap down and leading). -
Page 57: Advanced Options: Language
Advanced Options: Language While eight choices are displayed in the Language list box, only English is currently supported. SV60970-OG Rev. A DA900 AddressRight ™ Printer 6-11... - Page 58 Using the DA900 Print Driver Notes 6-12 SV60970-OG Rev. A...
- Page 59 Maintenance General Cleaning ... 7-2 Replacing the Inkjet Cartridge ... 7-2 Setting "Ink Left" Feature When Replacing Cartridges ... 7-3 Purging the Printhead Nozzles ... 7-6 Cleaning the Printheads ... 7-6 Cleaning the Media Sensor ... 7-7 Replacing the Separator Tips ... 7-8 Replacing the Feed Rollers ...
-
Page 60: Maintenance
Order cleaning kit, supply #902-1. See Chapter 8 for ordering instructions. • Never spray or pour water directly on or into the printer; excess liquid could harm electronic parts. Always dampen a rag and apply it to the parts to be cleaned. -
Page 61: Setting "Ink Left" Feature When Replacing Cartridges
6. Repeat this procedure for each cartridge. Setting "Ink Left" When loading new inkjet cartridges for the first time: Feature When 1. After loading the new cartridges, turn the printer on. Replacing 2. Press the Menu key. Cartridges 3. Press the + key until the message “Enter when Head 1 is filled”... - Page 62 Head n has a new cartridge IMPORTANT: You should replace a cartridge when the printer indicates the ink has run out. If you don't, or reset the ink left setting to circumvent the low ink warning, the cartridge will run out of ink very soon after and prevent you from printing.
- Page 63 Press Enter and the following message will appear: Head n uses a cartridge Enter to use bulk ink 4. Press the + key to move to the next head and repeat steps 2 and 3 as necessary. SV60970-OG Rev. A DA900 AddressRight Printer ™ Cartridge Storage...
-
Page 64: Purging The Printhead Nozzles
White streaks will then appear in the printed text or graphic. To obtain better quality, purge the printhead nozzles: 1. Turn on the printer. 2. Feed in paper (for the purged ink to fall on). 3. Press the Menu key; "Enter to Purge" displays on the control panel. -
Page 65: Cleaning The Media Sensor
Media Sensor See the figure below for the location of the sensor. NOTE: Move printheads 2/3 and 4/5 to the outside to gain better access to the sensor. SV60970-OG Rev. A DA900 AddressRight Printer ™... -
Page 66: Replacing The Separator Tips
Maintenance Replacing the Separator Tips To replace the separator tips: 1. Before changing the separator tips, unplug the printer. 2. Release the separator locking lever on the left side of the feeder, as shown below. Push down to unlock 3. Push down the black tab on the separator to expose the screw, as shown below. - Page 67 Unlock (continued) and remove the separator tip. 6. Replace with a new rubber separator tip. 7. Reinstall the metal cover and screw as shown below. Do not overtighten. SV60970-OG Rev. A DA900 AddressRight Printer ™...
-
Page 68: Replacing The Feed Rollers
7-10 To replace the feed rollers: 1. Before removing the feed roller access plate, unplug the power to the printer. 2. Using a Phillips screwdriver, remove the four screws from the feed roller access plate. See below. 3. Remove the feed roller access plate. See below. - Page 69 4. Rotate the feed roller shaft so the screws face up. See below. Feed Rollers (continued) 5. Use a 3/32" Allen wrench to remove the two 8/32 x 1/4" buttonhead cap screws. See below. SV60970-OG Rev. A DA900 AddressRight Printer ™ 7-11...
- Page 70 Maintenance Replacing the 6. Remove the half feed roller. See the picture below. Feed Rollers 7. Rotate the shaft so the screws on the other half of the (continued) 8. Place the new half-feed roller on the shaft and secure 9.
-
Page 71: Troubleshooting
Power Problems ... 8-3 Feeding Problems ... 8-3 Intermittent Feeds ... 8-3 Multiple Feeds ... 8-4 Paper Jams in Printer ... 8-4 Printing Problems ... 8-4 Printer Does Not Respond to Software ... 8-4 No Print on Media ... 8-5 Poor Print Quality ... -
Page 72: Getting Help
Pitney Bowes provides several information resources. Phone Support Technical support is available from the Pitney Bowes National Diagnostic Center. Before You Call Please read the troubleshooting information in this chapter. -
Page 73: Power Problems
• Turn printer OFF and then ON. • Plug a different device into the outlet you are us- ing. If the outlet does not work, plug the printer into a different outlet. • Static electricity is interfering with operation. Turn the printer OFF and ON. -
Page 74: Multiple Feeds
6. Worn separator tip. Replace separator tip. Printer does not respond to software • Check connection between printer and computer. If you have a good parallel port connection, the "on-line" LED on the printer control panel will be lit. SV60970-OG Rev. A... -
Page 75: No Print On Media
Cartridge not properly inserted. Remove and rein- sert the cartridge into the cartridge holder. • Clean sensor. • The job has been started from the printer. Restart. Run print job from Envelope Designer Plus. • Bad connection. 1. If this port can communicate with printer using another parallel cable, replace cable. -
Page 76: Print Slanted Or Skewed
Blurry print • Printhead too high. Lower printheads. • Too much dust in printer. Clean rollers and printheads. • Printheads were scratched when cleaned. Replace print cartridge. When cleaning, use proper wipe in correct direction. - Page 77 • Wrongly directed or forceful wipes have driven par- ticles into nozzles. Replace the cartridge. Clean printheads as directed in Chapter 6—Maintenance. • Addresses not positioned properly; too close to center of media. ™ Printer...
-
Page 78: Prints Garbage
Extra lines on media, losing data • Buffer overflow. Check the data in your database. Close the print job screen. Power down printer for a few seconds, then restart print job. SV60970-OG Rev. A... - Page 79 • Center media in input area. (Use "0" reference on ruler.) • Stock direction set wrong. Change from Forward to Reverse or Reverse to Forward where you want to insert the field. ™ Printer...
-
Page 80: Printer Errors
Troubleshooting Printer Errors 8-10 Out of Paper The paper sensor did not detect paper within one second of starting the feeder. Check if input bin is empty. Refill paper. Dirty sensor not seeing media. Clean sensor. Jam blocking path. Clear jam. -
Page 81: Supplies And Options
Supplies and Options Supplies and Accessories ... 9-2 How to Order ... 9-3 Options ... 9-3... - Page 82 Cleaning Kit IMPORTANT: Do not use the alcohol contained in Cleaning Kit 902-1 on printer rollers as it may damage them. The following table summarizes available ink types to help you choose the right ink for your application. Regular Ink...
-
Page 83: How To Order
How to Order To order supplies, access www.pitneybowes.com/supplies You'll find a complete, easy-to-navigate online store that offers a wide assortment of Pitney Bowes supplies at attractive prices. Be sure to take advantage of special quantity pricing and online discounts. Ordering by Phone Call 1-800-243-7824. - Page 84 Supplies and Options Notes SV60970-OG Rev. A...
-
Page 85: Glossary
Appendix A Glossary... - Page 86 [+] key on the printer control panel which advances one menu item when in Setup and Service modes. [-] key on the printer control panel which backs up one menu item when in Setup and Service modes. 2 of 5 Barcode — a barcode describing a series of digits (0-9) in which each digit is represented by five elements.
- Page 87 Printer ™ Belt Speed — the speed at which the printer moves the media past the printhead area. Bitmap — a graphical object made up of a series of dots, some of which are black (or another color), some a contrasting color, which make up the art.
- Page 88 Envelope Size Window — a screen used to set the exact size of the piece being printed so that it appears correctly in the layout screen. Error — a light on the printer which indicates a problem such as a jam or no media loaded.
- Page 89 Head Dividers — in the View Menu, toggles on and off the grey lines used to mark the boundary of a print head area. Head Info — a tab and screen on the Property Sheet (File/Printer Setup) which lists printhead details.
- Page 90 Paper Support — a guide which moves forward and backward to support the media at the correct angle for feeding. Parallel Port — a port on the rear of the printer where the cable to your computer is connected. Pause Job Button — a button that, when pressed, stops the printer and ends the transmission of data to it.
- Page 91 Printer ™ Printer Setup — (in the File menu) opens the Property Sheet which allows you to set and view details on print head information, set tray and package breaks and other functions that are available in Envelope Designer Plus.
- Page 92 Segmented Rollers — replaceable rollers which feed the media into the print area. Separators — part of the printer which separates the media as they are printed. Separator Gap — the adjustable gap between the separators and the feed deck.
- Page 93 Printer ™ Test Print — a key on the printer control panel used to place the printer in test mode. This enables you to test the printer without the software. Also, a light on the printer which indicates that it is powered up and initialized.
- Page 94 Appendix A—Glossary SV60970-OG Rev. A A-10...
-
Page 95: Appendix B Application Notes
Appendix B Application Notes Fixed Head Versus Shuttle-Head Printers ... B-2 Printheads and Bands ... B-2 Color ... B-4 Unprintable Areas ... B-4 Dual Purpose Ruler ... B-5 Other Printer Characteristics ... B-5 Compatibility Issues ... B-6... -
Page 96: Fixed-Head Versus Shuttle Head Printers
Fixed-head printers differ from shuttle-head printers in a few very important ways. The DA900 is a fixed- head printer with six print heads that operate on four bands. Each print head is able to print 1/2 inch of your layout. Therefore, the DA900 is able to print a total of three inches of text and/or graphics. -
Page 97: Printheads And Bands
It is possible to “gang” head 6 to heads 4-5, and gang head 1 to head 2-3, resulting in two 1.5-inch bands. This is useful should you need the extra inch for a large Printer ™... -
Page 98: Color
Fixed Head tab and select Attach to expand the printable area. While color is supported in the DA900, note that its use is different than with other Pitney Bowes AddressRight shuttle-head printers. The DA900 em- ploys “spot color,” meaning that each of the six print heads uses a single-color ink cartridge. -
Page 99: Dual Purpose Ruler
DA900. There is a corresponding ruler on the DA900, with zero in the middle of the printer. Use the left ruler in Enve- lope Designer Plus—using the inch (not millimeter) scale—to determine where to set your print heads. -
Page 100: Compatibility Issues
Appendix B—Application Notes Compatibility Issues The DA900 will work with most text editors, word pro- cessing and mail list programs. We do not however, recommend using Windows Notepad. SV60970-OG Rev. A... -
Page 101: Index
Index... - Page 102 B-4 Colors print incorrectly (wrong colors print) 8-9 Compatibility issues B-6 Computer requirements 2-5 Contents of printer carton 4-2 Control language 2-4 Control panel 3-3, 3-4 DEC computer special parallel port settings for 4-9 Dimensions, equipment 2-4 Display, operator 2-4...
- Page 103 9-3 Operating conditions, environmental 2-4 Operating systems supported 2-5 Operator display 2-4 Options ordering 9-3 Options, available 2-5 Options for your printer 9-3 Ordering supplies and accessories 9-3 Out of paper error 8-10 Output area 3-3 ™ Printer...
- Page 104 Printer characteristics B-5 errors 8-10 fails to respond to software 8-4 preferences 6-5 properties window 6-4 Printer Components, Location of 3-2, 3-3 Feed Ramp 3-2 Input Area 3-2, 3-3 Interface Panel 3-2, 3-3 Separators 3-2, 3-3 Side Guides 3-2 Printer Control Panel Messages 3-5...
- Page 105 8-7 wrong colors print 8-9 wrong/incomplete information prints 8-8 Unprintable areas B-4 Upper exit rollers adjustment 5-9 for Pitney Bowes 8-2 SV60970-OG Rev. A DA900 AddressRight W980 Stacker 2-5 Weight 2-4 White lines/streaks in print 8-7...
- Page 108 One Elmcroft Road Stamford, Connecticut 06926-0700 www.pitneybowes.com *SV60970-OGRevA* Printed on recycled paper PB Form SV60970-OG Rev. A 9/02 © 2002 Pitney Bowes Inc. All rights reserved. Printed in USA.