Pitney Bowes AddressRight DA300 Quick Setup Instructions Manual
Hide thumbs
Also See for AddressRight DA300:
- Operator's manual (120 pages) ,
- Operating manual (96 pages)
Advertisement
Quick Links
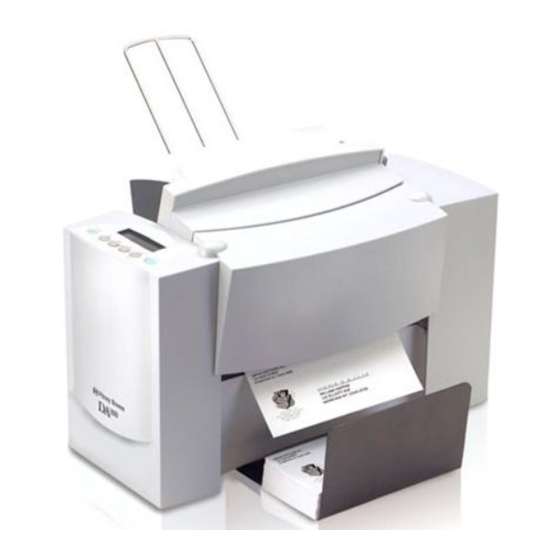
What's What
1. H-Block Separators
2. Input Area
3. Interface Panel
a. Power Switch
b. Power Cord
c. Parallel Connector
d. Serial Connector
4. Wire Frame Input Stacker
5. Material Prop and Lock Knob
6. Wireframe Slide
7. Wireframe Feed Angle Lock
Knob
8. Wireframe Slide Lock Lever
(Not Shown)
9. Feed Fence
10.Control Panel
11.Stacker Tray
12.Output Area
13.Exit Rollers (Not Shown)
14.Top Cover
How to Set Your Printer Up
1. Set the H-Block Separators to the thickness of your material.
2. Center the wireframe input stacker under your material.
3. Set the feed angle of the wireframe to about 45 degrees for standard weight materials. Set it
lower for heavier materials, higher for lighter materials.
4. Set the feed fence to the width of your material plus 1/16th inch.
5. Fan (aerate) your material. Load your material (envelope flaps down and trailing, bottom edge
feeding first).
6. Set the material prop so it's about even with the top of the stack.
7. Adjust the media thickness lever to its mid position.
8. Adjust the exit rollers so they overlap the edges of your material by 1/4 inch.
9. Print a test piece. Readjust media thickness lever to get best print quality.
10.Install the DA300 print driver and Envelope Designer™Plus application.
The following pages explain each step in a general way. The DA300 Operator Guide has complete
instructions.
SV61037 Rev. A 5/03 ©2003 Pitney Bowes Inc. All rights reserved. Printed in USA
Quick Setup Instructions
for your AddressRight
4
3 (see figure below)
5
6
7
8
9
Interface Panel
3a
TM
Printer DA300
2
1
14
3d
3c
3b
13
12
11
10
Advertisement

Related Manuals for Pitney Bowes AddressRight DA300


Summary of Contents for Pitney Bowes AddressRight DA300
- Page 1 10.Install the DA300 print driver and Envelope Designer™Plus application. The following pages explain each step in a general way. The DA300 Operator Guide has complete instructions. SV61037 Rev. A 5/03 ©2003 Pitney Bowes Inc. All rights reserved. Printed in USA...
-
Page 2: Set The Separator Gap
Set the Separator Gap 1. Loosen the lock knobs to unlock all three H-Blocks. 2. Lift the blocks to their highest position lock in place. 3. Place a sample piece of material between the separator fingers (the lower section of Separator Fingers H-Blocks) and the feed roller. -
Page 3: Position The Feed Fence
Position the Feed Fence 1. Place a sample piece of material in the input area. 2. Slide the fence until it almost touches the stack. 3. Check that there's about 1/16" clearance (the thickness of a dime) between the fence and the stack. -
Page 4: Adjust The Media Thickness Lever
Adjust the Media Thickness Lever 1. Set the media thickness lever to its mid position. Lower lever to darken 2. You’ll readjust the lever in step 9 to get printing; raise it to lighten printing the best print quality. Adjust the Exit Rollers 1. -
Page 5: Replacing The Ink Cartridge
Install the DA300 Print Driver and Envelope Designer Plus application 1. Before you can use your printer with your computer, you must install the Pitney Bowes DA300 printer driver. The driver gives your computer information about the printer you're using, and tells the printer about the settings you want to use in your print job. Refer to the... -
Page 6: Fixing Problems
Fixing Problems If this happens... Check this... Printer Fails to Respond • Is the printer connected to a live outlet? • Is the printer’s power switch ON? • Is the printer set to ON LINE? • Is the parallel cable connected at both the printer and computer? •...