
Related Manuals for GLP Joy 300


Summary of Contents for GLP Joy 300
- Page 1 Instruction Manual From Version 1.23 email: service@glp.de Internet: http://www.GLP.de...
- Page 2 German Light Production (V2.1)
-
Page 3: Table Of Contents
Contents Introduction ......................5 1.1 Safety rules.......................6 Installation .......................7 2.1 Mounting ......................7 2.1.1 Clamps ....................7 2.2 Secure the 0 ..................7 2.3 Connectors .......................7 2.3.1 AC Connectors ..................7 2.3.2 DMX .......................7 2.4 Fuse........................7 The Menu Field ......................8 3.1 Adjust the DMX- Address..................8 3.2 Read out the Running Time of Lamp and Unit..........9 3.2.1 Lamp Time 1 ..................9 3.2.2 Lamp Time 2 ..................9... - Page 4 6.2 How to change the lamp .................15 Change the Gobos ....................16 7.1 Safety Rules ....................16 7.2 How to change the Gobos ................16 Maintenance the 0 ..................17 8.1 Mirror and Optical System ................17 Technical Data / Overview ..................18 German Light Production (V2.1)
-
Page 5: Introduction
1 Introduction Illustration 1-1 German Light Production (V2.1) -
Page 6: Safety Rules
1.1 Safety rules 0 is a High-Tech Product. To guarantee a smooth operation, it is necessary to keep following rules. 1. Make sure that the mirror of the 0 , can move without any mechanical problems and that all fan openings are clean and not blocked by anything. 2. -
Page 7: Installation
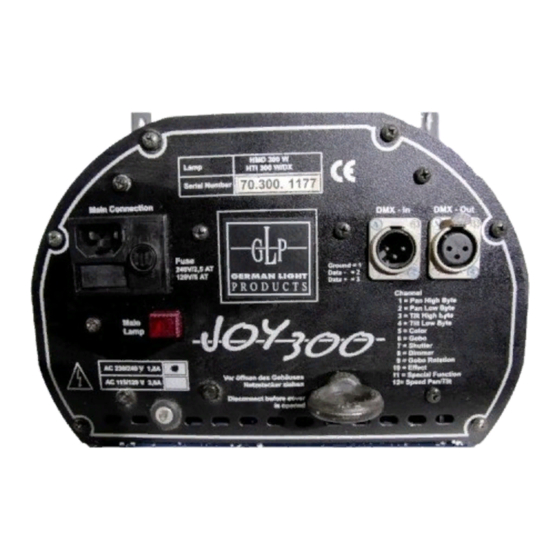
Installation 2.1 Mounting 0 is fully operational whether it hangs or is mounted to the wall. 2.1.1 Clamps Mount clamps and/or hooks directly to the bow of the . Please make sure to use right sized clamps and hooks and fit them securely. 2.2 Secure the Use always safety wires to secure the 0 , connect them with the eyelet (see... -
Page 8: The Menu Field
The Menu Field Menü Cursor Data- Data+ 3.1 Adjust the DMX- Address Right after turning on the 0 you can see the current DMX- Address. Choose this as follows: Count up or down the DMX- Address with the Data + or Data – buttons. After pushing the Cursor button the upcounting speed increases to a multiple. -
Page 9: Read Out The Running Time Of Lamp And Unit
3.2 Read out the Running Time of Lamp and Unit Select the time level by pressing the Menu key twice. Select the requested time by pressing the Cursor key, 3.2.1 Lamp Time 1 The current lamp time is shown alternating with LA 1. This time can be cleared by pressing the Data + and Data –... -
Page 10: The Test Level
3.4 The Test Level The Test Level makes a selftest procedure possible. Select the Selftest Procedure by pressing the Menu key three times. Start the Selftest program by pressing the Cursor key. The lamp will be started automatically and a selftest procedure with 8 steps will run. To leave the selftest press the Menu key again. -
Page 11: Channel Selection (Overview Table)
Channel selection (Overview table) Channel Description Value in % 1) PAN – High 0..170° 0..255 00..FF 0..100 High-Pos .. High-Pos + 0,7° 0..255 00..FF 0..100 2) PAN – Low 0..110° 0..255 00..FF 0..100 3) TILT – High 4) TILT – Low High-Pos .. - Page 12 Channel Description Value in % Audio Gobo-change slow Audio Gobo-change fast 7) Shutter Shutter closed 0..15 00..0F 0..6 Shutterfrequence slow – fast 16..239 10..EF 7..93 Shutter open 240..255 F0..FF 94..100 8) Dimmer Dimmer closed (0%) 0..15 00..0F 0..6 Dimmer 1%...99% 16..239 10..EF 7..93...
- Page 13 Channel Description Value in % Next Time in 1/10 sec 5..199 05..C7 3..78 Audio – min. Time 1 sec 200..209 C8..D1 79..82 Audio – min. Time 2 sec 210..219 D2..CB 83..85 Audio – min. Time 3 sec 220..229 DC..E5 86..89 Audio –...
-
Page 14: Programming The J O Y - 3 0
Programming the You can program the 0 in a standalone program within 25 steps. This program can run automatically after turning on the unit. This means you need a DMX Controller for programming but not for running the stand alone program. 5.1 Engage the Program Mode Normal - Mode: Receive standard DMX signal. -
Page 15: Call On The Standalone Program
5.3 Call on the Standalone Program Engage the Send – Mode at the The program starts automatically after turning on the unit. In the display you can see the Next Time for the following step. At the last step the program will jump automatically to the beginning of the program. -
Page 16: Change The Gobos
Change the Gobos 0 is fitted with standard Gobos (∅26 mm, picturesize 22mm). 7.1 Safety Rules • Unplug AC power connection • Allow to cool (over 30 minutes) • Don’t touch lamp with bare fingers. • Close the 0 before you connect the AC power! 7.2 How to change the Gobos Please look also Illustration 1-1. -
Page 17: Maintenance The J O Y - 3 0
Maintenance the The cleaning of the inner optical System, color filters, color correction filter and lenses should be done by qualified person only! Contact your local GLP Dealer for details. Use no strong detergents, acid etc. for cleaning the case. -
Page 18: Technical Data / Overview
Technical Data / Overview • AC 230V/1,8 AT or AC 115V/3,6 AT • HTI 300 W/DX Lamp with 750 h lifetime or, HMD 300 W Lamp with 3000 h lifetime • Power compensated • DMX 512 Standard • Weight 16 kg •... - Page 19 German Light Production (V2.1)
Need help?
Do you have a question about the Joy 300 and is the answer not in the manual?
Questions and answers