Advertisement
Quick Links
AM100
Installation Guide
Installationsanleitung, Guía de Instalacíon, Guida de Installazione, Guide d'Installation, Installatie gids
Warranty, Garantie, Garantía, Garanzia, Garantie, Waarborg: http://www.mounts.com/warranty
9531-100-001-01
www.mounts.com | North America 800.368.9700 | International +1-714-632-7100 | Europe +44 (0) 24 7664 4105
1321 S. State College Blvd., Fullerton, CA 92831 USA
Advertisement

Subscribe to Our Youtube Channel
Related Manuals for Premier Mounts AM100


Summary of Contents for Premier Mounts AM100
- Page 1 AM100 Installation Guide Installationsanleitung, Guía de Instalacíon, Guida de Installazione, Guide d’Installation, Installatie gids Warranty, Garantie, Garantía, Garanzia, Garantie, Waarborg: http://www.mounts.com/warranty 9531-100-001-01 www.mounts.com | North America 800.368.9700 | International +1-714-632-7100 | Europe +44 (0) 24 7664 4105 1321 S. State College Blvd., Fullerton, CA 92831 USA...
-
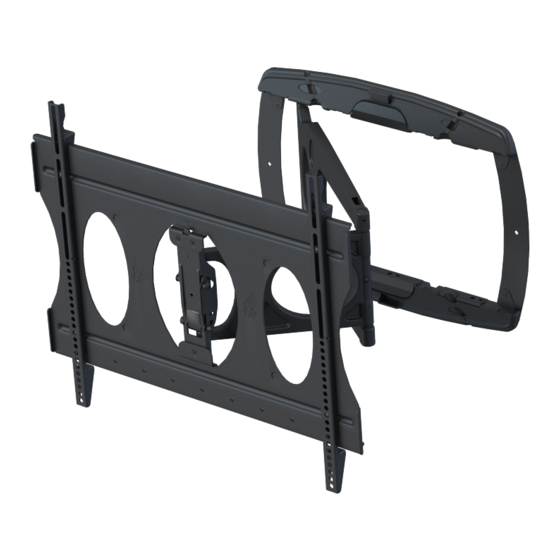
Page 2: Included Components
1/2”/14mm (Wood Only) Remove the plastic hole covers from the upper and lower Prior to initial step 1 of the installation, your AM100 can easily Set Screw plates. Loosen the (2) set screws on the plate using the have the main “swing left” pivot point of the main swing out Locations 2.5mm allen key supplied. - Page 3 Installation Guide Installationsanleitung, Guía de Instalacíon, Guida de Installazione, Guide d’Installation, Installatie gids Take the thick cardboard mounting template supplied and Using a suitable stud-finder device for frame walls, mark the place the it over the mounting studs with the screen center position of the stud centers.
- Page 4 Installationsanleitung, Guía de Instalacíon, Guida de Installazione, Guide d’Installation, Installatie gids Re-install the front wall arm plate to the arm with the three Raise the AM100 assembly so the mounting slots are over M5 flat head screws you set aside earlier. Confirm screws the four drilled mounting holes.
- Page 5 Installation Guide Installationsanleitung, Guía de Instalacíon, Guida de Installazione, Guide d’Installation, Installatie gids With the upper and lower security screws loosened on each Once the correct pitch and depth screws are pulled from bracket (two people recommended) raise the display and...
- Page 6 Installation Guide Installationsanleitung, Guía de Instalacíon, Guida de Installazione, Guide d’Installation, Installatie gids Install the upper and lower “push on” plastic “beauty covers” We recommend where possible that the power and signal to the upper and lower wall plates. Reinstall the upper and cables be run separately through the mount until mating at lower plastic cable covers to the mounts main swing arm.
- Page 7 Installation Guide Installationsanleitung, Guía de Instalacíon, Guida de Installazione, Guide d’Installation, Installatie gids 26.33 32.20 1.50 23.06 15° 24.80 MAX TILT 1.60 29.49 20.73 15.86 12.56 21.38 16.00 1.00 18.00 1.85 34.16 23.66 (D2) (D2) 10.50 21.00 12.12 (D1)
- Page 8 What Premier Mounts Will Do At the sole option of Premier Mounts, Premier Mounts will repair or replace any product or product part that is defective. If Premier Mounts chooses to replace a defective product or part, a replacement product or part will be shipped to you at no charge, but you must pay any related labor costs.
Need help?
Do you have a question about the AM100 and is the answer not in the manual?
Questions and answers