Table of Contents
Advertisement
Quick Links
Release Date: June 30, 2003
Publication Number: TP01057
Revision Date: NA
Revision: A
Visit the IMI Cornelius web site at www.cornelius.com for all your Literature needs.
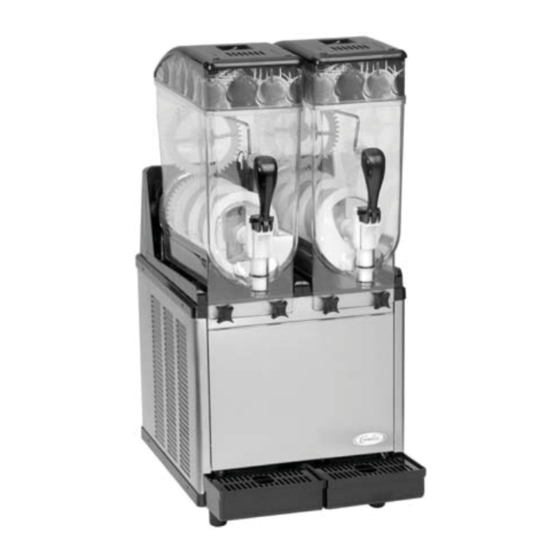
ICE PEAK
Granita
Training Manual
®
Distributed By:
Commercial Refrigeration Service, Inc.
http://WWW.IceCubes.NET
http://WWW.JetsprayParts.COM
(623) 869-8881
(866) 423-6253
Advertisement
Table of Contents

Related Manuals for Cornelius Granita


Summary of Contents for Cornelius Granita
- Page 1 Training Manual Distributed By: Commercial Refrigeration Service, Inc. http://WWW.IceCubes.NET Release Date: June 30, 2003 http://WWW.JetsprayParts.COM (623) 869-8881 Publication Number: TP01057 (866) 423-6253 Revision Date: NA Revision: A Visit the IMI Cornelius web site at www.cornelius.com for all your Literature needs.
- Page 2 800-238-3600 FAX:763-422-3297 FAX:800-535-4231 Trademarks and Copyrights: Aurora, Cornelius, Decade, Hydro Boost, Sitco, Spirit, UF-1, Vanguard, Venture, Olympus, and Vista are registered trademarks of IMI Cornelius Inc. Optifill trademark is pending. This document contains proprietary information and it may not be reproduced in any way without permission from Cornelius.
-
Page 3: Table Of Contents
Replacing the Light Bulbs (As Needed) 20 Seal Maintenance 22 Bell Shaped Seal 22 Spindle Bushing Seal 22 Bowl Gasket (located at rear of bowl) 23 O-Ring Maintenance 23 © 2003, IMI Cornelius Inc. - i - Publication Number: TP01057... - Page 4 Troubleshooting 27 Appendix A - Component Replacement 33 Gear Motor Removal 33 Viscosity Switch Removal 36 Condenser Filter Replacement 37 Transformer Removal 38 Service Control Board 39 Review 41 Publication Number: TP01057 - ii - © 2003, IMI Cornelius Inc.
-
Page 5: Introduction
Do not wait for the filter alarm to sound before cleaning the condenser, it should be done monthly or more often if necessary. • It is best not to turn the unit power off at night as it causes the product to separate. © 2003, IMI Cornelius Inc. - 1 - Publication Number: TP01057... - Page 6 Ice Peak Training Manual Publication Number: TP01057 - 2 - © 2003, IMI Cornelius Inc.
-
Page 7: Overview
Advanced functionality includes daily defrost times, bowl temp display, time display, and condenser filter alarm. In addition, the dispensers can be set to the refrigeration mode, allowing overnight storage. © 2003, IMI Cornelius Inc. - 3 - Publication Number: TP01057... -
Page 8: Option Section
Condition: The filter in not properly installed. Corrective Action: Properly install the filter. • Condition: The unit has been installed near a heat source. Corrective Action: Reposition the unit to maximize ventilation space. Publication Number: TP01057 - 4 - © 2003, IMI Cornelius Inc. - Page 9 Press the “Auto Timer” clock button to set the minutes to complete time setting that you want it to turn to refrigeration mode, (defrost mode). Then press the “Press To Select Function” button to save the setting. © 2003, IMI Cornelius Inc. - 5 - Publication Number: TP01057...
- Page 10 • When this alarm activates, turn off all switches. Then determine the condition (see “Filter Cleaning” Alarm section for conditions and corrective actions. Publication Number: TP01057 - 6 - © 2003, IMI Cornelius Inc.
-
Page 11: Switch Control Board
Bowl Thermostats, Rocker Switch Models only. Used to maintain bowl temperature while in the refrigeration mode. Distributed By: Commercial Refrigeration Service, Inc. http://WWW.IceCubes.NET http://WWW.JetsprayParts.COM (623) 869-8881 (866) 423-6253 FIGURE 5 Bowl Thermostat Controls © 2003, IMI Cornelius Inc. - 7 - Publication Number: TP01057... -
Page 12: Setting Defrost, Rocker Switch Models
NOTE: In the cooling mode, the LED will read the actual temperature of the product (the tempera- ture setting is preset to NSF standards and is not adjustable.) In the “Freeze” or “Off” mode the LED will read the current time. Publication Number: TP01057 - 8 - © 2003, IMI Cornelius Inc. -
Page 13: High Pressure Cut Out Switch
They are factory set at: Cut Out 30 bar; Cut In 22 bar NOTE: It is a good idea to confirm the settings at the time of installation and when ever service work is performed. FIGURE 9 FIGURE 8 © 2003, IMI Cornelius Inc. - 9 - Publication Number: TP01057... -
Page 14: Optional Accessories
PTIONAL CCESSORIES Auto Fill Installation and Operation The Cornelius Auto Fill Kit is intended for use with 5:1 BIB (Bag-In-Box) syrup concentrates. Other ratios are available by request. To install and operate the Auto Fill Kit, follow the instructions below. -
Page 15: Security Kit Installation
Remove the lower rear panel from the Granita Auto Fill dispenser. Route the 3/8” syrup and water lines from the Auto Fill box up through the back of the Granita Auto Fill dispenser. Attach a syrup and water line to each respective bowl as shown. -
Page 16: Electrical Diagram Black Box Auto Fill
Ice Peak Training Manual Electrical Diagram Black Box Auto Fill Brix Pumps Water Inlet FIGURE 14. Water Inlet Connection Probe Connections FIGURE 13 Publication Number: TP01057 - 12 - © 2003, IMI Cornelius Inc. -
Page 17: Mounting
Q.C.D. used is determined by the company packaging the concentrate. Concentrates which are highly viscous and/or contain solids, may be packaged with connection that uses a less restrictive Q.C.D. and 1/2” (13mm) I.D. tubing. © 2003, IMI Cornelius Inc. - 13 - Publication Number: TP01057... -
Page 18: Outlet Lines To The Dispenser
If the finished drink flow rate is not as desired, adjust the regulator (50psi (3.4 bar)). If using a fixed pressure reducer, adjust the water shut-off valve to obtain the desired finish drink flow rate. Publication Number: TP01057 - 14 - © 2003, IMI Cornelius Inc. -
Page 19: System Details
ATER UALITY Use only high quality filtered water when mixing product for the Granita machine. The best product will not taste good if poor quality water is used in its preparation. Make sure the Brix of the product is at least 13.0 to prevent damage to mixing parts and gear motors. -
Page 20: Consistency Adjustment
(+/-). (+) = thicker, (- Lever ) = thinner. NOTE: This indicator lever is a gauge only. To adjust con- sistency, turn adjusting screw on top. FIGURE 21 Publication Number: TP01057 - 14 - © 2003, IMI Cornelius Inc. -
Page 21: Cleaning And Sanitizing Procedures
• Simultaneously apply pressure to the 2 mounting tabs (A) and lift the dispensing valve (B) to pull it out of its position. FIGURE 24 Remove the product bowl by pulling it downwards. © 2003, IMI Cornelius Inc. - 15 - Publication Number: TP01057... - Page 22 • Replace the auger assembly on the evaporator. • Secure all the parts in place by screwing on the securing bolt counterclockwise. Publication Number: TP01057 - 16 - © 2003, IMI Cornelius Inc.
- Page 23 NOTE: Add 4 ounces of Stera Sheen to 4 gallons (15 liters) of 120 F (50 C) water to achieve a concentrate of 100 parts per million. FIGURE 30 © 2003, IMI Cornelius Inc. - 17 - Publication Number: TP01057...
- Page 24 Prepare a minimum of 4 gallons (15 liters) of sanitizing solution (Stera Sheen Label or equivalent) following the manufacturer’s instructions. Distributed By: Commercial Refrigeration Service, Inc. http://WWW.IceCubes.NET http://WWW.JetsprayParts.COM (623) 869-8881 (866) 423-6253 Publication Number: TP01057 - 18 - © 2003, IMI Cornelius Inc.
-
Page 25: Maintenance
Unplug the machine. Remove the back panel and filter. Remove the dust that has accumulated between the fins of the condenser using a dry brush or vacuum. FIGURE 33 © 2003, IMI Cornelius Inc. - 19 - Publication Number: TP01057... -
Page 26: Replacing The Light Bulbs (As Needed)
Carefully remove the light bulb while holding the merchan- dising cover with the top open. Insert the new bulb and replace the light cover. Place lid on machine and plug lid cord back into lid. FIGURE 35 Publication Number: TP01057 - 20 - © 2003, IMI Cornelius Inc. - Page 27 Insert the new light bulb(s) (BA). ;Bracket Reassemble the rear back-lit merchandiser making sure that its slots are inserted properly in the relevant brackets. Plug machine into the power supply. Light Bulb FIGURE 37 © 2003, IMI Cornelius Inc. - 21 - Publication Number: TP01057...
-
Page 28: Seal Maintenance
Insert the brass guide tool on the drive shaft. Slip the spindle bushing over the guide tool and firmly press into place. Spindle Bushing Brass Guide Tool FIGURE 39 Publication Number: TP01057 - 22 - © 2003, IMI Cornelius Inc. -
Page 29: Bowl Gasket (Located At Rear Of Bowl)
Lubricate the O-rings each time they are replaced or the dispense handle is removed for clean- ing. Distributed By: Commercial Refrigeration Service, Inc. http://WWW.IceCubes.NET http://WWW.JetsprayParts.COM (623) 869-8881 (866) 423-6253 © 2003, IMI Cornelius Inc. - 23 - Publication Number: TP01057... -
Page 30: Refrigeration Diagram
Dryer Left Capillary Tube Left Evaporator Left Accumulator Left Compressor Right Right Cut-Out Dryer Right Capillary Tube Right Evaporator Right Accumulator Right C & CFM Condenser and Condenser Fan Motor Publication Number: TP01057 - 24 - © 2003, IMI Cornelius Inc. -
Page 31: Electrical Diagram
Lid Lamp Right GMFL Gear Motor Fan Left Microswitch Left Thermostat Left Microswitch Right Gear Motor Right Time Delay Board GMFR Gear Motor Fan Right Back Lamp Left Back Lamp Right © 2003, IMI Cornelius Inc. - 25 - Publication Number: TP01057... - Page 32 Ice Peak Training Manual LECTRONIC ONTROL EFRIGERATION IAGRAM Publication Number: TP01057 - 26 - © 2003, IMI Cornelius Inc.
- Page 33 Ice Peak Training Manual LECTRONIC ONTROL LECTICAL IAGRAM © 2003, IMI Cornelius Inc. - 27 - Publication Number: TP01057...
- Page 34 Ice Peak Training Manual Publication Number: TP01057 - 28 - © 2003, IMI Cornelius Inc.
-
Page 35: Troubleshooting
The main power is not functioning Replace the switch Product is leaking out of the bowl • One of the bowl seals is not in • Replace or reposition the seals place © 2003, IMI Cornelius Inc. - 27 - Publication Number: TP01057... - Page 36 (Installation near a heat source should be avoid) Publication Number: TP01057 - 28 - © 2003, IMI Cornelius Inc.
- Page 37 Ice Peak Training Manual NOTES _________________________________________________________________________________ _________________________________________________________________________________ _________________________________________________________________________________ _________________________________________________________________________________ _________________________________________________________________________________ _________________________________________________________________________________ _________________________________________________________________________________ _________________________________________________________________________________ _________________________________________________________________________________ _________________________________________________________________________________ _________________________________________________________________________________ _________________________________________________________________________________ _________________________________________________________________________________ _________________________________________________________________________________ _________________________________________________________________________________ _________________________________________________________________________________ _________________________________________________________________________________ _________________________________________________________________________________ _________________________________________________________________________________ _________________________________________________________________________________ _________________________________________________________________________________ © 2003, IMI Cornelius Inc. - 29 - Publication Number: TP01057...
-
Page 38: Transformer Removal
(steps 1-2) to install a new evaporator thermostat. FIGURE 44 Transformer Removal Remove left side panel. Remove 1 - 10mm nut and slip the transformer off of its mounting stud. FIGURE 46 FIGURE 45 Publication Number: TP01057 - 30 - © 2003, IMI Cornelius Inc. -
Page 39: Service Control Board
FIGURE 48 c. Remove the 2 screws from the upper plastic molding and lift the left side panel out of the lower plastic molding. Screws FIGURE 49 © 2003, IMI Cornelius Inc. - 31 - Publication Number: TP01057... - Page 40 Remove 2 - 7/32 nuts and lock washers that hold the control board in place. FIGURE 50 Remove the front access panel to gain access to the high pressure cut out switch. Publication Number: TP01057 - 32 - © 2003, IMI Cornelius Inc.
- Page 41 Note: The top screw is shorter then the 2 screws on the bottom. Merchandiser Light FIGURE 54 FIGURE 53 Remove the rear access panel and condenser filter. Rear Access Panel Condenser Filter FIGURE 56 FIGURE 55 © 2003, IMI Cornelius Inc. - 33 - Publication Number: TP01057...
- Page 42 Remove the 2 mounting screws from the gear motor cooling fan. Disconnect the ground wire and power connection. Power Connector Mounting Ground Screws Wire FIGURE 60 FIGURE 59 Remove the viscosity adjustment assembly. Mounting Tension Spring FIGURE 62 FIGURE 61 Publication Number: TP01057 - 34 - © 2003, IMI Cornelius Inc.
- Page 43 Apply grease to this area when you when you install the gear motor. install the gear motor. FIGURE 64 FIGURE 65 Distributed By: Commercial Refrigeration Service, Inc. http://WWW.IceCubes.NET http://WWW.JetsprayParts.COM (623) 869-8881 (866) 423-6253 © 2003, IMI Cornelius Inc. - 35 - Publication Number: TP01057...
- Page 44 Auger Drive Shaft Shear FIGURE 67 Remove the gear drive motor (Gear Motor Removal, steps 1-7) before replacing a bowl temperature sensor. Bowl Temp Sensor FIGURE 68 FIGURE 69 Publication Number: TP01057 - 36 - © 2003, IMI Cornelius Inc.
- Page 45 Remove the 2 13 mm bolts that hold the condenser fan motor bracket in place and pull the assembly out of the chassis. Moving the Compressor Condenser Fan for Fan Motor Motor Bolts Clearance FIGURE 72 FIGURE 73 © 2003, IMI Cornelius Inc. - 37 - Publication Number: TP01057...
- Page 46 Mounting Stud Transformer Mounting Washer Remove the left side panel (see Condenser Fil- ter Replacement, step 1) to service fuses. Low Voltage Fuse 10A High Voltage Fuses 20A Publication Number: TP01057 - 38 - © 2003, IMI Cornelius Inc.
- Page 47 Use caution when separating the display and main board not to loose the plastic stand offs. NOTE: It is a good idea to mark all connections before disconnecting the wires. Plastic Stand Off Main Board Display Board Connector I.D. © 2003, IMI Cornelius Inc. - 39 - Publication Number: TP01057...
- Page 48 Remove the front access panel to gain acc3es to the high pressure cut out switches (see Condenser Foam Replacement, step 2). LECTRICAL IAGRAM Found on the Back of the Front Access Panel FIGURE 78 Publication Number: TP01057 - 40 - © 2003, IMI Cornelius Inc.
-
Page 49: Review
REVIEW DATE: ____________________________________________________________________ NAME: ___________________________________________________________________ LOCATION: ___________________________________________________________________ The following questions summarize important points in this training lesson. Should we specify Dow 111 lubricant?___________________________________________ At what temperature does the filter alarm sound and what triggers it?___________________ At what temperature does the system alarm sound and what triggers it?_________________ What is the pre set NSF temperature and how is it controlled?________________________ How long are the settings saved to memory?______________________________________ How is the stand by refrigeration mode controlled?_________________________________... - Page 51 Distributed By: Commercial Refrigeration Service, Inc. http://WWW.IceCubes.NET http://WWW.JetsprayParts.COM (623) 869-8881 (866) 423-6253 IMI Cornelius Inc. One Cornelius Place Anoka, MN 55303-1592 U.S.A.
Need help?
Do you have a question about the Granita and is the answer not in the manual?
Questions and answers