Table of Contents
Advertisement
Quick Links
Advertisement
Table of Contents

Related Manuals for CNB XNET IBP5030CR


Summary of Contents for CNB XNET IBP5030CR
- Page 1 Ver. 1.0 XNET (IBP5030CR) Installation Manual...
-
Page 2: Important Notices
Important Notices The copyright of this manual is owned by CNB Technology Inc. It is illegal to copy and distribute this manual without permission. Damages caused by use of not suggested parts and misuse will not be applicable for support. -
Page 3: Table Of Contents
Network Weatherproof Camera Installation Manual Index 1. About XNET ........................4 1.1. About XNET ..........................4 1.2. XNET - Highlights ........................4 1.3. XNET Applications ........................4 2. About the Product ......................5 2.1 Contents ............................ 5 2.2 Product Information ........................5 2.3 Hardware ........................... -
Page 4: About Xnet
Network Weatherproof Camera Installation Manual 1. About XNET 1.1. About XNET XNET is an internet based surveillance system that is compatible with various network conditions through easy installation, user interface, and multi-Codec such as MJPEG, MPEG-4, and H.264. XNET provides stable real-time surveillance by monitoring live mega pixel video and audio with local storage (in case of any network problems) and hybrid IP technology that can be integrated into the existing analog CCTV systems. -
Page 5: About The Product
Network Weatherproof Camera Installation Manual 2. About the Product 2.1 Contents Please make sure that no contents listed below are missing in the package IBP5030CR PRODUCT SUNVISOR L Wrench BOLT AND SCREW BRACKET SUPPORT Power and Video Adaptor and Power Cable Terminal RJ45 SCREW 2.2 Product Information... -
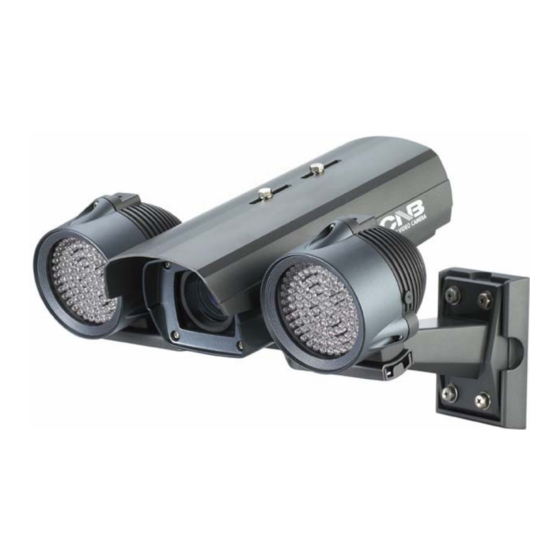
Page 6: Hardware
Network Weatherproof Camera Installation Manual 2.3 Hardware 2.3.1 Hardware Designation Complete System ① Sunvisor fix Screw: Fixes Sunvisor on the Camera ② Photo Sensor ③ IR Illuminator : automatically illuminates depending on the light intensity ④ Sunvisor : Protects the camera against rain, snow, and direct sunlight ⑤... -
Page 7: Camera Module - Rear
Network Weatherproof Camera Installation Manual 2.3.2 Camera Module – Rear As shown in the picture above, open up the rear cap by undoing the four screws on the corners. Main body Rear body ① Illuminator Control Connector : controls the IR LED units ②... -
Page 8: Cable Connection
Network Weatherproof Camera Installation Manual 2.3.3 Cable Connection Power Input(#1, #2) Use the cable adapter in the package to connect power. Red –+12V DC, Black - GND Please use the accessory power supply provided in the package. (DC12V/5A) Analog Video Output (#7, #8) Use this output for immediate monitoring of the video during installation. -
Page 9: Network Cable
Network Weatherproof Camera Installation Manual 2.3.4 Network Cable The waterproof cable from the product can be connected to a 10Mbps or 100Mbps Ethernet, and it uses a standard RJ-45 connector. Please follow the order listed below for network connection. 1. Cut the outer Jack of the 2. -
Page 10: Adjusting Zoom And Focus
Network Weatherproof Camera Installation Manual 2.3.5 Adjusting Zoom and Focus As shown in the picture below, open up the front cap by undoing the four screws on the corners. Loosen the zoom and focus fix lever for adjustment, and tighten them back after. Focus Handle Use this lever to adjust the focus of the Lens Zoom Handle... -
Page 11: Mounting The Camera
Network Weatherproof Camera Installation Manual Alarm Output This terminal can only be connected up to DC 30V/400mA. An additional relay switch is needed to control higher voltage or current. Internal Circuitry External Connection 2.3.7 Mounting the Camera 1. Install Sunvisor to the Camera’s MAIN BODY using Sunvisor blocks, washers, and screws. 2. -
Page 12: Software Installation
Network Weatherproof Camera Installation Manual 3. Software Installation This section provides brief guidelines on installing the XNET software and using it to monitor Video and Audio. If you have questions about details not explained in this section or if the product is not functioning as described, please refer to FAQ before contacting your provider. -
Page 13: Installing Ip-Installer Software And Configuring Ip Address
Network Weatherproof Camera Installation Manual 3.2. Installing IP-Installer Software and Configuring IP address 3.2.1. About IP-Installer A unique IP address is required in order to connect the network camera to the network and have a Client PC connected to the camera remotely through the network. IP-Installer software, provided in the Installation CD and also available to download from http://www.cnbtec.com, makes it easy to configure the IP address. - Page 14 Network Weatherproof Camera Installation Manual Select the camera you wish to configure and click (Set IP Address) button to open the box shown in Figure 3-2. Figure 3-2. Set IP Address box 3. When you enter the IP address and click Set button, the box shown in Figure 3-3 will appear. Figure 3-3.
-
Page 15: Using Web Viewer
Network Weatherproof Camera Installation Manual 4. Using Web Viewer You can connect to the network camera using a web browser or “XNET-CMS” software. For instructions on how to use XNET-CMS software, please refer to XNET-CMS Manual, provided in the installation CD. 4.1. - Page 16 Network Weatherproof Camera Installation Manual Enter the user name and password to bring up the web viewer page. The default id and password is “root” and “admin” respectively. If you changed the HTTP port number from the default value, put a colon and port number at the end of the IP address.
-
Page 17: Web Viewer Page
Network Weatherproof Camera Installation Manual 4.2. Web Viewer Page Web viewer page consists of Video area and menu area. Figure 4-2. Web Viewer page 17 / 20... -
Page 18: Sub Menu Description
Network Weatherproof Camera Installation Manual Menu Description Menu Captures and saves the current Video frame as a still image. Capture The image is saved as jpeg file in the following folder: C:₩xNetCapture You can access the setup page for each XNET feature from this main setup page. Setting Please refer to [XNET Owner’s Manual] for detail. -
Page 19: Specifications
Configurable Brightness, Sharpness, White Balance Ipv4, HTTP, HTTPs, UDP, TCP, RTSP, RTP, SMTP, FTP, ICMP, DHCP, UPnP, Bonjour, Protocol ARP, DNS, DynDNS, NTP, IGMP(Multicast) *) OnVif 1. CNB DDNS 2. DynDNS.org Supported DDNS Network 3. Reference code with SDK Video access from... - Page 20 Web Viewer (Window Web Browser Base) Live view for up to 10 user clients Monitoring Application Video Snapshot to file (JPEG) XNET NVR, CNB CMS and Utility (IP-Installer, etc) System Upgrade Firmware upgrade over HTTP Maintenance Digital Input / Output Control...
Need help?
Do you have a question about the XNET IBP5030CR and is the answer not in the manual?
Questions and answers