Table of Contents
Advertisement
Advertisement
Table of Contents

Subscribe to Our Youtube Channel
Related Manuals for Yukon Trail Badger 100


Summary of Contents for Yukon Trail Badger 100
- Page 1 Read Instructions Before Using Your New Badger 100...
-
Page 2: Table Of Contents
Table of Contents NOTICE...............2 SAFETY GEAR...............3 LOCATION OF LABELS.............4 SPECIFICATIONS.............5 LOCATION OF PARTS............6 OPERATION ..............7 LEFT AND RIGHT HAND GRIP.........7 ENGINE ON/OFF SWITCH AND PULL CORD......7 FUEL FILL........... ..8 FUEL VALVE........ -
Page 3: Notice
NOTICE! NOTICE! Failure to follow these instructions nullifies any warranty, whether stated or implied. Before operating your Badger 100 Mini Bike Warning! A pre-operation check must be conducted, before starting the engine, insure safety, prevent mishaps, and damage to components. -
Page 4: Safety Gear
CAUTION Never perform any unauthorized modifications to this vehicle. Only use original replacement part which can be obtained through YUKON TRAIL INC. 877-441-6999 DO NOT RETURN STORE. For questions regarding assembly and use, call Customer Service: 877-441-6999. -
Page 5: Location Of Labels
LOCATION OF LABELS DO NOT RETURN STORE. For questions regarding assembly and use, call Customer Service: 877-441-6999. -
Page 6: Specifications
SPECIFICATIONS Description Data Description Data 1295mm Overall length Bore x Stroke 52 X 45 (51 inch) 476.2mm PTO shaft Overall width Counter clockwise (18.75 inch) rotation 863.6mm Displacement Overall height 97cc (34 inch) of cylinder 927.1mm NGK- 6RTF, BM4A, Wheelbase Spark plug (36.5 inch) BMR4A... -
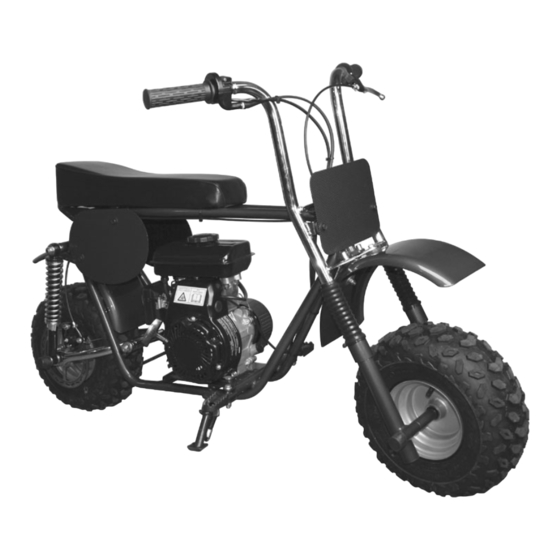
Page 7: Location Of Parts
LOCATION OF PARTS Hand Brake Seat Cushion Side Panel Spark Plug Rear Shock Rear Wheel Clutch Cover Oil Fuel Plug Drive Chain Front Shock Front Wheel Throttle Handle Front Fender Gas Tank Air Filter Rear Fender Rear Shock Brake Caliber Pull Start Cord Footrest Kickstand... -
Page 8: Operation
LEFT AND RIGHT HAND GRIP OPERATION Brake Lever Throttle control grip Left Hand Grip Right Hand Grip OFF button Pulling in brake lever located on left hand grip will stop mini bike. Applying the hand throttle (moving throttle counter clockwise) will cause engine rpms to increase, causing mini bike to move forward. -
Page 9: Fuel Fill
FUEL AND FUEL VALVE OPERATION Fuel filling The capacity of the fuel tank is 4.2L (.95 gal) . Unscrew the gas cap by turning it counter clockwise and carefully fill the tank with unleaded gasoline through the opening. DO NOT MIX GAS AND OIL TOGETHER, THIS IS A 4-STROKE ENGINE. -
Page 10: Inspection Before Riding
INSPECTION BEFORE RIDING ITEM TO CHECK CONTENT Steering Smoothness; No restriction of movement; No play or looseness Brakes Proper brake lever free play; enough brake force. Tires Proper air pressure; Enough tread depth; No cracks, rips, or other damages Note: Check tire pressure, spec is located on side of tire. -
Page 11: Engine Starting And Stopping
ENGINE STARTING AND STOPPING Never start the engine in a closed place as the exhausted gas from the vehicle contains toxic carbon monoxide. 1. Ensure there is fuel in fuel tank and oil in crank case. 2. Set fuel valve lever to “ON” position 3. -
Page 12: Inspection And Maintenance
INSPECTION AND MAINTENANCE CHECKING THE OIL Check engine oil each time prior to operating mini bike. The oil level should be between upper and lower lines of oil gauge. 1. Set the Mini Bike on level ground, screw off the oil gage plug, wipe the oil gage rod clean and then insert the gage plug into the crankcase again to check the oil level. -
Page 13: Changing The Oil
INSPECTION AND MAINTENANCE Changing the Oil 1. Remove the “Screw Plug” located at the bottom of the engine and let the oil drain into an approved collection container. DO NOT PERFORM THIS PROCEDURE WHILE THE ENGINE IS HOT. SERIOUS BURNS COULD RESULT FROM CONTACT WITH HOT OIL. 2. -
Page 14: Checking & Cleaning Air Filter
CHECKING & CLEANING THE AIR FILTER 1. Locate Air Filter Box at rear of engine 2. Remove air filter cover by unscrewing Phillips head screw 3. Remove foam Air filter element. 4. Tap Air filter element gently to remove most of the dust and dirt. 5. -
Page 15: Adjusting Throttle Cable
ADJUSTING THE THROTTLE CABLE Make sure the throttle cable is adjusted properly. To adjust throttle cable, rotate adjustment nut located at the hand throttle. Check if the throttle twist grip has the required free operating movement. The required free operating movement: 2-6mm (.078 -.24in) . If the grip cannot be moved freely, turn the adjusting nut to ensure proper operating movement. -
Page 16: Adjustment Of Rear Brake
ADJUSTMENT OF REAR BRAKE 1. The front brake hand grip should have free operating movement of 5-7mm (.2-.3in) . Adjust with free play adjustment bolt. 2. To make rear brake pad adjustment, turn rear adjusting bolt clockwise to loosen and counter clockwise to tighten brake tension. -
Page 17: Adjustment Of Chain
ADJUSTMENT OF CHAIN 1. When chain adjustment is needed, loosen 4 bolts under engine. 2. Move engine forward to tighten chain or backward to loosen chain. 3. Tighten bolts under engine Torque bolts to 25 ft./lbs. 4. Repetitively check tension of chain. Loosen Tighten Chain... -
Page 18: Clutch Cleaning And Maintenance
CLUTCH CLEANING AND MAINTENANCE After every 5 hour of use, your clutch will need cleaning and lubrication. If clutch becomes too dirty or has lack of lubrication, the clutch will have a tendency to stick. This will cause the Mini-Bike to want to take off before throttle is applied. To clean and lubricate clutch, follow the instructions below: 1. -
Page 19: Vehicle Washing
VEHICLE WASHING Cleaning the vehicle regularly can slow down the color fading of its body and make it easier to check if there is any damage and any oil leakage. CAUTION Washing the Mini Bike with over-pressurized water may cause damage to some of its components. -
Page 20: Instructions For Storage
INSTRUCTIONS FOR STORAGE If the vehicle is not going to be used for a long period of time, for example, in winter time, some steps should be taken to prevent malfunction of and damage to its components which might be caused by long storage. -
Page 21: Resumption Of Service After Storage
RESUMPTION OF SERVICE AFTER STORAGE 1. Remove the covering and remove the wooden blocks used in storing the vehicle. Change the engine oil if the vehicle has been out of service for over 4 months. 2. Drain off the remaining atomized anti-rust oil from the fuel tank, followed by filling it with fresh gasoline therein. -
Page 22: Maintenance Schedule
MAINTENANCE SCHEDULE MAINTENANCE SCHEDULE ITEM OF EACH USE 1ST MO./20 EVERY 3 MO./50 EVERY 6 MO./100 EVERY YR./300 MAINTENANCE HRS. HRS. HRS. HRS. Engine oil-Check *Engine oil-Change Air filter-Check *Air filter-Clean *Air filter-Change *Carburetor sediment cup-Clean Spark plug-Check-Adjust Spark plug-Replace Idle speed-Check-Adjust **valve clearance... -
Page 23: Troubleshooting
TROUBLESHOOTING Engine will not Start 1. Fuel valve OFF Move Fuel valve lever to ON. 2. Choke OPEN Move Chock Lever to CLOSED 3. Out of fuel Refuel 4. Bad fuel; engine stored without Drain fuel and carburetor. treating or draining gasoline, or Refuel with fresh gasoline refueled with bad gasoline 5. - Page 24 A COPY OF THE SALES RECEIPT AND UPC BAR CODE MUST BE INCLUDED WITH THIS REGISTRATION CARD. Thank you for purchasing an Yukon Trail, Inc. Badger 100 Mini Bike. If there are parts missing or if your Badger 100 Mini Bike does not run properly, do not return your Badger 100 Mini Bike to the place of purchase.
Need help?
Do you have a question about the Badger 100 and is the answer not in the manual?
Questions and answers