Table of Contents
Advertisement
Quick Links
Advertisement
Table of Contents

Subscribe to Our Youtube Channel
Related Manuals for Gosafe GOS-606 i


Summary of Contents for Gosafe GOS-606 i
- Page 1 ...
-
Page 2: Table Of Contents
TABLE OF CONTENTS 1. Device Introduction 1.1 Device Introduction 1.2 Physical Appearance 1.3 Front view 1.4 Device Features 1.5 Scope of this le 1.6 Speci cation 1.7 Terms and Abbreviation 2. Quick Install Instructions 2.1 Charging battery 2.2 Open device 2.3 Take out battery 2.4 Insert SIM card 2.5 Insert battery... - Page 3 6. Other Functions 6.1 Commands Table 6.2 Hotline number 6.3 Combine Command 7. Structures of SMS from Device 7.1 Normal Location SMS (TXT format) 7.2 Normal Location SMS (Hyperlink Format ) 7.3 Error Command Alert 7.4 Alarm 8. User command list and default setting 9.
-
Page 4: Device Introduction
1.DEVICE INTRODUCTION The simple, yet sporty and sleek GOS 606 is a personal and portable tracking device unlike anything else. Always know where your child may be. Watch over loved ones who may need you. Track your company’s assets wherever they go. With just one push of a button, you can know within one minute the exact location of your GOS 606. -
Page 5: Front View
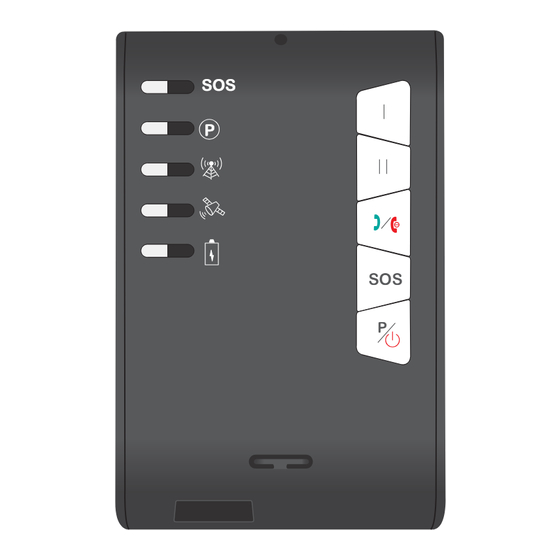
1.3 FRONT VIEW SOS LED Quick Dial 1 Park LED GSM LED Quick Dial 2 GPS LED Answer/Hang up Power LED Power off and Park Speaker Speaker Speaker for voice calls Microphone for voice calls Answer/Hang up Button Press the button to answer/hang up the calls To call the contact stored in quick dial 1 Quick Dial 1 Button Quick Dial 2 Button... -
Page 6: Device Features
1.4 DEVICE FEATURES An “SOS” Button that immediately sends an alert to contacts preset by the user in case of an emergency. Quick Dial Buttons allow the device to call up to 2 pre determined numbers (a third Quick Dial Button is reserved by GO SAFE) Five LED’s showing GPS signal, GSM/GPRS signal, Parking, SOS, &... -
Page 7: Speci Cation
1.6 SPECIFICATION Physical Size 72(L)x47(W)x27(H)mm Weight 62g (battery included) Environmental Operating Temperature - 15 °C to + 55 °C Store Temperature - 5 °C to + 45 °C Humidity 5 - 95% Power Voltage 5V DC Battery Li - Ion 3.7V/1000mAh Power Consumption <500uA (Sleep mode) <5mA (Power save mode) -
Page 8: Quick Install Instructions
2.QUICK INSTALL INSTRUCTIONS 2.1 CHARGING BATTERY In order to keep a long life for the battery, please full charge the battery for the rst time. Steps are shown as follow; Connect USB cable into “USB” port on your GOS 606. While charging, the power LED is red and it will turn to Green if device is fully charged. -
Page 9: Open Device
2.2 OPEN DEVICE Open the G606 enclosure carefully by screwing o the four screws. 2.3 TAKE OUT BATTERY Take out battery from inside the device. -
Page 10: Insert Sim Card
2.4 INSERT SIM CARD Please follow the steps to insert SIM card. 2.4.1 Unlock the SIM card jacket. 2.4.1 Insert SIM card. -
Page 11: Insert Battery
2.4.3 Press down SIM card and lock the jacket. 2.5 INSERT BATTERY Put battery back into the device. -
Page 12: Close Device
2.6 CLOSE DEVICE Close enclosure and make it fasten by screw driver. 2.7 POWER ON In power o status, press button ‘POWER/PARK’ for 2 seconds. Then all indicators will ash one time and buzzer on for one time. Device is powered on and will search for the GSM and GPS signal. -
Page 13: Set User No
2.8 SET USER NO. To set user No., you can use any mobile phone to send the following SMS command to SIM card No. inside the device: with country code Message 1234,UNO;+8613887656789 Command Control Word Password Send SMS Reply UNO:+8613912345678 Note “86”... -
Page 14: Modify Password
2.9 MODIFY PASSWORD To modify user password at the rst usage is strongly suggested. To modify password, you can use user No. send the following SMS command to the SIM card No.: New Password Message 1234,UPW;5678 Command Control Word Old Password Send SMS Reply UPW: 5678... -
Page 15: Set User Work Mode
2.10 SET WORK MODE Device will send location information sms or call to user by time set (default is 30 min). User can send the following command to change the interval and data format. Data format of SMS Message 1234,UUM;30M;G;T Upload Mode Upload Interval Command Control Word... -
Page 16: Set Time Zone
2.11 SET TIME ZONE After setting the time zone, device will send the local time in SMS provided GPS data is valid. If there is no GPS data, then device will not send the time information,. Time Zone Message 1234,TZN; 10:00 Command Control Word Password Send SMS... -
Page 17: Location Poll
2.12 LOCATION POLL There are two ways to poll location from the device. By sending PQR SMS to device. The user mobile can call to the idevice number and will hang up after rst ring. The device will then send back GPS location to the user mobile. Command Control Word Message 1234,PRQ... -
Page 18: Set Apn
2.13 SET APN Only if the APN is set, you can go to our web for tracking by using GPRS. Make sure your SIM card inside device has activated GPRS mode. APN Password Send SMS Message 1234,APN;cmnet;internet;internet APN user name Access Point Name (Confirm Access Point Name from the service provider) -
Page 19: Keyboard Operation
3.KEY BOARD OPERATION There are ve keyboard operations. Note: Only if the key board is unlocked, the operation can be fulfilled. When device accepts the operation from the key board, the Park LED will flash one time and buzzer will be on for one time. 3.1 POWER IN/OFF DEVICE Press button ‘POWER/PARK’... -
Page 20: Sos Button
METHOD TO DIAL A CALL Press 'I' or 'II' button, device will dial to the corresponded phone number saved in FCL command (button 'I' is for FCL0 and button 'II' is for FCL1). During this process press 'PICK UP/HANG UP' can hang up the phone. The call duration can be 6 minutes maximum. -
Page 21: Alarm
4. ALARM When alarm triggered, device will send one SMS to user mobile phone with the location information. In default setting, device will send alarm twice and interval is 3 minutes. Then it will automatically clear alarm and send alarm again when new alarm triggered. -
Page 22: Enable/Disable Goe Fence Alarm
Description Ctrl Word Command Reply Remarks There are 28 fences in total, from numbers 0 to 27. You can enable/disa- ble alarm for di erent fence independently by sending the following command. Para3 “0”/”87”: enable/disable alarm for di erent geo fence. Range:0~ FFFFFFF hexadecimal format. -
Page 23: Power Saving Mode Setting
5. POWER SAVING MODE SETTING To set user No., you can use any mobile phone to send the following SMS command to the SIM card No. inside device: APN Password Message 1234,PSM;32 Command Control Word Password Send SMS Reply Note: “32”: power save mode parameter. -
Page 24: Gsm Power Save Parameter
Here is the de nition of parameters Para set Wake up condition Works after wake up always open GPS (no power save) always open GPS (no power save) GPS module wakes up. Get the 3D location data within search time. 1). - Page 25 Para set Wake up condition Works after wake up 1):Alarm generated Dealing method is same as parameter set to “1” Dealing method is same as parameter set to “2” 2) GSM power on according to con guration. (set upload by interval for Dealing method is same as parameter set to “3”...
-
Page 26: Other Functions
6. OTHER FUNCTIONS 6.1 COMMAND TABLE Description Ctrl Word Command Reply Remarks “9”: microphone volume. Set this parameter to change the volume of the microphone. The lager number represents larger voice volume. Range:0~15. Adjusting “90”: speaker volume. Set this 1234,AGN;9;90 AGN:9;90 Volume parameter to change the volume of the... - Page 27 Description Ctrl Word Command Reply Remarks The range of three parameters is the same, that is: 1 ~ 255. "20”: vibration threshold. Unit: times/second. "30”: vibration time. Unit is second. This parameter is used with parameter 1 to judge whether the vehicle status is shift from stop to move.
-
Page 28: Hotline Number
6.2 HOTLINE NUMBER When hotline number calls to device, device will pickup automatically after 3 rings. This can forced the device to start dual communication. You can set 16 hotline numbers and user number can be one of them. Please use OEM con guration software or our web to set the numbers. -
Page 29: Structures Of Sms From Device
Mobile Network Code LAC=517A Location Area Code CID=1FB1 Cell Identity TMP=25.6C Temperature BAT=4.2V;100.0% Power 7.2 NORMAL LOCATION SMS (HYPERLINK FORMAT) (Located Successful)Google link Gosafe G606 V1.17 Device Name and Version http://maps.goole.com/stat- Google Map Link icmap?zoom=14&size=150x 150&markers=39.9493,116.3 875&sensor=false TMP=25.6C Temperature BAT=4.2V;100.0% Power... -
Page 30: Error Command Alert
(Located Successful)Yandex link Device Name and Version Gosafe G606 V1.17 Yandex Link http://m.maps.yandex.ru/?ll=116.3875,39. 949328&pt=116.3875,39.949328&z=12 Temperature TMP=25.6C Power BAT=4.2V;100.0% (Located Unsuccessful) use LBS Gosafe G606 V1.17 Device Name and Version MCC=460 Mobile Country Code MNC=1 Mobile Network Code LAC=517A Location Area Code... - Page 31 Alarm type SMS received (hyperlink) SMS received (TXT) SMS received (LBS) G606 V1.17 G606 V1.17 G606 V1.17 over speed http://maps.google.com/static GPS 10/71 MCC=460 map?zoom=14&size=300x300 UTC 12 06 08 12:24:20 MNC=0 &markers=23.164683,113.4248 N23.164614 LAC=2503 6sensor=false E113.428672 CID=962C Alarm:over speed SPD:0km/h 0 Alarm:over speed Alarm:over speed G606 V1.17...
-
Page 32: User Command List And Default Setting
8. USER COMMAND LIST AND DEFAULT SETTING Command Explain Default illustration Upgrade words parameters command firmware reset to reset to default default Set user phone empty √ × number Set user password UPW;1234 Password:1234 √ × User upload mode UUM0;30M;G;W √... - Page 33 Command Explain Default illustration Upgrade words parameters command firmware reset to reset to default default Enable/ disable KLK 1 √ × enable key lock function Enable/ disable enable KTN 1 √ × key tone Adjust volume AGN;9;90 √ × Interval: 30 min...
-
Page 34: Led Flashes & Relevant Device Status
9. LED FLASHES & RELEVANT DEVICE STATUS There is an external LED light to re ect device status in G606. To check the statuses, please count the LED light ashes then compare it to the chart below: SOS LED (red) Low battery alarm 1 ash interval 8 seconds SOS alarm... -
Page 35: Trouble Shooting
10. TROUBLE SHOOTING 10.1 CAN NOT RECEIVE REPLY SMS Reason: when device is powered on, it will search the SMS center number but if it is not being searched by the device. Solution: send command to change the SMS center number. - Page 36 www.gosafesystem.com...
Need help?
Do you have a question about the GOS-606 i and is the answer not in the manual?
Questions and answers