Table of Contents
Advertisement
Quick Links
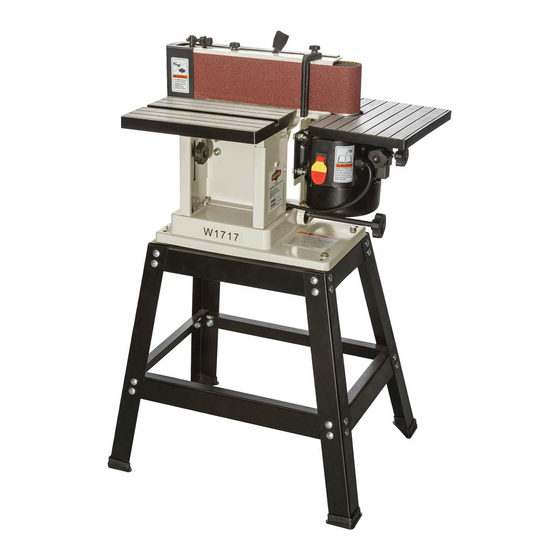
MODEL W1717
Horizontal/Vertical Sander
INSTRUCTION MANUAL
Phone: 1-360-734-3482 • On-Line Technical Support: tech-support@shopfox.biz
COPYRIGHT © August, 2003 BY WOODSTOCK INTERNATIONAL, INC.
WARNING: NO PORTION OF THIS MANUAL MAY BE REPRODUCED IN ANY SHAPE OR FORM WITHOUT
THE WRITTEN APPROVAL OF WOODSTOCK INTERNATIONAL, INC.
Printed in China
Advertisement
Table of Contents

Related Manuals for Shop fox SHOP FOX W1717


Summary of Contents for Shop fox SHOP FOX W1717
- Page 1 Horizontal/Vertical Sander INSTRUCTION MANUAL Phone: 1-360-734-3482 • On-Line Technical Support: tech-support@shopfox.biz COPYRIGHT © August, 2003 BY WOODSTOCK INTERNATIONAL, INC. WARNING: NO PORTION OF THIS MANUAL MAY BE REPRODUCED IN ANY SHAPE OR FORM WITHOUT THE WRITTEN APPROVAL OF WOODSTOCK INTERNATIONAL, INC.
- Page 2 WARNING Some dust created by power sanding, sawing, grind- ing, drilling, and other construction activities con- tains chemicals known to the State of California to cause cancer, birth defects or other reproductive harm. Some examples of these chemicals are: • Lead from lead-based paints. •...
-
Page 3: Table Of Contents
CONTENTS INTRODUCTION ....................2 About Your New Sander..................2 Woodstock Service and Support ................2 Warranty and Returns ..................3 Specifications ....................3 SAFETY ......................4 Standard Safety Instructions ..................4 Know Your Machine ....................6 Safety Instructions for Your Sander................7 110V Operation....................8 Extension Cords ....................8 Grounding ......................8 ASSEMBLY ....................9... -
Page 4: Introduction
For more features and details, refer to the Specifications sub-section in this manual. Woodstock International, Inc. is committed to customer satisfaction in providing this manual. It is our intent to include all the information necessary for safety, ease of assembly, practical use and durabili- ty of this product. -
Page 5: Warranty And Returns
We do not warrant that machinery complies with the provisions of any law or acts. In no event shall Woodstock International, Inc.'s liability under this war- ranty exceed the purchase price paid for the product, and any legal actions brought against Woodstock International, Inc. -
Page 6: Safety
SAFETY READ MANUAL BEFORE OPERATING MACHINE. FAILURE TO FOLLOW INSTRUCTIONS BELOW WILL RESULT IN PERSONAL INJURY. Indicates an imminently hazardous situation which, if not avoided, WILL result in death or serious injury. Indicates a potentially hazardous situation which, if not avoided, COULD result in death or serious injury. - Page 7 12. DO NOT force tool. The machine will do a safer and better job at the rate for which it was designed. 13. Use correct tool. DO NOT force machine or attachment to do a job for which it was not designed. 14.
-
Page 8: Know Your Machine
Know Your Machine An important part of safety is knowing your machine and its components. Please take the time to learn the items shown below in Figure 1. The letters in the picture correspond to the following descriptions in the list. Figure 1. -
Page 9: Safety Instructions For Your Sander
Safety Instructions for Your Sander USE this and other machinery with caution READ and understand this and respect, and always consider safety entire instruction manual first, as it applies to your individual work- before using this machine. ing conditions. Remember, no list of safety Serious personal injury guidelines can be complete, and every may occur if safety and... -
Page 10: 110V Operation
110V Operation Grounding SHOP FOX ® Model W1717 ⁄ HP, 110 volt motor draws approximately 4 amps. Serious injury or fire may Since other machines may be using the same occur if you plug this circuit, make sure the circuit, circuit breaker, machine into a receptacle or fuse can carry the total load without tripping. -
Page 11: Assembly
If you receive it damaged or operations with your missing any parts, please contact Woodstock machine. Serious personal International Service and Support at 1-360-734- injury may occur if safety 3482 or send e-mail to:tech-support@shopfox.biz. -
Page 12: Shop Preparation
Always dis- components sanders, contact your pose of waste rags in a Woodstock International dealer for a copy of the sealed container to make Dust Collection Basics handbook and available sure they do not cause accessories. fire or environmental hazards. -
Page 13: Stand Assembly
Stand Assembly The Model W1717 Sander mounts onto a heavy duty metal work stand. This assembly will be fastened together using the supplied M8-1.25 x 12 carriage bolts, 8mm washers and 8mm hex nuts. Finger tighten the hardware at this time. To assemble the work stand, do these steps: 1. -
Page 14: Mounting Sander
Mounting Sander UNPLUG sander before Mounting the sander to the stand will require you do any assembly! the help of an assistant. Secure the sander to Otherwise, serious per- the stand using the supplied M8-1.25 x 40 hex sonal injury to you or oth- bolts, 8mm washers and 8mm flat washers. -
Page 15: Adjustments
ADJUSTMENTS Locking Lever UNPLUG the power cord when making any adjust- ments on this machine! Otherwise, serious per- sonal injury to you or oth- ers may occur! Belt Tracking The belt tracking must be adjusted correctly to make the belt ride parallel with the table. Figure 7. -
Page 16: Scale Pointer
Scale Pointer UNPLUG the power cord The scale pointer on the sander indicates the tilt when making any adjust- angle of the sanding belt relative to the edge ments during operation! sanding table. It has been set at the factory but Otherwise, serious per- throughout the life of your machine, you may sonal injury to you or oth-... -
Page 17: Roller Adjustment
Roller Adjustment The motor mounting plate can be adjusted to correctly position the main roller in relation to the platen. To adjust the main roller position, do these steps: 1. UNPLUG THE SANDER! 2. Loosen the four motor mounting bolts (Figure 12). -
Page 18: Operations
OPERATIONS Test Run THIS MACHINE creates The purpose of a test run is to identify any sawdust. Always wear unusual noises and vibrations, as well as to con- safety glasses or a face firm that the machine is performing as intended. shield during all sanding operations. -
Page 19: Power Switch
Power Switch ® The power switch on the SHOP FOX Model W1717 not only starts and stops operation, but features a safety lockout key. When the key is removed, as shown in Figure 14, the sander is disabled to prevent accidental start up. Figure 14. -
Page 20: Edge And End Sanding
Edge and End Sanding Edge and end sanding operations should be per- formed on the edge sanding table. These opera- tions are designed to sand flat edges, smooth sharp corners and remove stock. To start an edge or end sanding operations, do these steps: Figure 15. -
Page 21: Contour Sanding
Contour Sanding Curves and profile sanding operations can be sanded on the contour table. To start a contour sanding operations, do these steps: 1. UNPLUG THE SANDER! 2. Loosen the lock knobs in Figure 18 to adjust the contour table height to the desired posi- tion. -
Page 22: Flat Sanding Operation
Flat Sanding Flat sanding operations can be performed with the sanding belt tilted to 180˚. To start flat sanding operations, do these steps: 1. UNPLUG THE SANDER! 2. Loosen the belt tilting lock knob shown in and rotate the sanding belt to the 180˚ mark on the scale (FIgure 20). -
Page 23: Changing Sanding Belt
Changing Sanding Belt UNPLUG the power cord when making any adjust- ments during operation! The sanding belt will need to be changed if the Otherwise, serious per- belt ever becomes worn or damaged. sonal injury to you or oth- ers may occur! To change the sanding belt, do these steps: 1. -
Page 24: Maintenance
MAINTENANCE General MAKE SURE that your To ensure optimum performance from your machine is unplugged sander, make a habit of inspecting it before during any maintenance each use. Check for the following conditions procedures except and repair or replace when necessary: where instructed other- wise! If this warning is •... - Page 25 NOTES -23-...
-
Page 26: Parts
PARTS -24-... - Page 27 PART # DESCRIPTION PART # DESCRIPTION X1717001 SANDING CLOTH PLATFORM XPW03M FLAT WASHER 6MM X1717002 BELT COVER XPLN04M LOCK NUT M8-1.25 X1717002A BELT COVER (SMALL) XPW01M FLAT WASHER 8MM X1717003 DUST CHUTE XPFH27M FLAT HD SCREW M4-.7 X 5 X1717004 BASE XPS532M PHLP HD SCR M8-1.25 X 25...
-
Page 28: Troubleshooting
Troubleshooting Sanding SYMPTOM POSSIBLE CAUSE CORRECTIVE ACTION Deep sanding grooves or 1. Sanding belt grit is too coarse for the 1. Use a finer grit sanding belt. scars in workpiece. desired finish. 2. Workpiece is being sanded across the 2. Sand with the grain. grain. - Page 29 _________________________________________________________ What is your annual household income? _________________________________________________________ _________________________________________________________ ___$20,000-$29,999 ___$60,000-$69,999 ___$30,000-$39,999 ___$70,000-$79,999 What new accessories would you like Woodstock International to carry? ___$40,000-$49,999 ___$80,000-$89,999 _________________________________________________________ ___$50,000-$59,999 ___$90,000 + _________________________________________________________ What is your age group? Do you think your purchase represents good value?
- Page 30 FOLD ALONG DOTTED LINE Place Stamp Here WOODSTOCK INTERNATIONAL, INC. P.O. BOX 2309 BELLINGHAM, WA 98227-2309 FOLD ALONG DOTTED LINE TAPE ALONG EDGES--PLEASE DO NOT STAPLE...
Need help?
Do you have a question about the SHOP FOX W1717 and is the answer not in the manual?
Questions and answers