Table of Contents
Advertisement
Quick Links
Advertisement
Table of Contents

Related Manuals for Heta SCAN-LINE 800 AQUA


Summary of Contents for Heta SCAN-LINE 800 AQUA
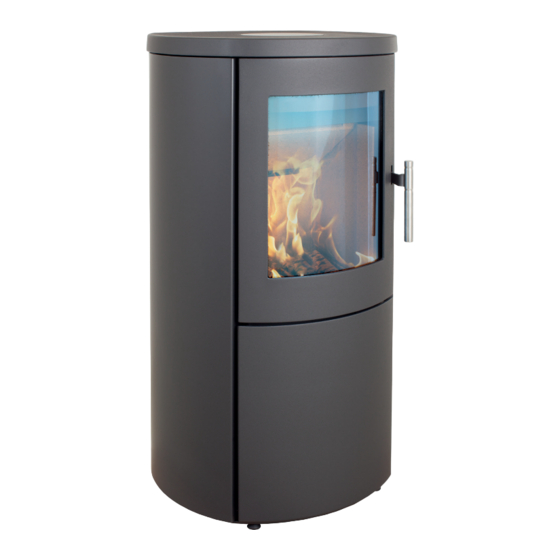
- Page 1 SCAN-LINE 800 AQUA APPROVED FOR USE IN SMOKE CONTROL AREAS WHEN BURNING DRY WOOD LOGS OR AUTHORISED FUELS www.heta.dk www.heta.dk Installation and Operating Instructions for Heta SL800 Aqua stove Pevex1018/AH/ver1:Jan 2013 Pevex1018/AH/ver1:Jan 2013...
-
Page 2: Installation Instructions
Combustible materials should The chimney opening must follow not be stored in the compartment national and local regulations. Howe- below the ashpan. ver, the area of the opening should Installation and Operating Instructions for Heta SL800 Aqua stove Pevex1018/AH/ver1:Jan 2013... -
Page 3: Draft Conditions
• The weather is fine. is opened. The minimum chimney • The wind is blowing strongly. draft to ensure satisfactory combu- Installation and Operating Instructions for Heta SL800 Aqua stove Pevex1018/AH/ver1:Jan 2013... -
Page 4: First Firing
Thus it is important to use dry, well seasoned wood, i.e. wood with Willow a moisture content of no more than 20%. This is achieved by storing the wood for 1–2 years before use. Pieces Installation and Operating Instructions for Heta SL800 Aqua stove Pevex1018/AH/ver1:Jan 2013... -
Page 5: Chimney Fires
Installation and Operating Instructions for Heta SL800 Aqua stove Pevex1018/AH/ver1:Jan 2013... - Page 6 The wood will light in 2/3 minutes. Adjust the air slider for optimum combustion. Installation and Operating Instructions for Heta SL800 Aqua stove Pevex1018/AH/ver1:Jan 2013...
- Page 7 It is important to maintain the layer of instructions. Installation and Operating Instructions for Heta SL800 Aqua stove Pevex1018/AH/ver1:Jan 2013...
-
Page 8: Risk Of Explosion
800 Aqua The nominal output is the output to which the stove has been tested. The test was carried out with the secondary air 70% open. Installation and Operating Instructions for Heta SL800 Aqua stove Pevex1018/AH/ver1:Jan 2013... -
Page 9: Operational Problems
This soot can be easily and effectively can be repaired using touch-up paint, removed by using proprietary stove which is available in spray cans. glass cleaner. Installation and Operating Instructions for Heta SL800 Aqua stove Pevex1018/AH/ver1:Jan 2013... - Page 10 • The glass non-original spares will void • The sealing rope the guarantee. • The grate frame The stove is prepared for a fresh air intake. Installation and Operating Instructions for Heta SL800 Aqua stove Pevex1018/AH/ver1:Jan 2013...
- Page 11 Connection of external air flow (fresh air) through the floor on Scan-Line 800 Aqua When connection external air flow use a ø100 air conduit (for instance Lindab) with matching collar band. Installation and Operating Instructions for Heta SL800 Aqua stove Pevex1018/AH/ver1:Jan 2013...
- Page 12 Emptying the ash pan, fig. 4-7 Cleaning after sweeping the chimney and replacing the stones. Fig 8-14 - Scan-Line 800 Aqua Installation and Operating Instructions for Heta SL800 Aqua stove Pevex1018/AH/ver1:Jan 2013...
- Page 13 Installation and Operating Instructions for Heta SL800 Aqua stove Pevex1018/AH/ver1:Jan 2013...
- Page 14 (point 4) SYR-Temperature valve (pkt. 5) 12 mm copper pipe for water for 12 mm copper outlet - boiling pipe for water safety fuse connection (point 2) (point 1) Installation and Operating Instructions for Heta SL800 Aqua stove Pevex1018/AH/ver1:Jan 2013...
- Page 15 NB!! The installation should always be carried out in accordance with valid standards and regulations by an authorized electrician. Installation and Operating Instructions for Heta SL800 Aqua stove Pevex1018/AH/ver1:Jan 2013...
- Page 16 Ministers in the de- of smoke control areas and you can volved administrations for those coun- contact them for details of Clean Air tries. Separate legislation, the Clean Act requirements. Installation and Operating Instructions for Heta SL800 Aqua stove Pevex1018/AH/ver1:Jan 2013...
Need help?
Do you have a question about the SCAN-LINE 800 AQUA and is the answer not in the manual?
Questions and answers