Escea IB850 Installation Manual
Inset fascia
Hide thumbs
Also See for IB850:
- Installation manual (23 pages) ,
- Service manual (12 pages) ,
- Quick start manual (2 pages)
Advertisement
Quick Links
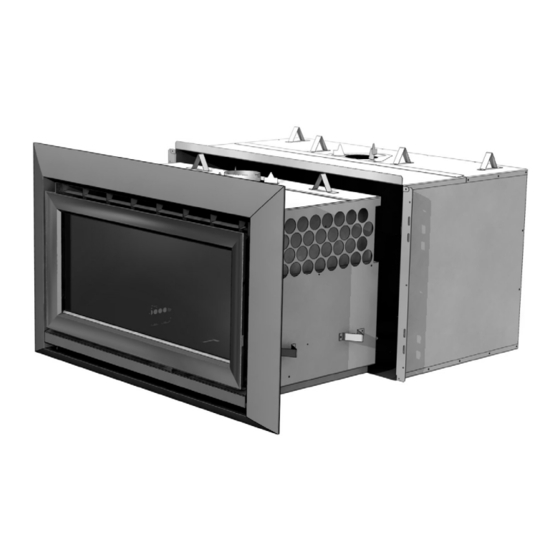
IB850, IB1100
Inset Fascia
Australian Edition
Important:
The appliance shall be installed in accordance with;
• This installation instruction booklet
• Must be installed by a qualified person
• This Manual replaces section 21.0 of the IB850/1100 Installation Manual
This appliance is not intended for use by young children or infirm persons unless they have been
adequately supervised by a responsible person to ensure that they can use the appliance safely.
Young children should be supervised to ensure that they do not play with the appliance.
Manufactured by: Escea Ltd, PO Box 5277 Dunedin NZ, Ph: +64 3 479 0302, email: info@escea.com.au
For contact details of your local escea distributor or dealer please visit www.escea.com.au
630097_5 Inset Fascia Installation Manual AUS.doc
Installation Manual
Advertisement

Subscribe to Our Youtube Channel
Related Manuals for Escea IB850


Summary of Contents for Escea IB850
- Page 1 Young children should be supervised to ensure that they do not play with the appliance. Manufactured by: Escea Ltd, PO Box 5277 Dunedin NZ, Ph: +64 3 479 0302, email: info@escea.com.au For contact details of your local escea distributor or dealer please visit www.escea.com.au...
- Page 2 1285 Ø Flueing the heater: Gas Specifications: This heater is to be conventionally flued with a Heat output IB850 = 7.5kW 100mm dia flue system, in accordance with the Heat output IB1100 = 7.9kW requirements of A55601/AGG01 Gas Input = 40MJ/h...
- Page 3 If a cavity is to be created in a corner the picture to the left gives the approximate minimum sized interior wall and resultant flue position. IB1100 IB850 1235 1075 1265 Fire Installation: Please refer to the separate install instructions that come with the fire.
- Page 4 Replace the glass Note: If the glass gasket requires a replacement, call your nearest Escea agent who will ensure the part is replaced with the correct type. In the event that the glass is broken by impact, purchase the replacement from an authorised Escea agent only.
- Page 5 Step 4: Fit the two screws at the base of each side of this fascia. The heater may have to be adjusted in or out of the cavity to ensure fascia fits correctly. Step 5: Attach the inner fascia brackets to the Inner Fascia as per the instruction page supplied with the fascia.
Need help?
Do you have a question about the IB850 and is the answer not in the manual?
Questions and answers