Table of Contents
Advertisement
Advertisement
Table of Contents

Subscribe to Our Youtube Channel
Related Manuals for Dog trace d–control easy


Summary of Contents for Dog trace d–control easy
- Page 1 d–control easy Electronic training collar Service instructions...
- Page 2 Thank you for purchasing the product DOGtrace™ d–control EASY from VNT electronics s.r.o., Czech Republic. We would like to ask you for reading this manual carefully before using the unit and keeping it for future use. EC Declaration of Conformity Guideline R&TTE 1999/5/CE The manufacturer: VNT electronics s.r.o.
-
Page 3: Table Of Contents
Contents Introduction ................4 Scope of delivery . -
Page 4: Introduction
Introduction Do you need to have your dog under your instant control? Do you want to train it easily, quickly, precisely, and effi ciently? The electronic training system DOGtrace™ d–control, consisting of the transmitter and the collar, will help you train your dog with effi ciency that cannot be reached by any other methods. -
Page 5: Product Description
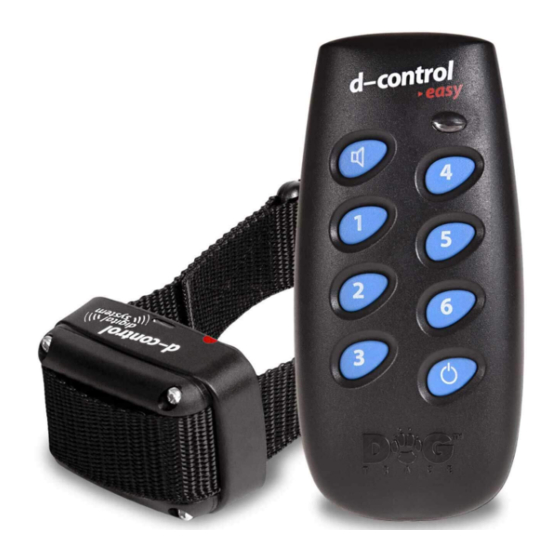
Product description REMOTE CONTROLLER COLLAR WITH THE STRAP REMOTE CONTROLLER 1 – Buttons to select correction pulses 1–6, 2 – Sound signal button, 3 – ON/OFF power switch, 4 – Indicator. COLLAR WITH THE STRAP 1 – Woven strap, 2 – Electrodes, 3 – Indicator, 4 – Target. -
Page 6: Battery Installation And Replacement
Battery installation and replacement INSTALLATION (REPLACEMENT) OF THE BATTERY IN THE RECEIVER (COLLAR) Remove 4 screws of the receiver housing cover plate with a cross-head screwdriver. Install the 3V lithium CR2 battery. Mind the correct polarity indicated on the receiver PCB with “+“ symbol in the battery compartment (see the photo). - Page 7 INSTALLATION (REPLACEMENT) OF THE BATTERY IN THE REMOTE CONTROLLER Remove the screw on the rear side of the remote controller and remove the battery compartment lid from the controller carefully. Install a new 3V CR 2 battery and mind the correct polarity indicated on the battery compartment lid.
-
Page 8: Turning On/Off
Turning ON/OFF TURNING THE REMOTE CONTROLLER ON/OFF Turning on: Press down for 1 second the black On/Off button on the remote controller. Turning on is indicated by a sound signal and by a fl ashing green LED. Turning off : Again, press down for 1 second the black On/Off... -
Page 9: Programming (Matching) Of The Remote Controller And The Receiver
Programming (matching) of the remote controller and the receiver Every remote controller has its own RF operational code. Programming of the remote controller with the receiver (collar) will be take place during the fi rst use of the DOGtrace™ d–control set or with a new remote controller or a receiver (when former or latter is lost). -
Page 10: How To Use The Remote Controller
REPROGRAMMING OF YOUR RECEIVER The receiver can be programmed repeatedly without restraint either using the same remote controller or with another (see the section Programming (matching) of your remote controller and receiver). It is possible to program an unlimited number of receivers to one receiver, which is possible to use for common training of several dogs. -
Page 11: How To Check That Your Dogtrace™ D-Control Works Correctly
How to check that your DOGtrace™ d–control works correctly You can check anytime whether your set works correctly. Before the check, make sure that the receiving collar is turned off . Connect the leads of the testing discharge lamp to both electrodes (loosen up the electrodes, insert the wires of the lamp under them so that they can be fi... -
Page 12: For The Best Results
For the best results Training commands, you are sending to your dog, are transmitted from the transmitting unit to the collar equipped with the receiver by radio waves. The propagation of radio waves is infl uenced by a series of factors and under normal conditions the range of this unit is approximately 200 metres (depending on geographic conditions and surroundings). -
Page 13: We Are Starting With The Training Collar
We are starting with the training collar The trainer’s elementary knowledge in training dogs is the prerequisite for using the training collar. If you do not have this knowledge, we recommend you to turn to a training centre, a cynology club, or a school for dogs where you will learn the basic communication with your dog. - Page 14 Sound signal It is only up to you how you will use it, which depends on the method you wish to train your dog. With the sound signal you can: Send a sound warning to your dog when it is doing something inappropriate. Catch the attention of your dog…...
-
Page 15: Tips
Short pulse (hold the button pressed down for 1 second at the most) Use this function to correct the behaviour of your dog. Short pulses are usually used at a later stage of the training after the dog has already been trained with long pulses. -
Page 16: Hints For Using
Hints for using Do not place your remote controller close to objects sensitive to magnetic fi elds that might get damaged and be out of repair. Do not put your d–control EASY in places exposed to high temperatures. It is necessary to replace the batteries every two years and also in the case that the set is not used for a long time. -
Page 17: Troubleshooting
Troubleshooting Before you start considering your unit to be faulty: Read out this Service Instruction manual once again and make sure that the problem is not caused by weak batteries or by incorrect application. Check to see if the batteries are positioned correctly with regard to their polarity. If a problem persists, try to initialize the system by removing the battery from the battery holders in the receiver, then use a metal tool (e.g. -
Page 18: Technical Data
Technical data TRANSMITTER Weight ..........60 grams (without battery) Range .
Need help?
Do you have a question about the d–control easy and is the answer not in the manual?
Questions and answers