Table of Contents
Advertisement
Quick Links
Advertisement
Table of Contents

Related Manuals for Dog trace d-control Edge


Summary of Contents for Dog trace d-control Edge
- Page 1 Edge d-control Edge Training collar for dogs...
- Page 2 SENDER (MANUAL DEVICE) - Chapter 5.1 DISPLAY DESCRIPTION - Chapter 5.2 RECEIVER (CIRCUIT) - chapter 5.3...
-
Page 3: Table Of Contents
CONTENTS 1. Declaration of conformity........................4 2. Important notices ..........................4 3. ECMA ..............................4 4. Package Contents / Optional Accessories ....................4 5. Description of the device.........................5 5.1 Transmitter ............................5 5.2 LCD display..........................5 5.3 Receiver............................5 6. Transmitter preparation ........................5 6.1 Inserting (replacing) the battery in the transmitter ................5 6.2 Checking the battery level in the transmitter ................5 6.3 Turning the transmitter on/off ....................5 7. -
Page 4: Declaration Of Conformity
DECLARATION OF CONFORMITY The manufacturer VNT electronics s.r.o. declares that the Dogtrace d-control Edge Electronic Training Collar complies with the Council of Europe Directive 2014/53/EU and conforms to all applicable standards. For more information, please visit www.dogtrace.com. IMPORTANT NOTICES Please read the instructions carefully before use. Keep the instructions for f u t u r e r e f e r e n c e . -
Page 5: Transmitter
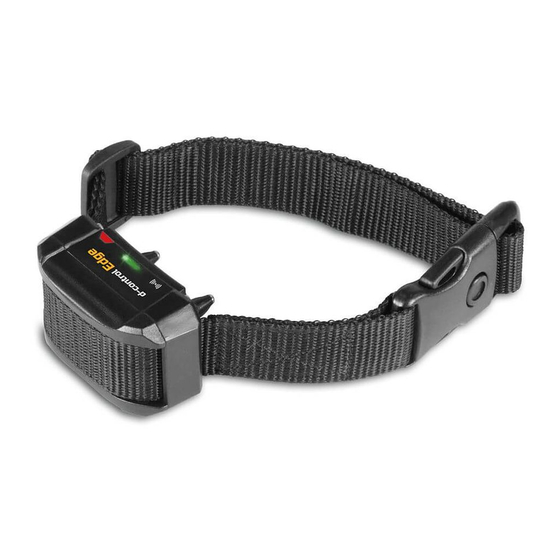
EQUIPMENT DESCRIPTION 5.1 Transmitter (fig. 1 on page 2) 1. Integrated antenna 2. Command buttons 3. LCD display 4. Buttons for selecting the dog 5. Off/on button 6. Buttons for adjusting the size of stimulation 7. Red dot indicating the magnet for fastening the collar 8. -
Page 6: Receiver Preparation
RECEIVER PREPARATION 7.1 Inserting (replacing) the battery in the receiver 1. Use a Phillips screwdriver to remove the 4 screws from the bottom of the receiver and remove the cover (Figure 3 on page 2). 2. Insert a CR2 3V lithium battery in the correct polarity. 3. - Page 7 First, you must set the desired number of positions on the controller for pairing the collars: 1. Simultaneously long press the buttons and the currently set number of positions will flash on the display .
-
Page 8: Pairing A Second Transmitter To A Receiver
2. Use the buttons to set the desired number of positions for pairing the collars you want to use on the controller. 3. Confirm your selection by briefly pressing the button. Use the buttons to select between collar positions (depending on the settings - collar 1 to 6). -
Page 9: Putting On The Training Collar
7.7 Putting on the training collar The strap (collar) on which the receiver is attached must be tightened to ensure good contact between the contact points of the receiver and the dog's skin. It is recommended to put the collar on a standing dog. The collar with the receiver is properly tightened if you can put 2 fingers between the collar and the dog's neck. -
Page 10: Acoustic Signal
9.1 Acoustic s i g n a l The receiver on the dog's collar starts to emit an acoustic (sound) signal. This command can precede the stimulus pulse and is a very effective warning. The acoustic signal can be used instead of the command to me / to the leg, in this case it replaces the whistle, whose volume is always perceived by the dog in the same way. -
Page 11: Setting Keys Lock
4. If you want to have a booster function on the button, use the buttons to select the level of stimulus pulse you want to have set on this button. 5. A short press on the button will return you to the main screen. 6. - Page 12 MAXIMUM TYPICAL MINIMUM RANGE RANGE RANGE 10.2 Use of training collar in winter period When using a training collar in winter, it is important to keep in mind: Low humidity - causes lower skin conductivity. Therefore, it is necessary to ensure better conductivity between the contact points of the receiver and the dog's skin.
-
Page 13: Maintenance
Make sure the receiver is switched off. Connect the test gag pins to both contact points - loosen the contact points, insert the gag pins underneath them so that they hold firmly and tighten the contact points again (see picture). Switch on the transmitter and receiver. - Page 14 The device has been approved for use in EU countries and is therefore provided with the CE All necessary documentation is available on the website: www.electric-collars.com mark. Changes to technical parameters, properties and printing errors reserved. Service center and distribution Reedog, sro Sedmidomky 459/8 101 00 Prague 10...
Need help?
Do you have a question about the d-control Edge and is the answer not in the manual?
Questions and answers