
Related Manuals for Quanmax QBOX-1700


Summary of Contents for Quanmax QBOX-1700
- Page 1 QBOX-1700 ® 0.6-Liter Box PC with Intel Atom™ Bay Trail Dual core E3825 Processor User’s Guide...
-
Page 2: Table Of Contents
Content Content Content ........................2 Figures & Tables ......................3 Safety Instructions ...................... 4 Before You Begin .................. 4 When Working Inside a Computer ............5 Preventing Electrostatic Discharge ............5 Instructions for Lithium Battery ............. 6 Voltage Ratings ..................6 Preface ........................ -
Page 3: Figures & Tables
Figure 7 Turning on the system ..............19 Figure 10 VESA mounting (1) ..............20 Figure 11 VESA mounting (2) ..............20 Table 1 QBOX-1700 product specifications ..........12 Table 2 BIOS Main Menu ................22 Table 3 Advanced Menu ................23 Table 4 Advanced Menu –... -
Page 4: Safety Instructions
Safety Instructions Safety Instructions Before You Begin Before handling the product, read the instructions and safety guidelines on the following pages to prevent damage to the product and to ensure your own personal safety. Refer to the “Advisories” section in the Preface for advisory conventions used in this user’s guide, including the distinction between Warnings, Cautions, Important Notes, and Notes. -
Page 5: When Working Inside A Computer
Safety Instructions When Working Inside a Computer Before taking covers off a computer, perform the following steps: Turn off the computer and any peripherals. Disconnect the computer and peripherals from their power sources or subsystems to prevent electric shock or system board damage. This does not apply when hot swapping parts. -
Page 6: Instructions For Lithium Battery
(e.g. to the collecting points for disposal of batteries) Voltage Ratings The external power adaptor of the QBOX-1700 has the following voltage ratings: Input: 100-240 VAC, 50-60 Hz ... -
Page 7: Preface
Preface Preface How to Use This Guide This guide is designed to be used as step-by-step instructions for installation, and as a reference for operation, troubleshooting, and upgrades. Unpacking When unpacking, follow these steps: After opening the box, save it and the packing material for possible future shipment. -
Page 8: Maintaining Your Computer
Preface receiver is connected. Consult the dealer or an experienced radio/TV technician for help. Changes or modifications not expressly approved by us could void the user's authority to operate the equipment. NOTE The assembler of a personal computer system may be required to test the system and/or make necessary modifications if a system is found to cause harmful interference or to be noncompliant with the appropriate standards for its intended use. -
Page 9: Power Protection
Preface the operating and storage humidity specifications. Altitude Operating a system at a high altitude (low pressure) reduces the efficiency of the cooling fans to cool the system. This can cause electrical problems related to arcing and corona effects. This condition can also cause sealed components with internal pressure, such as electrolytic capacitors, to fail or perform at reduced efficiency. - Page 10 Preface longer period of time when AC power is lost. UPS systems that provide only 5 minutes of battery power let you conduct an orderly shutdown of the system, but are not intended to provide continued operation. Surge protectors should be used with all UPS systems, and the UPS system should be Underwriters Laboratories (UL) safety approved.
-
Page 11: Chapter 1 Introduction
Chapter 1 Introduction Overview The QBOX-1700 is a Box PC with a volume of just 0.6-liter that is ideal for space ® critical applications. This embedded hardware platform is designed with Intel Atom™ Bay Trail Dual core E3825 processor which provides with excellent performance. -
Page 12: Product Specifications
System Fan Temperature Operating: 0°C to 50°C, 0%-90%, non-condensing Humidity Storage: -20°C to 80°C, 0%-90%, non-condensing Dimensions 130 x 40 x 110 mm (WxHxD) Weight 750 g Mounting VESA mount Certifications CE, FCC Class A Table 1 QBOX-1700 product specifications... -
Page 13: System Tour
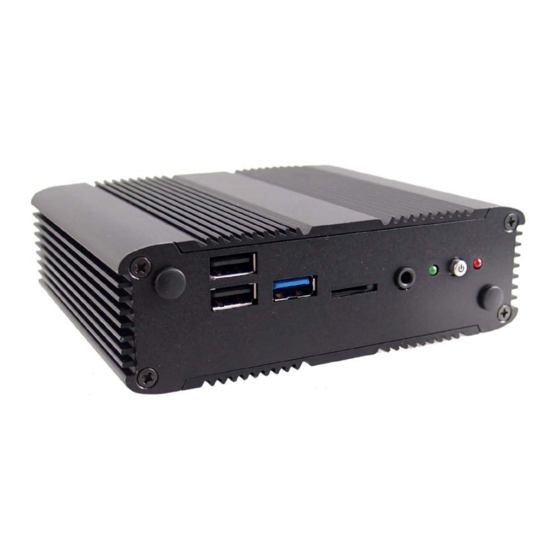
Chapter 1 System tour Refer to the diagrams below to identify the components of the system. Front Panel Figure 1 Front Panel The USB (Universal Serial Bus) port is compatible with USB devices such as keyboards, mouse devices, cameras, and hard disk drives. USB allows many devices to run simultaneously on a single computer, with some peripheral acting as additional plug-in sites or hubs. -
Page 14: Figure 2 Rear Panel
Chapter 1 Rear Panel Figure 2 Rear Panel Ethernet The eight-pin RJ-45 LAN port supports a standard Ethernet cable for connection to a local network. DC Jack The supplied power adapter converts AC power to DC for use with this jack. Power supplied through this jack supplies power to the PC. -
Page 15: Mechanical Dimensions
Chapter 1 Mechanical Dimensions 130 x40 x 110 mm (WxHxD) Figure 3 Mechanical Dimensions... -
Page 16: Chapter 2 Getting Started
Chapter 2 Chapter 2 Getting Started Setting up your PC Connecting the monitor Connect the VGA/ HDMI cable from your display to the VGA/ HDMI port. HDMI Figure 4 VGA/ HDMI... -
Page 17: Figure 5 Connecting Usb Mouse & Keyboard
Chapter 2 Connecting USB mouse & keyboard Your QBOX-1700 does not come with a keyboard and mouse, but you can use any USB keyboard or mouse with your computer. USB 3.0 USB 2.0 Figure 5 Connecting USB mouse & keyboard NOTE Using a third-party USB mouse or keyboard may require software drivers. -
Page 18: Figure 6 Rj45 / Rs-232 Connector
Chapter 2 Connecting to a network device Connect one end of a network cable to the LAN port on the system rear panel and the other end to a hub or switch. RJ45 RS-232 RS-232 Connector Pin Assignment Figure 6 RJ45 / RS-232 connector... -
Page 19: Figure 7 Turning On The System
Chapter 2 Turning on the system Connect the power adapter cable to the DC jack (DC IN) of the QBOX-1700 Connect the power cable to the power adapter Connect the power cable to a power outlet Press the power switch on the front panel to turn on the system... -
Page 20: Mounting Your Pc To A Monitor
To fasten the metal shelf, your monitor must comply with VESA75 or VESA100 standard. Place the QBOX-1700 onto the monitor and secure it with the heat dissipating fins properly on VESA mount kit as shown below. Figure 9 VESA mounting (2) -
Page 21: Chapter 3 Ami Bios Setup
Chapter 3 Chapter 3 AMI BIOS Setup Overview This chapter provides a description of the AMI BIOS. The BIOS setup menus and available selections may vary from those of your product. For specific information on the BIOS for your product, please contact us. NOTE: The BIOS menus and selections for your product may vary from those in this chapter. -
Page 22: Main Menu
B o o t S e c u r i t y S a v e & E x i t Product Information Product Name QBOX-1700 BIOS Version R0.03 (x64) BIOS Build Date 04/30/2014 Select Screen TXE FW Version 01.00.02.1067... -
Page 23: Advanced Menu
Chapter 3 Advanced Menu Table 3 Advanced Menu BIOS SETUP UTILITY M a i n A d v a n c e d B o o t S e c u r i t y S e r v e r M g m t S a v e &... -
Page 24: Table 4 Advanced Menu – Display Configuration
Chapter 3 Table 4 Advanced Menu – Display Configuration BIOS SETUP UTILITY M a i n A d v a n c e d B o o t S e c u r i t y S e r v e r M g m t S a v e &... -
Page 25: Table 5 Advanced Menu – Super Io Configuration
Chapter 3 Table 5 Advanced Menu – Super IO Configuration BIOS SETUP UTILITY M a i n A d v a n c e d B o o t S e c u r i t y S a v e &... -
Page 26: Table 7 Advanced Menu –Cpu Chipset Configuration
Chapter 3 Table 7 Advanced Menu –CPU Chipset Configuration BIOS SETUP UTILITY M a i n A d v a n c e d B o o t S e c u r i t y S a v e &... -
Page 27: Table 8 Advanced Menu –Sata Configuration
Chapter 3 Table 8 Advanced Menu –SATA Configuration BIOS SETUP UTILITY M a i n A d v a n c e d B o o t S e c u r i t y S a v e & E x i t ... -
Page 28: Table 9 Advanced Menu –Usb Configuration
Chapter 3 Table 9 Advanced Menu –USB Configuration BIOS SETUP UTILITY M a i n A d v a n c e d B o o t S e c u r i t y S a v e & E x i t ... -
Page 29: Table 10 Advanced Menu –Tpm Configuration
Chapter 3 Table 10 Advanced Menu –TPM Configuration BIOS SETUP UTILITY M a i n A d v a n c e d B o o t S e c u r i t y S a v e & E x i t ... -
Page 30: Table 11 Advanced Menu –H/W Monitor
Chapter 3 Table 11 Advanced Menu –H/W Monitor BIOS SETUP UTILITY M a i n A d v a n c e d B o o t S e c u r i t y S a v e & E x i t ... -
Page 31: Table 12 Power Management Configuration
Chapter 3 Table 12 Power Management Configuration BIOS SETUP UTILITY M a i n A d v a n c e d B o o t S e c u r i t y S e r v e r M g m t S a v e &... -
Page 32: Boot Menu
Chapter 3 Boot Menu Table 13 Boot Menu BIOS SETUP UTILITY M a i n A d v a n c e d B o o t S e c u r i t y S a v e & E x i t ... -
Page 33: Security Menu
Chapter 3 Security Menu Table 14 Security Menu BIOS SETUP UTILITY M a i n A d v a n c e d B o o t S e c u r i t y S a v e & E x i t Password Description ... -
Page 34: Save & Exit Menu
Chapter 3 Save & Exit Menu Table 15 Save & Exit Menu BIOS SETUP UTILITY M a i n A d v a n c e d B o o t S e c u r i t y S a v e &... - Page 35 Chapter 3 Save Changes and Exit Exit system setup after saving the changes. Once you are finished making your selections, choose this option from the Exit menu to ensure the values you selected are saved to the CMOS RAM. The CMOS RAM is sustained by an onboard backup battery and stays on even when the PC is turned off.
-
Page 36: Chapter 4 Driver Installation
You can download the drivers for the QBOX-1700 from our website and install as instructed there. For other operating systems, please contact us.
Need help?
Do you have a question about the QBOX-1700 and is the answer not in the manual?
Questions and answers