Table of Contents
Advertisement
Quick Links
Advertisement
Table of Contents

Related Manuals for Craftex CX503


Summary of Contents for Craftex CX503
- Page 1 CX503 METAL WORKING BELT SANDER User Manual...
-
Page 2: Table Of Contents
TABLE OF CONTENTS General Safety Instructions..................3 Specific Safety Instructions ..................4 Features........................5 Physical Features ....................6 Set-Up........................7 Un-Packing & Inventory ..................7 Proper Grounding ....................8 Securing to Shop Floor ................... 9 Mounting the Sander....................9 Eye Shield, Tool Rest and Spark Trap..............10 Dust Collection...................... -
Page 3: General Safety Instructions
GENERAL SAFETY INSTRUCTIONS FOR MACHINES Extreme caution should be used when operating all power tools. Know your power tool, be familiar with its operation, read through the user manual, and practice safe usage procedures at all times. ALWAYS read and understand the NEVER leave a tool unattended while it user manual before operating the is in operation. -
Page 4: Specific Safety Instructions
CX503 – METALWORKING SANDER SPECIFIC SAFETY INSTRUCTIONS This machine is designed and Flammable materials. Sanding metal intended for use by properly trained causes sparks. Make sure there is no and experienced personnel only. If flammable material close to the sander you are not familiar with the proper while operation. -
Page 5: Features
CX503 a Metalworking Sander. The Craftex name guarantees Craft Excellence. By following the instructions and procedures laid out in this user manual, you will receive years of excellent service and satisfaction. The CX503 is a professional tool and like all power tools, proper care and safety procedures should be adhered to. -
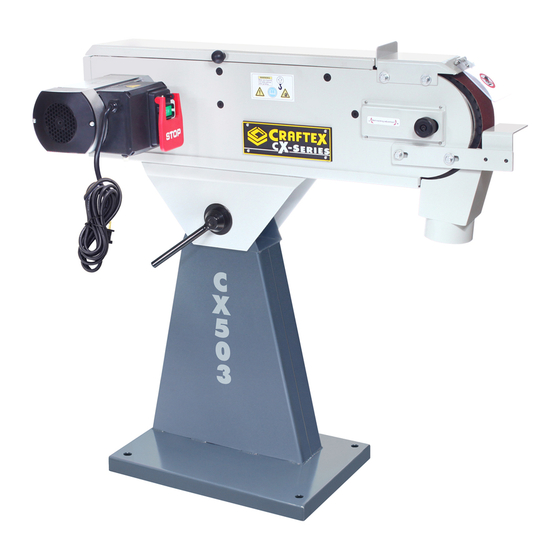
Page 6: Physical Features
CX503 – METALWORKING SANDER PHYSICAL FEATURES Sanding Belt ON/OFF Switch Eye Shield Angle Adjustment Lever Eye Shield Bracket Belt Tracking Adjustment Knob Belt Guard Front Dust Port Belt Guard Securing Knob Tool Rest Motor Base... -
Page 7: Setup
Figure-1 Minimum workspace for CX503 Figure-2 Inventory WARNING CX503 is a heavy machine. Do not over- exert yourself. Use a fork truck or other LIST OF CONTENTS mechanical devices for safe moving. A. Metalworking Sander ...... 1 B. -
Page 8: Proper Grounding
50-feet in length and the cord is 12-gauge to prevent motor damage. Your CX503 should be wired with a plug having 3-prongs to fit a 3 prong grounded receptacle as shown in figure-3. -
Page 9: Securing To Shop Floor
SECURING TO SHOP FLOOR The CX503 features four securing holes on its base which allows securing the machine to the shop floor. Floor securing hardware does not come with the machine. When securing the machine to the shop floor, make sure to level the machine with a precision level. -
Page 10: Eye Shield, Tool Rest And Spark Trap
EYE SHIELD, TOOL REST AND FRONT DUST PORT The CX503 features an eye shield in front of the belt for the protection of operator’s eyes. The eyes shield must be installed before operation. Install the eye shield to the sander as shown in figure-8. -
Page 11: On/Off Switch
ON/OFF SWITCH TEST RUN The CX503 features an ON/OFF switch Once you have assembled your sander located on the right side of the motor. The completely, it is then time for a test run to switch has a big red stop paddle for... -
Page 12: Belt Tracking
Make sure the belt is not touching the edge of the sander and it is tracking centrally on the wheel. Figure-13 Sanding belt tracking Figure-12 Angling the sander WARNING Do not make any adjustments while the machine is running. Turn the machine BELT TRACKING OFF and un-plug the cord from the power... -
Page 13: Belt Replacement
Loosen the tension on the belt by pulling BELT REPLACEMENT out the belt tension lever shown in figure- The sanding belt must be checked regularly and replaced if it is old or damaged. To replace the sanding belt: Make sure the switch is in the OFF position and the cord is disconnected from the power source. -
Page 16: Parts Breakdown
CX503 PARTS BREAKDOWN... -
Page 17: Parts List
CX503 PARTS LIST REF# DESCRIPTION REF# DESCRIPTION CUP HEAD SCREW M6X50 CUP HEAD SCREW M4X6 FLAT WASHER Φ6 LEFT COVER BOLT M8X12 WORK TABLE FENCE EXTENSIONS FIXATION BOARD OF WORK TABLE SELF-LOCKINGNUTM6 FLAT ASHERΦ8X28 NUT M4 HEXAGONSOCKET MOTOR COUNTERSUNK HEAD SCREW... -
Page 18: Warranty
This warranty shall not apply to consumable products such as blades, bits, belts, cutters, chisels, punches etceteras. Craftex shall in no event be liable for injuries, accidental or otherwise, death to persons or damage to property or for incidental contingent, special or consequential damages arising from the use of our products.
Need help?
Do you have a question about the CX503 and is the answer not in the manual?
Questions and answers