Table of Contents
Advertisement
Advertisement
Table of Contents

Related Manuals for Craftex CX505


Summary of Contents for Craftex CX505
- Page 1 CX505 6” x 89” EDGE BELT SANDER User Manual...
-
Page 2: Table Of Contents
TABLE OF CONTENTS General Safety Instructions ................3 Specific Safety Instructions................4 Features ....................... 5 Physical Features ..................6 Unpacking ....................7 Setup ......................7 Proper Grounding ..................7 Assembly ...................... 8 Stand ......................8 Installing the Sander Onto the Stand............8 Motor Drum Guard.................. -
Page 3: General Safety Instructions
GENERAL SAFETY INSTRUCTIONS Extreme caution should be used when operating all power tools. Know your power tool, be familiar with its operation, read through the owner’s manual and practice safe usage procedures at all times. ALWAYS read and understand the router bits, shaper heads, blades, user manual before operating the knives or making other adjustments or... -
Page 4: Specific Safety Instructions
CX505 – 6” x 89” EDGE BELT SANDER SPECIFIC SAFETY INSTRUCTIONS MAKE SURE the sander is connected ALWAYS wear a dust mask and safety to the matched and specific power glasses while operating the sander. The source instructed in the manual. -
Page 5: Features
As part of the growing line of Craftex CX-Series woodworking equipment, we are proud to offer CX505 a 6” x 89” Edge Belt Sander. By following the instructions and procedures laid out in this user manual, you will receive years of excellent service and satisfaction. The CX505 is a professional tool and like all power tools, proper care and safety procedures should be adhered to. -
Page 6: Physical Features
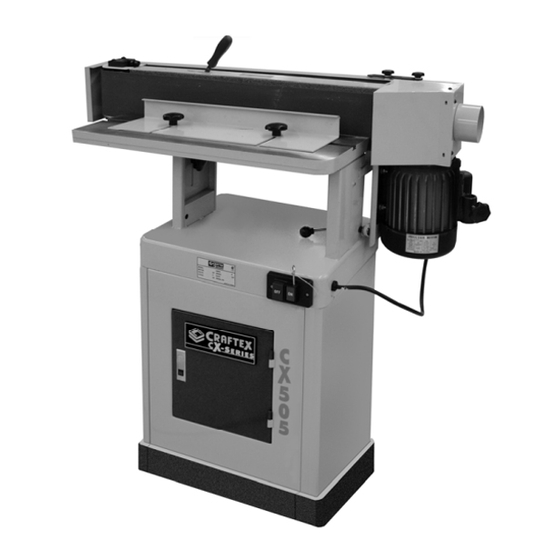
CX505 – EDGE BELT SANDER PHYSICAL FEATURES 6” x 48” Belt Belt Tension Sanding Belt Dust Hood Guard Lever Lock Knobs Fence Lock Knobs Motor Drum Guard Fence Work 4” Dust Table Hood Sanding Head Tilt Lock Knob 1-1/2 HP... -
Page 7: Unpacking
CX505 is for use on a normal 110 volt circuit. Make sure that the machine is In case if you really find it necessary to use... -
Page 8: Assembly
ASSEMBLY Assembling the CX505 edge belt sander is simple easy. assemble machine, follow the instructions given below. STAND Attach the side brackets to the front and rear brackets as shown in figure-2 using screws and washers and lock washers Figure-3 Installing the bottom plate provided. -
Page 9: Motor Drum Guard
Figure-5 Securing the sander onto the stand from inside the cabinet WARNING! The CX505 is a heavy machine. Do not over-exert yourself. Get the help of an Figure-7 Installing the fence assistant when lifting the sanding head onto the stand. -
Page 10: Workpiece Stop
Figure-10 Installing the table onto the rod BELT TRACKING Belt tracking means where the belt rides on The table is used with CX505 only when the the drums. The belt should always be table is in vertical position. centered on both drums. -
Page 11: On/Off Switch
Proper belt tracking prolongs the belt life, ON/OFF SWITCH preventing the belt from slipping off the The ON/OFF switch on CX505 features a drums during operation. The belt tracking is safety key to prevent from accidental or adjusted by tilting the idler drum slightly unauthorized operations. -
Page 12: Test Run
TEST RUN WORKPIECE INSPECTION Once you have assembled your machine CX505 is designed to sand wood only. Do completely, it is then time for a test run to not use this machine to sand metals, glass make sure that the machine works properly or stone etc. -
Page 13: Table Height Adjustment
The belt on CX505 is 6” in width. When sanding a 3” tall work-piece, for the first half you can adjust the table height and use the... -
Page 14: Installing/Replacing The Sanding Belt
INSTALLING / REPLACING SANDING BELT The CX505 comes with a 6”x 89” sanding belt. To install the sanding belt: Make sure the machine is disconnected from the power source. Uninstall the belt guards, dust hood, auxiliary table and the work-piece stop (if Figure-17 Belt tension handle already installed). -
Page 15: Maintenance
MAINTENANCE CLEANING During the life of your machine, you will The moisture from the wood dust remaining need to practice some regular maintenance on the table surface can cause rust. The to keep your sander in peak performance table and other unpainted surfaces of the condition. -
Page 16: Troubleshooting
TROUBLESHOOTING TROUBLE CAUSES CORRECTION Motor doesn’t start. 1. No electricity. 1. Check mains and fuse. 2. Defective switch, motor or 2. Consult an electrician. cord. 3. Wait and reset overload 3. Overload has reacted. cut-off. Sanding belt slips. 1. Sanding belt is stretched. 1. -
Page 17: Parts Diagram
CX505 PARTS DIAGRAM... -
Page 18: Parts List
CX505 PARTS LIST REF NO. DESCRIPTION 20101001 CABINET W0000006 MAGANETIC SWITCH 20101005 WORK TABLE BRACK S0120380 LOCK NUT 3/8"-16UNC 20101007 CAM ECCENTRIC S0110600 HEX. NUT 3/8"-16UNC S0310525 PIN 5*25 10102024 LOCK HANDLE 3/8"-16UNC 10102023 HAND KNOB S0400525 KEY 5*5*25 S0020416 HEX. - Page 19 S0310306 PIN 3*6 S0050404 SET SCR. 1/4"*20UNC*1/4" 10104049Q POSITION PLATE 10104050 POINTER 20102020 LOCKING NUT 20101022 SANDING BELT 10104046 MITER GAUGE BODY S0030108 RD.HD.SCR. 5/32"*32UNC*1/2" S0110100 HEX.NUT 5/32"-32UNC 10104045 HAND KNOB 21700001 SANDING TABLE 21700002 SANDING TABLE STAND 21700037 ARBOR 20101039 KNOB BOLT 8*35 S0310640...
- Page 20 20101031 BELT REPLACING PLATE 20101032a SAND CLAMP HANDLE S0020530 HD.HEX.SCR. 5/16"*18UNC*1-3/4" S0120201 NYLON NUT 5/16"-18UNC 20101033 TILT SCALE S0040301c FLAT HD.SCR. 3/16*3/4 10102022 WIDTH POINTER S0040300 FLAT HD.SCR. 3/16"*24UNC*3/8" M0000000 MOTOR S0020520 HD.HEX.SCR 5/16"*18UNC*1-1/4" S0210500 FLAT WASHER 8.5"*16*2T 5/16" L0000154a ELECTRIC CORD 21700039 BELT COVER 21700013...
- Page 21 20103044 DRIVER WRENCH S0040512M FLAT HD.SCR. M5 S0040420M FLAT HD.SCR. 4*20 S0121400M ANTI-LOOSEN NUT M14*2.0P 10401029 RUBBER FEET S0090512 RD.HD.SCR 5/16"-18*3/4" 90100062 FIXED BASE 20101051 EXTENSION TABLE S0230300 SPRING WASHER 3/16" 20101050 SUPPORTING ROD J0000102 SCALE 10105052 LABEL S0010505 HEX. SCREW 5/16" * 1-1/4" S0030501 HEX.
- Page 22 21700029 EXTENSION SPRING C1100698 SMALL BALL BEARING S0520008 RING 21700025 FIXED LOOP S0010520M SOC. HD. CAP SCR. 5*20 20900049 BEARING COVER 6202 S0020501 HEX. HD. SCREW 5/16"*18UNC*1" S0040412M FLAT HD. SCREW 4*12 21700017 BEARING BASE C1206202 BEARING 6202 20900049 BEARING COVER 6202 C1106003 BEARING 6003 S0400430...
- Page 23 21700051 ROLLER ARBOR 21700008 DRIVEN ROLLER S0050606M SOC.SET.SCR. 6*6 S0400540 KEY 5*5*40 21700009 WORM S0210300a FLAT WASHER 3/16" S0400425 KEY 4*4*25 S0230500M SPRING WASHER W1017W-2 STRAIN RELIEF BUSHING 21700032 JOING PLATE 21700033 SPRING BUCKLE SHAFT 21700038K DUST COLLECTION 21700053 SPONGE 21700054 SPONGE PIECE S0300845...
-
Page 24: Warranty
This warranty shall not apply to consumable products such as blades, bits, belts, cutters, chisels, punches etceteras. Craftex shall in no event be liable for injuries, accidental or otherwise, death to persons or damage to property or for incidental contingent, special or consequential damages arising from the use of our products.
Need help?
Do you have a question about the CX505 and is the answer not in the manual?
Questions and answers