Table of Contents
Advertisement
Quick Links
Advertisement
Table of Contents

Related Manuals for Craftex CT125


Summary of Contents for Craftex CT125
- Page 1 CT125 – BABY DRUM SANDER 13”...
-
Page 2: Table Of Contents
INDEX General Safety Instructions Page 3 Specific Safety Instructions Page 4 Specifications Page 5 Features Page 6 Unpacking and Assembly Unpacking Page 7 Mounting Page 7 Dust Collection Page 8 Test Run Page 9 Operations Sanding Depth Page 9 Variable Speed Page 10 Sandpaper Replacement Page 11... -
Page 3: General Safety Instructions
GENERAL SAFETY INSTRUCTIONS EXTREME CAUTION SHOULD BE USED IN OPERATING ALL POWER TOOLS. KNOW YOUR POWER TOOL, BE FAMILIAR WITH ITS OPERATION. READ THE OWNER’S MANUAL AND PRACTICE SAFE USAGE PROCEDURES AT ALL TIMES. CONNECT your machine ONLY to the matched and specified power source. -
Page 4: Specific Safety Instructions
SPECIFIC SAFETY INSTRUCTIONS Like all power tools and machinery, proper safety and attention must be adhered to. There is danger associated with using any tool or machine so pay careful attention each and every time you use your tool. • DO NOT jam or try and over push the work piece into the machine during operation. -
Page 5: Specifications
Craft Excellence. By following the instructions and procedures laid out in this owner’s manual, you will receive years of excellent service and satisfaction. The CT125 is a professional tool and like all power tools, proper care and safety procedures should be adhered to. -
Page 6: Features
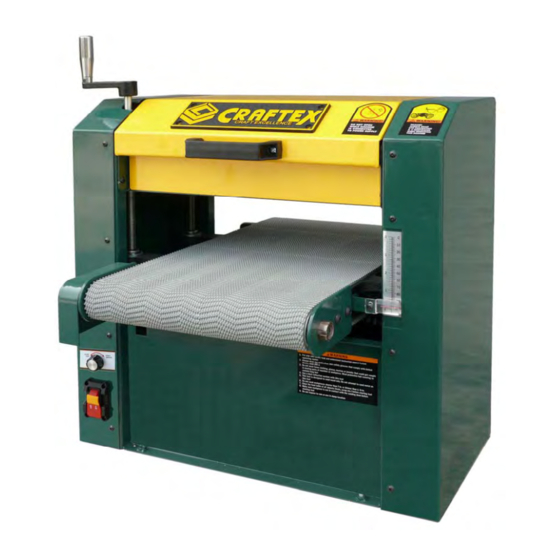
CT125 – BABY DRUM SANDER 13” FEATURES A – CHROME CRANK HANDLE B – TOP COVER C – CONVEYOR BELT D – VARIABLE SPEED KNOB FOR CONVEYOR E – SIDE PANEL F – THICKNESS SCALE G – ON/OFF SWITCH... -
Page 7: Unpacking And Assembly
CT125 – BABY DRUM SANDER 13” UNPACKING AND ASSEMBLY Carefully unpack the CT125 from its crate and unsure that everything is in tact. When setting your machine in the desired location, make sure that you have enough machine clearance in order to use this machine to the full capacity. -
Page 8: Dust Collection
CT125 – BABY DRUM SANDER 13” CRANK HANDLE Now the crank handle that came with the machine needs to be installed. The handle should be installed on the top left side of the unit. Make sure that the set screws and handle are firmly in place before moving on. -
Page 9: Test Run
CT125 – BABY DRUM SANDER 13” TEST RUN Connect your machine to the correct power source. Once it is connected you are ready to perform the first test run. Take a careful look in and around your machine before turning it on to ensure everything is in place, all screws and knobs are securely fastened and that all controls are working properly. -
Page 10: Variable Speed
CT125 – BABY DRUM SANDER 13” VARIABLE SPEED The variable speed knob will allow you to increase the feed rate of your work piece from 0 – 22 FPM. The correct speed will vary from work piece to work piece and will depend of what type of wood you are using. -
Page 11: Sandpaper Replacement
CT125 – BABY DRUM SANDER 13” SANDPAPER REPLACEMENT The CT125 is designed with 3” sandpaper rolls. The grit of paper you chose depends on what job you a doing. An extra coarse, low grit paper is generally used for sanding of rough material, removing glue or thickness sanding. -
Page 12: Tension & Tracking
CT125 – BABY DRUM SANDER 13” TENSION AND TRACKING After reasonable usage of the drum sander, the conveyor may slightly stretch and will require to be tensioned. When tensioning the conveyor belt, it is important to do so from both sides and not to tension one side more than the other as this may lead to more tracking problems. - Page 13 CT125 – BABY DRUM SANDER 13” TRACKING The conveyor must track straight for proper sanding. If the conveyor tracks to either side and not straight, you must fix the tracking. When tracking your conveyor, remember that this process can take some time and that proper balance and patience is required.
-
Page 14: Maintenance
CT125 – BABY DRUM SANDER 13” MAINTENANCE Cleaning and maintaining this machine is relatively easy. It is imperative to vacuum or use an air blower to clean off wood dust from internal components from time to time to keep the machine clean. To clean your sandpaper from time to time to preserve the life, you can use a rubber abrasive cleaner and run it on the drum as it spins. -
Page 15: Thickness Scale Calibration
CT125 – BABY DRUM SANDER 13” THICKNESS SCALE CALIBRATION After some time you may notice that the thickness scale can be a little off. In order to sand accurately you must make sure that the thickness scale is calibrated properly and this is an easy process to do every once in a while. -
Page 16: Trouble Shooting
TROUBLE SHOOTING SYMPTOM POSSIBLE CAUSE POSSIBLE SOLUTION Machine is vibrating 1. V Belts are worn or 1. Inspect the belts and too much or is too loose replace with same noisy 2. Motor or other integral size or re-tension component is loose 2. - Page 17 TROUBLE SHOOTING SYMPTOM POSSIBLE CAUSE POSSIBLE SOLUTION Machine doesn’t turn 1. Capacitor is faulty 1. Test and replace on or trips breaker 2. Centrifugal switch is capacitor if needed when turned on faulty 2. Adjust or replace 3. Motor ON/OFF switch is centrifugal switch faulty 3.
- Page 18 TROUBLE SHOOTING SYMPTOM PROSSIBLE CAUSE POSSIBLE SOLUTION Sandpaper tears off 1. Sand paper is not 1. Re-check to ensure drum or wears securely fastened to paper is fastened to excessively drum drum using spring 2. Nail or metal piece in loaded release wood being sanded 2.
-
Page 19: Parts List & Diagrams
CT125 – PARTS LIST... - Page 20 CT125 – PARTS DIAGRAM...
- Page 21 CT125 – PARTS LIST...
- Page 22 CT125 – PARTS DIAGRAM...
- Page 23 CT125 – PARTS LIST...
- Page 24 CT125 – PARTS DIAGRAM...
-
Page 25: Warranty Information
CRAFTEX 2 YEAR LIMITED WARRANTY Craftex warrants every product to be free from defects in materials and agrees to correct such defects where applicable. This warranty covers two years for parts and 90 days for labour (unless specified otherwise), to...
Need help?
Do you have a question about the CT125 and is the answer not in the manual?
Questions and answers