Table of Contents
Advertisement
Quick Links
Advertisement
Table of Contents

Related Manuals for Craftex CX506


Summary of Contents for Craftex CX506
- Page 1 CX506 12" DISC SANDER User Manual (March 24th, 2014)
-
Page 2: Table Of Contents
TABLE OF CONTENTS General Safety Instructions..................3 Specific Safety Instructions ..................4 CX506 Features...................... 5 Physical Features ....................6 Unpacking ....................... 7 Workbench Load..................... 7 Clean Up......................... 7 Proper Grounding ....................8 Mounting On A Workbench..................9 Switch Disabling Key ....................9 Test Run ......................... -
Page 3: General Safety Instructions
GENERAL SAFETY INSTRUCTIONS FOR MACHINES Extreme caution should be used when operating all power tools. Know your power tool, be familiar with its operation, read through the user manual and practice safe usage procedures at all times. ALWAYS read and understand the NEVER leave a tool unattended while it user manual before operating the is in operation. -
Page 4: Specific Safety Instructions
CX506 – 12" DISC SANDER SPECIFIC SAFETY INSTRUCTIONS Read and follow all the instructions Make sure before making and safety precautions in the user adjustments, the switch is in the “OFF” manual before setup or use. position and the cord is un-plugged. -
Page 5: Cx506 Features
As part of the growing line of Craftex CX-Series woodworking equipment, we are proud to offer the CX506 a 12" Disc Sander. By following the instructions and procedures laid out in this user manual, you will receive years of excellent service and satisfaction. The CX506 is a professional tool and like all power tools, proper care and safety procedures should be adhered to. -
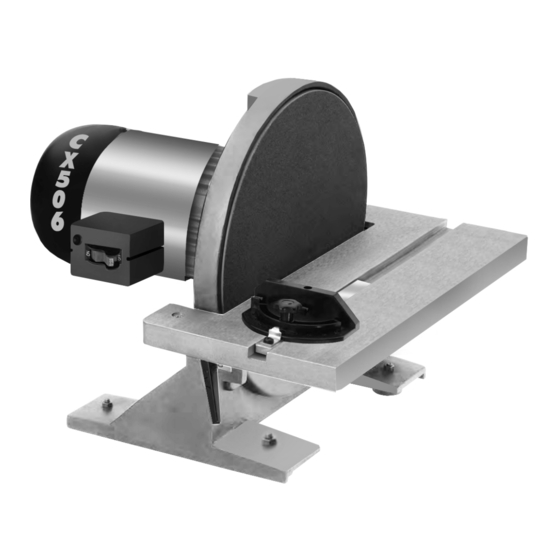
Page 6: Physical Features
PHYSICAL FEATURES Disc Guard 12" Sanding Disc Motor Work Table ON/OFF Miter Slot Switch Miter Gauge Base Tilt Scale with Lock Knob... -
Page 7: Unpacking
Some parts come pre-assembled shipping purposes. WORKBENCH LOAD CX506 sander is not very heavy. If using a workbench, make sure to place the sander on a workbench that has the capacity to support the weight of the CX506 sander. -
Page 8: Proper Grounding
It is strongly recommended not to use Grounding provides path least extension cords with your CX506. Always resistance for electric current to reduce the try to position your machine close to the risk of electric shock. power source so that you do not need to use extension cords. -
Page 9: Mounting On Aworkbench
Figure-3 Direct Mount washers and hex nuts are used to secure the sander to the workbench. See figure-2. SWITCH DISABLING KEY The CX506 features a switch disabling key which prevents from unauthorized use. Figure-2 Through Mount Figure-4 Switch disabling key removed... -
Page 10: Test Run
TABLE TILT ADJUSTMENT operation. To test run the machine: The table on CX506 can be positioned from 0° to 45° at any angle, for angled sanding. Make sure you have read and understood the instructions given in the manual. -
Page 11: Miter Gauge
MITER GAUGE ATTACHING SANDPAPER The miter gauge needs to be adjust The CX506 comes with a 12" sanding disc, perpendicular to the face of the table slot attached to the cast iron disc platen with its when it is mounted to the table slot. -
Page 12: Miter Sanding
MITER SANDING ANGLE SANDING To get a perfect miter, cut the work-piece The CX506 features a table which can be slightly longer and sand it to the desired positioned from 0° to 45° at any angle for dimension. angled sanding. -
Page 13: Maintenance
MAINTENANCE CLEANING During the life of your machine, you will Wipe off the sawdust built up from the table need to practice some regular maintenance surface and vacuum the dust from the to keep your sander in peak performance motor fan area. condition. -
Page 14: Parts Diagram
CX506 PARTS DIAGRAM... -
Page 15: Parts List
CX506 PARTS LIST PART DESCRIPTION Q'TY PART DESCRIPTION Q'TY Fan Cover Mitre Gauge Philips Screw M5*6 Hex Screw M5X172 Spring Washer D5 Philips Screw M4X8 Flat Washer D5 Flat Washer D5 Pointer End Caps Working Table Ball Bearing Philips Screw M6*20... -
Page 16: Warranty
This warranty shall not apply to consumable products such as blades, bits, belts, cutters, chisels, punches etceteras. Craftex shall in no event be liable for injuries, accidental or otherwise, death to persons or damage to property or for incidental contingent, special or consequential damages arising from the use of our products.
Need help?
Do you have a question about the CX506 and is the answer not in the manual?
Questions and answers