Table of Contents
Advertisement
Advertisement
Table of Contents

Related Manuals for Craftex CX507


Summary of Contents for Craftex CX507
- Page 1 MODEL CX507 16" OPEN END DRUM SANDER USER MANUAL Version 1.0...
-
Page 2: Table Of Contents
TABLE OF CONTENTS General Safety Instructions ................3 Specific Safety Instructions................4 Features ....................... 5 Physical Features ..................6 Unpacking ....................7 Setup ......................7 Proper Grounding ..................7 Assembly ...................... 8 Test Run ....................... 9 Adjustments....................9 Work-piece Inspection ..................10 Sanding Belt Replacement ................10 Depth of Cut ....................11 Sanding Operation..................12... -
Page 3: General Safety Instructions
GENERAL SAFETY INSTRUCTIONS Extreme caution should be used when operating all power tools. Know your power tool, be familiar with its operation, read through the owner’s manual and practice safe usage procedures at all times. ALWAYS read and understand the router bits, shaper heads, blades, knives user manual before operating the or making other adjustments or repairs. -
Page 4: Specific Safety Instructions
CX507 - 16" OPEN END DRUM SANDER SPECIFIC SAFETY INSTRUCTIONS MAKE SURE the sander is connected ALWAYS wear a dust mask and safety to the matched and specific power glasses while operating the sander. The source instructed in the manual. -
Page 5: Features
As part of the growing line of Craftex CX-Series woodworking equipment, we are proud to offer CX507 a 16" Open End Drum Sander. By following the instructions and procedures laid out in this user manual, you will receive years of excellent service and satisfaction. The CX507 is a professional tool and like all power tools, proper care and safety procedures should be adhered to. -
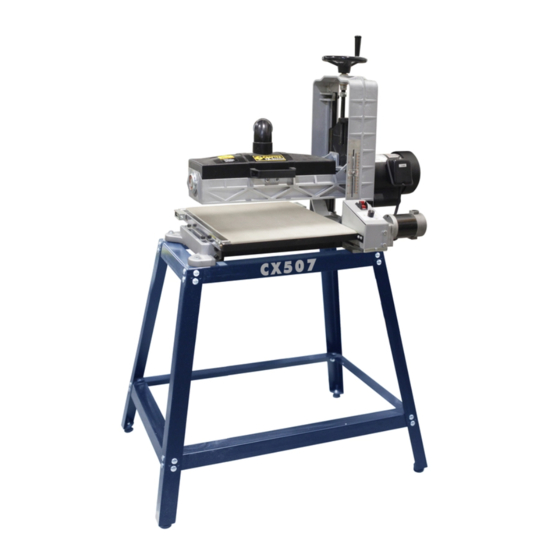
Page 6: Physical Features
CX507 – 16" OPEN END DRUM SANDER PHYSICAL FEATURES Height Adjustment Dust Collection Hand Wheel Port elbow Height Gauge Dust Cover Handle & Latch Sanding Drum Motor Sanding Drum Dust Cover Magnetic Switch Conveyor Belt Tracking Adjuster Conveyor Belt Feed Motor... -
Page 7: Unpacking
It is strongly recommended not to use extension cords with your CX507. Always CX507 is for use on a normal 110 volt try to position your machine close to the circuit. Make sure that the machine is... -
Page 8: Assembly
Get the help of a friend or use a fork truck ASSEMBLY and lift the sander, align the mounting holes Position the two short and the two long top and place the sander onto the stand. braces upside down on the floor in the form Secure it using hex bolts, washers and nuts of a rectangle and attach the four legs to provided. -
Page 9: Test Run
If the machine does not start, the switch personal injury. disabling features is working. If the machine starts, immediately stop the machine. The switch disabling feature is not TO TEST RUN THE CX507: working correctly. 1. Make sure you have read the manual understood safety instructions given in it. -
Page 10: Work-Piece Inspection
WORK-PIECE INSPECTION SANDING BELT REPLACEMENT Before cutting the work-piece, make sure to inspect it for nails, staples, small pieces of Disconnect the machine from the power stone or metal and any other object which source. is dangerous to come in contact with the sanding paper / sanding drum. -
Page 11: Depth Of Cut
Hold the sanding belt with one hand to keep DEPTH OF CUT tension on the belt and roll away the drum One full turn of the height adjustment hand from you with the other hand to wrap the wheel anti-clockwise, will give 1/64" depth belt onto the drum until you reach the of cut. -
Page 12: Sanding Operation
Make sure to reduce the feed rate as the SANDING OPERATION grit and desired finish change. Make sure the switch is OFF and sander is disconnected from the power source. Turn the switch OFF when the operation is complete. Make sure the correct sandpaper grit is installed on the drum. -
Page 13: Conveyor Belt To Drum Alignment
CONVEYOR BELT TO DRUM ALIGNMENT If the measurement at "A" is greater than the same point at "B" by 0.020" or less, proceed as follows: Figure-11 Tensioning the conveyor belt As for starting point, make sure that the ends of the both tensioning screws extend evenly approximately 1/4"... -
Page 14: Conveyor Belt Replacement
Recheck the measurement at A and at B. REPLACEMENT Test sand a piece of wood and check for The conveyor belt on the CX507 will get old uniform thickness. with use and will need a replacement. If the measurement at A exceeds B by TO REPLACE THE BELT more than .020”, or if distance B is greater... -
Page 15: Maintenance
WARNING! surfaces. Make sure the machine’s power switch is OFF and the cord is disconnected from When the sandpaper on the CX507 the power source when installing / becomes loaded with built-up sawdust, run removing any part or servicing the a sandpaper cleaner through the sander a sander. -
Page 16: Troubleshooting
TROUBLESHOOTING PROBLEM PROBABLE CAUSE SOLUTION Abrasive strip comes loose from Slack in abrasive strip abrasive Reattach abrasive strip. clips improperly installed Wood burned during sanding Abrasive strip edges Reattach abrasive strip properly. overlapped Replace abrasive. Abrasive loaded with resin Try coarser grit – limit depth of Depth of cut excessive cut. -
Page 17: Electrical Diagram
ELECTRICAL DIAGRAM... -
Page 18: Parts Diagram And List
CX507 PARTS DIAGRAM... - Page 19 CX507 PARTS LIST...
- Page 22 CX507 STAND PARTS DIAGRAM & LIST...
-
Page 23: Warranty
This warranty shall not apply to consumable products such as blades, bits, belts, cutters, chisels, punches etceteras. Craftex shall in no event be liable for injuries, accidental or otherwise, death to persons or damage to property or for incidental contingent, special or consequential damages arising from the use of our products.
Need help?
Do you have a question about the CX507 and is the answer not in the manual?
Questions and answers