Table of Contents
Advertisement
Advertisement
Table of Contents

Related Manuals for SHOWTEC LED Commander Pro


Summary of Contents for SHOWTEC LED Commander Pro
- Page 1 LED Commander Pro ORDERCODE 50725...
- Page 2 For more information: iwant@showtec.info You can get some of the best quality, best priced products on the market from Showtec. So next time, turn to Showtec for more great lighting equipment. Always get the best -- with Showtec ! Thank you!
-
Page 3: Table Of Contents
Showtec Showtec LED Commander Pro Product Guide ™ Warning ....................................2 Safety Instructions ................................. 2 Operating Determinations ............................3 Return Procedure ................................4 Claims ....................................4 Description of the device ..............................5 Overview ..................................5 Controller Front ................................6 Controller Backside..............................7 Set Up and Operation ............................... -
Page 4: Warning
Save the carton and all packing materials. In the event that a fixture must be returned to the factory, it is important that the fixture be returned in the original factory box and packing. Your shipment includes: • LED Commander Pro • Incl. Power adapter 1,75m • User manual... -
Page 5: Operating Determinations
If your Showtec device fails to work properly, discontinue use immediately. Pack the unit securely (preferably in the original packing material), and return it to your Showtec dealer for service. -
Page 6: Return Procedure
Connection with the mains Connect the device to the mains with the power-plug. Always pay attention, that the right color cable is connected to the right place. International EU Cable UK Cable US Cable BROWN YELLOW/COPPER FASE BLUE BLACK SILVER YELLOW/GREEN GREEN GREEN... -
Page 7: Description Of The Device
Features LED Commander Pro is a light controller from Showtec and features: • The LED Commander Pro is the successor of the LED commander • The upgrade is simple but unique and very useful • Easy to use • Control 8 RGB fixtures •... -
Page 8: Controller Front
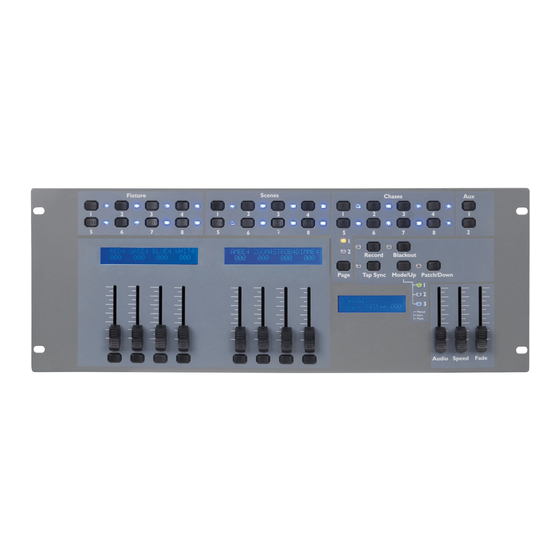
Controller Front Fig. 2 1) Fixture buttons and LED indicators 1-8: Use Fixture button 1-8 to select a fixture. 2) Scenes buttons and LED indicators 1-8: Push a scene button to activate a scene. 3) Chase buttons and LED indicators 1-8: Push a chase button to activate a chase. 4) Aux Buttons: AUX 1 and AUX 2 5-12) 8 Faders: Use the faders to manually set the intensity. -
Page 9: Controller Backside
Controller Backside Fig. 3 26) DMX OUT 27) DMX Polarity Switch 28) USB Light 29) Audio Input: This jack accepts a line level audio input signal ranged from 100 mV to 1Vpp. 30) MIDI Thru: MIDI port for connection to a sequencer or MIDI device. 31) MIDI Out: MIDI port for connection to a sequencer or MIDI device. -
Page 10: Patch Modes
Patch Modes There are 4 Patch Modes: 1) Patch Address Patch Name MIDI 4) AUX 1.1 Patch Address 1. Press and hold the Patch/Down button (20) for 3 seconds to enter Patch Mode. 2. The red LED next to the button lights up. 3. - Page 11 5. With the 7 slider you are able to set the desired preset name table: 6. With the 8 slider you are able to set the 8 different preset names: Tables and Preset Names Table 1 Table 2 Table 3 Dim 1 Green Satur...
-
Page 12: Midi
4. Release the 2 buttons and wait for 15 seconds. All LEDs will flash 3 times, indicating your operation has been successful. The LED Commander Pro is now back to its original factory default settings. After the factory reset, the fixture is auto patched... -
Page 13: Scenes
Scenes Record a Scene 1. Press and hold down the the Record button (15) for 3 seconds to enter Record Mode. 2. The red LED next to the button lights up. 3. Select the fixture you want to program by pressing the desired Fixture button (1). 4. -
Page 14: Chases
Chases Record a Chase 1. Press and hold down the the Record button (15) for 3 seconds to enter Record Mode. 2. The red LED next to the button lights up. 3. Select the proper Page by pressing the Page button (14). You can choose Page 1 or Page 2. The orange LED above the button lights up. -
Page 15: Delete A Chase
Delete a Chase 8. Deselect all fixtures, scenes and chases. 9. Press and hold down the the Record button (15) for 3 seconds to enter Record Mode. 10. The red LED next to the button lights up. 11. Select the proper Page by pressing the Page button (14). The orange LED next to the button lights up 12. -
Page 16: Manual/Auto / Music Mode
2. You can control the Audio sensitivity by adjusting the Audio fader (21). Fade Time is available in Music Mode The LED Commander Pro can be used as a plug-and-play device with the following Showtec products: 42431 Par 64 Short, RGB LED... -
Page 17: Maintenance
5. If nothing happens after 30 seconds, unplug the device. 6. If you are unable to determine the cause of the problem, do not open the LED Commander Pro, as this may damage the unit and the warranty will become void. -
Page 18: Product Specification
Product Specification Model: Showtec LED Commander Pro • The LED Commander Pro is the successor of the LED commander • The upgrade is simple but unique and very useful • Easy to use • Control 8 RGB fixtures • Adjustable Speed control •...
Need help?
Do you have a question about the LED Commander Pro and is the answer not in the manual?
Questions and answers