
Related Manuals for SHOWTEC ColorCue 3


Summary of Contents for SHOWTEC ColorCue 3
- Page 1 MANUAL ENGLISH ColorCue 3 Order code: 50705 Highlite International B.V. – Vestastraat 2 – 6468 EX – Kerkrade – the Netherlands...
-
Page 2: Table Of Contents
ColorCue 3 Table of contents Warning ....................................2 Unpacking Instructions ..............................2 Safety Instructions ................................. 2 Operating Determinations ............................3 Return Procedure ................................4 Claims ....................................4 Description of the Device ..............................5 Features ..................................5 Top View – Fixtures/Playbacks Section ........................5 Top View –... -
Page 3: Warning
Your shipment includes: ● Showtec ColorCue 3 ● AC power adapter with 4 interchangeable AC plugs (Europe, UK, US/JP, AUS/NZ) ●... -
Page 4: Operating Determinations
● If your device fails to work properly, discontinue the use immediately. Pack the unit securely (preferably in the original packing material), and return it to your Showtec dealer for service. ● For adult use only. The device must be installed beyond the reach of children. Never leave the unit running unattended. -
Page 5: Return Procedure
ColorCue 3 Return Procedure Returned merchandise must be sent prepaid and in the original packing, call tags will not be issued. Package must be clearly labeled with a Return Authorization Number (RMA number). Products returned without an RMA number will be refused. Highlite will not accept the returned goods or any responsibility. -
Page 6: Description Of The Device
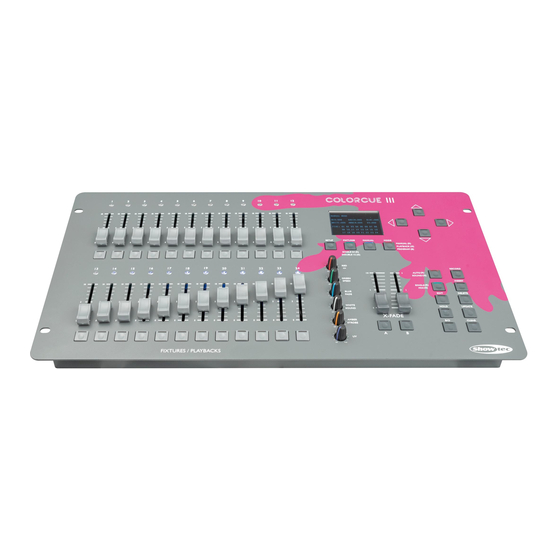
ColorCue 3 Description of the Device Features The ColorCue 3 is a LED DMX controller featuring 2 master faders, 24 fixture intensity faders, 6 color rotary encoders, 24 memory buttons for colors/chases/user memories. – ● Power input: 9 12 V DC, 800 mA ●... -
Page 7: Top View - Modes/Functions Section
ColorCue 3 Top View – Modes/Functions Section Fig. 02 LCD display AMBER/STROBE control Modes buttons with LEDs J) UV control RED/DIRECTION control K) BANK A master fader and flash button with LED GREEN/SPEED control L) BANK B master fader and flash button with LED... -
Page 8: Back View
Power switch ON/OFF Installation Remove all packing materials from the ColorCue 3. Check if all foam and plastic padding is removed. Connect the LED controller to a power outlet with the supplied AC power adapter. Always disconnect from electric mains power supply before cleaning or servicing. -
Page 9: Setup Mode
ColorCue 3 Fig. 04 Setup Mode In this mode you can select the type of the LEDs of the connected lighting fixture(s) and the MIDI address of the device. The setup mode screen provides information about the MIDI address of the device, the LEDs type of the connected fixtures, the starting DMX address of the last connected fixture, whether the default settings of the fixtures are active, and the firmware version. -
Page 10: Dmx Starting Address Of The Connected Fixtures
There are no functional differences between Approach 1 and 2. MIDI Address Setup In setup mode press the UP/DOWN buttons (25)/(28) to assign the MIDI address of the ColorCue 3. The selection range is 1–16. Refer to MIDI Implementation Chart on page 21 for more information. -
Page 11: Operating Functions
ColorCue 3 In single mode the FIXTURES buttons and faders (01)–(24) control the connected up to 24 fixtures. In this mode BANK A master fader and flash button (K) act as master fader and flash button for all connected fixtures, and BANK B master fader and flash button (L) have no function. -
Page 12: Clear The Programmer
ColorCue 3 Clear the Programmer Before exiting programming mode, you need to clear the programmer. Make sure color selection mode is enabled. See Color Selection Mode vs. Parameter Selection Mode on page 10. Press the CLEAR button (44) to clear any value, set with the controls (E)–(J). The LED on the button will light up. -
Page 13: Crossfade Between Bank A And Bank B (Double Control Mode)
ColorCue 3 04) Make sure the color selection mode is enabled. Turn the controls (E)–(J) to select the desired color. The available colors are red, green, blue, white, amber and UV. Turning the control clockwise will increase the color intensity. The display will show the color value in the range 0–255. If you want to clear a selection, press the CLEAR button (44). -
Page 14: Programming Mode
ColorCue 3 Programming Mode In this mode you can program and edit scenes and chases. The scenes and chases can be assigned to the 24 PLAYBACKS buttons (A)–(B). The programming mode screen provides information about the selected PLAYBACKS button number, the step number, the direction of the chase, the playback speed of the chase in bpm (beats per minute) and the fade percentage. -
Page 15: Chase Parameters
ColorCue 3 Note: One chase can have up to 100 steps. However, the maximum number of steps for all recorded chases is limited to 1000 steps in total. 09) Clear the programmer. Chase Parameters When you create a chase you can set the direction in which the steps will be played back, the playback speed of a step and the fade percentage between steps. -
Page 16: Delete A Step In A Chase
ColorCue 3 Delete a Step in a Chase 01) In programming mode, press and hold down the DELETE button (40) for 3 seconds. The LED on the button will light up. 02) Press the PLAYBACKS button (01)–(24) for which you want to delete a step in a chase. The LED on the button will start blinking. -
Page 17: Insert A Step In A Chase
ColorCue 3 Insert a Step in a Chase 01) In programming mode, press and hold down the INSERT button (38) for 3 seconds. The LED on the button will light up. 02) Press the PLAYBACKS button (01)–(24) for which you want to insert a step in the chase. The LED on the button will start blinking. -
Page 18: Factory Reset
ColorCue 3 You can additionally select between single chase play and multiple chase play. Press the SINGLE/MIX button (37) to toggle between the two options. ● Single: The LED on the button will light up in red. If this option is enabled, only one chase will be played back at a time. -
Page 19: Maintenance
05) If nothing happens after 30 seconds, unplug the device. If you are unable to determine the cause of the problem, do not open the ColorCue 3, as this may damage the unit and the warranty will become void. Return the device to your Showtec dealer. -
Page 20: Product Specifications
ColorCue 3 Product Specifications Model: Showtec ColorCue 3 Power input: 9–12 V DC, 800 mA Power consumption: 15 W (max) Dimensions: 482 x 261 x 80 mm (L x W x H) Weight: 3,6 kg Signal pin OUT: pin 1 earth, pin 2 (-), pin 3 (+) -
Page 21: Dimensions
ColorCue 3 Dimensions Order code: 50705... -
Page 22: Midi Implementation Chart
ColorCue 3 MIDI Implementation Chart Function Transmitted Recognized Remarks Basic channel Default Changed Mode Default Messages Altered Note number 22–85 22–84 True voice Velocity Note ON Note OFF After touch Key's Channel Pitch bend Control change Prog Change True# SysEx... - Page 23 ColorCue 3 Order code: 50705...
- Page 24 ©2020 Showtec...
Need help?
Do you have a question about the ColorCue 3 and is the answer not in the manual?
Questions and answers