
Subscribe to Our Youtube Channel
Related Manuals for SHOWTEC Helix S5000 Q4


Summary of Contents for SHOWTEC Helix S5000 Q4
- Page 1 MANUAL ENGLISH Helix S5000 Q4 Ordercode: 43725 Highlite International B.V. – Vestastraat 2 – 6468 EX – Kerkrade – the Netherlands...
-
Page 2: Table Of Contents
Helix S5000 Q4 Table of contents Warning ....................................4 Safety Instructions ................................. 4 Operating Determinations ............................6 Rigging .................................... 6 Connection with the mains............................8 Return Procedure ................................8 Claims ....................................8 Description of the device ..............................9 Features ..................................9 Overview .................................. - Page 3 Helix S5000 Q4 6.11. Factory................................32 7. Information ................................32 DMX Channels ................................33 4 Channels ................................33 6 Channels ................................33 8 Channels ................................34 20 Channels ................................36 24 Channels ................................37 Maintenance ..................................39 Troubleshooting ................................40 No Light ..................................40 No Response to DMX..............................
- Page 4 Helix S5000 Q4 Ordercode: 43725...
-
Page 5: Warning
Save the carton and all packing materials. In the event that a fixture must be returned to the factory, it is important that the fixture be returned in the original factory box and packing. Your shipment includes: ● Showtec Helix S5000 Q4 ● Schuko to Neutrik PowerCON True1 power cable (1,5 m) ●... - Page 6 ● If your Showtec device fails to work properly, discontinue use immediately. Pack the unit securely (preferably in the original packing material), and return it to your Showtec dealer for service.
-
Page 7: Operating Determinations
Helix S5000 Q4 ● This device falls under protection class I. Therefore it is essential to connect the yellow/green conductor to earth. ● Repairs, servicing and electric connection must be carried out by a qualified technician. ● WARRANTY: Till one year after date of purchase. - Page 8 Helix S5000 Q4 The Helix S5000 Q4 can be placed on a flat stage floor, by means of the included mounting bracket, or be mounted to any kind of truss with clamps and quick-locks. Improper installation can cause serious damage to people and property!
-
Page 9: Connection With The Mains
Helix S5000 Q4 Connection with the mains Connect the device to the mains with the power-plug. Always pay attention, that the right color cable is connected to the right place. International EU Cable UK Cable US Cable BROWN YELLOW/COPPER PHASE... -
Page 10: Description Of The Device
Description of the device Features The Showtec Helix S5000 Q4 is a high-power panel light with IP65 protection grade. It has an extremely high light output and is very suitable for illumination of larger indoor and (temporarily) outdoor areas. ●... -
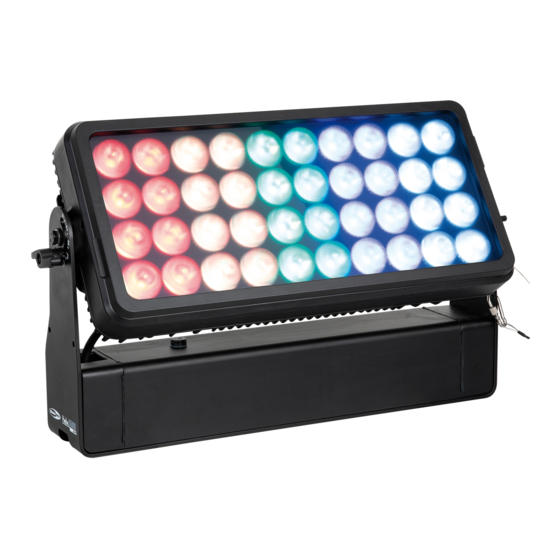
Page 11: Overview
Helix S5000 Q4 Overview Fig. 01 01) 40 x Prolight Opto RGBW 4-in-1 10W LEDs 02) 5-pin DMX connector IN 03) 5-pin DMX connector OUT 04) 100-240V Neutrik PowerCON True1 power connector OUT 05) 100-240V Neutrik PowerCON True1 power connector IN... -
Page 12: Installation
Helix S5000 Q4 Installation Remove all packing materials from the Helix S5000 Q4. Check that all foam and plastic padding is removed. Connect all cables. Do not supply power before the whole system is set up and connected properly. Always disconnect from electric mains power supply before cleaning or servicing. -
Page 13: Installing The Beamshapers (43727/43728/43729)
Helix S5000 Q4 Installing the Beamshapers (43727/43728/43729) 01) In order to install the beamshaper, place it on the lens of the Helix. The beamshaper is equipped with multiple magnets which keep it firmly in position. 02) In order to remove the beamshaper, pull it by the handles located on its sides. -
Page 14: Installing The Tophat (43730)
Helix S5000 Q4 Installing the Tophat (43730) 01) Pull on the spring-loaded locking screws, on both sides of the tophat, to unlock the mechanism. Fig. 05 02) Place the tophat on the Helix, to secure the tophat’s screws in the Helix’s mounting holes. -
Page 15: Set Up And Operation
Helix S5000 Q4 Set Up and Operation Follow the directions below, as they pertain to your preferred operation mode. Before plugging the unit in, always make sure that the power supply matches the product specification voltage. Do not attempt to operate a 120V specification product on 230V power, or vice versa. -
Page 16: Multiple Helixes (Dmx Control)
Helix S5000 Q4 Multiple Helixes (DMX Control) 01) Fasten the effect light onto firm trussing. Leave at least 0,5 meter on all sides for air circulation. 02) Always use a safety cable (ordercode 70140 / 70141). 03) Plug the end of the electric mains power cord into a proper electric power supply socket. -
Page 17: Multiple Helixes (Wireless Dmx Control)
DMX cable signal at the same time When the device is in Auto mode or Built-in Programs mode, please ensure that the paired 2.4GHz wireless signal transmitter is OFF. The Helix S5000 Q4 is only a WDMX receiver and never a WDMX transmitter Ordercode: 43725... -
Page 18: Example 1
The Helix cannot send any wireless signals. Therefore, the slave Helix fixtures must always be connected via a DMX signal cable. The Helix S5000 Q4 is only a WDMX receiver and never a WDMX transmitter When the Helix operates in DMX or Slave mode, it can receive a wireless DMX signal (CH1-512) and at the same time it can also send a DMX signal, via its DMX output (03), through a DMX cable. -
Page 19: Example 2
Helix S5000 Q4 Example 2 The Showtec Operator Air (50726) sends out a wireless signal with 512 channels and the Helix picks up this signal. Connect the Helix to the wireless DMX signal transmitter The Helix S5000 Q4 cannot actively search for wireless signal transmitters. -
Page 20: Fixture Linking
DAP Audio DMX Terminator 3-pin. Ordercode FLA42. ● DAP Audio DMX Terminator 5-pin. Ordercode FLA43. Note: connect the Helix S5000 Q4 with the dedicated special XLR cables for outdoor use. FL83150 – Neutrik DMX Cable 5-pin XLR IP65 (1,5 m) FL833 –... -
Page 21: Control Panel
Helix S5000 Q4 Control Panel A) DMX LED indicator OLED display C) MODE button D) DOWN button UP button SET button Fig. 11 DMX Control Mode The fixtures are individually addressed on a data-link and connected to the controller. The fixtures respond to the DMX signal from the controller. -
Page 22: Menu Overview
Helix S5000 Q4 Menu Overview Ordercode: 43725... - Page 23 Helix S5000 Q4 Ordercode: 43725...
-
Page 24: Main Menu Options
Helix S5000 Q4 Main Menu Options DMX settings Manual mode Auto mode Built-in programs Master/Slave mode Settings Information Upon start-up, the display will show the current software version, temperature and the signal type. 1. DMX Settings With this menu you can set the DMX address, choose the desired DMX mode and activate/deactivate the wireless DMX. -
Page 25: Address
Helix S5000 Q4 1.1. Address With this menu you can set the desired DMX starting address. 01) Press the UP/DOWN buttons to set the desired DMX address. The adjustment range is between 001- 512. 02) Press the SET button to confirm your choice. -
Page 26: W-Dmx Unlock
Helix S5000 Q4 1.4. W-DMX Unlock With this menu you can unlock the wireless DMX. 01) Press the UP/DOWN buttons to choose YES (to unlock the wireless DMX) or NO (to return to the previous screen). 02) Press the SET button to confirm your choice. -
Page 27: Built-In Programs
Helix S5000 Q4 4. Built-in Programs With this menu you can set the built-in programs. 01) While in the main menu, press the UP/DOWN buttons to choose PROGRAM. 02) Press the SET button to enter the menu. The display will show: 03) Press the UP/DOWN buttons to choose MODE and press the SET button to enter the menu. -
Page 28: Programs 02-26
Helix S5000 Q4 4.2. Programs 02-26 01) If you have chosen one of the programs 02-26, the display will show: 02) Press the UP/DOWN buttons to choose one of the 2 options: ● SPEED ● STROBE 03) Press the SET button to enter the desired menu. -
Page 29: Settings
Helix S5000 Q4 6. Settings With this menu you can adjust the device’s settings. 01) While in the main menu, press the UP/DOWN buttons to choose SETTINGS. 02) Press the SET button to enter the menu. The display will show: 03) Press the UP/DOWN buttons to choose one of the 11 submenus: ●... -
Page 30: Dimmer Speed
Helix S5000 Q4 6.2. Dimmer Speed With this menu you can set the dimmer speed. 01) Press the UP/DOWN buttons to select FAST or SMOOTH. 02) Press the SET button to confirm your choice. 6.3. Fan Speed With this menu you can set the fan speed. -
Page 31: Pixel Dir
Helix S5000 Q4 6.4. Pixel Dir With this menu you can set the pixel direction. 01) Press the UP/DOWN buttons to select NORMAL or INVERT. 02) Press the SET button to confirm your choice. 6.5. PWM Frequency With this menu you can set the PWM frequency. -
Page 32: Dmx Fail
Helix S5000 Q4 6.7. DMX Fail With this menu you can set the device’s behavior in case of a DMX failure. 01) Press the UP/DOWN buttons to select one of the 4 options: ● OFF: the device will black out the light output ●... -
Page 33: Key Backlight
Helix S5000 Q4 6.10. Key Backlight With this menu you can set whether the 4 buttons (MODE, SET, UP, DOWN) will be illuminated or not. 01) Press the UP/DOWN buttons to select ON or OFF. 02) Press the SET button to confirm your choice. -
Page 34: Dmx Channels
Helix S5000 Q4 DMX Channels 4 Channels Channel 1 – Red 0-255 Gradual adjustment Red, from dark to brightest Channel 2 – Green 0-255 Gradual adjustment Green, from dark to brightest Channel 3 – Blue 0-255 Gradual adjustment Blue, from dark to brightest Channel 4 –... -
Page 35: Channels
Helix S5000 Q4 8 Channels Channel 1 – Dimmer 0-255 Dimmer intensity, from dark to brightest Channel 2 – Red CH1 must be open; CH6-7 must be closed 0-255 Gradual adjustment Red, from dark to brightest Channel 3 – Green CH1 must be open;... - Page 36 Helix S5000 Q4 29-34 Millennium Gold 35-40 Gold Amber 41-46 Yellow 47-52 Chrome Yellow 53-58 Deep Amber 59-64 Spring Yellow 65-70 Lime Green 71-76 JAS Green 77-82 Fern Green 83-88 Moss Green 89-94 Primary Green 95-100 Dark Green 101-106 Green...
-
Page 37: Channels
Helix S5000 Q4 The Helix’s output is divided into 5 sections. 20 Channels Channel 1 – Red (section 1) 0-255 Gradual adjustment Red, from dark to brightest Channel 2 – Green (section 1) 0-255 Gradual adjustment Green, from dark to brightest Channel 3 –... -
Page 38: Channels
Helix S5000 Q4 The Helix’s output is divided into 5 sections. 24 Channels Channel 1 – Dimmer 0-255 Dimmer intensity, from dark to brightest Channel 2 – Strobe CH1 must be open; CH3-24 must be open 0-10 Not functional 11-255 Strobe flash frequency, from OFF to highest frequency Channel 3 –... - Page 39 Helix S5000 Q4 173-178 Blue 179-184 Congo Blue 185-190 Surprise Pink 191-196 Fuchsia Pink 197-202 Follies Pink 203-208 Special Rose Pink 209-214 Pink 215-220 Moroccan Pink 221-226 Warm White 227-232 Cold White 233-255 Open White Channel 4 – Color switch/Color flow...
-
Page 40: Maintenance
Gradual adjustment White, from dark to brightest Maintenance The Showtec Helix S5000 Q4 requires almost no maintenance. However, you should keep the unit clean. Otherwise, the fixture’s light output will be significantly reduced. Disconnect the mains power supply and then wipe the cover with a damp cloth. Wipe the front glass panel clean with glass cleaner and a soft cloth. -
Page 41: Troubleshooting
01) Power supply. Check if the unit is plugged into an appropriate power supply. 02) The LEDs. Return the Helix to your Showtec dealer. 03) The internal fuse. Return the Helix to your Showtec dealer. 04) If all appears to be O.K., plug the unit in again. -
Page 42: Product Specifications
Helix S5000 Q4 Product Specifications Model: Showtec Helix S5000 Q4 Input voltage: 100-240V AC, 50/60Hz Power consumption: 415W Peak power: 810W Power linking: 3pcs@110V, 7pcs@240V DMX linking: 30pcs Dimensions: 530 x 125 x 318 mm (LxWxH) Weight: 11,5 kg Operating and Programming:... -
Page 43: Dimensions
Helix S5000 Q4 Dimensions Ordercode: 43725... - Page 44 ©2018 Showtec...
Need help?
Do you have a question about the Helix S5000 Q4 and is the answer not in the manual?
Questions and answers