Table of Contents
Advertisement
Quick Links
NTI
NETWORK
R
TECHNOLOGIES
INCORPORATED
VOPEX-C5USBVUA-4 /-8
Installation and Operation Manual
1275 Danner Dr
Tel:330-562-7070
Fax:330-562-1999
Aurora, OH 44202
www.networktechinc.com
VOPEX
VOPEX-C5USBVA-4 /-8
VGA Video/Audio
Splitter/Extender
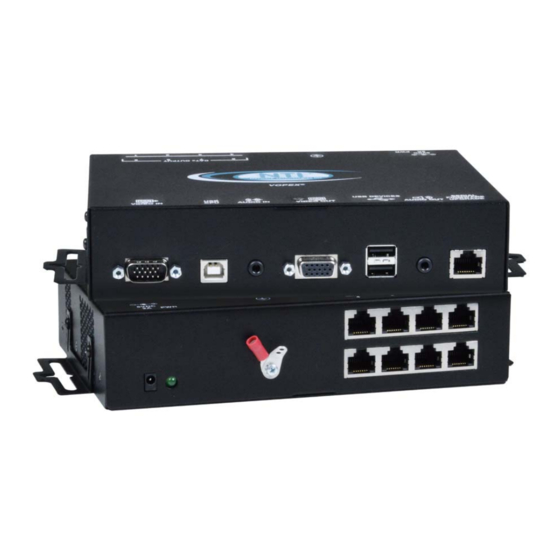
VOPEX-C5USBVUA-8 (Front and Rear View)
®
Series
MAN208 Rev Date 11/20/2014
Advertisement
Table of Contents

Related Manuals for NTI VOPEX-C5USBVA-4


Summary of Contents for NTI VOPEX-C5USBVA-4
- Page 1 NETWORK 1275 Danner Dr Tel:330-562-7070 TECHNOLOGIES Fax:330-562-1999 Aurora, OH 44202 INCORPORATED www.networktechinc.com ® VOPEX Series VOPEX-C5USBVA-4 /-8 VOPEX-C5USBVUA-4 /-8 VGA Video/Audio Splitter/Extender Installation and Operation Manual VOPEX-C5USBVUA-8 (Front and Rear View) MAN208 Rev Date 11/20/2014...
- Page 2 Ethernet router, hub or switch or other Ethernet RJ45 connector of an Ethernet device. Damage to devices connected to the Ethernet may result. Note: CATx connection cable used between NTI VOPEX Series Splitter and XTENDEX Series Remote or any XTENDEX Series products should not be run underground, outdoors or between buildings.
-
Page 3: Table Of Contents
TABLE OF CONTENTS Introduction..................................1 Materials ..................................1 Features and Functions..............................2 Limitations ..................................4 Preparation for Installation .............................. 4 VOPEX Installation................................5 VOPEX-C5USBVA-x ..............................5 Local Device Connections ............................6 Remote Unit Installation ..............................7 ST-C5USBVUA-R-1000............................... 7 Connect the CATx cable ..............................8 Plug-in and Boot Up ................................ -
Page 4: Introduction
Audio+Firmware Upgradable Contact your nearest NTI distributor or NTI directly for all of your KVM needs at 800-RGB-TECH (800-742-8324) in US & Canada or 330-562-7070 (Worldwide) or at our website at www.networktechinc.com and we will be happy to be of... -
Page 5: Features And Functions
NTI VOPEX SERIES CAT5 USB KVM SPLITTER/EXTENDER FEATURES AND FUNCTIONS VOPEX LABEL CONNECTOR DESCRIPTION Video In 15HD male video for connecting a VGA cable between the VOPEX and the PC connector USB CPU USB Type B female for connecting a USB cable between the VOPEX and the PC 3.5mm Stereo jack... - Page 6 NTI VOPEX SERIES CAT5 USB KVM SPLITTER/EXTENDER XTENDEX Remote Unit (Sold Separately) LABEL CONNECTOR DESCRIPTION Green LED for visual indication that the Local Unit is configured for connection to a MAC Mode MAC CPU USB Type A female for connection of remote user USB device(s)
-
Page 7: Limitations
NTI VOPEX SERIES CAT5 USB KVM SPLITTER/EXTENDER LIMITATIONS • The audio input of the VOPEX-C5USBVA-4 / -8 is compatible with the following standard CPU audio outputs: • Line out - typically lime green in color • Speaker out- typically orange in color •... -
Page 8: Vopex Installation
NTI VOPEX SERIES CAT5 USB KVM SPLITTER/EXTENDER VOPEX INSTALLATION VOPEX-C5USBVUA-x 1. Make connections between the VOPEX and the CPU. (See Fig. 1.) Connect the VEXT-3 (supplied) between the 15HD connector on the CPU and the 15HD male connector marked "Video In" on the VOPEX. -
Page 9: Local Device Connections
NTI VOPEX SERIES CAT5 USB KVM SPLITTER/EXTENDER Local Device Connections If a VGA monitor and USB devices are to be located close to the VOPEX, connection ports are provided on the VOPEX to support them. The connections labeled “USB DEVICES” will support the connection of any USB 2.0 Low Speed or Full Speed rated devices, not just the keyboard and mouse shown below. -
Page 10: Remote Unit Installation
NTI VOPEX SERIES CAT5 USB KVM SPLITTER/EXTENDER REMOTE UNIT INSTALLATION ST-C5USBVUA-R-1000 Position a ST-C5USBVUA-R-1000 Remote Unit such that the CATx cable, the monitor cable, and speaker cable can each reach the Remote Unit comfortably. Connect the remote user's monitor cable to the female 15HD video connector on the Remote Unit. -
Page 11: Connect The Catx Cable
NTI VOPEX SERIES CAT5 USB KVM SPLITTER/EXTENDER CONNECT THE CATX CABLE Make sure the CATx cable has been installed in accordance with the “Preparation for Installation” instructions on page 4. Connect a CATx cable to one of the ports marked “CATx Output” on the VOPEX. -
Page 12: Plug-In And Boot Up
NTI VOPEX SERIES CAT5 USB KVM SPLITTER/EXTENDER PLUG-IN AND BOOT UP Proper Power-Up Sequence: 1) Power ON XTENDEX Remote Unit 2) Power ON VOPEX 3) Power ON CPU (See details below) Plug the power cord from each monitor and the power supply for each audio device into a power outlet. -
Page 13: Configuration And Command Mode
NTI VOPEX SERIES CAT5 USB KVM SPLITTER/EXTENDER CONFIGURATION AND COMMAND MODE Command Mode All models are enabled with a Command Mode feature to perform the following: fine adjustment of the general video quality fine adjustment of color skew (alignment of red, green, and blue signals on the monitor) -
Page 14: Fine Video Quality Adjustment
NTI VOPEX SERIES CAT5 USB KVM SPLITTER/EXTENDER Fine Video Quality Adjustment General Video Quality Adjustment Command Mode opens into General Video Quality Adjustment mode. To fine tune the general video quality, press the <Left Arrow> or <Right Arrow> keys until the desired improvement in the display has been achieved. -
Page 15: Toggle Mac Mode
NTI VOPEX SERIES CAT5 USB KVM SPLITTER/EXTENDER Toggle MAC Mode MAC Mode enables the user to connect the VOPEX to a MAC CPU. MAC Mode configures the VOPEX for passing mouse information to the MAC CPU. This is useful when the user wants to use mouse drivers provided by the mouse vendor, which allows the use of programmable functions for each mouse button. -
Page 16: Firmware Upgrade Procedure
NTI VOPEX SERIES CAT5 USB KVM SPLITTER/EXTENDER FIRMWARE UPGRADE PROCEDURE This procedure describes how to upgrade the firmware in this VOPEX (Models VOPEX-C5USBVUA-4/-8 only). If you are not certain whether this VOPEX has the most up-to-date firmware available, simply download the latest version and follow the upgrade procedure. -
Page 17: Prepare To Upgrade The Firmware
NTI VOPEX SERIES CAT5 USB KVM SPLITTER/EXTENDER Prepare to Upgrade the Firmware Models VOPEX-C5USBVUA-4/-8 only With the power to the PC and VOPEX OFF, connect a PC to the VOPEX using the supplied 5 foot patch cable and 9DB-to- RJ45 adapter. Connect the patch cable to the “RS232 FIRMWARE UPGRADE” port on the VOPEX, attach the supplied 9DB-to-RJ45 adapter to the patch cable, and connect the 9DB adapter to an available serial COM port on the PC. -
Page 18: Upgrade Procedures
NTI VOPEX SERIES CAT5 USB KVM SPLITTER/EXTENDER Upgrade Procedures Start the Bootloader In the HyperTerminal window on the attached computer, press and hold the <Tab> key and power ON the VOPEX. The following message (or one similar) will be displayed on the screen: ST-C5-USBVA Bootloader Revision: 1.1... -
Page 19: Upgrade The Local Port Controller Firmware
NTI VOPEX SERIES CAT5 USB KVM SPLITTER/EXTENDER Upgrade the Local Port Controller Firmware The Local port controller firmware comes as a file in Intel Hex format and has the extension .hex (i.e. filename.hex). To upgrade any of Local Port controller with this firmware, press <p> from the terminal window. The following message should appear on the screen: Send .hex file using XModem protocol... - Page 20 NTI VOPEX SERIES CAT5 USB KVM SPLITTER/EXTENDER To proceed to upgrade the Remote controller, press <r> from Terminal window. The following message should appear on the screen: Erasing flash memory… Memory successfully erased Send .bin file using Xmodem protocol.. At this point the binary file c5usbvu-rcsx-x.bin must be sent. To do this, from HyperTerminal: 1.
-
Page 21: Technical Specifications
NTI VOPEX SERIES CAT5 USB KVM SPLITTER/EXTENDER TECHNICAL SPECIFICATIONS Characteristic Video Compatibility VGA,SVGA, XGA, SXGA,UXGA Video Quality Adjustment Automatic, for up to 1000 feet of CAT5 cable, with manual override (fine video quality adjustment can only be performed manually at the Remote... -
Page 22: Interconnection Cable Wiring Method
Brown Figure 9- View looking into RJ45 female Note: CATx connection cable used between NTI VOPEX and the XTENDEX Series Remote or any XTENDEX Series products should not be run underground, outdoors or between buildings. WARNING: Outdoor or underground runs of CATx cable could be dangerous and will void the warranty. -
Page 23: Warranty Information
NTI VOPEX SERIES CAT5 USB KVM SPLITTER/EXTENDER Problem Cause Solution • • Monitor sometimes goes Electrical power system is very Make sure the interconnection cable is not near any blank for an instant or the noisy, particularly the ground. power lines.
Need help?
Do you have a question about the VOPEX-C5USBVA-4 and is the answer not in the manual?
Questions and answers