
Related Manuals for Platinum 4300 TL


Summary of Contents for Platinum 4300 TL
- Page 1 I n s t a l l a t i o n a n d O p e r a t i n g Ma n u a l I n v e r t e r V e r s i o n 0 5 / 2 0 1 0 , Ma t . N o . 7 3 4 5 5 9 - A B...
- Page 2 The Diehl-Controls service hotline is accessible as follows: +49 7522 73 777 +49 7522 73 737 E-Mail service.platinum@diehlako.com Installation and operating manual: PLATINUM Inverter 4300 TL, 4800 TL, 5300 TL, 6300 TL, 7200 TL Version 05/2010 Mat. No. 734 559-AB...
-
Page 3: Table Of Contents
11 Disposal ............. . .71 Installation and operating manual: PLATINUM Inverter 4300 TL, 4800 TL, 5300 TL, 6300 TL, 7200 TL Version 05/2010 Mat. -
Page 4: Table Of Contents
16 Manufacturers Warranty of Diehl AKO Stiftung & Co. KG......77 Installation and operating manual: PLATINUM Inverter 4300 TL, 4800 TL, 5300 TL, 6300 TL, 7200 TL Version 05/2010 Mat. -
Page 5: Warning Notices
Layout of numbered lists: 1. List level 1 2. List level 1 2.1 List level 2 2.2 List level 2 Installation and operating manual: PLATINUM Inverter 4300 TL, 4800 TL, 5300 TL, 6300 TL, 7200 TL Version 05/2010 Mat. No. 734 559-AB... -
Page 6: Symbols On The Product
PLATINUM Inverter 4300 TL, 4800 TL, 5300 TL, 6300 TL, 7200 TL Symbols Symbols on the product Installation and operating manual: PLATINUM Inverter 4300 TL, 4800 TL, 5300 TL, 6300 TL, 7200 TL Version 05/2010 Mat. No. 734 559-AB... -
Page 7: Safety And Dangers
230 V/50 Hz mains. Do not use the inverter in autonomous power systems. Do not use the inverter in vehicles. Installation and operating manual: PLATINUM Inverter 4300 TL, 4800 TL, 5300 TL, 6300 TL, 7200 TL Version 05/2010 Mat. No. 734 559-AB... - Page 8 Remote control of AC power in connection with PLATINUM PowerCommander, PLATINUM WebMaster and a control device on the mains supply side. Installation and operating manual: PLATINUM Inverter 4300 TL, 4800 TL, 5300 TL, 6300 TL, 7200 TL Version 05/2010 Mat. No. 734 559-AB...
-
Page 9: Scope Of Delivery
5. Hold the inverter at the grip openings and lift it out of the base pad. 6. Put down the inverter. Installation and operating manual: PLATINUM Inverter 4300 TL, 4800 TL, 5300 TL, 6300 TL, 7200 TL Version 05/2010 Mat. No. 734 559-AB... -
Page 10: Mounting The Inverter
Avoid dust formation with electrically conductive dust particles. DIEHL Controls advises against installing the inverter in living spaces. Note Installation and operating manual: PLATINUM Inverter 4300 TL, 4800 TL, 5300 TL, 6300 TL, 7200 TL Version 05/2010 Mat. No. 734 559-AB... - Page 11 Hold protector 1 on bottom side and pull away from inverter. During assembly: Hang protector on left or right side of inverter. Hang protector in upper fixture. Installation and operating manual: PLATINUM Inverter 4300 TL, 4800 TL, 5300 TL, 6300 TL, 7200 TL Version 05/2010 Mat. No. 734 559-AB...
- Page 12 PLATINUM Inverter 4300 TL, 4800 TL, 5300 TL, 6300 TL, 7200 TL Mounting Fig. 3 Protector position during assembly Installation and operating manual: PLATINUM Inverter 4300 TL, 4800 TL, 5300 TL, 6300 TL, 7200 TL Version 05/2010 Mat. No. 734 559-AB...
- Page 13 The display position 1 for the PLATINUM TL series is marked Drill the mounting holes and insert the screw anchors. Bolt down mounting fixture 2. Installation and operating manual: PLATINUM Inverter 4300 TL, 4800 TL, 5300 TL, 6300 TL, 7200 TL Version 05/2010 Mat. No. 734 559-AB...
- Page 14 6 in the marked position (paper strip). Ensure that the locking screw 6 is accessible for the dismounting of the inverter. Installation and operating manual: PLATINUM Inverter 4300 TL, 4800 TL, 5300 TL, 6300 TL, 7200 TL Version 05/2010 Mat. No. 734 559-AB...
-
Page 15: Connection Of The Inverter
Caution Make sure that cable connector in latched in receptacle correctly. Installation and operating manual: PLATINUM Inverter 4300 TL, 4800 TL, 5300 TL, 6300 TL, 7200 TL Version 05/2010 Mat. No. 734 559-AB... - Page 16 (see 14 Technical Data). Connect exclusively safety extra low voltage on the Caution contact of the external indicator. Installation and operating manual: PLATINUM Inverter 4300 TL, 4800 TL, 5300 TL, 6300 TL, 7200 TL Version 05/2010 Mat. No. 734 559-AB...
- Page 17 (2) DC terminals - (3) DC terminals + (4) Fan (not for 4300 TL) (5) Bushing for AC voltage cable Installation and operating manual: PLATINUM Inverter 4300 TL, 4800 TL, 5300 TL, 6300 TL, 7200 TL Version 05/2010 Mat. No. 734 559-AB...
- Page 18 AC power to at least two inverters with less power and to at least two phases. Installation and operating manual: PLATINUM Inverter 4300 TL, 4800 TL, 5300 TL, 6300 TL, 7200 TL Version 05/2010 Mat. No. 734 559-AB...
- Page 19 Put cable through bushing for AC voltage connection cable. Suitable for cable diameters between 12 and 21 mm. Note Installation and operating manual: PLATINUM Inverter 4300 TL, 4800 TL, 5300 TL, 6300 TL, 7200 TL Version 05/2010 Mat. No. 734 559-AB...
- Page 20 When the AC voltage connection is completed: Close cover of AC voltage connection area. Fasten cover with screws. Installation and operating manual: PLATINUM Inverter 4300 TL, 4800 TL, 5300 TL, 6300 TL, 7200 TL Version 05/2010 Mat. No. 734 559-AB...
- Page 21 (5) PC interface to EIA232 (exclusively for service purposes) It is possible to connect up to 50 PLATINUM inverters. Note Installation and operating manual: PLATINUM Inverter 4300 TL, 4800 TL, 5300 TL, 6300 TL, 7200 TL Version 05/2010 Mat. No. 734 559-AB...
- Page 22 DIEHL Controls recommends to use connectors if EIA485 bus line as follows: For incoming line pair: connector 9 connector 10 For outgoing line pair: connector 11 connector 12 Installation and operating manual: PLATINUM Inverter 4300 TL, 4800 TL, 5300 TL, 6300 TL, 7200 TL Version 05/2010 Mat. No. 734 559-AB...
- Page 23 For lines without RJ45 plugs, connect lines A and B in RJ45 plugs on connectors A and B. Installation and operating manual: PLATINUM Inverter 4300 TL, 4800 TL, 5300 TL, 6300 TL, 7200 TL Version 05/2010 Mat. No. 734 559-AB...
- Page 24 Phase Balancer and connection of the connecting cable, see installation and operating manual PLATINUM Phase Balancer. Installation and operating manual: PLATINUM Inverter 4300 TL, 4800 TL, 5300 TL, 6300 TL, 7200 TL Version 05/2010 Mat. No. 734 559-AB...
- Page 25 Put upper part of protector 2 on upper fixture 1 and slightly push down housing. Slide bottom part of protector in liwer fixture 3. Installation and operating manual: PLATINUM Inverter 4300 TL, 4800 TL, 5300 TL, 6300 TL, 7200 TL Version 05/2010 Mat. No. 734 559-AB...
- Page 26 If parameters of the inverter have been adapted to special Note requirements of the energy supplier, this is indicated on the start screen. Installation and operating manual: PLATINUM Inverter 4300 TL, 4800 TL, 5300 TL, 6300 TL, 7200 TL Version 05/2010 Mat. No. 734 559-AB...
-
Page 27: Initial Startup Of Inverter
The inverter is supplied with power. Configuration through the following dialogs. Initial startup Function Start configuration process with this inverter. Installation and operating manual: PLATINUM Inverter 4300 TL, 4800 TL, 5300 TL, 6300 TL, 7200 TL Version 05/2010 Mat. No. 734 559-AB... - Page 28 The network scan can only recognize more than 1 inverter if the Note inverters are correctly networked via the EIA 485 interface. Installation and operating manual: PLATINUM Inverter 4300 TL, 4800 TL, 5300 TL, 6300 TL, 7200 TL Version 05/2010 Mat. No. 734 559-AB...
- Page 29 2 and the right-hand one no. 3. The following screen is not displayed if only one inverter is Note configured. Installation and operating manual: PLATINUM Inverter 4300 TL, 4800 TL, 5300 TL, 6300 TL, 7200 TL Version 05/2010 Mat. No. 734 559-AB...
- Page 30 1, which is shown on the display. When the OK key was pressed at the second inverter, this inverter is allocated no. 2, etc.. Installation and operating manual: PLATINUM Inverter 4300 TL, 4800 TL, 5300 TL, 6300 TL, 7200 TL Version 05/2010...
- Page 31 Entry only at one inverter. All inverters connected to the network are blocked. With the number allocation completed, the inverter switches to the Country Code screen. Installation and operating manual: PLATINUM Inverter 4300 TL, 4800 TL, 5300 TL, 6300 TL, 7200 TL Version 05/2010 Mat. No. 734 559-AB...
- Page 32 Inverter shows following screen: Press OK key. The inverter automatically transmits the country code setting to all network participants. Installation and operating manual: PLATINUM Inverter 4300 TL, 4800 TL, 5300 TL, 6300 TL, 7200 TL Version 05/2010 Mat. No. 734 559-AB...
- Page 33 Accept date setting. Time Function Increment or decrement present digit. Select next or previous digit. Accept time setting. Installation and operating manual: PLATINUM Inverter 4300 TL, 4800 TL, 5300 TL, 6300 TL, 7200 TL Version 05/2010 Mat. No. 734 559-AB...
- Page 34 (if available). After the data transmission, the inverter will show the menu Time settings (see 7.6 Settings). Installation and operating manual: PLATINUM Inverter 4300 TL, 4800 TL, 5300 TL, 6300 TL, 7200 TL Version 05/2010 Mat. No. 734 559-AB...
-
Page 35: Phase Balancer
To accept device numbers of replaced inverters: Select EXCHANGE INVERTER. To renumber: Select REASSIGN NUMBERS. Installation and operating manual: PLATINUM Inverter 4300 TL, 4800 TL, 5300 TL, 6300 TL, 7200 TL Version 05/2010 Mat. No. 734 559-AB... - Page 36 Inverter shows device number of the replaced device in the lower left corner. After device replacement: Set date and time. Installation and operating manual: PLATINUM Inverter 4300 TL, 4800 TL, 5300 TL, 6300 TL, 7200 TL Version 05/2010 Mat. No. 734 559-AB...
- Page 37 PLATINUM Inverter 4300 TL, 4800 TL, 5300 TL, 6300 TL, 7200 TL Start Up Reassign numbers Renumbering see 6.1 Initial startup of inverter. Installation and operating manual: PLATINUM Inverter 4300 TL, 4800 TL, 5300 TL, 6300 TL, 7200 TL Version 05/2010 Mat. No. 734 559-AB...
-
Page 38: Dc Disconnector
DC disconnector to minimize wear and tear of the contacts. Fig. 14 DC disconnector (1) DC disconnector Installation and operating manual: PLATINUM Inverter 4300 TL, 4800 TL, 5300 TL, 6300 TL, 7200 TL Version 05/2010 Mat. No. 734 559-AB... -
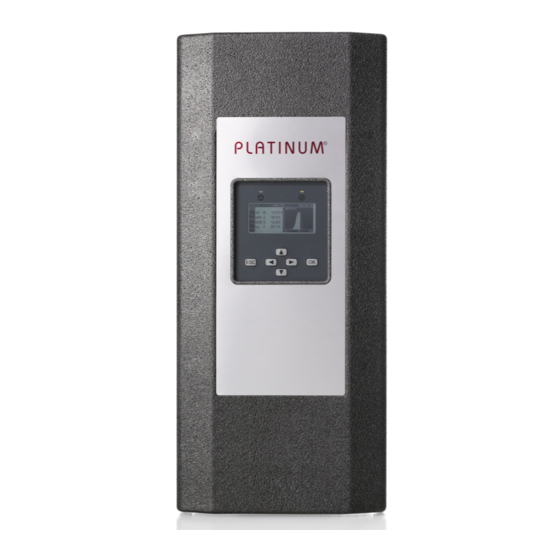
Page 39: Display And Operation
(5) LED green (6) Date (7) OK key (8) Navigation keys (9) ESC key (10)Device number (11)Scroll arrows vertical (12)Day Installation and operating manual: PLATINUM Inverter 4300 TL, 4800 TL, 5300 TL, 6300 TL, 7200 TL Version 05/2010 Mat. No. 734 559-AB... - Page 40 Adjustable in menu Time settings. Keys The functions of the keys are indicated in the tables under the illustrations. Installation and operating manual: PLATINUM Inverter 4300 TL, 4800 TL, 5300 TL, 6300 TL, 7200 TL Version 05/2010 Mat. No. 734 559-AB...
-
Page 41: Standard Screen
Number in the top left corner of the graphic: maximum value of scale Depending on max. DC power of inverter Installation and operating manual: PLATINUM Inverter 4300 TL, 4800 TL, 5300 TL, 6300 TL, 7200 TL Version 05/2010 Mat. No. 734 559-AB... -
Page 42: Main Menu
Back to Main Menu. Arrow to the right of the table: designation of physical value displayed in graphic Installation and operating manual: PLATINUM Inverter 4300 TL, 4800 TL, 5300 TL, 6300 TL, 7200 TL Version 05/2010 Mat. No. 734 559-AB... - Page 43 Current shows a list of the current electric values for DC and AC side. Function Switch to menu Today. Back to Main Menu. Installation and operating manual: PLATINUM Inverter 4300 TL, 4800 TL, 5300 TL, 6300 TL, 7200 TL Version 05/2010 Mat. No. 734 559-AB...
- Page 44 The values displayed by the inverter may differ from the readings of Note calibrated electricity meters. (1) Physical values (2) Graphic of physical value Installation and operating manual: PLATINUM Inverter 4300 TL, 4800 TL, 5300 TL, 6300 TL, 7200 TL Version 05/2010 Mat. No. 734 559-AB...
- Page 45 Table: For the display period TODAY, the current power value is displayed. For all other periods, the maximum value is displayed. Installation and operating manual: PLATINUM Inverter 4300 TL, 4800 TL, 5300 TL, 6300 TL, 7200 TL Version 05/2010 Mat. No. 734 559-AB...
- Page 46 Time Date format Daylight saving time Function Navigate within menu. Back to menu Settings. Call up selected menu. Installation and operating manual: PLATINUM Inverter 4300 TL, 4800 TL, 5300 TL, 6300 TL, 7200 TL Version 05/2010 Mat. No. 734 559-AB...
- Page 47 To accept time setting: Select SELECT. Press OK key. The inverter automatically shares the new time setting with all network participants. Installation and operating manual: PLATINUM Inverter 4300 TL, 4800 TL, 5300 TL, 6300 TL, 7200 TL Version 05/2010 Mat. No. 734 559-AB...
- Page 48 Manual setting of daylight saving time required. AUTOMATIC Inverter sets daylight saving time automatically, depending on set country and calendar. Installation and operating manual: PLATINUM Inverter 4300 TL, 4800 TL, 5300 TL, 6300 TL, 7200 TL Version 05/2010 Mat. No. 734 559-AB...
- Page 49 Back to menu Settings. Accept selected language. The inverter automatically shares the new language setting with all network participants. Installation and operating manual: PLATINUM Inverter 4300 TL, 4800 TL, 5300 TL, 6300 TL, 7200 TL Version 05/2010 Mat. No. 734 559-AB...
- Page 50 Alarmkontakt ist deaktiviert. INTERVAL The alarm contact (NO contact) opens and closes periodically if a safety-relevant or blocking error occurs. Installation and operating manual: PLATINUM Inverter 4300 TL, 4800 TL, 5300 TL, 6300 TL, 7200 TL Version 05/2010 Mat. No. 734 559-AB...
- Page 51 Value for 1 kWh feed current (for rebate calculation). Increment or decrement present digit. Navigate between input fields. Back to menu Settings. Accept setting. Installation and operating manual: PLATINUM Inverter 4300 TL, 4800 TL, 5300 TL, 6300 TL, 7200 TL Version 05/2010 Mat. No. 734 559-AB...
- Page 52 Back to menu Settings. RESET Set energy meter to 0. Select BACK or RESET. Confirm selection. Back to menu Settings. Installation and operating manual: PLATINUM Inverter 4300 TL, 4800 TL, 5300 TL, 6300 TL, 7200 TL Version 05/2010 Mat. No. 734 559-AB...
- Page 53 Resetting is not possible. METER 2 Shows feed data of the inverter since the latest reset of meter 2. Installation and operating manual: PLATINUM Inverter 4300 TL, 4800 TL, 5300 TL, 6300 TL, 7200 TL Version 05/2010 Mat. No. 734 559-AB...
- Page 54 PLATINUM PV-Monitor, PLATINUM ViewMaster and PLATINUM Webmaster). NUMBER OF INVERTERS Shows the number of inverters in the network. Installation and operating manual: PLATINUM Inverter 4300 TL, 4800 TL, 5300 TL, 6300 TL, 7200 TL Version 05/2010 Mat. No. 734 559-AB...
- Page 55 When contacting the PLATINUM service, have the serial number Note ready. After changing the inverter network parameters, the display shows USER-DEFINED NETWORK MONITORING. Installation and operating manual: PLATINUM Inverter 4300 TL, 4800 TL, 5300 TL, 6300 TL, 7200 TL Version 05/2010 Mat. No. 734 559-AB...
- Page 56 HARDWARE Shows the inverter hardware version. EIA485 Shows the data bus software version. Shows version of bootloader software. Installation and operating manual: PLATINUM Inverter 4300 TL, 4800 TL, 5300 TL, 6300 TL, 7200 TL Version 05/2010 Mat. No. 734 559-AB...
-
Page 57: Error Display
Destruction of the inverter due to fatal errors! Switch off AC. Switch off DC. If available: Warning Set DC disconnector to 0. Notify PLATINUM service. Installation and operating manual: PLATINUM Inverter 4300 TL, 4800 TL, 5300 TL, 6300 TL, 7200 TL Version 05/2010 Mat. No. 734 559-AB... - Page 58 Inverter switches off acoustic alarm. Press key ESC again. Inverter shows start screen. Red LED flashes as long as the error persists. Installation and operating manual: PLATINUM Inverter 4300 TL, 4800 TL, 5300 TL, 6300 TL, 7200 TL Version 05/2010 Mat. No. 734 559-AB...
- Page 59 The inverter displays the screen Non-blocking error. The red LED is flashing. Delete error display with key ESC. Installation and operating manual: PLATINUM Inverter 4300 TL, 4800 TL, 5300 TL, 6300 TL, 7200 TL Version 05/2010 Mat. No. 734 559-AB...
- Page 60 3 s. Function Navigate within menu. Return to standard display. Call up selected menu. Installation and operating manual: PLATINUM Inverter 4300 TL, 4800 TL, 5300 TL, 6300 TL, 7200 TL Version 05/2010 Mat. No. 734 559-AB...
- Page 61 Explanations about the events see 12.1 Table of events. Have the event code and the serial number ready when contacting the PLATINUM service. Installation and operating manual: PLATINUM Inverter 4300 TL, 4800 TL, 5300 TL, 6300 TL, 7200 TL Version 05/2010 Mat. No. 734 559-AB...
- Page 62 The parameters can exclusively be modified by certified persons with Note the PLATINUM service tool. Installation and operating manual: PLATINUM Inverter 4300 TL, 4800 TL, 5300 TL, 6300 TL, 7200 TL Version 05/2010 Mat. No. 734 559-AB...
- Page 63 If one of the inverters fails, the other two inverters will limit the AC power to the set unbalanced load. Installation and operating manual: PLATINUM Inverter 4300 TL, 4800 TL, 5300 TL, 6300 TL, 7200 TL Version 05/2010 Mat. No. 734 559-AB...
- Page 64 Back to menu Main Menu. Accept setting. Range of values: 10 s to 9,999 s Factory setting: 300 s Installation and operating manual: PLATINUM Inverter 4300 TL, 4800 TL, 5300 TL, 6300 TL, 7200 TL Version 05/2010 Mat. No. 734 559-AB...
- Page 65 A reconfiguration of the country is only possible within the first four Note hours after the connection. Afterwards, this menu item is blocked. Installation and operating manual: PLATINUM Inverter 4300 TL, 4800 TL, 5300 TL, 6300 TL, 7200 TL Version 05/2010 Mat. No. 734 559-AB...
- Page 66 Select Reconfiguration in the Service Menu. Change inverter numbers see 6.1 Initial startup of inverter, subsection Allocating inverter numbers. Installation and operating manual: PLATINUM Inverter 4300 TL, 4800 TL, 5300 TL, 6300 TL, 7200 TL Version 05/2010 Mat. No. 734 559-AB...
- Page 67 Pull the plugs in the following order: 1. AC side 2. DC side Maintenance The inverter is maintenance-free. Installation and operating manual: PLATINUM Inverter 4300 TL, 4800 TL, 5300 TL, 6300 TL, 7200 TL Version 05/2010 Mat. No. 734 559-AB...
-
Page 68: Placing Out Of Operation
Use mounting elements appropriate for the mounting wall and the weight of the inverter unit. Wear protective footwear when mounting and Danger dismounting inverters. Installation and operating manual: PLATINUM Inverter 4300 TL, 4800 TL, 5300 TL, 6300 TL, 7200 TL Version 05/2010 Mat. No. 734 559-AB... - Page 69 Pack the inverter in the packaging of the replacement. If a single inverter is returned: Demand additional packaging from Diehl-Controls or reuse it. Installation and operating manual: PLATINUM Inverter 4300 TL, 4800 TL, 5300 TL, 6300 TL, 7200 TL Version 05/2010 Mat. No. 734 559-AB...
- Page 70 3. Place the lid pad on the inverter. 4. Slide the outer box over the inverter. 5. Secure the box with packing straps. Installation and operating manual: PLATINUM Inverter 4300 TL, 4800 TL, 5300 TL, 6300 TL, 7200 TL Version 05/2010 Mat. No. 734 559-AB...
-
Page 71: Troubleshooting
Restart inverter. If measure is not successful: Call Service. DC voltage too high Check module interconnection. Installation and operating manual: PLATINUM Inverter 4300 TL, 4800 TL, 5300 TL, 6300 TL, 7200 TL Version 05/2010 Mat. No. 734 559-AB... - Page 72 Diagnosis support during Provide the service with the error code if required. service measured temperatures too Check ventilation openings. high Installation and operating manual: PLATINUM Inverter 4300 TL, 4800 TL, 5300 TL, 6300 TL, 7200 TL Version 05/2010 Mat. No. 734 559-AB...
-
Page 73: Standards And Approvals
DIN EN 61 000-6-3 DIN VDE 0126-1-1 DIN EN 61000-3-2 DIN EN 61000-3-3 DIN EN 61000-3-11 DIN EN 61000-3-12 Installation and operating manual: PLATINUM Inverter 4300 TL, 4800 TL, 5300 TL, 6300 TL, 7200 TL Version 05/2010 Mat. No. 734 559-AB... -
Page 74: Technical Data
97.4% 97.7% 98.0% European efficiency 96.8% 97.0% 97.0% 97.3% 97.6% Working temperature range -20 °C to +60 °C Installation and operating manual: PLATINUM Inverter 4300 TL, 4800 TL, 5300 TL, 6300 TL, 7200 TL Version 05/2010 Mat. No. 734 559-AB... - Page 75 Storage capacity sufficient for 30 yrs operating time Technical data apply to maximum height above MSL of 2,000 m. Note Installation and operating manual: PLATINUM Inverter 4300 TL, 4800 TL, 5300 TL, 6300 TL, 7200 TL Version 05/2010 Mat. No. 734 559-AB...
-
Page 76: Ec Declaration Of Conformity
Klaus Frehner CEO Photovoltaics Phone: +49 (0) 7522 73 0 Fax: +49 (0) 7522 73 300 Mailto: info@diehlako.com www.diehlako.de Installation and operating manual: PLATINUM Inverter 4300 TL, 4800 TL, 5300 TL, 6300 TL, 7200 TL Version 05/2010 Mat. No. 734 559-AB... - Page 77 Warranted Product at the Warranted User’s premises (Warranty Period). This Warranty Period ends not later than Installation and operating manual: PLATINUM Inverter 4300 TL, 4800 TL, 5300 TL, 6300 TL, 7200 TL Version 05/2010 Mat. No. 734 559-AB...
- Page 78 3 months after the end of the Warranty Period. Installation and operating manual: PLATINUM Inverter 4300 TL, 4800 TL, 5300 TL, 6300 TL, 7200 TL Version 05/2010 Mat. No. 734 559-AB...
- Page 79 The same rule applies to any missing clause in this agreement. Installation and operating manual: PLATINUM Inverter 4300 TL, 4800 TL, 5300 TL, 6300 TL, 7200 TL Version 05/2010...
- Page 80 The exclusive place of jurisdiction in case of any conflict arising from, or in connection with this manufacturer’s warranty, is Wangen im Allgäu/FRG. Installation and operating manual: PLATINUM Inverter 4300 TL, 4800 TL, 5300 TL, 6300 TL, 7200 TL Version 05/2010 Mat. No. 734 559-AB...
- Page 82 Diehl AKO Stiftung & Co. KG PLATINUM Service Pfannerstraße 75 Tel: +49 7522 73-777 88239 Wangen im Allgäu, Deutschland Fax: +49 7522 73-737 Tel: +49 7522 73-700 service.platinum@diehl-controls.com Fax: +49 7522 73-710 platinum@diehl-controls.com www.diehl.com/photovoltaics...
Need help?
Do you have a question about the 4300 TL and is the answer not in the manual?
Questions and answers