Table of Contents
Advertisement
Quick Links
Advertisement
Table of Contents

Related Manuals for Fuji Xerox DocuPrint C2090 FS


Summary of Contents for Fuji Xerox DocuPrint C2090 FS
- Page 1 DocuPrint C2090 FS User Guide...
- Page 2 It may be a legal offence to print currency notes, certificates of stocks and securities, or any other documents of similar nature, regardless of whether they will be used. Fuji Xerox is not responsible for any breakdown of machines due to infection of computer virus or computer hacking.
-
Page 3: Table Of Contents
Illegal copies and printouts ..................7 Symbols and terminologies ..................8 Types of manuals ......................9 Safety notes.......................9 Using this manual ....................11 2. Introducing the DocuPrint C2090 FS................ 12 Features........................12 Package contents ....................13 Overview of the DocuPrint C2090 FS components..........15 2.3.1 Front view ........................15 2.3.2... - Page 4 Setting color scan from control panel ..............48 5.2.3 Setting original paper size and file type..............48 5.2.4 Image quality ......................48 5.2.5 Scanning an image from the DocuPrint C2090 FS ..........49 5.2.6 Scanning to FTP......................49 5.2.7 Scanning to USB-Key....................50 Scanning an image with computer ................50 5.3.1...
- Page 5 8.9.5 Fax stop & Fax cancel .....................85 8.9.6 Fax Broadcast cancel ....................85 8.10 Using Scan Tool Box ....................86 8.10.1 Application .......................87 8.10.2 Copy ........................89 8.10.3 Fax...........................91 8.10.4 File ...........................93 8.10.5 E-mail........................95 8.10.6 OCR.........................97 8.10.7 Setting........................99 9. Paper handling......................101 Paper sources .......................101 9.1.1 Usable paper ......................101 9.1.2...
- Page 6 11.6.4 Copier error messages ..................162 11.6.5 Fax error messages....................162 11.6.6 System error messages..................163 11.7 Replacing components ..................164 11.7.1 Replacing the retard pad ..................164 12. CentreWare Internet Services Tool ..............167 12.1 Access to CentreWare...................167 12.1.1 What is CentreWare Internet Services? ..............167 12.1.2 Environment setting for browser................167 12.2...
-
Page 7: Preface
1.1 About this manual Thank you for choosing the DocuPrint C2090 FS MFP (Multi Function Printer). With your DocuPrint C2090 FS you can print, copy, scan and fax. This is a manual on operating this MFP and the important points to note. It also tells you how to maintain it and troubleshoot problems. -
Page 8: Symbols And Terminologies
your country. • Currency • Bank notes and checks • Bank and government bonds and securities • Passports and identification cards • Copyright material or trademarks without the consent of the owner • Postage stamps and other negotiable instruments Exercise caution when copying the following items: •... -
Page 9: Types Of Manuals
CentreWare CD-ROM first if it is not already installed. 1.8 Safety notes For your own safety, please read this page carefully before using the DocuPrint C2090 FS. Graphic Symbols used throughout the guide Used for items that if not followed directly, can lead to severe or WARNING fatal injuries. - Page 10 Laser Printer Precautions The DocuPrint C2090 FS utilizes laser technology. Follow the precautions below to ensure safe, efficient operation. Unless specifically instructed in the manual, be careful not to touch the fuser, which is marked CAUTION HOT SURFACE. If you have been using the DocuPrint C2090 FS for an extended period of time, the fuser may be very hot.
-
Page 11: Using This Manual
1.9 Using this manual Chapter summary The DocuPrint C2090 FS User Guide consists of the following chapters to help you use the product efficiently with ease. Chapter Title Description Preface This chapter provides safety information, regulatory notices, important warning and cautions that should be noted by the user. -
Page 12: Introducing The Docuprint C2090 Fs
• Auto-redialing • Reports fax status Important: • While sending or receiving a fax, the DocuPrint C2090 FS still performs other functions such as printing and scanning simultaneously, but at a slower speed. Copier • Copy resolution up to 600 dpi •... -
Page 13: Package Contents
Remove the DocuPrint C2090 FS from its packaging box and move it to the desired location for installation. When the DocuPrint C2090 FS is first taken out of the packaging box, the cover of the machine is taped. Remove the tape. - Page 14 Transportation lock is located at the back of part B. Slowly flip over the scanner unit and move the transportation lock to unlocked position before using the DocuPrint C2090 FS. Open document cover and remove the paper on the document glass.
-
Page 15: Overview Of The Docuprint C2090 Fs Components
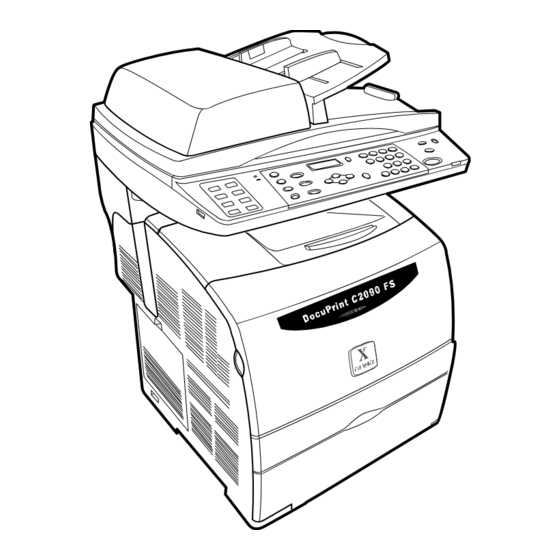
Overview of the DocuPrint C2090 FS components This section provides a brief description of the main components of the DocuPrint C2090 FS. 2.3.1 Front view Auto Document feeder (ADF) Cover A Paper stopper Control panel Part B Output tray Extension output tray... -
Page 16: Inside The Docuprint C2090 Fs
2.3.3 Inside the DocuPrint C2090 FS Cover C Fuser Paper Guide 2.3.4 Printer components Drum cartridge slot Toner cartridge slot Note: • For instructions on installing cartridges, see “Installing the toner cartridges” & “Installing the drum cartridge” section. - 16 -... -
Page 17: Scanner Components
Transportation lock USB Port Note: • Transportation lock is located at the back of the part B. Slowly flip over the scanner unit and remove the transportation lock to unlocked position before using the DocuPrint C2090 FS - 17 -... -
Page 18: Control Panel
2.3.6 Control panel - 18 -... - Page 19 Button Name Functions Fast keys Specific registered dial fast key. Transmission light (green) Indicates data transmission. Job in Memory (red) Indicates job processed in memory. Copy options From top to bottom: <Size/Type>: Press to choose type/size of the original document or the paper to be used.
-
Page 20: Getting Started
3.1 Placing the DocuPrint C2090 FS The DocuPrint C2090 FS should be located at a well-ventilated place so that the exhaust gases and heat generated are not directly blown onto the user’s face. Proper ventilation is necessary to prevent the machine from overheating. -
Page 21: Switching On And Off The Power
• Press the power switch of the printer to the <|> position. The toner cartridge carrier rotates and then stops. The [Load XXXX (the color of the toner) Cartridge] message is displayed on the control panel. Note: • Before removing the power cord from the machine, make sure the power is switched off properly. 3.2 Switching On and Off the Power 3.2.1 Switching on the power... -
Page 22: Switching Off The Power
In the Date setting screen, set the date by the numeric keys and press <Set>. In the Network screen, press the <Copy> button or turn the power off and on. Remove the DocuPrint C2090 FS from its packaging box and move it to the desired location for installation. -
Page 23: Setting Ip Address
3.3.2 Setting IP address In Copy Mode, press <Menu> on the control panel. Press <▼> for four times and press <Set>. On the Password screen, press <0> four times, press <Set>. On the Network screen, press <Set>. Select Ethernet, TCP IP, or Protocol with <◄/►> and press <Set>. In the IP address screen, select the desired option <◄/►>... -
Page 24: Setting Country Code
3.3.4 Setting country code The DocuPrint C2090FS Fax function requires telecommunication certification by countries. Before you using DocuPrint C2090FS Fax function, you need configuring the fax setting for location of the certified countries that offer fax as standard capability. In FAX Mode, press <Menu> on the control panel. Press <▼> to find [Configuration – Need password?] screen then press <Set>... -
Page 25: Exiting The Power Save Mode
When no print data is received for 5 minutes, the printer will enter the power saver mode. When the printer enter power saver mode, only the <Power Saver> indicator lights, the screen on the control panel becomes dark and all the other indicator goes out. The display also goes out, and nothing is displayed. 3.5 Exiting the power save mode The printer is automatically cancels the power save mode once it receives data from the computer. - Page 26 4. Remove the top part of the seal from the toner cartridge and pull the seal in the direction of the arrow, keeping it parallel with the toner cartridge. 5. Insert the toner cartridge with the arrow facing you. Push the cartridge all the way into the slot. Push both sides evenly until it is secure.
-
Page 27: Installing The Drum Cartridge
7. Close the front cover. The toner cartridge carrier rotates to the next empty slot. 8. Repeat steps 1 through 7 until all cartridges are installed. Notes: • The toner cartridge is installed securely when the lock lever cannot be turned further. •... - Page 28 5. With the lever in the upright position, hold the drum cartridge by the handle, align the arrows on the drum cartridge with the corresponding arrows on the printer and guide the cartridge in until it snaps into place. 6. Pull down the lever on the right to lock the drum cartridge in place. Flip down the top cover, and then close the front cover.
-
Page 29: Installing Extra Memory
• After installing the drum cartridge, the printer makes an adjustment for about one to two minutes. Do not switch off the printer during this time. 3.8 Installing extra memory Memory expansion to 256 MB is supported for this printer. When additional memory is installed, the total memory capacity becomes 352 MB respectively. - Page 30 4. Before you insert additional memory to machine, please remove presented dummy DIMM card, firstly. 5. Hold the additional memory so that the notch is aligned with the protrusion on the slot, and insert the additional memory into the slot firmly. 6.
-
Page 31: Connecting Cables
3.9 Connecting cables This section covers the connection of the USB cable, LAN cable, and phone cable. 3.9.1 USB cable Connect the USB cable to your PC or notebook to be used for printing and scanning operation. 1. Connect the USB cable to the USB connector at the back of the printer. 2. -
Page 32: Phone Cables
Note: • Please make sure the network service is ready for using. 3.9.3 Phone cables Connect the printer directly to a telephone wall jack for fax operation. Connect one end of the phone cable to the LINE connector on the printer. Connect the other end of the phone cable to the telephone wall jack. -
Page 33: Installing Software
Depending on the environment being used, the required software and its installation procedure may be different. Important: • The Fuji Xerox DocuWorks software package contains scanner TWAIN driver, scanner WIA driver (support Windows XP and Server 2003 only), printer driver, fax printer driver, and Tool Box application (MFP Scan-to-XXX utility). •... - Page 34 Click [Install MFP software]. The Install Shield Wizard starts automatically. In the process of installation, there are two ways to connect to the MFP, one is through USB connection, and the other is through network setup. Follow the steps below to complete the installation. Note: •...
-
Page 35: Usb Connection
3.12 USB connection Click the [Connected via USB], connect the MFP with the USB cable provided and click [NEXT] to continue. Software installation is in progress. When the installation is completed. Click [Finish] to close the wizard. Note: • Make sure that your USB cable is properly connected to your PC / Notebook and the machine is powered on before you use the [Connected via USB] function. -
Page 36: Network Connection
3.13 Network connection Select the [Connected via the network], and click [NEXT] to continue. There are two methods of identifying the MFP. Click the recommended [Search from a list of detected MFPs], and click on [NEXT] to continue. - 36 -... - Page 37 3. If your MFP is not found on the network, please check the connections and click [Refresh] to search again. Press [NEXT] to proceed if your MFP detected the network. Or you can use the other selection to specify your MFP from the network. 4.
- Page 38 6. The installation is completed. Click [Finish] to close the wizard. - 38 -...
-
Page 39: Setting Configuration Of Paper
3.14 Setting Configuration of Paper When installation of the print driver is completed, set the configuration of paper type, and paper size under the [Printing Preferences] tab in the print driver interface. For details, refer to the Online Help for the print driver. From the [Start] menu, choose [Settings] option and click [Printers]. -
Page 40: Uninstalling The Drivers And Scan Tool Box
3.15 Uninstalling the Drivers and Scan Tool Box The installed software can be removed by using the uninstallation tool under the Fuji Xerox directory. To uninstall the driver, go to Start \ Fuji Xerox \ Uninstall DocuPrint C2090FS. The un-installation tool activates. The Installation Wizard window pops up, click [Remove] to uninstall the driver. -
Page 41: Uninstalling The Software
3.16 Uninstalling the Software To remove Adobe PDF and the DocuWorks software from your computer, go to Start \ Control Panel \ Add/Remove Programs. A list of all the programs installed on your computer is displayed. Select the program you want to remove and click [Remove] to uninstall the software from your computer. -
Page 42: Printing
1. From the [File] menu of the application software, select [Print]. 2. Select the DocuPrint C2090 FS as the printer to be used. To use the various print features of this printer, display the properties of the printer, and set the necessary items. For details on each item and how to configure the settings, refer to the Online Help for the print driver. -
Page 43: Specifying The Printer Settings
4.3 Specifying the printer settings To customize your print settings, press [Properties] in the Print dialog box and the Print Properties dialog box appears. 4.3.1 Number of prints To specify the number of prints, enter the number of copies in the [Quantity] field and press [OK]. 4.3.2 Resizing the prints To resize the prints, choose the original paper size and then the output size desired. -
Page 44: Adjusting Layout
4.3.3 Adjusting layout To adjust the page layout, click [Image Shift / Print Position…] button to configure settings for image shift, print position and margins position for your document. - 44 -... -
Page 45: Adding Watermarks
4.3.4 Adding watermarks To add watermarks on your print, click the [Watermark] tab to add a preset water mark, create a new water mark, or edit watermark settings. - 45 -... -
Page 46: Advanced Settings
4.3.5 Advanced settings To customize the settings for graphic prints, click the [Graphic] tab and the following dialog box will appear. • Choose output color. For B/W prints, check [enhanced Black and White] for better print quality. • Choose [Image Adjustment Mode] to specify print quality of images. •... -
Page 47: Scanning
5.2 Scanning an image with operating panel There are two ways to scan an image using the DocuPrint C2090 FS. You can either perform scanning task directly through the control panel on the DocuPrint C2090 FS, or use any image editing software that is TWAIN compatible, such as Fuji Xerox DocuWorks Desk software provided in the CD Rom. -
Page 48: Setting Color Scan From Control Panel
1. In Scan mode, press the <Scan> button, and use the <◄/►> buttons to choose the destination to which an image is scanned. 2. You can scan to one of the following destinations: • USB-Key memory flash disk • PC-USB (via USB port) •... -
Page 49: Scanning An Image From The Docuprint C2090 Fs
Scanning to FTP Note: • Before scanning to FTP, make sure the DocuPrint C2090 FS is connected to the Internet and the settings for FTP server has been properly configured. To scan a document to FTP (FTP1 to FTP5), do the following: Press <Scan>... -
Page 50: Scanning To Usb-Key
Scan via WIA (Windows Image Acquisition) There are two ways to scan an image through WIA: Scan to an application via WIA: Double click [My Computer] icon on the desktop and select [FX DocuPrint C2090 FS Scanner]. - 50 -... - Page 51 Choose a program to scan an image and click [OK]. Choose an appropriate paper source and mode to scan the image and click [Scan] to proceed. Notes: • When you select Document feeder as paper source, the preview function will not available. •...
-
Page 52: Scan To A File Via Wia
When you scan the document with unsupported size, it will be read by unexpected size. 5.3.2 Scan to a file via WIA: Right-click the [FX DocuPrint C2090 FS Scanner] icon to display the context menu. Click [Get picture using Scanner Wizard]. Click [Next] to proceed. - Page 53 The scanner wizard displays the scanning progress on the screen. After scanning is complete, select [Nothing, I’m finished working with these pictures] and click [Next] to close to the wizard. - 53 -...
-
Page 54: Scanning From Application Via Twain Driver
To scan an image with the application software via TWAIN driver, do the following: Launch the application that supports TWAIN. Choose the required function to display the TWAIN dialog for FX DocuPrint C2090 FS Scanner. In most case select [Import] or [Acquire image] etc. from the [File] menu. - Page 55 With [Simple Mode] you can choose the pre-defined scanning type according to your document type or your scanning purpose. Simple Mode With [Advanced Mode] you can perform detailed settings such as resolution and Color mode. Advanced Mode To switch between two modes, click the corresponding tab. - 55 -...
-
Page 56: Previewing And Adjusting The Scan Area From Twain Driver
Note: • When scan Legal 13” and Legal 14”, please switch to Advance Mode with Auto Document Feeder scan source, Simple Mode does not support this function. 5.3.4 Previewing and adjusting the scan area from TWAIN driver Once you have configured the basic settings for scanning, you can preview the image and select or adjust the area of the image you want to scan. -
Page 57: Image Adjustment From Twain Driver
Select [Resolution], the quality is shown by ‘dpi’. Select from 75dpi to 600dpi with Auto Document Feeder scan source or 75dpi to 4800dpi with Document Glass scan source. Select [Descreen] mode by your document type to eliminate Moiré patterns of scan image. Choose [Scan size] of your document size. - Page 58 - 58 -...
-
Page 59: Copying
6. Copying This chapter explains how to make basic copies and customize settings for special copy jobs. 6.1 Placing the originals You can either place originals on either the ADF or on the document glass. Before making a copy, make sure the transportation lock on the back of the part B is set to the unlock position. -
Page 60: Making Copies
1. To specify the number of copies, do the following: 1. Make sure the DocuPrint C2090 FS is in Copy mode. If not, press the <Copy> button on the control panel. 2. Make sure the [Copies] value is highlighted in the LCD panel. Enter the number of copies you want to make using the number keypad. -
Page 61: Enlarging/Reducing The Copy Size
Press the <▲> button to return to [READY] mode. To specify the sharpness of your copy, do the following: Make sure the DocuPrint C2090 FS is in Copy mode. If not, press the <Copy> button on the control panel. Press the <Image Quality>. - Page 62 COPY MAGNIFICATION TABLE Document Copy 100% 122% 141% 100% 115% 100% Note: • Pressing and holding the <Clear All> button resets settings for all modes. To copy Std.size paper or Envelopes, do the followings For standard size paper copy, do the followings, 1.
-
Page 63: Resetting The Copy Settings
To copy Std. Size To copy Envelopes Document setting direction Document Glass A4 Size A4 Size Paper setting Paper feed direction direction Width width width Flap The flap folded and on the The flap opened and toward Paper Tray left side Envelop that is under Envelop that is over 220mm width. -
Page 64: Restrictions On Copying
• Pressing and holding the <Clear All> button resets settings for all modes. 6.7 Restrictions on copying Users of this machine must observe the following restrictions to ensure the responsible and legal use of this machine. See “Regulatory notices” on page in Preface. - 64 -... -
Page 65: Sending A Fax
7. Sending a fax This chapter explains how to send fax copies and customize settings for fax tasks. 7.1 Placing the originals You can either place originals on either the Auto Document Feeder (ADF) or on the document glass. Before sending a fax, make sure the transportation lock on the back of the part B is set to the unlock position. Always keep the document glass clean to prevent dirty or blurry images. -
Page 66: Sending Faxes
Legal 14 paper only support and selectable when on ADF scan 7.2 Sending faxes To send a fax, make sure that the DocuPrint C2090 FS is connected to the phone cable and the fax connection is on. You can send a fax by one of the following ways: PC FAX &... - Page 67 Select “FAX printer” then press [OK] Before the fax printer driver fax out the document, the following window appears on the screen. Enter the recipient information and click [Add to list] to add it to the recipient list. Click the [OK] button to send the fax - 67 -...
-
Page 68: Sending A Fax From One-Touch / Speed-Dial Direct Fax
To sending a fax from Network Fax 1. Make sure the Ethernet cable connected and driver is installed in system. 2. From the [File] menu of the application software, select [Print]. 3. Select the FAX Network Printer as the printer to be used the press [OK]. 4. -
Page 69: Sending A Fax From Forward Fax
Also you can process TX reservation FAX through by one touch dial or speed dial. Using one-touch dial. 1. Press <One tough Dial> then LCD show [FAX Ready - One Touch X] X: the selected number (1-8) 2. Select a number (1-8) from the numeric keypad and press <Start>. Using Speed Dial. -
Page 70: Receiving Faxes
7.3 Receiving faxes To receive a fax, make sure that the DocuPrint C2090 FS is connected to the phone cable and the fax connection is on. The Docuprint C2090FS support 2 kinds receive mode 7.3.1 Auto-answering FAX Rx 1. Press <FAX> to enter into Fax mode, press the <Menu> button on the control panel. Use the <▼>... -
Page 71: Image Quality
To determine the output paper type, do the following: 1. Press <FAX> button then <Size/Type> button on the control panel. Use the <◄/►> buttons to browse for function list. 2. Choose [Paper type] and press <Set> to configure the settings. 3. -
Page 72: Fax Tx Mode Setting (Resolution)
2. LCD shows [ AutoFit . ◄ OFF | ON ►], use the <◄/►> buttons to set this function on or off. 3. Press <Set> to confirm your setting. Notes: • Default setting is OFF. • Auto Fit on/off setting only available under DocuPrint C2090FS work as fax receiver. •... -
Page 73: Advanced Functions
To access the setup menu, do the following: Make sure the DocuPrint C2090 FS is turned on, and then press the <Menu> button on the control panel. The submenu is displayed on the LCD screen. Use the <▲/▼> buttons to select a submenu. - Page 74 Press the <▲> button to return to [READY] mode. To determine the file type to print, do the following: 1. Press <Scan> button then <Size / Type> and use the <◄/►> buttons to select function. 2. Use the <◄/►> buttons to choose [File Type] and press the <Set> button. 3.
-
Page 75: Scanner Settings
8.3 Scanner settings You can configure the settings for brightness and scan resolution by doing the following: To configure the brightness of the scanned images: Press <Scan> then <Image Quality> button. Use the <◄/►> to choose [Brightness] and press <Set> to confirm. Press the <◄/►>... -
Page 76: Fax Settings
To specify special copy functions such as 2 in1(ADF Only>, Collate (ADF), Frame Erase, Back Remove, or Image Shift, do the following: Press <Copy> then <Menu> Use the <◄/►> buttons to choose the special copy function desired: • 2 in 1 (ADF only) •... - Page 77 1. Press <FAX> then <Menu> button, use the <▼> buttons to select [ Configuration – Need Password] function.Press <Set> and input the password to enter [Configuration-FAX]. 2. Press <Set> and input password press <Set> to enter into [Configuration - FAX] 3.
-
Page 78: Host Settings
3. Press <Set> and use the <◄/►> to find [FAX Config – Dial Type]. 4. Press <Set> the LCD showns [Dial Type – Tone]. 5. Use the <◄/►> buttons to select Tone / Pulse. 6. Press <Set> to confirm your setting To specify the setting for the Accumulate Doc, do the following: 1. -
Page 79: System Settings
Press the <Menu> button on the control panel. Use the <▼> buttons to select [Configuration Need Password] and press <Set>. Use the <◄/►> buttons to select [Network Config - Network] and press <Set>. Use the <◄/►> buttons to select [Network Config - TCP/IP] and press <Set>. Use the <◄/►>... -
Page 80: Printing A Status Sheet
Use the numeric keypad on the control panel to enter the current time and date. 8.8 Printing a status sheet To confirm the current status of the DocuPrint C2090 FS and verify that options are installed correctly, you may want to print a status sheet. -
Page 81: Fax Report
Press the <Menu> button on the control panel. Press the <▼> button twice to select [Print Report - Func. Setting] Press the <►> button to select [Panel settings]. Press the <►> button to select [Job History]. Press the <►> button to select [Error History]. Press <Set>... -
Page 82: Scan Report
1. Press the <Menu> button, use the <◄/►> buttons and LCD shows [Fax Report – Address Book] 2. Press <Set> to confirm your setting. To configure the setting for [Broadcast ], do the following: 1. Press the <Menu> button, use the <◄/►> buttons and LCD shows [Fax Report – Broadcast] 2. -
Page 83: Jobs Initiated From Application
Scan To FTP3 Scan To FTP4 Scan To FTP5 Press <Set> to cancel the job. 2. Cancel a copy job Procedures Press < Stop> to enter cancel menu. Using <◄> or <►> to select the scan job you want to cancel while multiple jobs are proceeding. -
Page 84: Jobs Initiated From Scan Tool Box
YYYYYY : Job owner Press <Set> to confirm your setting to cancel the job. Select [OK] while popup a confirmation dialog. Cancel a Direct Fax job Procedures While this job still in spooler, you can refer to “Cancel a print job” section to process cancel the job by control panel or spooler. -
Page 85: Canceling An Operation
Press <Cancel> on progress window while scanner is scanning. It can be also canceled from control panel, please refer to “Cancel a Scan job” section to cancel the job. 8.9.4 Canceling an operation Pressing the <Stop> button and <Set> to canceling and confirm the current processing job is the easiest and quickest way. -
Page 86: Using Scan Tool Box
8.10 Using Scan Tool Box Scan Tool Box is a scan application tool for optimizing MFP scan functions on your computer. User may utilize each scan functions for their own purpose by Scan Tool Box icons. Scan Tool Box main dialog displays 7 items, which functions are: Application Copy File... -
Page 87: Application
8.10.1 Application In the Scan images function, you can indicate an application to edit scanned image file and some scan parameters of this function as follows: [Scan source] [Scan source] is allows the user to select the document source from the [Document Glass] or [Auto Document Feeder]. - Page 88 [Set temporary files path] User may setup temporary path to save each of scanned images via [Browse] icon. All scans will be saved into this folder with bitmap format and only the last scan of multiple page images should be all pages will be sent to the application software.
-
Page 89: Copy
8.10.2 Copy Copy documents in the function, you can using this function to copy documents and set the number of copies. It is necessary to install printer before using the function. The copy parameters in this item are as follows: Scanner settings: [Scan source] [Scan source] is allows the user to select the document source from the [Document Glass] or [Auto... - Page 90 For [Multiple page scan], if this option is checked, a message box appears asking for placement of the next page to be scanned on the flatbed scanner. Notes: • When Multiple Page Scan Check Box available, in Tool Box copy mode Job log will record the Scan Job and Print Job of each page.
-
Page 91: Fax
8.10.3 Fax Save the scanned image use this function to save scanned image and send a fax by a fax printer after configuring your fax items. It is necessary to install fax printer before using the function. Before faxing, User can set some items, which are introduced as follows: Scanner settings: [Scan source]... - Page 92 Adjust contrast value from step -100 to 100, a value of -100 corresponds to the darkest level and a value of 100 corresponds to the lightest. Printer settings: [File name] Enter the name of the file to be stored. A serial number will be added automatically in the file name for multi-page scans (as well as the document type extension, PDF, TIF, DOC, etc).
-
Page 93: File
FujiXerox Docuprint C2090FS. Please refer to section 5.2 for more information. On the keyboard of FujiXerox DocuPrint C2090 FS, the functions [To PC (USB)] of MFP will also apply this function for process via USB port. You can refer “5.2 Scanning an image” section for this function. - Page 94 Enter the name of the file to be stored. A serial number will be added automatically in the file name for multi-page scans (as well as the document type extension, PDF, TIF, DOC, etc). [File type] Select image file format as you want for all scans. For multiple page scan, file types will be limited to PDF, TIF and DOC only.
-
Page 95: E-Mail
8.10.5 E-mail Attach scanned image file to e-mail in the function after configure your mail. User can set some items, which are as follows: [Scan source] [Scan source] is allows the user to select the document source from the [Document Glass] or [Auto Document Feeder]. - Page 96 Click the [Start] that displayed on the windows screen then click [Control panel] and select [Internet option] then Programs tab and select your favorite E-mail application software from list and press [OK] to confirm you setting. This setting will available after re-start Tooling Box utility again. •...
-
Page 97: Ocr
8.10.6 OCR Save scanned file using this function and apply DocuWorks application for character recognition (OCR). It is necessary to install DocuWorks application before using the function. User can set some items, which are as follows: [Scan source] [Scan source] is allows the user to select the document source from the [Document Glass] or [Auto Document Feeder]. - Page 98 Show image file format on OCR scans. The file format in TIF represents the original image of document and XDW represents DocuWorks format and TXT represents the final OCR outcomes. [Path] Input directory where scanned images will be saved. [Browse] Setup the path to save each of scanned images via [Browse] icon.
-
Page 99: Setting
8.10.7 Setting Customize your scanner connection and maintain fax phone book here; there are 2 settings, which are as follows: Device settings: This setting indicates user may select from either USB or Ethernet connection for scans. [Local device] Connect scanner device via USB cable. [Broadcast] List all available scanner devices from Ethernet network. - Page 100 [Add] Add a set of record into the phone book [Delete] Delete the selected record from phone book. [Edit] Edit the selected record from phone book by above [Add] phone book dialog. [Defaults] Click this icon to recover to original settings. [Apply] Save modified settings.
-
Page 101: Paper Handling
9. Paper handling This section covers the paper handling aspects of the DocuPrint C2090 FS. Paper sources There are several paper sources that can be used with the DocuPrint C2090 FS. 9.1.1 Usable paper The types of paper that can be used on this printer are as follows:... -
Page 102: Supported Paper
9.1.2 Supported paper The following table displays the supported paper types for this printer. Paper characteristics Paper name Weight Paper type & caution XC-4200DP 20lb Plain Medium weight paper for (standard international distribution and paper for general office use B/W printing) X-pression 24lb Plain... -
Page 103: Unusable Paper
• For details on special media, such as heavy weight paper, envelops, and coated paper not listed in the table, contact our Customer Support Center or your dealers. 9.1.4 Unusable paper The following types of paper might cause paper jams, malfunctions or damage to the device. •... - Page 104 Load the paper with the side to be printed facing up and with all four corners aligned. Slide the width guides inward until they rest lightly against the edge of the paper stack. Close cover D. Set the paper size and type according to the message displayed on the control panel. Notes: •...
-
Page 105: Loading Envelopes
9.3. Loading envelopes Envelopes should be loaded in the paper tray. Load envelopes with the address side facing up as shown in the diagram below. Envelope Envelope that is that is over under 220 mm 220 mm in in width width Paper feed Paper feed... -
Page 106: Removing Printouts Or Copies
9.5. Removing printouts or copies The optional extension output tray is designed to prevent paper from falling from the printer after the print job is complete. Before printing a document, pull out the extension output tray. If the extension output tray is still not long enough for the paper you are loading, pull the extension output tray further. -
Page 107: Troubleshooting Guide
10. Troubleshooting guide Before treating the problem as a machine breakdown, refer to the following tips and check the condition again. 10.1 When paper jams CAUTION • When removing jammed paper, make sure that no pieces of torn paper are left in the machine. A piece of torn paper remaining in the machine can cause fire. - Page 108 2. Gently lift up the scanner unit and then open Cover C. 3. Push up the levers on both side and remove any jammed media. Important: • Never touch the outer levers located on both sides of the fuser unit, which are used to remove or install the fuser unit.
-
Page 109: When The Printer Interior Gets Dirty
4. Move the levers back to their original positions, and then close all covers. 10.1.2 When the printer interior gets dirty Clean the interior of the printer using the cleaning rod. Note: • It is recommended to clean the inside of the printer on a regular basis such as after replacing the toner cartridge. - Page 110 Hold the cleaning rod and push it in and pull it out several times to clean the interior of the printer. - 110 -...
-
Page 111: Printer Problems
Push the cleaning rod back to its original position until it stops and then push the lever that was pulled at step 1 back to its original position. The access window cover is closed. Close the front cover. 10.2 Printer problems Problems Possible Reason/Solution No power... -
Page 112: Print Quality Problem
10.3 Print quality problem Problems Possible Reason/Solution Print is light (faded, blurred) • Replace with a new piece of paper. • Do not use a used paper for printing. Replace with the correct type of paper for printing. • Check the drum cartridge and replace with a new one if necessary. - Page 113 Images, printed transparencies, • Check and load the correct type of paper. and envelopes are blurred. • Make sure proper settings are configured for printing. Cannot print. • Check if there is any error message on the LCD screen and then follow the on-screen instructions.
-
Page 114: Scanning Problems
The product does not scan. • Wait until the Print light stays on in green (ready for scanning). • Your DocuPrint C2090 FS may not work properly if you use a USB cable other than the one supplied in the package. Use only the USB cable supplied in the package. -
Page 115: Scanning Quality Problems
10.5 Scanning quality problems Problems Possible Reason/Solution Your original is not scanned or • Make sure the documents is placed on the document glass with only a few dots appear as the the side to be scanned facing down. scanned image. Straight lines in your original •... -
Page 116: Copying Problems
10.6 Copying problems Problems Possible Reason/Solution The DocuPrint C2090 FS does • Make sure paper is loaded in the paper tray. See “Loading paper” not copy. section. • Make sure the original is placed face-down on the document glass or face-up in the ADF. See “Placing the originals” section of “Setup and Quick Reference Guide”. -
Page 117: Paper Handling Problems
10.8 Paper handling problems Problems Possible Reason/Solution Paper does not feed properly. • The paper guides may not be set properly. Make sure the paper guides in all the cassettes are set in the correct paper size positions. • Curled paper is loaded. Straighten paper or load new paper. •... -
Page 118: Menu Tree
10.9 Menu tree This section briefly introduces the DocuPrint C2090 FS operation menu tree and settings using the control panel. For details on how to operate the control panel, refer to “Control panel” on page 10. For COPY/FAX/SCAN mode menu tree instructions, refer to the menu tree section on the User Guide (on the software bundle CD-ROM). - Page 119 This LCD screen displays the system status: 1. The MFP is sending a fax. FAX Scanning.. XXX.XXXX.XXXX 2. XXX-XXXX-XXXX: Indicates the Tx fax number. This LCD screen displays the system status: 1. The MFP is printing from PC. Printing... XXXX XXXXXXXXXX 2.
-
Page 120: Docuprint Language Initialization & Lcd Indication
10.9.2 DocuPrint language initialization & LCD indication LCD indication Instruction Push <Set>. Select English, Tradi. Chinese, Simpl. Chinese, or Korean for system settings and push <Set> again to confirm. Select Yes and push <Set>. Changes to the next indication automatically. Load the yellow toner cartridge and close the front cover. -
Page 121: Major Function Keys And Menu Flow Chart
10.10 Major function keys and menu flow chart 10.10.1 <Size/Type> key You can set the paper type and size of the original document and the output paper type and size by pressing the <Size/Type> key. . Size/Type Size/Type Size/Type Size/Type Size/Type Original Size Original Type... -
Page 122: Image Quality> Key
10.10.2 <Image Quality> key Press the <Image Quality> button to set the system brightness and sharpness and the RGB color balance for your output document. 10.10.3 <Reduce/Enlarge> key Press the <Reduce/Enlarge> button to set the enlargement or reduction rate for your document output. Reduce/Enlarge ▲... -
Page 123: Menu> Key
10.10.4 <Menu> key Press the <Menu> button to access the on-screen display menu for copy/scan/print modes. Copy Function ▲ Copy Function ▲ Copy Function ▲ Copy Function ▲ MENU Frame Erase ◄► 2 in 1 (ADF Only) ◄► Collate ◄► Back Romove ◄►... - Page 124 Copy Function ▲ Image Shift ◄► Image Shift ▲ Image Shift ▲ Image Shift ▲ Image Shift ▲ ◄► Center ◄► Left ◄► Right ◄► ShiftValue(mm) ▲ ShiftValue(mm) ▲ ◄ XX ► (0 – 50) ◄ XX ► (0 – 50) Image Shift ▲...
- Page 125 Configuration ▲ Configuration ▲ Network ◄► System ◄► System ▲ System ▲ Power Save Mode ◄► Warning Beep ◄► System ▲ Power Save Timer ▲ Warning Beep ▲ Power Save Timer ◄► 5 min ◄► High Volume ◄► Power Save Timer ▲ Warning Beep ▲...
- Page 126 Maintenance ▲ Maintenance ▲ Configuration ▲ Paper Property ◄► Init NVRAM ◄► OP panel ◄► Init NVRAM OK? ▲ OP Panel ▲ OP Panel ▲ ◄ | Yes ► Touch Tone ◄► AdminPassword ◄► Paper Property ▲ Paper Property ▲ Touch Tone ▲...
-
Page 127: Scan> Key
Maintenance ▲ BTR Voltage ◄► BTR Voltage ▲ Plain ▲ Plain ◄► BTR ◄ XX ► (0 -15) Bond ▲ BTR Voltage ▲ BTR ◄ XX ► (0 -15) Bond ◄► BTR Voltage ▲ Transparency ▲ Transparency ◄► BTR ◄ XX ► (0 -15) BTR Voltage ▲... - Page 128 10.10.5.1 Setting Scan destination. 10.10.5.2 Setting Scan size and type Size/Type Size/Type Size/Type Size/Type Original Size Original Type File Type Original Type Original Size File Type TEXT Jpeg Original Size Original Type File Type on Text&Photo Original Size Original Type Photo File Type on TIFF...
- Page 129 10.10.5.3. Setting Scan image quality and resolution - 129 -...
- Page 130 10.10.5.4. Scan mode operate menu and configuration setting. Menu Toner Change ▲▼ Toner Change ▲▼ Toner Change ▲▼ Toner Change ▲▼ Cyan ◄► Magenta ◄► Yellow ◄► Black ◄► Change Cyan Change Magenta Change Yellow Change Black Wait… Wait… Wait… Wait…...
- Page 131 Configuration ▲ Configuration ▲ Network ◄► System ◄► System ▲ System ▲ System ▲ Power Save Mode ◄► Power Save Timer ◄► Warning Beep ◄► Warning Beep ▲ Power Save Timer ▲ Power Save Mode ▲ High Volume ◄► ◄ Off | ►...
- Page 132 - 132 -...
- Page 133 Maintenance ▲ BTR Voltage ◄► BTR Voltage ▲ Plain ▲ Plain ◄► BTR ◄ XX ► (0 -15) BTR Voltage ▲ Bond ▲ Bond ◄► BTR ◄ XX ► (0 -15) BTR Voltage ▲ Transparency ▲ Transparency ◄► BTR ◄ XX ► (0 -15) BTR Voltage ▲...
-
Page 134: Fax> Key
10.10.6 <FAX> Key When you press <FAX> button, you can start to process FAX mode and relevant function setting. - 134 -... - Page 135 Size / Type Size / Type ▲ Size / Type ▲ Size / Type ▲ Size / Type ▲ Original Size ◄► Original Type ◄► Paper Size ◄► Paper Type ◄► Original Size ▲ Original Type ▲ Paper Size ▲ Paper Type ▲...
-
Page 136: Reduce / Enlarge > Key Under Fax Mode
10.10.7 <Reduce / Enlarge > Key under Fax mode 10.10.7.1 Using <Reduce/Enlarge> to setting Auto Fit function then press <Menu> to setting FAX function. Menu FAX Report ▲▼ FAX Report ▲▼ FAX Report ▲▼ FAX Report ▲▼ Accumulate Doc ◄► Panel Setting ◄►... - Page 137 Configuration ▲ Need Password PassWord ▲ PassWord Not match Input : **** Invalid Match Configuration ▲▼ ◄► FAXConfig ▲ Dial Type ◄► Dial Type ▲ Dial Type ▲ Tone ◄► Pulse ◄► Configuration ▲ Configuration ▲ Network ◄► System ◄► System ▲...
- Page 138 - 138 -...
- Page 139 System ▲ Menu Timeout ▲ Menu Timeout ◄► 10 sec ◄► Menu Timeout ▲ 20 sec ◄► Menu Timeout ▲ 30 sec ◄► Menu Timeout ▲ 60 sec ◄► System ▲ Time HH:MM ▲ Time&Date ◄► XX : XX ◄► Date YYYY/MM/DD▲...
- Page 140 Maintenance ▲ BTR Voltage ◄► BTR Voltage ▲ Plain ▲ Plain ◄► BTR ◄ XX ► (0 -15) BTR Voltage ▲ Bond ▲ Bond ◄► BTR ◄ XX ► (0 -15) BTR Voltage ▲ Transparency ▲ Transparency ◄► BTR ◄ XX ► (0 -15) BTR Voltage ▲...
-
Page 141: Copy> Key
10.10.8 <Copy> Key When you press <Copy> button, you can start to process copy mode and relevant function. 10.10.8.1 Using <10-key>, <Clear>, <▲> and <▼> to switch different function mode. 10.10.8.2 When press <STOP> Key, you can process Job canceling function - 141 -... - Page 142 10.10.8.3 Image quality setting. - 142 -...
-
Page 143: Size / Type> Key Under Scan Mode
10.10.9 <Size / Type> Key under Scan mode Size/Type Size/Type Size/Type Size/Type Original Size Original Type File Type Original Type Original Size File Type TEXT Jpeg Original Size Original Type File Type on Text&Photo Original Size Original Type Photo File Type on TIFF Original Size Original Type... -
Page 144: Menu> Key Under Copy Mode
10.10.10 <MENU> key under Copy mode Copy Function ▲ Copy Function ▲ Copy Function ▲ Copy Function ▲ MENU Frame Erase ◄► 2 in 1 (ADF Only) ◄► Collate ◄► Back Romove ◄► 2 in 1 (ADF Only) ▲ Collate ▲... - Page 145 Copy Function ▲ Image Shift ◄► Image Shift ▲ Image Shift ▲ Image Shift ▲ Image Shift ▲ ◄► Center ◄► Left ◄► Right ◄► ShiftValue(mm) ▲ ShiftValue(mm) ▲ ◄ XX ► (0 – 50) ◄ XX ► (0 – 50) Image Shift ▲...
- Page 146 Configuration ▲ Configuration ▲ Network ◄► System ◄► System ▲ System ▲ Power Save Mode ◄► Warning Beep ◄► System ▲ Power Save Timer ▲ Warning Beep ▲ Power Save Timer ◄► 5 min ◄► High Volume ◄► Power Save Timer ▲ Warning Beep ▲...
- Page 147 Maintenance ▲ Maintenance ▲ Configuration ▲ Paper Property ◄► Init NVRAM ◄► OP panel ◄► Init NVRAM OK? ▲ OP Panel ▲ OP Panel ▲ ◄ | Yes ► Touch Tone ◄► AdminPassword ◄► Paper Property ▲ Paper Property ▲ Touch Tone ▲...
- Page 148 Maintenance ▲ BTR Voltage ◄► BTR Voltage ▲ Plain ▲ Plain ◄► BTR ◄ XX ► (0 -15) Bond ▲ BTR Voltage ▲ BTR ◄ XX ► (0 -15) Bond ◄► BTR Voltage ▲ Transparency ▲ Transparency ◄► BTR ◄ XX ► (0 -15) BTR Voltage ▲...
-
Page 149: Appendix
11. Appendix This chapter contains product specification and troubleshooting information for user’s reference. 11.1 Specifications DocuPrint C2090 FS Specifications Product Type Multifunction Color Laser Printer Functions Print/Copy/FAX/Scan Max. Dimensions W: 498 mm x D: 475 mm x H: 685 mm with ADF... -
Page 150: Optional Accessories And Consumables
Auto Document Integrated Simplex Auto Document Feeder (Max. 50 sheets @75gsm paper) Feeder MSBF/ MPBF MSBF: 20,000 pages for scanner (ADF + Flatbed) MPBF: 50,000 pages for printer Max. Printer 600 dpi x 600 dpi with 2400 dpi images enhancement Resolution (Image enhancement only available for B/W print) Max. -
Page 151: Optional Accessories
11.2.1 Optional accessories Product name Product code 256MB Memory E3100027 11.2.2 Consumables Important: • The high print quality and the high speed printing of this printer are designed to be most stabilized when genuine toner cartridges are used. Using the consumables whose specifications differ from genuine consumables may cause degradation of printer performance. -
Page 152: Handling Consumables
You can download the latest print driver from our company’s web site. Click [About] on the [Detailed Settings] tab of the printer properties dialog box. Click [Fuji Xerox Web Site]. The web browser will be activated and the web site displayed. Following the instruction, download the corresponding print driver. -
Page 153: Upgrading The Firmware Version Of This Multi-Functions Printer
3. Click setup.exe to install the upgrade software. 4. The latest version of the firmware for DocuPrint C2090 FS is downloaded and upgraded automatically. 5. After upgraded firmware please turn off power and turn on again to execute new firmware. - Page 154 4. Select a file record and click [Delete] button to remove binary firmware code that you don’t want to upgrade from the list. 5. Click [Upgrade] button to execute firmware upgrade process, then the tool will transfer loaded firmware code to MFP and pop up a message to ask your confirmation before process firmware upgrade.
- Page 155 6. You can also monitor the upgrade progress on the LCD of OP Panel. Request to Update sys-Code Sys Code Loading !!! Warning!!! Sys Code Loading USBTranser Ready ZRN CODE Checksum OK TAK CODE DirectDMASucceed TAK CODE PCI DATA Succeed TAK CODE Checksum OK 7.
-
Page 156: Web Server Upgrade
4. Download the upgrade Firmware software from the service website or get a copy of the upgrade software from the service person to your local PC. 5. Click [Upgrade] and select setup.exe to install the upgrade software. 6. The latest version of the software for DocuPrint C2090 FS is downloaded and upgraded automatically. Note: •... -
Page 157: Status And Error Messages
11.6 Status and error messages This section lists error messages displayed on the LCD when an error occurred during printing, scanning, or fax operation. 11.6.1 Printer error messages See below for error messages displayed when an error occurred during printing. Printer application error [No Paper- Please Add Paper] No paper in the paper tray. - Page 158 [Drum Cartridge - Error 009-361] Xero CRUM verify error. [Drum Cartridge - Error 009-366] Xero CRUM Imitation error [No Paper in – Paper Tray] No paper is detected by no paper sensor for MSI tray. [Yellow Cartridge - Error 009-364] Y toner cartridge verifies error.
- Page 159 [Open E - Clear Jam] Jam is detected [%s - Yellow Cartridge] [%s - Please replace] Y toner life error [%s – MagentaCartridge] [%s - Please replace] M toner life error [%s - Cyan Cartridge] [%s - Please replace] C toner life error [%s - Black Cartridge] [%s - Please replace] K toner life error...
- Page 160 [%s – MagentaCartridge] [%s - Replace Soon] M toner life warning [%s - Cyan Cartridge] [%s - Replace Soon] C toner life warning [%s - Black Cartridge] [%s - Replace Soon] K toner life warning [%s - Drum Cartridge] [%s - Replace soon] Xero CRU life warning [%s - Replace 009-405] BTR2 life warning...
-
Page 161: Scanner Error Messages
11.6.2 Scanner error messages See below for error messages displayed on the LCD when an error occurred during Flatbed scan, ADF scan, N3R, Network scan, or Scan to PDF. Scanner application error [Network Error – Press Set key] Abnormal command or protocol. [Network Error - Need Retry] Can't transfer image data to PC [USBKey Error –... -
Page 162: Scanner Driver Error
[FTP Full Error - Press Set Key] FTP server doesn't have enough room for storage. 11.6.3 Scanner driver error [Unlock Carriage – Press Set Key] Carriage is locked. Release the locker at the bottom of scanned flat bed the press <Set> to continue. [Close Cover A] ADF cover is opened. -
Page 163: System Error Messages
[Paper Size Error - Change Paper] < 3 sec > [Chose A4? - Press SET if YES] < 3 sec > [Chose 8.5x11? - Press SET if YES] < 3 sec > [Chose 8.5x14? - Press SET if YES] < 3 sec > Paper size error (only support A4, Letter, and Legal 14) [Paper Size Error - Change Paper] <... -
Page 164: Replacing Components
[Memory Full – Need Retry] No available buffer for system report. [Print… - Log history] Printing log history when there are more then 20 records. [Report Error – Need Retry] System report maybe exist other errors except the above 2 [Code Update –... - Page 165 2. Lift the lower edge of the retard pad and push down the upper left edge. Then gently slide the retard pad downwards to remove it from the slot. 3. Make sure the retard pad is inserted in the correct direction. The rubber pad should be facing up and the thinner edge be on the left.
- Page 166 6. Close the Cover A (ADF cover). - 166 -...
-
Page 167: Centreware Internet Services Tool
12. CentreWare Internet Services Tool 12.1 Access to CentreWare 12.1.1 What is CentreWare Internet Services? CentreWare Internet Services is the software that allows you to display, configure and change the current status or settings of a printer by using a browser on a computer. CentreWare Internet Services also enables you to configure network settings through the network computer instead of the printer's control panel. -
Page 168: Web
Chinese (Taiwan) [zh-tw] Click [OK]. Click [OK] in the [Internet Options] dialog box. Setting the Multifunction Printer's IP Address to Non-proxy Procedures Select [Internet Options] from [Tools] on the menu bar. Click [LAN Settings] in the [Connections] tab. Specify either of the following under [Proxy server]. •Deselect [Use a proxy server for your LAN] check box •Click [Advanced], enter the printer's IP address in [Exceptions], and then click [OK] Click [OK]. -
Page 169: Jobs
"n%"(n denotes 1 to 100): n% consumables left "Unknown": Unknown situation "No cartridge installed": Drum cartridge not installed 12.2.2 Jobs In the [Jobs] tab, you can check details of jobs sent via the protocols or control panels. There are two topics in the tab: [Job List] [History List]... - Page 170 Host I/F Display the interface that accepts the job. Completed at Display the time the job finished. Communication Log Display the fax transmission and receiving logs. Number Display the index of the job. Date/Time Display the time the job is sent by the host. Duration Display the duration of the job last.
-
Page 171: Setup Menu
Pages Display the number of processed pages. Phone number Display the phone number or ID information. The cause of accumulation Display the processed status of the job. 12.2.3 Setup Menu One-Touch Dials Set One-Touch Dials of address book. Number Display the index of the One-Touch Dial setting. Name Display the name of the One-Touch Dial setting. - Page 172 Set ftp settings of address book. Number Display the index of the ftp setting. Name Display the name of the ftp setting. IP Address Display the IP address of ftp setting. User can click the [Create] or [change] button to edit the Address Book FTP settings. FTP Name (optional): (Max.
-
Page 173: Properties
12.3 Properties In the [Properties] tab, you can view and set properties of the printer. There are 8 topics in this tab: [Machine Details] [Machine Configuration] [Counters] [Internet Services Settings] [Port Status] [Port Settings] [Protocol Settings] [Control Panel Settings] Procedures to navigate the [Properties] page are described below. To Display Settings Procedures Select a topic on the left frame. -
Page 174: Machine Configuration
The characters that can be entered include alphanumeric characters, period (.), hyphen (-), underscore (_), and at mark (@). This setting is just for record. No e-mail will be sent to this address. 12.3.2 Machine Configuration Displays the information of major specifications. Product Name Product name information. - Page 175 Internet Service Settings This page allows you to configure the settings for CentreWare Internet Services. Auto Refresh Allow you to select whether to refresh the contents displayed automatically. You may set [On] or [Off] for this feature. The default is [On]. Auto Refresh Interval Enter a time when the contents displayed will be refreshed automatically.
- Page 176 Detects Ethernet transmission rate and Duplex settings automatically. 10Base-T Half-Duplex Selects 10Base-T Half-Duplex as the default value. 10Base-T Full-Duplex Selects 10Base-T Full-Duplex as the default value. 100Base-TX Half-Duplex Selects 100Base-TX Half-Duplex as the default value. 100Base-TX Full-Duplex Selects 100Base-TX Full-Duplex as the default value. Current Ethernet Settings Displays the current Ethernet transmission speed.
- Page 177 Community Name (Read Only) (MAX. 31 x 1 byte characters) Enter the community name used for reference and display. You can enter a maximum of 31 characters. The default is "public". Community name that has been set will not be displayed on the screen. Community Name (Read/Write) (MAX.
- Page 178 Operation Panel Touch Tone: Set touch tone mode, [On] or [OFF] Panel Language: Set language setting, [English], [Simplified Chinese], [Traditional Chinese], [Korean] T.A.M: Set T.A.M. mode, if setting is [On], detect line status before sending or receiving fax jobs, wait until line is available while sending out a fax job, receive the fax first if anyone try to call out with this line.
- Page 179 [-2], [-1], [0], [1], [2]. Reduce/Enlarge Reduce/Enlarge: Set default settings of copy reduce/enlarge setting, support options include [100%], [Preset], [Auto Fit], [Full Image], [Zoom]. Preset: This option is available on when [Preset] option is selected in Reduce/Enlarge selection, supported options include [A4 -> A5 (70 %)], [B4 -> A5 (81 %)], [A4 -> B5 (86 %)], [B5 ->...
-
Page 180: Maintenance
Original Type: Set default setting of scan original paper type setting, [Text], [Text & Photo], [Photo], [No filter]. File Type: Set default setting of scan file type setting, [JPEG], [BMP] and [TIFF]. Image Quality Scan Resolutions: Set default setting of scan resolutions setting, [150 dpi], [300 dpi], [600 dpi], [1200 dpi]. -
Page 181: Index
Index Accessories ............150 Host settings ............78 Additional memory ........29, 30 Adjusting layout ..........44 Auto Document feeder (ADF) ......12 Auto Fit ...............71 ICM..............46 Auto-redial ............12 ICM Adjustment ..........46 Image quality..........60, 71 Image Quality........... 122 Installing the drum cartridge ......27 B/W printing ............102 Installing the toner cartridge ...... - Page 182 Receiving faxes ..........70 Tx reservation FAX ..........68 Redial Attempt ..........178 Retard pad ............13 USB..............35 Safety notes............9 Scan resolution ...........75 Sharpness............178 Warning Beep ..........177 Speed-dial Direct FAX ........68 Waterm............... 45 Watermarks............45 TCP/IP ............78, 176 Toner cartridge ...........25 Zoom ...............
Need help?
Do you have a question about the DocuPrint C2090 FS and is the answer not in the manual?
Questions and answers