Kaba E-Plex 5200 User Manual
E-plex
Hide thumbs
Also See for E-Plex 5200:
- Quick reference manual (2 pages) ,
- Installation instructions manual (20 pages)
Table of Contents
Advertisement
Quick Links
Advertisement
Table of Contents

Subscribe to Our Youtube Channel
Related Manuals for Kaba E-Plex 5200


Summary of Contents for Kaba E-Plex 5200
- Page 1 Advanced ACS Software User Guide...
-
Page 2: Technical Support
Kaba Access Control. The information contained in this publication is accurate to the best of Kaba Access Control’s knowledge. Specifications are subject to change without notice. Trademarks The following items are trademarks or registered trademarks of Kaba Ilco in the United States and/or other countries. -
Page 3: Table Of Contents
Table of Contents 1 About the E-Plex Advanced ACS ......................1–1 System Components ..........................1–2 E-Plex 5200 and E-Plex 5700 Locks ....................1–2 Prox Cards and Prox Card Reader/Enroller (E-Plex 5700 Only)............1–3 PC and E-Plex Advanced ACS Software ..................... 1–3 M-Unit and E-Plex Advanced ACS M-Unit Software ................ - Page 4 States of the Lock..........................4–2 Battery Life and Replacement....................... 4–2 Sequence of Operations ........................4–3 Default Values of the E-Plex 5200 and E-Plex 5700 Lock Programmable Parameters ....... 4–4 Configuring the Lock Functions ....................... 4–4 Initial Programming of the Lock ....................... 4–4 Entering Pushbutton Programming Mode.....................
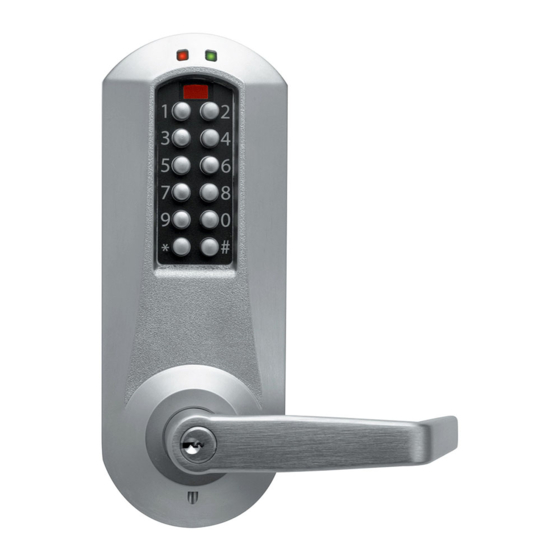
- Page 5 E-Plex Advanced The E-Plex 5200 and E-Plex 5700 door locks are designed to limit and control entry to an area or premises through the use of a numeric combination (PIN) entered via the keypad, for both the E-Plex 5200 and E-Plex 5700, and the presentation of a proximity token (Prox Card), for the E-Plex 5700.
-
Page 6: About The E-Plex Advanced Acs
Access Mode – This mode refers to a lock that is operational for user access. When the lock is in Access Mode, the method of lock access is PIN only for the E-Plex 5200. The method of lock access for the E-Plex 5700 is PIN only, Prox Card only, or PIN and Prox Card. -
Page 7: Prox Cards And Prox Card Reader/Enroller (E-Plex 5700 Only)
About the E-Plex Advanced ACS Prox Card Only (E-Plex 5700 only) Only the presentation of a valid Prox Card is required to access the lock. PIN and Prox Card (E-Plex 5700 only) The entry of a valid PIN followed by the presentation of a valid associated Prox Card is required to access the lock. -
Page 8: Pc System Operator Classifications
Door Groups You can define an unlimited amount of door groups in both the system database and the lock. A door group represents a group of physical doors that contain the E-Plex 5200 and/or the E- Plex 5700 locks. Access Schedules You can define an unlimited amount of Access Schedules in the system database. -
Page 9: Holidays/Vacations
About the E-Plex Advanced ACS Because you may specify whether the door access method is PIN (E-Plex 5200/E-Plex 5700), Prox Card (E-Plex 5700 only), or both (E-Plex 5700 only), the different access schedules in the system cannot overlap. If you have a need for periods of time where access for certain groups of users overlaps partially, you will need to break those time periods into separate access schedules. -
Page 10: The E-Plex Advanced Acs Package
Service User – A Service User has authorization any time of day to a lock for a specified period of time, from 1 hour to 24 hours from the first time he or she enters the PIN, or for one-time entry. The Service User has PIN only access to the E-Plex 5200 or E-Plex 5700 locks. -
Page 11: Getting Started
Getting Started The contents of this chapter are intended to assist you with setting up your E-Plex Advanced ACS (E-Plex 5200/E-Plex 5700). The items explained in this chapter include: • System Requirements • Basic System Setup • Main Menu and Toolbar E-Plex Advanced ACS User’s Guide... -
Page 12: System Requirements
Advanced ACS software. Quick Start Guide Complete this Quick Start Guide to quickly set up an E-Plex 5200/E-Plex 5700 lock. 1. Ensure that you have already installed your Palm PDA Desktop OS version 4.0 or higher on your PC and that your Palm PDA communicates (HotSyncs) to your PC without any problem. -
Page 13: Setting Up And Installing The Palm Os On The Pda (M-Unit)
18. Repeat Steps 16 and 17 above for other doors created in the system. 19. Select the Doors to program (upload) for your E-Plex 5200 and/or E-Plex 5700 lock configuration files and HotSync these upload data files to your M-Unit. -
Page 14: Software Registration And Installation
Kaba Access Control in order to use the software. Registering the software will help secure your system database and the locks on your site and will also aid Kaba Access Control in making you aware of any new software upgrades, patches, etc. when required. - Page 15 4. Close this screen and click Install Software. The system displays the following screen, which prompts you to choose an option to register your software – through Kaba Access Control’s dedicated website or by calling Kaba Access Control’s Technical Support phone line, as shown below: If you click Option1: Register Online, proceed to the next step.
- Page 16 E-Plex Advanced ACS Software Registration page. If you are registering for the first time, proceed to step 7. If you lost your registration key, and need to retrieve it from Kaba Access Control, proceed to step 13.
- Page 17 10. Complete the fields of the Optional Information area if you choose to provide additional information to Kaba Access Control. A sample of some of the fields is shown below. Note: Information submitted is kept private and used only by Kaba Access Control for informational purposes.
- Page 18 14. Type your Email Address in the field and click Send Registration Key. You will receive an e-mail from Kaba Access Control with your Registration Key. 15. Write your Registration Key down and close the window. On the Install E-Plex Advanced Access Control Software screen, click Continue Installation to complete the installation.
- Page 19 Option 2: Registering by Phoning Kaba Access Control’s Technical Support 16. When you click this option, the system displays the following screen: Follow the instructions on the screen to register by calling Kaba Access Control’s Technical Support line. 17. Kaba Access Control’s Technical Support personnel will first register your contact info, Factory Number, and Serial Number for your software CD, and will then give you a unique 8-digit Registration Key for your software over the phone.
- Page 20 Getting Started The InstallShield Wizard guides you through the software setup and installation after you have registered the software with Kaba Access Control. During installation, an E-Plex Advanced ACS icon is added to the Windows Desktop screen and to the Windows Program menu.
-
Page 21: Installing The E-Plex Palm Interface Application On The M-Unit (Palm Pda)
Your 16-digit Customer Key can be read anytime from the Help | About screen of the E-Plex Advanced ACS software, as shown below. This same Customer Key must also be entered in your M-Unit(s) before programming and/or auditing the E-Plex 5200 and E-Plex 5700 locks. Example of Software Registration Data Input and Output A 6-digit... - Page 22 Getting Started The system displays the Install Tool screen, followed by the Confirm Add window: 4. Click Done. –OR– If you want to change the destination (for example, to a Memory Card in the Palm), click Change Destination. The system displays the Change Destination screen. 5.
-
Page 23: Hotsyncing The M-Unit
Getting Started HotSyncing the M-Unit Complete the following steps to HotSync the M-Unit. This installs the E-Plex ACS application on the M-Unit. 1. From the main screen of the M-Unit, tap the HotSync icon. 2. When the following screen appears, ensure Cradle/Cable or just Cable (depending on the type of PDA you have) is selected. - Page 24 Getting Started 3. Tap the HotSync button. The following screens appear on the M-Unit and PC Desktop while the M-Unit connects with the PC. M-Unit PC Desktop 4. When the HotSync is complete, you will receive a message that it was successful. 5.
-
Page 25: Windows Xp Vs. Palm Hotsync Vs. E-Plex Advanced Acs Software Compatibility
Getting Started Windows XP vs. Palm HotSync vs. E-Plex Advanced ACS Software Compatibility When using the E-Plex Advanced ACS Software with certain Windows XP PCs, a software compatibility problem exists if older versions of the Palm Desktop OS and its HotSync Manager are installed. - Page 26 Getting Started 2. Click OK. The M-Unit displays the Enter Customer Key screen. 3. Using the stylus and M-Unit’s “Keyboard” function, enter your 16-digit customer key in the fields. Note: You must click in each field, press the Number icon on the PDA’s silkscreen, and tap the numbers.
-
Page 27: Installing The Prox Card Reader/Enroller (E-Plex 5700 Only)
5. If your Customer Key changes for any reason, i.e., for security reasons, you can access the Enter Customer Key screen from the E-Plex ACS menu by selecting Cust. Key. You will now be able to program and audit the E-Plex 5200/E-Plex 5700 locks using the M- Unit. - Page 28 The E-Plex Advanced ACS has now been loaded and is ready for logon. The software displays the E-Plex Advanced ACS logon screen: Note: The default Operator Name is “kaba” and Password is “kaba”. These will only be used for the initial logon to the E-Plex Advanced ACS, and both must be changed to proceed further.
- Page 29 Note: Be sure to make a note of the password that was specified. If it is lost, you will have to reinstall your E-Plex Advanced ACS software, or call Kaba Access Control’s Technical Support line for assistance. It is recommended that you create another operator for the software so that you have more than one entry path into the software.
- Page 30 14. Click OK. The system prompts you to enter the card format. 15. Select the card format from the Wiegand Bit Format for Prox Cards options. Note: If you only use E-Plex 5200 locks in your facility, Prox Card setup is not required. Simply proceed to the next step.
-
Page 31: Main Menu And Toolbar
Getting Started The software displays the Main Menu for the E-Plex Advanced ACS: Main Menu and Toolbar This section describes the Main Menu and Toolbar, which are the primary points to access the functions of the E-Plex Advanced ACS. Main Menu The Main Menu provides access to all functions and displays the available menu options. -
Page 32: Toolbar
You can also import user information from another system using exactly the same tab- delimited text file format, including the header title record, as mentioned above. You can call Kaba Access Control’s Technical Support for more help with importing or exporting user information. - Page 33 Getting Started Door Groups From the Door Groups menu, you can add, edit, or delete any number of door groups. Access Schedules From the Access Schedules menu, you can add, edit, or delete up to 16 access schedules. An access schedule is a defined time period during the span of a week in which users can be granted access to the door.
- Page 34 Doors From the Doors menu, you can add, edit, or delete any number of physical doors that have an E-Plex 5200/E-Plex 5700 lock in the software. Access Assignment Note: The Access Assignment menu is the most important menu; everything related to access control is tied together in this menu.
- Page 35 Getting Started System Setup From the System Setup menu, you can set up and maintain all system information, such as Wiegand bit format for Prox Cards and global PIN length for Users. You can add new Operators to the software, delete existing Operators, or modify the passwords for existing Operators.
- Page 36 Getting Started 2–26 PKG 3114 0106 E-Plex Advanced ACS User’s Guide...
-
Page 37: Using The E-Plex Advanced Acs Software
Using the E-Plex Advanced ACS Software This chapter explains how to use the E-Plex Advanced ACS software, including: • System Setup Menu • Managing Door Groups • Managing Access Schedules • Managing Holidays/Vacations • Managing User Groups • Managing Users •... -
Page 38: System Setup Menu
Using the E-Plex Advanced ACS Software System Setup Menu The System Setup menu allows you to define and maintain global system settings that, in most cases, you need to do only once during the initial system setup. To access system settings, select an option from the System Setup menu or click the System Setup menu icon. - Page 39 Using the E-Plex Advanced ACS Software • Card ID Optionally, you can also assign a Prox Card for the Master here, in which case the Master has to use dual credential (PIN and Prox Card) every time to program the lock at the lock keypad.
-
Page 40: Making A New Operator
Using the E-Plex Advanced ACS Software Making a New Operator The Add New Operator option allows you to create a new Operator in the E-Plex Advanced ACS. Note: The first Operator that you create in the software upon installation is the Level 1 Operator. -
Page 41: Deleting An Operator
Using the E-Plex Advanced ACS Software Deleting an Operator The Delete Operator option allows you to delete an Operator from the E-Plex Advanced ACS software. Complete the following steps to delete an Operator: 1. From the System Setup menu, select Delete Operator. The software displays the Delete Operator window: 2. -
Page 42: Changing An Operator Password
Using the E-Plex Advanced ACS Software Changing an Operator Password The Change Password option allows you to change an Operator’s password. Complete the following steps to change an Operator’s password: 1. From the System Setup menu, select Change Password. The software displays the Change Password window. -
Page 43: Archiving The Pc Activity Log
Using the E-Plex Advanced ACS Software Archiving the PC Activity Log The Archive PC Activity Log function allows you to archive and remove old records in the system activity log. Complete the following steps to archive the PC Activity Log. 1. -
Page 44: Managing Door Groups
Using the E-Plex Advanced ACS Software • Once the appropriate month and year are displayed, select the exact archive date by clicking the date on the calendar. The date should be circled in blue. 5. Click OK. The software confirms that the Activity Log archive is complete. 6. -
Page 45: Adding A Door Group
Using the E-Plex Advanced ACS Software Adding a Door Group Complete the following steps to add a door group. 1. From the Manage Door Groups window, click Add. The software displays the Add Door Group window. 2. In the Door Group field, type the name of the door group you are adding. Note: The door group name can be a maximum of 20 characters and may include special characters and spaces. -
Page 46: Editing A Door Group
Using the E-Plex Advanced ACS Software Editing a Door Group Complete the following steps to edit a door group: 1. From the Manage Door Groups window, select a door group to edit by clicking it. 2. Click Edit. The software displays the Edit Door Group window. 3. -
Page 47: Deleting A Door Group
Using the E-Plex Advanced ACS Software 7. Click OK again. The software displays the edited door group in the Manage Door Groups window. Note: You should update your locks to reflect modified door groups by programming the M-Unit and uploading the information to the locks. For more information, refer to M- Unit Handheld PDA in Chapter 5, Programming and Auditing Locks. -
Page 48: Managing Access Schedules
Using the E-Plex Advanced ACS Software If you click Yes, the software prompts you for confirmation. 4. Click Yes. The software alerts you that the door group has been deleted from the database. 5. Click OK. The software returns to the updated Manage Door Groups window. Note: You should update your locks to reflect modified door groups by programming the M-Unit and uploading the information to the locks. -
Page 49: Adding An Access Schedule
Using the E-Plex Advanced ACS Software The software displays the Manage Access Schedules window. From this window, you can add, edit, or delete access schedules. Adding an Access Schedule Complete the following steps to manage access schedules. Note: You may add additional access schedules at any time. 1. -
Page 50: Editing An Access Schedule
Using the E-Plex Advanced ACS Software 5. In the End Time field, type or select an end time. This is the time that access ends each day. 6. Click Save. The software displays the new access schedule in the Manage Access Schedules window. - Page 51 Using the E-Plex Advanced ACS Software 3. In the Access Schedule Name field, change the name of the access schedule. 4. Select the appropriate check box for the day(s) you want to change in the access schedule. These are the days that users will have access to a door. 5.
-
Page 52: Deleting Access Schedules
Using the E-Plex Advanced ACS Software 10. Click OK again. The software displays the edited access schedule in the Manage Access Schedules window. Note: You should update your locks to reflect modified door groups by programming the M-Unit and uploading the information to the locks. For more information, refer to M- Unit Handheld PDA in Chapter 5, Programming and Auditing Locks. -
Page 53: Managing Holidays/Vacations
Using the E-Plex Advanced ACS Software 4. Click OK. The software returns to the updated Manage Access Schedules window. Note: You should update your locks to reflect modified door groups by programming the M-Unit and uploading the information to the locks. For more information, refer to M- Unit Handheld PDA in Chapter 5, Programming and Auditing Locks. -
Page 54: Adding A Holiday/Vacation
Using the E-Plex Advanced ACS Software The software displays the Manage Holidays/Vacations window. From this window, you can add, edit, or delete holidays or vacations. Adding a Holiday/Vacation Complete the following steps to add a holiday/vacation. 1. From the Manage Holidays/Vacations window, click Add. The software displays the Add Holiday/Vacation window. - Page 55 Using the E-Plex Advanced ACS Software 4. In the Start Date and Time field, select the start date using the drop-down arrow and selecting the date from the calendar. Note: 12:00:00 AM indicates midnight or the start of the calendar day. 5.
-
Page 56: Editing A Holiday/Vacation
Using the E-Plex Advanced ACS Software Editing a Holiday/Vacation Complete the following steps to edit a holiday/vacation. 1. From the Manage Holidays/Vacations window, select the holiday or vacation you want to edit by clicking it. 2. Click Edit. The software displays the Edit Holiday/Vacation window. 3. - Page 57 Using the E-Plex Advanced ACS Software 10. Click Yes to update the holiday or vacation. The software alerts you that the database has been updated and that it will search for affected doors. 11. Click OK. If doors were affected, the software alerts you with a list of doors that need to be re-programmed;...
-
Page 58: Deleting A Holiday/Vacation
Using the E-Plex Advanced ACS Software Deleting a Holiday/Vacation Complete the following steps to delete a holiday/vacation. Note: You cannot delete a holiday or vacation if it is assigned to a door. 1. From the Manage Holidays/Vacations window, select the holiday or vacation you want to delete by clicking it. -
Page 59: Managing User Groups
Using the E-Plex Advanced ACS Software Managing User Groups In the E-Plex Advanced ACS software, you can group similar users into User Groups like departments. For example, you may have a group of users who can be assigned to a user group called Office-Staff. -
Page 60: Editing A User Group
Using the E-Plex Advanced ACS Software 3. Click Save. The software alerts you that the user group was added to the database. 4. Click OK. The software displays the new user group in the Manage User Groups window. Note: You can add additional user groups at any time. Editing a User Group Complete the following steps to edit a user group. -
Page 61: Deleting A User Group
Using the E-Plex Advanced ACS Software 5. Click OK. The software displays the edited user group in the Manage User Groups window. Deleting a User Group Complete the following steps to delete a user group. 1. From the Manage User Groups window, select a user group to delete by clicking it. 2. -
Page 62: Managing Users
Using the E-Plex Advanced ACS Software Note: You should update your locks to reflect modified user groups by programming the M-Unit and uploading the information to the locks. For more information, refer to M- Unit Handheld PDA in Chapter 5,Programming and Auditing Locks. Managing Users In the E-Plex Advanced ACS software, you can add and maintain Users, and if they are E- Plex 5700 lock users, you can additionally assign their associated Prox Cards. - Page 63 Using the E-Plex Advanced ACS Software Complete the following steps to add a user: 1. From the Manage Users window, click Add. The software displays the Add User window. If a Prox Card Reader is connected: If a Prox Card Reader is not connected: 2.
-
Page 64: Editing A User
Using the E-Plex Advanced ACS Software 9. Place a flat side of the Prox Card on or in close proximity to the Prox Reader. The Card ID field will display the card ID, and the Prox Reader will display a green light once the card is successfully read. - Page 65 Using the E-Plex Advanced ACS Software If a Prox Card Reader is not connected: 3. From the User Group drop-down list, select a user group. 4. In the Last Name field, re-type the last name of the user. 5. In the First Name field, re-type the first name of the user. 6.
-
Page 66: Deleting A User
Using the E-Plex Advanced ACS Software 12. Click OK. The software displays the edited user in the Manage Users window: Note: You should update your locks to reflect modified users by programming the M- Unit and uploading the information to the locks. For more information, refer to M-Unit Handheld PDA in Chapter 5, Programming and Auditing Locks. -
Page 67: Batch Enrolling Users (E-Plex 5700 Only)
Using the E-Plex Advanced ACS Software 5. Click OK again. The software returns to the updated Manage Users window: Note: You should update your locks to reflect modified users by programming the M- Unit and uploading the information to the locks. For more information, refer to M-Unit Handheld PDA in Chapter 5, Programming and Auditing Locks. - Page 68 Using the E-Plex Advanced ACS Software Note: The facility code is a three-digit number from 000-255 that is usually not printed on the card for security reasons. If you scan a card from the group of cards that you want to batch enroll under the Read User Card sub-menu, you can read the facility code as the first three digits of the card ID.
-
Page 69: Reading A User Card (E-Plex 5700 Only)
Using the E-Plex Advanced ACS Software Reading a User Card (E-Plex 5700 Only) Complete the following steps to read a user card: 1. From the Manage Users window, click Read User Card. The software displays the Read Lost Card window: 2. -
Page 70: Managing Doors
In the E-Plex Advanced ACS software, Doors are literally the physical doors at your site where either the E-Plex 5200 (PIN only) or the E-Plex 5700 (PIN & Prox) locks are installed. You can define new doors, maintain doors, and delete existing doors. -
Page 71: Adding A Door
Using the E-Plex Advanced ACS Software To manage doors, from the Door menu select Manage Doors, or click the Manage Doors button. The software displays the Manage Doors window: Adding a Door Complete the following steps to add a door. 1. - Page 72 Using the E-Plex Advanced ACS Software 5. From the Buzzer Volume field, select a volume level by using the Up and Down arrows. Note: The available buzzer volume levels range between zero (off) and three (loud); the default is one (low). 6.
-
Page 73: Editing A Door
Using the E-Plex Advanced ACS Software Note: You can add additional doors at any time. Editing a Door Complete the following steps to edit a door: 1. From the Manage Doors window, select a door to edit by clicking it. 2. -
Page 74: Deleting A Door
Using the E-Plex Advanced ACS Software 12. Click Yes. The software displays the edited Manage Doors window: Note: You should update your locks to reflect modified door groups by programming the M-Unit and uploading the information to the locks. For more information, refer to M- Unit Handheld PDA in Chapter 5, Programming and Auditing Locks. -
Page 75: Access Assignment
Using the E-Plex Advanced ACS Software Note: You should update your locks to reflect modified door groups by programming the M-Unit and uploading the information to the locks. For more information, refer to M- Unit Handheld PDA in Chapter 5, Programming and Auditing Locks. Access Assignment The Access Assignment function allows you to assign each door—one at a time—its access, granting door and user configuration. -
Page 76: Managing Access Assignment
Using the E-Plex Advanced ACS Software You may optionally enable the passage mode option, allowing free access to the door without any valid PIN or card. Managing Access Assignment Complete the following steps to manage door access assignment: 1. From the Door Group drop-down list, select a door group. 2. - Page 77 PIN + Card (for E-Plex 5700 only) Note: If the lock is an E-Plex 5200, the only option available for the access type is PIN. If the lock is an E-Plex 5700, all three options are available for the access type.
- Page 78 Using the E-Plex Advanced ACS Software 12. To cancel any actions performed, click Cancel. The software returns to the Manage Access Assignment window without making any changes. 13. To save any actions performed, click Save. The software saves your information and returns to the Manage Access Assignment window: 14.
- Page 79 Using the E-Plex Advanced ACS Software 16. Click Assign. The software displays the updated Assign Holidays/Vacation to Door for Access window: 17. To remove an assigned holiday or vacation, click an already assigned holiday/vacation to select it. 18. Click Unassign. The software prompts you for confirmation: 19.
- Page 80 Using the E-Plex Advanced ACS Software 22. From the Manage Access Assignment window, click Users. The Assign Users to Door for Access window displays: 23. Select a user by double-clicking anywhere on the user’s row. To select multiple users, hold the Ctrl key and click the users you wish to select. 24.
- Page 81 Using the E-Plex Advanced ACS Software The software displays the users in the fields to the right: 25. If you need to remove a user from the fields on the right, select the user and double-click the red arrow to return the user to the fields on the left: 26.
- Page 82 Using the E-Plex Advanced ACS Software Manager User Access User 3–46 PKG 3114 0106 E-Plex Advanced ACS User’s Guide...
- Page 83 For Service Users, you must assign between one and 24 hours of access to the door. Service Users will have PIN-only access (both in E-Plex 5200 and E-Plex 5700 locks). The access begins when a Service User enters the valid PIN at any time (“Always”...
-
Page 84: Programming Locks
Using the E-Plex Advanced ACS Software M-Unit User The M-Unit User is unique in that he or she does not have actual access to any door/lock, but can only program or audit locks using the M-Unit Palm PDA any time of the day. 27. -
Page 85: Programming A Lock By Uploading Data From The Pc
Using the E-Plex Advanced ACS Software The software displays the Data File Generator (PC to Handheld) window: From this window, you can program doors to upload to the M-Unit. Programming a Lock by Uploading Data from the PC Complete the following steps to program a lock: 1. - Page 86 Using the E-Plex Advanced ACS Software 3. The software displays the door name in blue, indicating that it is available to be programmed: 4. Click the green arrow: The software displays the door in the Doors to program area: Proceed to step 6. 3–50 PKG 3114 0106 E-Plex Advanced ACS User’s Guide...
-
Page 87: Auditing Locks
Using the E-Plex Advanced ACS Software 5. If you click Select Changed Doors, the software displays the door(s) where the lock configuration data has been updated in the Doors to program area. Note: The doors that have undergone change and are waiting for Sync File creation will be the only doors that will display in the Doors to program area. -
Page 88: Reporting
Using the E-Plex Advanced ACS Software Reporting The Reports option can be used to view and report on the data that you have defined in the E-Plex Advanced ACS software and locks. It can also report on the data that you have uploaded to locks defined in the software. -
Page 89: Printing Reports
Note: On some printers, the printed column alignment of a report may not be correct. If this happens, save the file as a text file (the default folder to save Reports is C:\Program Files\Kaba\EPlexAdvancedACS\Reports). Later, you can retrieve the saved report through Windows Explorer, and then print it to get a properly aligned report. -
Page 90: Access Schedules Report
Using the E-Plex Advanced ACS Software Note: The software pre-designates a file report name. You can override the name and enter the file name of your choice. 3. Click Save. The software confirms that the report has been saved: 4. Click OK. The software returns to the report window. 5. -
Page 91: Holidays/Vacations Report
Using the E-Plex Advanced ACS Software Holidays/Vacations Report The Holidays/Vacations report displays all holiday/vacation periods that have been defined in the E-Plex Advanced ACS software. From this window, you can print and save the Holidays/Vacations report. Archived PC Activity Log Report If you have previously archived the PC Activity Log, you can view the file data using the Archived PC Activity report. -
Page 92: Audits And User Tables From Downloaded Doors Report
Audits and User Tables from Downloaded Doors Report The E-Plex 5200/E-Plex 5700 stores up to 30,000 audit events. The audit file is circular and the oldest record is overwritten by the most recent. A hard reset does not clear the audit trail. - Page 93 Using the E-Plex Advanced ACS Software Viewing Audits Complete the following steps to view audits: 1. From the M-Unit Downloads window, select a file from the list by clicking it: 2. Click View Audits. The software displays the Audits Report window. Note: Click Help at any time for online help.
- Page 94 Using the E-Plex Advanced ACS Software Accessing a User Table Complete the following steps to access a user table: 1. From the M-Unit Downloads window, select a file from the list by clicking it: 2. Click User Table. The software displays the User Table Report window. Note: Click Help at any time for online help.
-
Page 95: List Door Uploads (M-Unit Uploads) Report
Using the E-Plex Advanced ACS Software Deleting an Audit Complete the following steps to delete an audit: 1. From the M-Unit Downloads window, select a file from the list by clicking it: 2. Click Delete. The software prompts you for confirmation: 3. - Page 96 Using the E-Plex Advanced ACS Software From this window, you can view uploads and audits, access user tables, and delete M-Unit uploads. Viewing Detailed Data in an Upload File Complete the following steps to view detailed data in an upload file: 1.
-
Page 97: List Doors Report
Using the E-Plex Advanced ACS Software Deleting an Upload Complete the following steps to delete an upload: 1. From the M-Unit Upload window, select a file from the list by clicking it: 2. Click Delete. The software prompts you for confirmation: 3. - Page 98 Using the E-Plex Advanced ACS Software Viewing the Doors Report Complete the following steps to view door information: 1. From the Doors Report window, select a door by clicking it: 2. Click View. The software displays the Door Info Report window: Note: Click Help at any time for online help.
-
Page 99: List Doors By User Report
Using the E-Plex Advanced ACS Software List Doors by User Report The List Doors by User report allows you to select a user and view all doors that the user has been assigned to, as well as the access schedules associated with each door. When a user is selected from the list, the software displays the doors assigned to that user in the Doors in which user has access area. - Page 100 Using the E-Plex Advanced ACS Software Viewing User Doors and Access Schedules Complete the following steps to view user doors and access schedules: 1. From the Door by User Report window, select a user name from the User Name list. The software displays the doors to which the user has access in the Doors in which user has access area.
-
Page 101: List Pc Activity Log Report
Using the E-Plex Advanced ACS Software List PC Activity Log Report The List PC Activity Log Report allows you to view the current data in the PC Activity Log for the E-Plex Advanced ACS software. Note: Click Help at any time for online help. From this window, you can print and save the PC Activity Log report. -
Page 102: List Operators Report
Using the E-Plex Advanced ACS Software Printing User Cards Complete the following steps to print user cards: 1. From the Users Report window, click Print Cards. The software displays the Print window: 2. Click OK. The software sends the report to the printer and confirms that the report is complete: 3. -
Page 103: Operating The E-Plex Lock At Its Keypad
Operating the E-Plex Lock at its Keypad This section describes how to operate the E-Plex 5200 and the E-Plex 5700 locks at the lock keypad, including: • Overview of the Lock • Configuring the Lock Functions • Initial Programming of the Lock E-Plex Advanced ACS User’s Guide... -
Page 104: Overview Of The Lock
There are three states of the lock: Factory Mode, Access Mode, and Pushbutton Programming Mode. Factory Mode The Factory Mode is one of three primary states of the E-Plex 5200/E-Plex 5700 locks. The main characteristics of this state are: •... -
Page 105: Sequence Of Operations
This section describes the sequence of operations for accessing and programming the E- Plex 5200/E-Plex 5700 lock. With the E-Plex 5200/E-Plex 5700 in the Factory Mode: • Program the lock function of the lock if you want it to be anything other than the factory default “Entry”... -
Page 106: Default Values Of The E-Plex 5200 And E-Plex 5700 Lock Programmable Parameters
The lock is now “activated” and can be programmed using the M-Unit (Maintenance Unit) Palm PDA. For Programming and Auditing Locks using the M-Unit, refer to Chapter 5. Default Values of the E-Plex 5200 and E-Plex 5700 Lock Programmable Parameters... -
Page 107: Entering Pushbutton Programming Mode
Operating the E-Plex Lock at its Keypad Entering Pushbutton Programming Mode This section describes the sequence of tasks to program the lock at the keypad in Pushbutton Programming Mode. 1. Put the lock in Programming Mode by pressing # Master code #. 2. -
Page 108: Additional Pushbutton Keypad Commands
Operating the E-Plex Lock at its Keypad Additional Pushbutton Keypad Commands The following operations can only be performed at the lock’s keypad. All other functions are to be set up and sent from the E-Plex Advanced ACS software via the M-Unit/Palm PDA. •... -
Page 109: Resetting The Lock
7. If you still see the red LED, the lock has a problem. Call a service person to repair or replace the lock. Identifying a Lock Model (Command 501#) Use the Lock Model Identification code to identify if the lock model is E-Plex 5200 or E-Plex 5700. Required User Level: Master, Manager 1. -
Page 110: Summary Of Pushbutton Programming Commands
500# Manual diagnostic Master, Manager 123456789*0# Lock Model 501# Identify if the lock is an E-Plex 5200 Master, Manager Identification or E-Plex 5700: Two sets of green and red LED flashes for E-Plex 5200 and seven sets of green and red LED flashes for E-Plex 5700. - Page 111 Operating the E-Plex Lock at its Keypad Parameters Condition Green LED Red LED Duration Rate Communication in ON (Alternate) ON (Alternate) 1/10 sec 1 sec progress Hard Reset sequence in ON (Alternate) ON (Alternate) 1/2 sec Continuously progress Hard Reset sequence 2 sec Once successful...
- Page 112 Operating the E-Plex Lock at its Keypad 4–10 PKG 3114 0106 E-Plex Advanced ACS User’s Guide...
-
Page 113: Programming And Auditing Locks
Programming and Auditing Locks The Maintenance Unit (M-Unit Palm PDA) is used to transfer (upload) data to and receive (download) data from the locks for the purpose of programming and auditing the locks. The items explained in this chapter include: •... -
Page 114: M-Unit Handheld Pda
Programming and Auditing Locks M-Unit Handheld PDA The Maintenance Unit (M-Unit) is Kaba Access Control's term for a handheld Personal Digital Assistant (PDA) that communicates with the locks via infrared signal. The M-Unit PDA connects to your PC to receive data downloaded from the PC (Lock Configuration Files, for example), and to upload/program the locks. -
Page 115: M-Unit User Definition
To program locks, the M-Unit User uses the M-Unit to transfer lock data from the E-Plex Advanced ACS software to the E-Plex 5200/E-Plex 5700 lock. Note: Before you can transfer lock data to E-Plex 5200/E-Plex 5700 locks, you must first prepare the data in the E-Plex Advanced ACS software. Refer to Programming Locks in chapter 3, Using the E-Plex Advanced ACS Software, for more information. - Page 116 Programming and Auditing Locks 4. On the pushbuttons, enter one of the following sequences as applicable: # Master PIN # 900# # Manager PIN # 900# # M-Unit PIN # Note: Hereinafter, these codes will be referred to as credentials. 5.
- Page 117 10 inches (10 cm and 25 cm). Position the top edge of the M-Unit parallel to the infrared glass window located above lock code buttons 1 and 2. E-Plex 5200 E-Plex 5700 Note: If you receive a message that the communication failed, repeat the procedure.
- Page 118 Programming and Auditing Locks 10. When the M-Unit and lock are communicating, the M-Unit displays the Data Management screen with available door groups. 11. Select the door group for the door you are programming. The Data Management screen displays the doors in the selected door group. 12.
- Page 119 Programming and Auditing Locks 13. The M-Unit prompts you that the file is ready to upload. 14. Tap Upload. The transfer of data from the M-Unit to the door lock begins. 15. After the transfer is complete, the M-Unit displays the following prompt: E-Plex Advanced ACS User’s Guide PKG 3114 0106 5–7...
-
Page 120: Auditing Locks
Programming and Auditing Locks 16. Tap OK. The upload is successful. The M-Unit returns to the E-Plex ACS main screen. 17. Tap Disconnect to properly disconnect the M-Unit from the lock. 18. Repeat steps 3–17 to program additional doors. Auditing Locks Before you can audit locks, you must select the number of records you want to see each time you do an audit. - Page 121 7. With the screen facing upwards, hold the M-Unit up to the lock at a distance of between 4 inches and 10 inches (10 cm and 25 cm). Position the top edge of the M-Unit parallel to the infrared glass window located above lock code buttons 1 and 2. E-Plex 5200 E-Plex 5700 E-Plex Advanced ACS User’s Guide PKG 3114 0106 5–9...
- Page 122 Programming and Auditing Locks Note: If you receive a message that the communication failed, repeat the procedure. Ensure that you are holding the M-Unit in the correct position, pointing it straight at the lock lens, and at the correct distance. 8.
- Page 123 Programming and Auditing Locks 10. After the transfer is complete, the M-Unit displays the following prompt: 11. Tap OK. The download is successful. The M-Unit returns to the E-Plex ACS main screen. 12. Tap Disconnect to disconnect the M-Unit from the lock. 13.
-
Page 124: Transferring Lock Audits From The M-Unit To The Pc
Programming and Auditing Locks Transferring Lock Audits from the M-Unit to the PC Complete the following steps to transfer lock audits from the M-Unit to the PC. 1. After downloading the lock audit to the M-Unit PDA, return to your PC. 2. -
Page 125: To View Lock Diagnostics
Programming and Auditing Locks To View Lock Diagnostics Complete the following steps to view lock diagnostics. 1. Connect the M-Unit to the Lock using the Communications code. 2. From the E-Plex ACS main menu, select Diagnostics. The M-Unit displays the Diagnostics screen. 3. -
Page 126: Managing Lock Data
Programming and Auditing Locks Managing Lock Data Complete the following steps to manage lock data, including viewing data and deleting it. 1. From the E-Plex ACS main menu, select Data Mgt. 2. The M-Unit displays the Data Management screen with available door groups. 3. - Page 127 Programming and Auditing Locks To View Lock Data 5. Tap Select. The M-Unit displays the door data. To Delete Lock Data 6. Tap Delete. The M-Unit prompts you for confirmation. 7. Click OK. The M-Unit deletes the lock data. E-Plex Advanced ACS User’s Guide PKG 3114 0106 5–15...
- Page 128 Programming and Auditing Locks 5–16 PKG 3114 0106 E-Plex Advanced ACS User’s Guide...
Need help?
Do you have a question about the E-Plex 5200 and is the answer not in the manual?
Questions and answers