Kaba e-plex 2000 Installation Instructions Manual
Hide thumbs
Also See for e-plex 2000:
- Installation instructions manual (49 pages) ,
- Operation manual (32 pages) ,
- Quick reference manual (2 pages)
Table of Contents
Advertisement
Quick Links
- 1 Diagram of Lock
- 2 Lock Handing
- 3 Reversing the Outside Lever for Series Without Mechanical Override
- 4 Installing Outside Lever on Non-Mechanical Override
- 5 Changing Lock Cylinders
- 6 Installing Battery Pack
- 7 Installing Lock Housings
- 8 Testing the Operation of the Lock
- Download this manual
See also:
Operating Manual
Installation Instructions
For technical assistance, call
1-800-849-TECH (8324) or 336-725-1331
between 8
& 5
EST
AM
PM
Monday through Friday (Excluding Holidays)
2 0 0 0
Kaba Access Control
2941 Indiana Avenue Winston-Salem, NC 27105 USA
Tel: (800) 849-8324 (336) 725-1331
Fax: (800) 346-9640 (336) 725-3269
www.kaba-ilco.com
www.e-plexlock.com
PK3176 0906
Advertisement
Table of Contents

Related Manuals for Kaba e-plex 2000


Summary of Contents for Kaba e-plex 2000
-
Page 1: Installation Instructions
For technical assistance, call 1-800-849-TECH (8324) or 336-725-1331 between 8 & 5 Monday through Friday (Excluding Holidays) 2 0 0 0 Kaba Access Control 2941 Indiana Avenue Winston-Salem, NC 27105 USA Tel: (800) 849-8324 (336) 725-1331 Fax: (800) 346-9640 (336) 725-3269 www.kaba-ilco.com www.e-plexlock.com... -
Page 2: Table Of Contents
To activate lock functions, the master combination must be changed at the time form the steps described. Kaba Access Control is not responsible for damage or of installation. -
Page 3: Tools Required
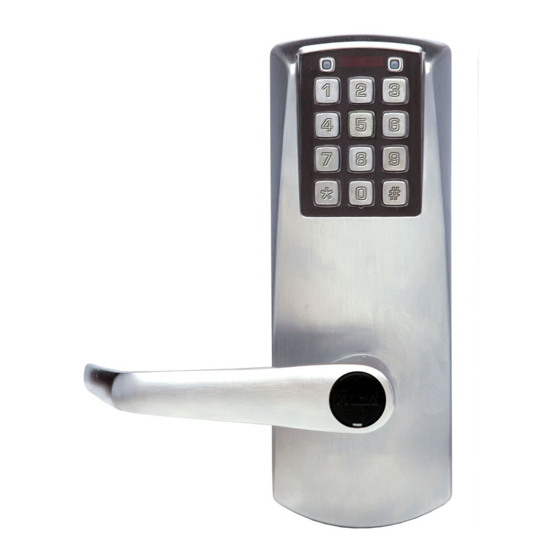
TOOLS REQUIRED: Diagram of lock: (A) Lock housing (E) Drive tube (I) Cap • Safety glasses • Phillips screwdriver (#2) (B) Inside drive hub (F) Lever catch (J) Cylinder • ⁄ " (13 mm) chisel • Fine steel file (C) Nylon washer (G) Countersink (K) Cylinder plug •... -
Page 4: Door Preparation
Plate Closing Direction Cylindrical Unit Assembly B. LOCK HANDING The E-Plex 2000 is a non-handed lock that is preassembled for left-hand Screws door installations. Spacers B-1 Determine the hand of your door. For Left Hand doors, proceed to section C. -
Page 5: Installing Outside Lever On Non-Mechanical Override
Door Thickness Table E. REVERSING THE OUTSIDE LEVER FOR SERIES WITHOUT Door Spacer 02 Spacer 04 Spacer 05 Screw MECHANICAL OVERRIDE Thickness thin length The lever is field reversible. If the handing is ⁄ " ⁄ " ( ⁄ " (35 mm) up to 1 40 mm) (10 mm) - Page 6 Turn the override shaft 90º clockwise so For Right-Handed Levers: Turn the key that the two small indents on the cross approximately 90º clockwise so that it is in the Countersink (g) in the top position are now vertically in line. (The cylinder vertical position and the countersink (g) is in can be used to turn override shaft.) the top position.
-
Page 7: Testing The Operations Of The Outside Lever
F-10 Remove the key. The lock will look as G-2 Test the Movement of the Lever shown at right. (without the key in cylinder) a. Turn the lever (h) clockwise for a Right- Right-handed F-11 Gently check the rotation of the lever Handed lock or counter-clockwise for a lock handle. -
Page 8: Changing Lock Cylinders
With the lever (h) in the horizontal posi- H-5 To remove the cap (i), insert a tion, insert the key (n) into the cylinder small flat screwdriver into this and turn it clockwise until it stops. (This groove and gently pry the cap off, applies to both Right and Left-Handed being careful not to damage it. -
Page 9: Installing Lock Housings
J. INSTALLING LOCK HOUSINGS Place the inside trim assembly on Square Spindle Position the door so that the spindles (o) Insert the slotted end of the square spindle engage the inside lever. Fasten into the outside lever hub until it locks, at an to the outside housing using the angle of 45º. -
Page 10: Testing The Operation Of The Lock
L. TESTING THE OPERATION OF THE LOCK Caution: Check the operation of the latch by making sure that the deadlatch stops against the strike as shown and does not slide into the strike opening L-1 Rotate inside lever and hold. Ensure that the latch is fully retracted and when the door is closed.
Need help?
Do you have a question about the e-plex 2000 and is the answer not in the manual?
Questions and answers