Table of Contents
Advertisement
Quick Links
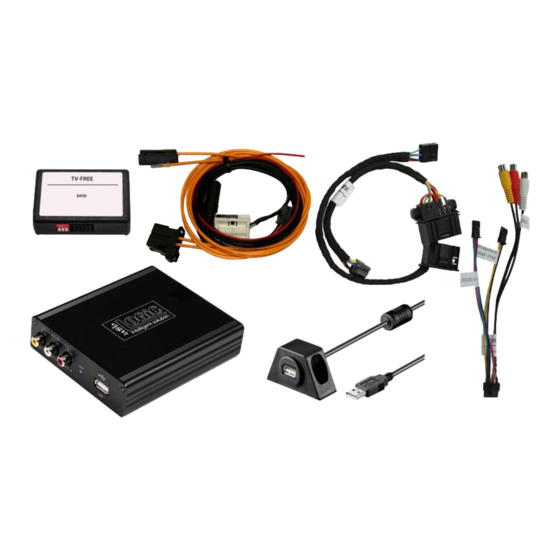
usbLOGiC USB-AV-Player
USB-E65
for BMW E65 Professional navigation systems
with 8.8" monitor
Product features
• USB-port for media up to 2 TB (2000GB)
• supports FAT32 and NTFS formatted media
• multi partition capable
• compatible with MP3, AVI, VOB, MOV, RMVB, JPG and many more
• last position memory
• integrated into and controllable by vehicle infotainment
• AV-input with IR-control channel
• control of after-market devices by OEM buttons, e.g. DVD-player, USB/iPod devices, ...
• after-market rear-view camera input
• automatic switching to rear-view camera input (only from usbLOGiC mode)
• rear-view camera power (+12V max 1A)
• rear-seat-entertainment AV-output
• optional remote control for full USB functions/rear-seat-entertainment
• power on remote out trigger signal (+12V max 1A) to switch on connected devices
• video-in-motion
Version 25.01.2012
USB-E65
Advertisement
Table of Contents

Related Manuals for Caraudio-Systems usbLOGiC


Summary of Contents for Caraudio-Systems usbLOGiC
- Page 1 • AV-input with IR-control channel • control of after-market devices by OEM buttons, e.g. DVD-player, USB/iPod devices, … • after-market rear-view camera input • automatic switching to rear-view camera input (only from usbLOGiC mode) • rear-view camera power (+12V max 1A) • rear-seat-entertainment AV-output •...
- Page 2 Factory nightvision, factory DVD-changer, factory rear-view camera 3. Operation 3.1. Activation of the video-in-motion function 3.2. Selecting the usbLOGiC as current AV-source 3.3. Assigning device control for connected AV-source 3.4. Switching to internal USB, AV-source or after-market rear-view camera 3.5.
-
Page 3: Legal Information
Legal Information By law, watching moving pictures while driving is prohibited, the driver must not be distracted. We do not accept any liability for material damage or personal injury resulting, directly or indirectly, from installation or operation of this product. This product should only be used while standing or to display fixed menus or rear-view-camera video when the vehicle is moving, for example the MP3 menu for DVD upgrades. - Page 4 Dip switches If an after-market rear-view camera shall be connected or a factory of USB-box rear-view camera is connected, in order for the usbLOGiC to automatically switch to its camera input, when reverse is engaged set dip2 = ON (up).
-
Page 5: Installation
1.4.2. Deactivating usbLOGiC AV input If no peripheral AV-source shall be connected to the usbLOGiC, we dip switches recommend to disable the AV-input, to avoid customers switching by of USB-box mistake to black/no picture of the AV-input. In order to disable the AV-input of the usbLOGiC, set dip1 = OFF (down). - Page 6 2.1. Installation of CAN-box TV-436 The CAN interface is connected to the backside of the OEM screen. Remove 3 TORX screws at the OEM screen. Remove cover grill (only plugged). Place soft towel beneath the navigation monitor to avoid scratches Flip down the board monitor.
- Page 7 Remove 12-pin insert from black vehicle harness connector. Insert 12-pin insert into black connector of the CAN interface harness TV-BMW65. Insert the completed black connector into CAN interface harness TV-BMW65. Connect 12-pin insert from CAN interface harness TV-BMW65 into black connector from vehicle harness.
- Page 8 2.2. Installation of USB-box USBC-M536 The fibre optical interface installation is made at the navigation computer, which is located at the left side in the trunk behind a cover and has to be removed. The video lead (red/colored - video signal, black - video ground) has to be removed from the white insert of C2C-BMW02.
- Page 9 Installation socket for the connection of USB-media. The USB-IRSET consists of the external C3C-SENSOR IR-sensor and the USBC-RC IR- remote control and can be used to control the usbLOGiC’s internal USB functions additionally to the control through the navigations buttons. Connect the C3C-SENSOR to the female black/red/blue 3pin AMP connector of harness C3C-AVIR and locate the sensor in an accessible place.
- Page 10 2.4.1. AV-source The usbLOGiC has the possibility to connect and remotely control by navigation buttons a pre-programmed device. The device list in the device control table shows the pre- programmed remote channels and the related IR-remote cables STA-xxx which must be ordered separately for the control of the device.
-
Page 11: After-Market Rear-Seat-Entertainment
The green wire of harness C2C-BMW02 can be used as +12V power (max 1A) supply for the rear-view camera. Note: Automatic switching to the camera-input when reverse gear is engaged works only in usbLOGiC mode. 2.4.4. After-market rear-seat-entertainment Using RCA-cables, connect the rear-seat-entertainment to the female RCA-connector VIDEO OUT of USB-box USBC-M536. -
Page 12: Operation
Select control levels setup “AV: RCxx” and assign related IR-code as described in device control table. Note: If the AV-input is deactivated (see chapter “Deactivating usbLOGiC AV-input”), the menu items “AV” and “AV: RCxx” will not be available. Version 25.01.2012 USB-E65... - Page 13 3.4. Switching to internal USB, AV-source or after-market rear-view camera In the usbLOGiC control menu, choose TV to enter internal USB mode, AV to enter AV-input mode (not available if AV-input is deactivated, see chapter “Deactivating usbLOGiC AV- input”) or REAR CAM to switch to the usbLOGiC after-market rear-view camera-input (even if the automatic switching to the camera input is disabled, see chapter “Automatic switching...
- Page 14 The function description equals the remote control buttons of the optional usbLOGiC remote control or the additional device. On the additional device the writing may vary (e.g. AV instead of Source).
-
Page 15: Specifications
-30°C to +80°C Weight 312g Measurements (box only) B x H x T 135 x 30 x 105 mm 5. Connections (USB-box) 6. Technical Support Caraudio-Systems Vertriebs GmbH NavLinkz GmbH manufacturer/distribution corporate sales/tech dealer-support Rheinhorststr. 22 Eurotec-Ring 45 D-67071 Ludwigshafen am Rhein...
Need help?
Do you have a question about the usbLOGiC and is the answer not in the manual?
Questions and answers