Table of Contents
Advertisement
Quick Links
Compatible with LandRover touch-screen
infotainment systems from model year 2012
Product features
• Plug and play multimedia interface
• 3 AV-inputs
• Optional control of after-market navigation NAV-NKSUNIR4 and of 2 after-market
devices
(e.g. DVD-player, DVB-T tuner) by factory touch-screen
• Rear-view camera input
• Rear-view camera power (+12V max 1A)
• Automatic switching to rear-view camera input
• Video-in-motion
• Rear-seat-entertainment output for AV-sources connected to the c.LOGiC
• USB update-port for software-updates by consumer
Version 11.02.2015
c.LOGiC-Interface
C4-LR12-NC
C4-LR12-NC
Advertisement
Table of Contents

Related Manuals for Caraudio-Systems c.LOGiC C4-LR12-NC


Summary of Contents for Caraudio-Systems c.LOGiC C4-LR12-NC
- Page 1 c.LOGiC-Interface C4-LR12-NC Compatible with LandRover touch-screen infotainment systems from model year 2012 Product features • Plug and play multimedia interface • 3 AV-inputs • Optional control of after-market navigation NAV-NKSUNIR4 and of 2 after-market devices (e.g. DVD-player, DVB-T tuner) by factory touch-screen • Rear-view camera input • Rear-view camera power (+12V max 1A) • Automatic switching to rear-view camera input • Video-in-motion • Rear-seat-entertainment output for AV-sources connected to the c.LOGiC • USB update-port for software-updates by consumer Version 11.02.2015 C4-LR12-NC...
-
Page 2: Table Of Contents
Contents 1. Prior to Installation 1.1. Delivery contents 1.2. Check compatibility of vehicle and accessories 1.3. Setting the dip-switches of the Interface-box C4C-M816C 1.4. LED’s of the interface-box C4C-M816C 2. Connection schema 3. Installation 3.1. Connecting interface-box and harnesses 3.2. Connection to the factory monitor 3.3. Connection to the vehicle AUX-input 3.4. Connecting peripheral devices 3.4.1. AV-source(s) 3.4.2. After-market navigation NAV-NKSUNIR4 3.4.3. Factory rear-view camera 3.4.4. After-market rear-view camera 3.4.5. Rear-seat-entertainment 4. Operation 4.1. Activation of the video-in-motion function 4.2. -
Page 3: Prior To Installation
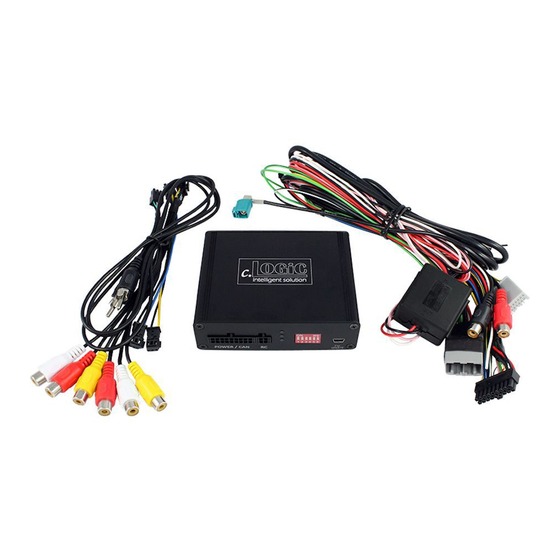
Legal Information By law, watching moving pictures while driving is prohibited, the driver must not be distracted. We do not accept any liability for material damage or personal injury resulting, directly or indirectly, from installation or operation of this product. This product should only be used while standing or to display fixed menus or rear-view-camera video when the vehicle is moving, for example the MP3 menu for DVD upgrades. Changes/updates of the vehicle’s software can cause malfunctions of the interface. We offer free software-updates for our interfaces for one year after purchase. To receive a free update, the interface must be sent in at own cost. Labor cost for and other expenses involved with the software-updates will not be refunded. 1. Prior to installation Read the manual prior to installation. Technical knowledge is necessary for installation. The place of installation must be free of moisture and away from heat sources. 1.1. Delivery contents Take down the SW-version and HW-version of the interface boxes, and store this manual for support purposes. Interface-box C4C-M816C HW_____ SW_____ IR-cable C2C-IR RCA-adapter Harness CAB-RCA1-15 C4C-LR02-NC 2 x AV-cable CAB-AV-6P Version 11.02.2015 C4-LR12-NC... -
Page 4: Check Compatibility Of Vehicle And Accessories
1.2. Check compatibility of vehicle and accessories Requirements Vehicle Range Rover Evoque L538, Range Rover Sport L320, Discovery4 L319 from model year 2012 Navigation Touch-screen infotainment version 3 Audio-AUX A factory audio-AUX input is required. Limitations Video-sources Only compatible to NTSC-sources. Factory-PDC The factory-PDC picture isn’t available by connecting the interface. Acoustic signals are still existing. 1.3. Setting the dip-switches of the interface-box C4C-M816C With the interface-box dip-switches it is possible to activate or deactivate the video-in- motion (dip 1), AV 2 (dip 2) and AV 3 (dip 3). Dip position “down” is OFF and position “up” is ON. Dip-switch OFF Dip 1 Rear-view camera On Rear-view camera OFF Dip 2 AV2 On AV2 Off Dip 3 AV3 On AV3 Off Dip 4-6 No function After each change of the dip switch settings you have to execute a power reset of the c.LOGiC interface-box! 1.4. LED‘s of the interface-Box C4C-M816C Version 11.02.2015 C4-LR12-NC... -
Page 5: Connection Schema
2. Connection schema Rear#view*camera* Rear#seat#entertainment*(op.onal)* *(op.onal)* Audio#inser.on*by*op.onal* CAB#TVAS30* RCA#Y#cable*to*audio#in*of* (op.onal)* harness*C4C#LR02#NC* Interface#box* C4C#M816C* REAR* *Harness** *RCA#adapter** C4C#LR02#NC* CAB#RCA1#15* AV#cable* CAB#AV#6P* ****Parking**NAV#NKSUNIR4* AV#source*3*(op.onal)** AV#source*2*(op.onal)* AV#source*1*(op.onal)* A"er%market*naviga/on* NAV%NKSUNIR40* *IR#cable* *******AV2** C2C#IR* *******AV3** Version 11.02.2015 C4-LR12-NC... -
Page 6: Installation
Interface*box! C4C*M816C! FRONT! !!!!+12V!rear*view!camera! !!!!!DeacEvaEon!AV1! !!!!!AkEvaEon!NAV*buIon! !!!!!(special!case)!! Factory!! Rear!of!! AUX!input! factory!monitor! !Harness!! C4C*LR02*NC! Female!16pin! connector! Rear!of!! vehicle!harness! factory!monitor! !IR*cable! C2C*IR! 3. Installation Switch off ignition and disconnect the vehicle’s battery! If according to factory rules disconnecting the battery has to be avoided, it is usually sufficient to put the vehicle in sleep-mode. In case the sleep-mode does not show success, disconnect the battery with a resistor lead. Place of installation is on the rear of the factory monitor. Version 11.02.2015 C4-LR12-NC... -
Page 7: Connecting Interface-Box And Harnesses
3.1. Connecting interface-box and harnesses Interface)box- C4C)M816C- FRONT- Interface)box- C4C)M816C- REAR- AV)cable- CAB)AV)6P- -Harness-- -IR)cable- C4C)LR02)NC- C2C)IR- Connect female 18pin Micro-Fit connector of harness C4C-LR02-NC to the male 18pin Micro-Fit connector (POWER/CAN) on the front of the interface-box C4C-M816C. Connect female 4pin Micro-Fit connector of IR-Cable C2C-IR to the male 4pin Micro-Fit connector (RC) on the front of the interface-box C4C-M816C. Connect female 6pin Micro-Fit connector of the AV-cable CAB-AV-6P to the male 6pin Micro-Fit connector (AV2/3) on the rear of the interface-box C4C-M816C. Version 11.02.2015 C4-LR12-NC... -
Page 8: Connection To The Factory Monitor
3.2. Connection to the factory monitor Rear!of!! !Harness!! factory!monitor! C4C*LR02*NC! Rear!of!! factory!monitor! Female!16pin! connector! vehicle!harness! Remove female 16pin connector of vehicle harness from the rear of the factory monitor and connect it to the Male 16pin connector of harness C4C-LR02-NC. Connect female 16pin connector of harness C4C-LR02-NC to the male 16pin connector on the rear of the factory monitor. Connect female Fakra-connector of harness C4C-LR02-NC to the purple male Fakra- connector on the rear of the factory monitor. If there is a factory rear-view camera inside the car remove the female Fakra-connector of the factory rear-view camera and connect it as described in chapter “Factoa. Version 11.02.2015 C4-LR12-NC... -
Page 9: Connecting Peripheral Devices
3.3. Connection to the factory AUX-input !Harness!! C4C*LR02*NC! Factory! AUX!input! RCA*adapter! (op>onal)! Connect the factory 3,5mmjack bush audio AUX adapter of the factory AUX-input to the female RCA-connectors of harness C4C-LR02-NC by optional RCA-adapter. Note: If connecting a rear-set-entertainment an optional RCA Y-cable is plugged in between, see chapter “Rear-seat-entertainment”. 3.4. Connecting peripheral devices It is possible to connect 3 after-market AV-sources, an after-market rear-view camera and rear-seat-entertainment to the c.LOGiC interface. Before final installation of the peripheral devices, we recommend to test-run the c.LOGiC functions to detect incompatibility of vehicle, navigation, factory accessories or peripheral devices as soon as possible. Note: Only compatible to NTSC video-sources. Version 11.02.2015 C4-LR12-NC... -
Page 10: Av-Source(S)
3.4.1. AV-source(s) The c.LOGiC interface has the possibility to connect and remotely control by factory touch- screen 3 after-market devices. AV1 is fix pre-programmed: AV1 – After-Market Navigation NAV-NKSUNIR4 Note: With the loose white-black cable of harness C4C-LR02-NC it is possible to deactivate AV1. ●● +12V = AV1 deactivated ●● 0V = AV1 activated Interface*box! C4C*M816C! REAR! !Harness!! !RCA*adapter!! C4C*LR02*NC! CAB*RCA1*15! AV*cable! CAB*AV*6P! ****Parking!!!NAV*NKSUNIR4! AV*source!3!(op8onal)!! AV*source!2!(op8onal)! AV*source!1!(op8onal)! A"er%market*naviga/on* NAV%WP9200* !IR*cable! !!!!!!!AV2!! C2C*IR! !!!!!!!AV3!! Version 11.02.2015 C4-LR12-NC... -
Page 11: After-Market Navigation Nav-Nksunir4
Connect the AV-RCAs of AV-source 2 and the AV-RCAs of AV-source 3 to the female RCA connectors of the respective AV-cable CAB-AV-6P (AV2/3). Using the respective STA-xxx IR-control cable, interconnect the blue-black (yellow- black) female 3pin AMP connector of IR-cable C2C-IR and the IR-port of the AV-source 1 (AV-source 2). Connect video RCA of AV-source 1 (NAV-NKSUNIR4) to female RCA connector NAV- AV1 on the rear of the interface-box C4C-M816C by RCA-adapter CAB-RCA1-15. See chapter “After-market navigation NAV-NKSUNIR4” for detailed information about connection. Note: It is also possible to connect an AV-source without control by factory touch- screen to AV1. In this case you need another AV-cable CAB-AV-6P (connection to 6pin MicroFir connector AV1 on the rear of interface-box C4C-M816C). 3.4.2. After-market navigation NAV-NKSUNIR4 AV#source*1** A"er%market*naviga/on* NAV%NKSUNIR4* Harness** C4C#LR02#NC* Interface#box* C4C#M816C* REAR* *RCA#adapter** CAB#RCA1#15* Connect video RCA of NAV-NKSUNIR4 to female RCA connector NAV-AV1 on the rear of the interface-box C4C-M816C by RCA-adapter CAB-RCA1-15. Connect the round male 13pin connector of harness C4C-LR02-NC to the round female 13pin RGB connector of the NAV-NKSUNIR4. Connect the female 6pin connector of harness C4C-LR02-NC to the male 6pin POWER connector of the NAV-NKSUNIR4. Version 11.02.2015 C4-LR12-NC... -
Page 12: Factory Rear-View Camera
3.4.2.1. Special case: Activation of the NAV-button With the loose green-black cable of harness C4C-LR02-NC it is possible to activate the NAV- button. ●● +12V = NAV-button activated 3.4.3. Factory rear-view camera Rear%view)camera) )(op/onal)) CAB%TVAS30) (op/onal)) Interface%box) C4C%M816C) REAR) If there is a factory rear-view camera installed remove the female Fakra-connector of the factory rear-view camera and connect it to the male Fakra-connector of the optionally available adapter CAB-TVAS30. Connect the video RCA of the optionally available adapter CAB-TVAS30 to the female RCA connector R-CAM IN of the interface-box C4C-M816C. Version 11.02.2015 C4-LR12-NC... -
Page 13: After-Market Rear-View Camera
3.4.4. After-market rear-view camera Harness) Rear%view)camera) +12V%camera%power%(max.%1A)% C4C%LR02%NC) )(op/onal)) Interface%box) C4C%M816C) REAR) Connect the video RCA of the after-market rear-view camera to the female RCA connector R-CAM IN of the interface-box C4C-M816C. Connect the green wire of harness C4C-LR02-NC to the camera power supply (+12V max. 1A). The green wire is high (+12V) when reverse gear is engaged. Note: Only compatible to NTSC-cameras. Version 11.02.2015 C4-LR12-NC... -
Page 14: Rear-Seat-Entertainment
3.4.5. Rear-seat-entertainment Interface)box- C4C)M816C- REAR- -Harness- C4C)LR02)NC- Rear)seat)entertainment-(op=onal)- Factory-- AUX)input- RCA)Y)cable- (op=onal)- Connect the video RCA of the rear-seat-entertainment to the female RCA connector VIDEO-OUT on the rear of the interface-box C4C-M816C. Connect the audio-RCA of the rear-seat-entertainment to the female RCA connectors of the optional RCA-Y-cable. Connect the audio RCA of the optional RCA-Y-cable to the female RCA connectors of the harness C4C-LR02-NC. Connect the audio RCA of the factory AUX-input to the female RCA connectors of the optional RCA-Y-cable (see chapter “Connection to the factory AUX-input”). Note: The last source keeps active on rear-seat-entertainment if you switch the navigation to OEM mode. Version 11.02.2015 C4-LR12-NC... -
Page 15: Operation
4. Operation 4.1. Activation of the video-in-motion function The video-in-motion function is activated permanently without disturbing the navigation performance. 4.2. Selecting the c.LOGiC as current AV-source At first activate the AUX to choose the c.LOGiC as current AV-source: • press AUDIO/VIDEO button • choose My Music • choose Option + • choose AUX Press AUDIO/VIDEO button for 3 seconds after activation of AUX to select the c.LOGiC as current AV-source. Short press AUDIO/VIDEO button to switch the AV-sources. Each repetition will switch to the next enabled input. If AV3 isn’t activated it will be skipped. 4.3. Control of the after-market navigation NAV-NKSUNIR4 It is possible to control an after-market navigation NAV-NKSUNIR4 connected to AV1 by factory touch-screen. Make display calibration for the after-market navigation NAV-NKSUNIR4: Remove the SD card from the NAV-NKSUNIR4 navigation and confirm the dialog box. Version 11.02.2015 C4-LR12-NC... - Page 16 Select the „Setting“ menu point. Select the „Calibration“ menu point. Start the display calibration. After successful calibration put back the SD card to NAV-NKSUNIR4 navigation (navigation software start automatically). Version 11.02.2015 C4-LR12-NC...
-
Page 17: Assigning Device Controls For Connected Av-Source (Av2/3)
4.4. Assigning device controls for connected AV-sources (AV2/3) After selecting the c.LOGiC as current AV-source (see chapter “Selecting the c.LOGiC as current AV-source”) choose the relevant AV-source (AV2 or AV3) by short pressing the AUDIO/VIDEO button. After it: • Press AUDIO/VIDEO button for 3 sec.(back into the factory mode) • Press AUDIO/VIDEO button for 10 sec. (interface switches to the last AV-source and starts the programming mode), the blue LED is blinking fast • within 40 seconds, enter the device-related IR-code for AV2 (AV3) as described in device control table (appendix A) by touch-screen, see picture of apportionment of the numbers below • the blue LED is blinking as often as the corresponding number of the RC-code (e.g. the blue LED is blinking 10 times for RC-code “10”). Do not press any button or the touch-screen while the blue LED is blinking because the programming will not be stored and must be restarted!!! Note: The IR-control channels for AV2 and AV3 are preset to RC-Code 41 compatible DVB-T tuners. Version 11.02.2015 C4-LR12-NC... -
Page 18: Control Of The Av-Sources By Factory Touch-Screen (Dvb-T/Dvd)
4.5. Control of the AV-sources by touch-screen (DVB-T/ DVD) It is possible to control the AV-sources connected to AV2 and AV3 by factory touch-screen. The factory touch-screen is divided into 9 areas. The picture below shows the functions of the AV-source which can be executed by short pressing (left function) and long pressing (about 2 sec., right function) the appropriate touch-screen area. The function description equals the remote control buttons of the AV-sources’ remote control. Note: Additionally to the control via factory touch-screen, it is possible to install the original IR-sensor of the AV-source. By using the Y-adapter STA-Y for the IR-Port of the AV-source, the controls of touch-screen AND device’s IR-sensor can be connected and used simultaneously. Installation of the IR-sensor is recommended as the controls via touch- screen are limited, and not all functions may be covered. Version 11.02.2015 C4-LR12-NC... -
Page 19: Specifications
Temperature range -30°C to +80°C Weight 190g Measurements (box only) B x H x T 105 x 30 x 84 mm 6. Connections (interface-box) Female-RCA) connectors- Male-4pin-- Interface)box- Micro)Fit-- C4C)M816C- connector- REAR- Interface)box- Male-6pin-- C4C)M816C- Micro)Fit-- FRONT- connectors- Male-18pin- Female-update) Micro)Fit-- connector-- connector- Mini-USB- 7. Technical Support Caraudio-Systems Vertriebs GmbH manufacturer/distribution In den Fuchslöchern 3 D-67240 Bobenheim-Roxheim email support@caraudio-systems.de Legal disclaimer: Mentioned company and trademarks, as well as product names/codes are registered trademarks ® of their corresponding legal owners. Version 11.02.2015 C4-LR12-NC...
Need help?
Do you have a question about the c.LOGiC C4-LR12-NC and is the answer not in the manual?
Questions and answers