Advertisement
Table of Contents
- 1 General Safety Rules
- 2 Other Safety Warnings
- 3 Double Insulation
- 4 Electrical Connection
- 5 Extension Cords
- 6 Assembling the Handle
- 7 Installing the Chute Control Rod
- 8 Powering on and off
- 9 Adjusting the Discharge Chute and Chute Deflector
- 10 Operating Tips
- 11 Replacing the Scraper
- 12 Replacing the Drive Belt
- 13 Replacing the Impeller
- 14 Year Limited Warranty
- Download this manual
Advertisement
Table of Contents

Related Manuals for Yardworks 060-3999-2


Summary of Contents for Yardworks 060-3999-2
- Page 1 Electric Snow Thrower model no. 060-3999-2 Toll-free: 1-866-523-5218 IMPORTANT: IMPORTANT: Read and follow all safety rules and operating instructions Read and follow all safety rules and before using this product. operating instructions before using this product. Instruction Manual...
- Page 2 060-3999-2 | contact us: 1-866-523-5218 SPECIFICATIONS KNOW YOUR THROWER EXPLODED VIEW PARTS LIST SAFETY GUIDELINES ELECTRICAL ASSEMBLY INSTRUCTIONS OPERATION MAINTENANCE TROUBLESHOOTING SYMBOLS WARRANTY Motor: 120 V, 60 Hz, 13 A Blade speed: Up to 2,600 RPM Clearing width: 20”...
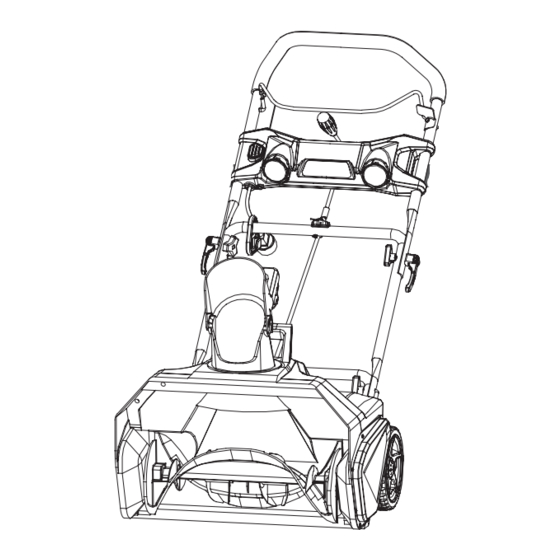
- Page 3 060-3999-2 | contact us: 1-866-523-5218 1. Upper handle 2. Middle handle 3. Lower handle 4. Wheel 5. Carrying or lifting handle (for transport only) 6. Scraper 7. Impeller 8. Discharge chute 10. Cord retainer 11. Chute control rod 12.
- Page 4 060-3999-2 | contact us: 1-866-523-5218...
- Page 5 060-3999-2 | contact us: 1-866-523-5218 Item Description Drawing Left side cover 332041205-2 Screw 32205877 Belt 329151205 Screw (M5×15) 32203100 Washer 3290250 Front cover assembly 311011210 Rear cover 341021205-2 Motor 361011210 Motor clamp 332101210 Wire clamp 3410801 Split pin 3290135 7”...
- Page 6 060-3999-2 | contact us: 1-866-523-5218 Item Description Drawing Front cover assembly 311011210 Link block 332061205 Impeller 341171205 Right driving block 339011205 Drive wheel 34109100-12 Washer 32217100 Left side plate 311111205 Bushing 332111205 Left driving block 339021205 Motor support...
- Page 7 060-3999-2 | contact us: 1-866-523-5218 Item Description Drawing Handle bar assembly 311041210 28-1 Safety switch button 34136486-2 28-2 Spring 33401229A 28-3 Faceplate 341141205-2 28-4 Switch pressure head 341201205 28-5 Screw 3220735N 28-6 333011108 28-7 Lamp screen 341051108 28-8...
-
Page 8: General Safety Rules
060-3999-2 | contact us: 1-866-523-5218 GENERAL SAFETY RULES READ ALL INSTRUCTIONS CAREFULLY 1. Read the instructions carefully. Become familiar with the controls and the proper use of the snow thrower. medication. 3. Do not allow children under the age of 14 to operate this snow thrower. Children who are 14 years of age and older must read the operating instructions and the safety rules in this manual carefully and understand them thoroughly, and must be trained and supervised by a parent. - Page 9 060-3999-2 | contact us: 1-866-523-5218 FOLLOW THESE RULES WHILE OPERATING THE SNOW THROWER 1. Walk. Do not run. 2. Verify that the snow thrower is not in contact with anything before turning it on. 3. Stay away from the discharge chute and impeller openings at all times. Keep face, hands, and feet away from concealed, moving, or rotating parts.
- Page 10 060-3999-2 | contact us: 1-866-523-5218 18. Do not overreach. Always keep proper footing and balance. 20. If the impeller does not rotate freely due to frozen ice, thaw the snow thrower thoroughly before attempting to use it. 21. Keep the impeller clear of debris.
-
Page 11: Other Safety Warnings
060-3999-2 | contact us: 1-866-523-5218 OTHER SAFETY WARNINGS 1. Verify that the snow thrower is secure while transporting. 2. Store the snow thrower in a dry that will prevent unauthorized use or damage. Keep out of the reach of children. -
Page 12: Double Insulation
060-3999-2 | contact us: 1-866-523-5218 DOUBLE INSULATION Double insulation is a concept in safety in electric power tools, which eliminates the need for the usual three wire grounded power cord. All exposed metal parts are isolated from the internal metal motor components with protecting insulation. - Page 13 060-3999-2 | contact us: 1-866-523-5218 1. Inspect the extension cord and the power cord on a regular basis. Look for deterioration, cuts, or cracks in the insulation. Inspect the connections for damage. Repair or replace the extension cord or the power cord if any damage is found.
-
Page 14: Assembling The Handle
060-3999-2 | contact us: 1-866-523-5218 ASSEMBLING THE HANDLE 1. Align the holes (4) on the middle handle (2) and the lower handle (3). Insert the bolts (5), and use the handle knobs (6) to tighten them. 2. Align the hole (7) on the middle handle (2) and the upper handle (1). Insert the cam locks (8) and tighten them with the handle knobs (9) provided. - Page 15 060-3999-2 | contact us: 1-866-523-5218 ASSEMBLING THE DISCHARGE CHUTE the posts (4) on either side click into the keyed holes (5).
-
Page 16: Installing The Chute Control Rod
060-3999-2 | contact us: 1-866-523-5218 INSTALLING THE CHUTE CONTROL ROD 1. Position the discharge chute (1) so that it faces forward. NOTE: Align the arrow (2) on the discharge chute with the arrow on the housing. 2. Align the holes (3) on the upper chute control rod (4) with the holes on the lower chute control rod (5). - Page 17 060-3999-2 | contact us: 1-866-523-5218...
-
Page 18: Powering On And Off
060-3999-2 | contact us: 1-866-523-5218 POWERING ON AND OFF 1. T 2. While pressing the safety switch button with one hand, use your other hand to simultaneouly pull the ON/OFF switch bar lever (2) toward you. Once the machine powers on, release the safety switch button and proceed with operation. - Page 19 060-3999-2 | contact us: 1-866-523-5218 USING THE CORD RETAINER This snow thrower is equipped with a cord retainer (1) in order to prevent the extension cord from disconnecting from the power cord while the snow thrower is in use. The cord retainer hangs from the cord guide bar.
-
Page 20: Adjusting The Discharge Chute And Chute Deflector
060-3999-2 | contact us: 1-866-523-5218 ADJUSTING THE DISCHARGE CHUTE AND CHUTE DEFLECTOR 1. To adjust the discharge chute, rotate the handle (1) on the chute control rod in the direction that you wish to direct the snow stream. -
Page 21: Operating Tips
060-3999-2 | contact us: 1-866-523-5218 OPERATING TIPS 1. Keep children and pets away from the operating area. 2. Keep the area to be cleared free of stones, toys, or other foreign objects that the impeller can throw. Such items may be covered by a snowfall and go unnoticed. If the snow thrower strikes an obstruction or a foreign object during operation, stop the snow thrower, unplug the extension cord, remove the obstruction, and inspect the snow thrower for damage. - Page 22 060-3999-2 | contact us: 1-866-523-5218 UTILIZING THE LED LIGHTS To utilize the LED lights (1) for night time snow removal, activate the LED light switch (2) . switch.
-
Page 23: Replacing The Scraper
060-3999-2 | contact us: 1-866-523-5218 REPLACING THE SCRAPER The scraper is located at the bottom of the impeller housing. 1. Ensure that the snow thrower is not plugged in. 2. Remove the screw (1) from each side plate that holds the scraper and 3 screws (2) from under the machine that secures the scraper to the machine. -
Page 24: Replacing The Drive Belt
060-3999-2 | contact us: 1-866-523-5218 REPLACING THE DRIVE BELT 1. Ensure that the snow thrower is not plugged in. 2. Remove the 5 screws (1) that secure the left side plate (2) to the frame of the snow thrower. -
Page 25: Replacing The Impeller
060-3999-2 | contact us: 1-866-523-5218 REPLACING THE IMPELLER 1. Remove the 5 screws (1) that secure the right side cover (2) to the frame of the snow thrower. 2. Remove the nut (3). 3. Remove the 5 screws (4) that secure the left side cover (5) to the frame of the snow thrower. - Page 26 060-3999-2 | contact us: 1-866-523-5218 STORAGE 1. Run the snow thrower for a few minutes in order to melt any snow that may be left on the snow thrower. 2. Wipe the snow thrower off with a dry cloth before storage. This will help prevent ice building up on the unit and parts freezing.
- Page 27 060-3999-2 | contact us: 1-866-523-5218 PROBLEM POSSIBLE CAUSE SOLUTION Then handle is not The bolts are not properly seated. Make sure the bolts are correctly installed through the in position. handle bars. Check to see if the hand knobs are tight.
- Page 28 060-3999-2 | contact us: 1-866-523-5218 Some of the following symbols may be used on this product. Please study them and learn their meaning. Proper interpretation of these symbols will allow you to operate the product better and more safely.
-
Page 29: Year Limited Warranty
060-3999-2 | contact us: 1-866-523-5218 2-YEAR LIMITED WARRANTY How to Obtain Service: Warranty service is available by calling the toll-free helpline, at 1-866-523-5218. For TWO YEARS from the date of purchase within The factory will not accept the return of a complete... - Page 30 Made in China. Imported by YardWorks Canada Toronto, Canada M4S 2B8...
Need help?
Do you have a question about the 060-3999-2 and is the answer not in the manual?
Questions and answers