Table of Contents
Advertisement
Quick Links
Advertisement
Table of Contents
Troubleshooting

Subscribe to Our Youtube Channel
Related Manuals for SAB Explorer PVR SC


Summary of Contents for SAB Explorer PVR SC
-
Page 2: Table Of Contents
Contents General Information ----------------------------------------------------------------------------------------- 3 Safety and Precaution ------------------------------------------------------------------------------ 3 Accessories -------------------------------------------------------------------------------------------- 5 Remote Control Unit ---------------------------------------------------------------------------------------- 6 System Connection ------------------------------------------------------------------------------------------ 7 Front Panel -------------------------------------------------------------------------------------------- 7 Rear Panel --------------------------------------------------------------------------------------------- 8 Connecting your System --------------------------------------------------------------------------- 9 Recommanded Antenna Connection ---------------------------------------------------------- 11 Time Setting ----------------------------------------------------------------------------------------- 13 Menu Structure ---------------------------------------------------------------------------------------------- 14 Menu Guide --------------------------------------------------------------------------------------------------- 15... -
Page 3: General Information
General Information Safety and Precautions Thank you for purchasing the digital satellite receiver. For your safety and proper operation, please take time reading this manual fully before installing and operating the receiver. We hope you will be able to take advantage of the numerous functions with the help of this manual. - Page 4 General Information Safety and Precautions ◈ ATTACHMENTS Do not use any attachments that are not recommended as these may cause hazard or damage to the STB. ◈ CONNECTION TO THE SATELLITE DISH LNB Disconnect the STB from the mains before connecting or disconnecting the cables from the satellite dish.
-
Page 5: Accessories
General Information Accessories Check the following accessories when you open the box User’s Manual 1 ea. RCU 1 ea RF Loopthrough cable 1 ea. Batteries 2 ea. The device, packaging material and batteries must never be disposed of with household. Please obtain appropriate information about regulations in your community, and dispose of all in accordance with regulations at the separate locations provided. -
Page 6: Remote Control Unit
Remote Control Unit STANDBY (Power) M (MUTE) Power On/Off, Standby Enable or disable audio Back (PREVIOUS) NUMERIC KEYS TV/SAT Return to the previous menu, Select channels by channel Receiver switches status or channel numbers or enter programming between TV and parameters. -
Page 7: System Connection
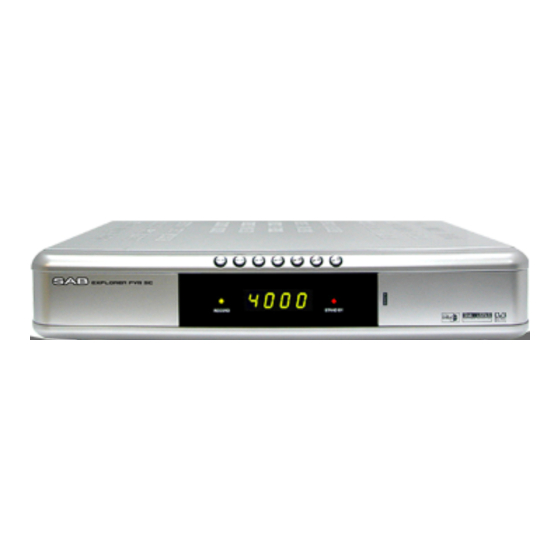
System Connection Front Panel ◈ 2 LED Display - Stand by LED : It shows Red LED when the power is off. - REC by LED : It shows GREEN LED when a program being recorded. ◈ Normal Display : It shows 4 digits of Channel number when the power is on. But it shows current time in Standby mode. -
Page 8: Rear Panel
System Connection Rear Panel ① ②③④⑤⑥ ⑦ ⑧ ⑨⑩ ⑪ ⑫ Please refer to the diagram above for all possible connections of your receiver Do not connect the unit to the mains socket until all other connections have been made and checked. 1) LNB1 IN : This port is to connect the coaxial cable from LNB of your Dish. -
Page 9: Connecting Your System
System Connection Connecting Your System ◈ TV Only There are two ways to connect the STB to your existing TV system. We recommend using one of the following cases for the best result : • Connect one end of RCA cable to the RCA jack on the back of the STB and the other end to a RCA jack on your TV. - Page 10 System Connection Connecting Your System ◈ TV with Motorized System (DiSEqC 1.2) There are two ways to connect the STB to your existing TV system. We recommend using one of the following cases for the best result • Connect one end of RCA cable to the RCA jack on the back of the STB and the other end to a RCA jack on your TV.
-
Page 11: Recommended Antenna Connection
System Connection Recommended Antenna Connection ◈ When you set the PVR to Loop Mode. 1. When a user has one antenna. Input a single source to Tuner A, and input the output signal from Tuner A to Tuner B using a splitter or loop through. 2. - Page 12 System Connection Recommended Antenna Connection ◈ When you set the PVR to Dual Mode. To provide Live and Timeshift services , and Recording service through Tuner A or Tuner B, input a signal source of the same attributes with the signal input to Tuner A to Tuner B.
-
Page 13: Time Setting
Setting Up Your System Time Setting Time Setting enables you to set your local time, manage time on the basis of your standards. When you initially power on, enter the Time Setting menu, and you set the local Time, your STB will provide all services based on the initial set time. In order to set an initial time, set date/month/year/hour/minute. -
Page 14: Menu Structure
Menu Structure Receive DB from PC Main Menu Service searching Main Menu Send DB to PC Download Software Receive DB from STB Factory Reset Send DB to STB Installation Menu Language Edit Channels Channel Manager Audio Language Edit Favorites Subtitle Language Timer List Recording Video Output... -
Page 15: Menu Guide
Menu Guide : Installation ◈ Service Searching Edit Place the cursor on the satellite which you want to edit and press the “Red” key to move satellite edit menu. 1) Tuner Select PVR has two tuner input. You can select either one 2) Ant Connect You can select antenna connection mode. - Page 16 Menu Guide : Installation ◈ Service Searching Edit 1) 22KHz In case you are using a Dual LNB or two antennas connected to a 22KHz tone switch box, make 22KHz tone switch Enable or Disable to select LNB or antenna. 2) DiSEqC DiSEqC must be used when using two or more antennas and LNBs.
- Page 17 Menu Guide : Installation ◈ Service Searching Edit * When selecting “MOTOR” Yellow color key(in DiSEqC menu) • DiSEqC 1.2 Motor : You can move the motor to the left or right by pressing the ◀▶ keys continuously, but when you stop pressing the ◀▶ keys, the motor will be stopped.
- Page 18 Menu Guide : Installation ◈ Service Searching Rename Select the satellite name you would like to rename and press the “OK” key. By using the “BACK” buttons, Move to be previous menu. Press “BLUE” key to Save. Scan Select the satellite you want to scan by using the ▲▼ keys . Press the “OK”...
- Page 19 Menu Guide : Installation ◈ Service Searching Transponder 1) Edit • Press the red key to change the parameter values of the selected transponder. • Place the cursor on the sub menu by using the ▲▼ keys and press the ◀ ▶ keys or “...
- Page 20 Menu Guide : Installation ◈ Service Searching Transponder 3) Scan If you cannot find it from the transponder list, you should insert all the setting parameters. If you want to have all other transponder information, select network “On”. You can also search a special channel of the specified transponder by specifying Video PID (Packet Identifier), Audio PID and PCR PID.
- Page 21 Menu Guide : Installation ◈ Download Software To maintain the STB up-to-date, you can upgrade the DB of the STB via other STB and personal computer. New versions of DB may include latest information on Satellites and transponders. 1.STB Upgrade You can select “On”...
-
Page 22: Channel Manager
Menu Guide : Channel Manager ◈ Edit Channel You can select, lock, delete, & move channel’s position in the channel list. Lock • You can select the channels that you want to lock or unlock by using the ▲▼ keys. And press the Red key to confirm your selection. - Page 23 Menu Guide : Channel Manager ◈ Edit Favorite Sorting Press the “RED” key and the following “Program Sorting” menu screen will be displayed. You can rearrange the lists by satellite, FTA / scramble, or alphabetically. Register Before you can use the “Favorite Channels List”, you must first register your favorite channels into the favorite list.
-
Page 24: Pvr Manager
Menu Guide : PVR Manager ◈ Timer list The Timer list function enables you to reserve a program recorded and view it using Reserve key. You can seek the previously reserved channels. Use the ▲▼ key to place the cursor on the desired location and press “OK” key to select. - Page 25 Menu Guide : PVR Manager ◈ Recording You can record using REC(●) key on Live screen or “RED” key on Recording menu screen . The start time of recording is the current time, and the end time is automatically entered on Setting the duration time. You can set the duration time using “OK”...
- Page 26 Menu Guide : PVR Manager ◈ Time Shift You can activate the time shift function by using “OK” key. select “ON” or “OFF” by using the “◀▶” key.,and Press “OK” key to confirm. ◈ Skip Time You can activate the skip time function by using “OK”...
-
Page 27: System Setup
Menu Guide : System Setup ◈ Language Settings To select the desired language of the Menu & Audio or Subtitle. Place the cursor on the sub menu by pressing the “▲,▼” keys and press the “◀,▶” keys to change language. The Language of Menu &... - Page 28 Menu Guide : System Setup ◈ Modulator Settings 1. RF Channel Select or change the RF channel number when the STB is connected to the TV by the RF jack. (Ch21~Ch69) Default : Ch38 2. RF Type You can select the RF type by using the ◀ ▶ keys out of PAL B/G, I D/K. ◈...
- Page 29 Menu Guide : System Setup ◈ Parental Control 1. System Lock To lock the receiver, select “System Lock” in the “Parental Control” menu and change it to the “On” mode by using the “◀,▶” keys. If the receiver is locked, whenever you try to start the STB, the “Password” screen will appear and you will be asked to enter your Password.
- Page 30 Menu Guide : System Setup ◈ System Information Place the cursor on this sub menu and press the “OK” key. It will show you the information of S/W & H/W version and provider.
-
Page 31: Common Interface
Menu Guide : Common Interface You can enjoy not only scrambled services using the Conditional Access Modules (CAM) with smart card, but also Free-To-Air services. This receiver is equipped with a twin-slot Common Interface under DVB specification, accepting two different types of PCMCIA modules. Plug in the appropriate CI module together with a valid Smart Card. - Page 32 Menu Guide : Common Interface You will see the next screen when you select “Common Interface” from the Menu. For example ; Slot 1 : Viaccess CAM is in the socket 1 and initialized Slot 2 : CAM is in the socket 2 and your receiver is initializing the CAM. The information available on the CI menu depends on the CAM provider.
-
Page 33: Utility
Menu Guide : Utility ◈ Captured Image You can view the captured images, and edit the files on this menu. The images can be captured by pressing Capture ( ) key while watching . 1. View Image Press “▲,▼ “ keys to choose the files, and OK key to view them. - Page 34 Menu Guide : Utility ◈ Tetris OK : Drop ▲ : Rotate ◀ : Move left ▶ : Move Right ◈ USB (Universal Serial Bus) USB port hidden under a front flip enables you to transfer data the AV files, and captured image files from a built-in hard disc in STB to PC, and conversely from PC to STB.
-
Page 35: Functions Guide
Functions Guide : Program Guide Now / Next / Schedule / Information (EPG) The information is only available from the transponder of the channel you are watching. To see the titles of current & next program, press the Red & Green key. You can see the program information that will be played for a week by pressing the Yellow key. -
Page 36: Timeshift
Functions Guide : Timeshift In the Timeshift mode, recording and playback can be activated simultaneously. You can play back a Recorded program from where you missed. 1.To enable Timeshift, follow the steps below. Main Menu → PVR Manager → Timeshift →... -
Page 37: Repeat
Functions Guide : Repeat During the play, Institution period of file (A-B) play repeatedly. There are three ways to activate repeat function 1) None : To disable repeat function. 2) All : repeat all of one file. 3) A-B : repeat the section between A and B. -
Page 38: List Menu
Functions Guide : List Menu This menu helps you to easily select the channel that you want to watch or edit. To display the Channel List, press the “List” or “OK” key while you are viewing a program and you will see all channels that you saved into the channel list. To watch a specific channel, first select it by pressing the “▲,▼”... -
Page 39: Function Keys
Functions Guide : Function Keys Use the following color keys to display various service lists and the symbol of color key will be marked right above of the channel list: • Red key : To display only Free to Air service list •... -
Page 40: Specification
Specification : Technical Specification Conditional Access Interface PCMCIA 2 Slots Common Interface Front End Input Frequency 950~2150MHz Input Impedance 75Ω Connector 2xF-Type RF Input Level -65~-25dBm LNB Control DiSEqC 1.0 & 1.2, USALS LNB Power 13V/18V (Max500mA with short circuit protection) LNB Tone Switch 22KHz Wave Form... -
Page 41: Technical Specification
Specification : Technical Specification Connectors TV SCART CVBS, RGB,S-VIDEO, Audio L/R VCR SCART CVBS, S-VIDEO,Audio L/R Audio Output 2 x RCA/Cinch Composite Video Output 1 x RCA/Cinch S/PDIF 1 x optic con. (Dolby Bitstream Out Available) USB 2.0 Compatible (Device/B-type) RF Modulator UHF I/O IEC male/female CH21~CH69(PAL B/G/I/D/K) - Page 42 Specification : Technical Specification Main CPU STi5514/180 MHz Front Control MPU AT89S52/11.0592 MHz Memory Flash Memory 4 MB Graphics (MPEG) 8 MB Memory System Memory 8 MB Storage Removable HDD Max. 120GB Recording Time 40 Hr/80 GB (Changeable depending on bit rate) Seagate (ST380012ACE/, 80GB) is the most recommendable to optimize the receiver’s function.
-
Page 43: Trouble Shooting Guide
Trouble Shooting Guide : Trouble Shooting If you suspect there is a fault with your receiver, please check the following trouble shooting guide before calling an authorized service agent. Warning! Under no circumstances attempt to repair the receiver yourself. Tampering with the receiver may result in fatal electric shock and will invalidate your warranty. -
Page 44: Trouble Shooting
Trouble Shooting Guide : Trouble Shooting Symptom Possible cause Poor Picture Quality • The level of Signal strength is low. Receiver not responding to • RCU batteries are dead or inserted remote control unit incorrectly. • The RCU is pointing toward wrong direction. Receiver is on but no picture or •... - Page 45 00A6-NEE-00...
Need help?
Do you have a question about the Explorer PVR SC and is the answer not in the manual?
Questions and answers