Table of Contents
Advertisement
Quick Links
Manual & Safety
Table of Contents
1
1
1
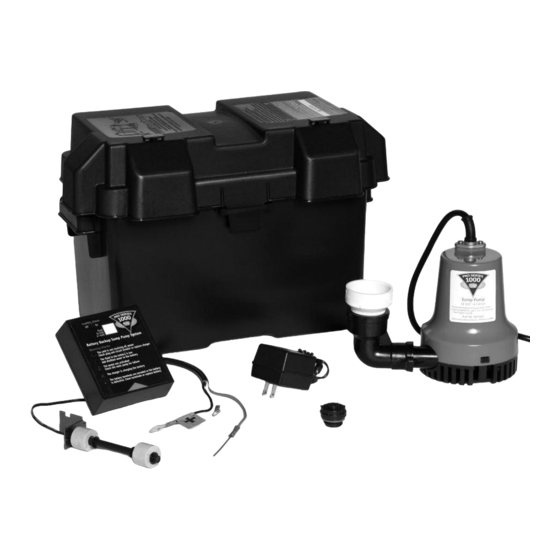
Items included in system
2
Additional items needed
2
Replacement parts list
2
2
Installation options
3
4
5
Direct discharge for narrow sumps
6
for narrow sumps
7
8
9
Positioning the float switch
9
9
9
9
9
Instruction
Warnings
Lights and Alarms
an emergency
10
Power alarm
10
Fluid low alarm
10
10,11
Pump activated alarm
11
Replacing the pump
11,12
System operating
12
Cleaning battery terminals
12,13
13
Testing the System
Testing the pump
14
14
Technical support
14
14
Warranty
15
Other Products
15
Battery Backup
Sump Pump
System
IMPORTANT: Even if you have the Pro Series 1000
backup sump pump system installed by someone
else, you must read and follow the safety
information contained in this manual. Failure to
do so could result in property damage, serious
injury, or death.
Advertisement
Table of Contents

Subscribe to Our Youtube Channel
Related Manuals for Glentronics PHCC-1000 Pro Series


Summary of Contents for Glentronics PHCC-1000 Pro Series
-
Page 1: Table Of Contents
Instruction Manual & Safety Warnings Table of Contents Important Safety Warnings and Understanding the Warning Instructions Lights and Alarms Electrical precautions Silencing the alarm during Battery preparation an emergency Battery precautions Power alarm Fluid low alarm Introduction Refilling the battery 10,11 Items included in system Pump activated alarm... -
Page 2: Important Safety Warnings And Instructions
You will need to refer to it before attempting any caps tight and level. installation or maintenance. ALWAYS keep these When service is required, contact Glentronics POSITIVE POST HAS NEGATIVE POST HAS instructions with the unit so that they will be... -
Page 3: Introduction
Float Switch The internal construction of some wet cell batteries may not be compatible with this system. Glentronics cannot guarantee the • A union with hose clamps or a “Y” connector Use of a Pro Series Call 800-991-0466, option #3 to order parts. -
Page 4: Pump & Pipe
Pump & Pipe NORMAL SUMP PIT INSTALLATIONS Installation Instructions FLOOR JOIST FLOOR JOIST There are two basic methods that can be used to SLOPE install the pump, a direct discharge to the PIPE DOWN outside of the building, or a connection to an existing discharge pipe. - Page 5 of the sump. A brick may be placed under the the installation, install a check valve in place Installation Instructions pump if there are rocks or other debris on the of the union. Make sure it is installed with sump floor that may clog the pump. the arrow pointing up, or it will not prevent INSTALLATION A: the backflow of water.
-
Page 6: Connection To Existing Discharge
Pump & Pipe Installation Instructions INSTALLATION B: CONNECTION TO AN EXISTING DISCHARGE PIPE (Diagram B) Depending on your installation requirements, PVC pipe lengths will vary. Cut the pipes and assemble them as shown in photo #7. Do not cement them together until you are sure they are cut to the correct lengths. - Page 7 Pump & Pipe attached, simply press the rest of the pump the outside of the building, no check valve is arrow pointing up or it will not prevent the onto the mounted strainer. required. However, a check valve will prevent backflow of water.
-
Page 8: Connection To Existing Discharge
Pump & Pipe the main AC pump with two (2) stainless steel 5. Install a check valve on the top of the PVC pipe with the “Y” extension facing down hose clamps. Position the bracket so the pipe attached to the Pro Series pump. Make toward the backup pump. -
Page 9: Battery Instructions
Battery Instructions normal. After the battery has been filled, screw DANGER / POISON the six (6) caps securely on the top of the battery. Contains sulfuric acid. Wear eye and clothing The Pro Series 1000 Standby Battery has been protection. If battery acid contacts skin or designed to run this system for a minimum of 6 CAUTION clothing, wash immediately with soap and... -
Page 10: Control Unit Connections
have all the cells filled equally or the 2. Positioning the dual float switch: The float Diagram F battery will not operate properly. The acid switch will activate the pump when the water OUTLET should reach a level about ¼” below the cap raises either float, and it will remain running WIRE SURGE... -
Page 11: Connecting The Battery
Pro Series part number 1015003. Contact warning lights that pinpoint potential problems. Glentronics at 800-991-0466, option #3 for parts. In addition, an alarm sounds to alert you to the problem. In some cases the lights and alarm will The fluid in the battery is low... -
Page 12: Refilling The Battery
REFER TO THE PHOTOS BELOW content may be used. Well water is not working, the float switch may be stuck, or it 4. Remove the fluid sensor from the top of the recommended. NEVER ADD MORE ACID. Fill battery. Unscrew the wing nuts and remove may be too small to handle the inflow of water. - Page 13 This green light replacement (receipt required). If the battery contacts eyes, flush with water for 15 should always be good, contact Glentronics’ service minutes and get prompt medical attention. flashing. It will department for further instructions. Review the safety instructions on page 1.
-
Page 14: Replacing The Battery
9. If any of the alarms are sounding, press the REPLACING THE BATTERY Replace the battery cap in the cell that is 2nd from the POSITIVE post with the cap from the WHITE button on the front of the control old battery. -
Page 15: Testing The Float Switch
You can receive technical support, or order parts hour of continuous pumping power left. Battery will the pump. The control unit will run the pump by calling Glentronics, Inc. at 800-991-0466, recharge when power is restored for approximately 25 seconds so it can empty all option #3, or by visiting the Pro Series website Battery is damaged or old . -
Page 16: Limited Warranty
The defective product must be returned directly to the factory, postage prepaid with the original bill there is an AC power loss or a pump problem. The of sale or receipt to the address listed below. Glentronics, Inc., at its option, will either repair or control unit has a terminal which can be connected to replace the product and return it postage prepaid.
Need help?
Do you have a question about the PHCC-1000 Pro Series and is the answer not in the manual?
Questions and answers