Table of Contents
Advertisement
Battery Backup
Sump Pump
System
Instruction Manual
& Safety Warnings
Table of Contents
Instructions
1
1
1
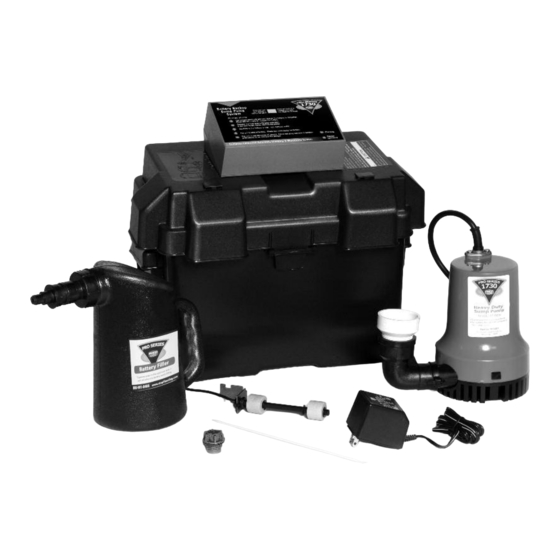
Items Included in System
2
Additional Items Needed
2
2
Replacement Parts List
2
Installation Options
3
4
5
Direct Discharge for Narrow Sumps
6
Connection to Existing Discharge for
Narrow Sumps
7
Preparation of the Battery
8
Positioning the Float Switch
9
9
9
9
9
IMPORTANT: Even if you have the Pro Series 1730 Backup Sump
Pump System installed by someone else, you must read and follow
the safety information contained in this manual. Failure to do so
could result in property damage, serious injury, or death.
Lights and Alarms
10
10
10,11
11,12
12
12,13
13
13
13
14
14
Testing the System
14
14
Technical Support
14
14
14
15
15
Advertisement
Table of Contents

Related Manuals for Glentronics 1730 pro series


Summary of Contents for Glentronics 1730 pro series
-
Page 1: Table Of Contents
Battery Backup Sump Pump Instruction Manual System & Safety Warnings Table of Contents Important Safety Warnings and Understanding the Warning Instructions Lights and Alarms Electrical Precautions Silencing the Alarm Battery Preparation During an Emergency Battery Precautions Battery Alarm Cleaning Battery Terminals 10,11 Introduction Replacing the Battery... -
Page 2: Important Safety Warnings And
BATTERY PRECAUTIONS contains important SAFETY WARNINGS and • DO NOT disassemble the control unit. OPERATING INSTRUCTIONS for the PHCC Pro DANGER • DO protect the electrical cord from sharp Series 1730 battery backup sump pump system. -
Page 3: Introduction
Introduction Control Unit The PHCC Pro Series 1730 backup sump pump system is battery-operated. It is designed as an emergency backup system to support your main AC sump pump, and it will automatically begin Battery pumping any time the float switch is activated Wires by rising water. -
Page 4: Pump & Pipe
Pump & Pipe NORMAL SUMP PIT Installation Instructions INSTALLATIONS FLOOR JOIST FLOOR There are two basic methods that can be used to JOIST install the pump, a direct discharge to the SLOPE outside of the building, or a connection to an PIPE DOWN existing discharge pipe. - Page 5 Pump & Pipe placed on the floor of the sump. A brick may and horizontal runs), install a check valve in be placed under the pump if there are rocks place of the union. Make sure it is installed Installation Instructions or other debris on the sump floor that may with the arrow pointing up, or it will not clog the pump.
- Page 6 Pump & Pipe water line and below the check valve. Drill the hole at a 45º angle toward the bottom Installation Instructions of the sump to avoid splashing water outside the sump pit. If a 1/8” hole is not INSTALLATION B: drilled in the pipe above the pump, an air CONNECTION TO AN EXISTING DISCHARGE PIPE lock may prevent the pump from operating.
- Page 7 Pump & Pipe the “L” bracket. (c) Once the strainer is the outside of the building, no check valve is the arrow pointing up or it will not prevent attached, simply press the rest of the pump required. However, a check valve will prevent the backflow of water.
-
Page 8: Connection To Existing Discharge
Pump & Pipe the main AC pump with two (2) stainless steel 5. Install a check valve on the top of the PVC the top of the “Y” assembly to the discharge hose clamps. Position the bracket so the pipe attached to the Pro Series pump. Make pipe with the “Y”... -
Page 9: Battery Instructions
Battery Instructions 1.265 specific gravity battery acid to fill the battery. It is available where you purchased the battery. A new Pro Series 2200 Standby Battery will run this system for a minimum of 7.5 hours PRO SERIES BATTERIES COME IN TWO continuously. -
Page 10: Control Unit Connections
2. Place the battery box on the floor. Place the A newly filled battery will sometimes require 2. Connecting the pump: Remove the security dry (unfilled) battery into the battery box. additional acid after about 20 minutes. tag from the pump and plug the pump wires Remove the two battery caps by lifting them up examine the fill level, and add additional acid if into the pump connector on the back of the... -
Page 11: Connecting The Battery
4. Connecting the battery: (a) Remove the wing SILENCING THE ALARM DURING AN breaker has blown, or the outlet is bad. running and the power is out, you will have a nuts from the battery terminals. Remove the EMERGENCY When the problem is corrected, the battery minimum of one-half (1/2) hour of continuous security tag from the battery cables. -
Page 12: Replacing The Battery
REFER TO THE PHOTOS AT LEFT REPLACING THE BATTERY DANGER 1. Unplug the charger from the wall outlet. Risk of electrical shock or battery explosion, 2. Remove the cover of the battery box by which can cause serious injury or death. Wear pushing in the tabs on the front and back, eye protection. -
Page 13: Fuse Alarm
union or check valve and remove the pump oxygen gas that may have been emitted from and rigid PVC pipe section from the sump pit. the battery. (c) Clear any debris from the strainer, and PUMP CH RGER 4. Then unscrew the wing nuts and remove the then reconnect the pump to the discharge battery cables and the fluid sensor from the pipe. -
Page 14: Pump Alarm
or it may be too small to handle the inflow of water. • Make sure the check valve is working and installed correctly • Make sure the discharge pipe is not clogged or frozen • If the power was out, the backup pump was POSITIVE NEGATIVE automatically activated. -
Page 15: Charging
1. Lift the float switch as described at left. To silence an alarm, press the Gray button for 2. Remove all debris from the bottom of the pit. Model # PHCC -1730 Serial # ___________________ Purchase Date_________________________ one (1) second. -
Page 16: Troubleshooting Guide
Try another outlet, replace the fuse, or reset the circuit breaker upgrading to one of the pumps in the PHCC Pro Series line. The power cord is unplugged from the wall ....
Need help?
Do you have a question about the 1730 pro series and is the answer not in the manual?
Questions and answers