Table of Contents
Advertisement
Advertisement
Table of Contents

Subscribe to Our Youtube Channel
Related Manuals for Accu-Scope 3000-LED series


Summary of Contents for Accu-Scope 3000-LED series
- Page 1 MANUAL 3000-LED MICROSCOPE SERIES Distributed By:...
-
Page 2: Table Of Contents
......................11 FIELD DIAPHRAGM ....................11 APERTURE DIAPHRAGM ......................12 OIL OBJECTIVE ........................... 13 FILTER FUSE REPLACEMENT ....................13 LED BULB REPLACEMENT ..................14 TECHNICAL SPECIFICATIONS..................16 TROUBLESHOOTING ....................17-19 MAINTENANCE........................20 SERVICE ..........................20 WARRANTY ........................20 ACCU-SCOPE ®... -
Page 3: Safety Notes
4. Store the instrument in a cool, dry environment. Cover the microscope with the dust cover when not in use. 5. ACCU-SCOPE microscopes are precision instruments which require periodic preventative ®... -
Page 4: Introduction
® ® microscopes are engineered and manufactured to the highest quality standards. Your microscope will last a lifetime if used and maintained properly. ACCU-SCOPE microscopes are carefully assembled, ® inspected and tested by our staff of trained technicians in our New York facility. Careful quality control procedures ensure each microscope is of the highest quality prior to shipment. -
Page 5: Components Diagram
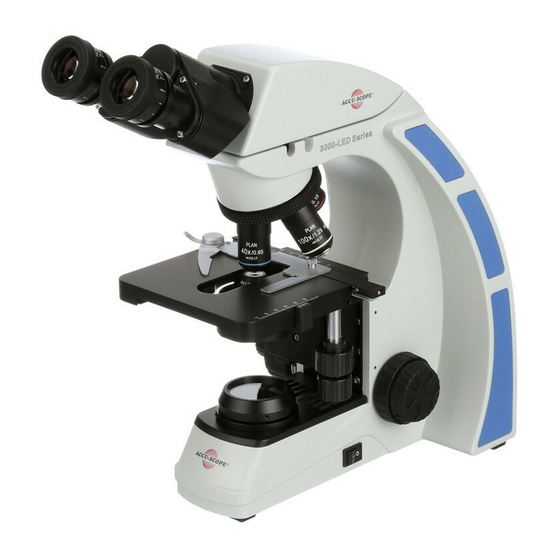
3000-LED MICROSCOPE SERIES COMPONENTS DIAGRAM Lock Screw Y-Axis Adjustment Knob Objective Nosepiece Coarse Focusing Knob Iris Diaphragm Adjustment Control Fine Focusing Knob X-axis Power Adjustment Switch Knob ACCU-SCOPE ®... -
Page 6: Assembly Diagram & Procedure
Should you need to disassemble/assemble your microscope in the future, please follow the instructions outlined below. When assembling the microscope, make sure that all parts are free of dust and dirt, and avoid scratching any parts or touching glass surfaces. ③ Eyepiece ② Objective ① ④ Condenser Power Cord ACCU-SCOPE ®... - Page 7 Rotate the coarse focusing knob to lower the Fig. 2 stage to a suitable position (see Fig. 2). Install the objectives into the objective nosepiece ② from the lowest magnification to the highest in a clockwise direction from the rear. ACCU-SCOPE ®...
- Page 8 90 ~ 240v when used with the Optional appropriate line cord. Cord Hanger An optional cord hanger can be installed on your microscope for simple and easy storage. (see Photos 1 & 2) Photo 2 Optional Cord Hanger Shown With Cord ACCU-SCOPE ®...
-
Page 9: Illumination
③ Rotate the X and Y-axis knobs ③ to move the slide into position. (Fig. 6) Fig. 6 ACCU-SCOPE ®... -
Page 10: Focusing
This allows the user to Fig. 9 adjust the coarse control tension to their individual preference. (Fig. 9). ACCU-SCOPE ®... -
Page 11: Field Diaphragm
For optimal viewing conditions set the condenser aperture diaphragm lever to match the magnification of the objective in the optical path (Fig. 11). Fig. 11 ACCU-SCOPE ®... -
Page 12: Oil Objective
(40xR) and deforming its optical performance, prevent dust and dirt from accumulating on the lens of the objective and degrading its optical performance, and will keep the slide clean to work with. ACCU-SCOPE ®... -
Page 13: Filter
Screw off the fuse from the fuse base with a Phillip’s head type screwdriver. Install a new fuse and screw it on the fuse base (see Fig. 14). ② Specification of the fuse: 250V, 3.15A. ① CAT #00-3277-3A Fig. 14 ACCU-SCOPE ®... -
Page 14: Led Bulb Replacement
Gently place the microscope on its arm as shown in Figure 15. Figure 15 Using a Philips head screwdriver, remove the 4 screws to release the base plate (Figure 16). Figure 16 Disconnect the make/break connector (Figure 17). Figure 17 ACCU-SCOPE ®... - Page 15 Secure the base plate with the 4 Philips screws (Figure 21). Figure 19 Figure 21 NOTE: With the new bulb installed, the condenser may need to be re-centered. To adjust the condenser centration, please follow the Assembly Figure 20 instructions for the Condenser on page 7. ACCU-SCOPE ®...
-
Page 16: Technical Specifications
Magnification market Type Objective aperture distance distance of the (color ring) (N.A.) (mm) (mm) cover slip 0.10 ∞ 0.17 Infinity 0.25 ∞ 0.17 Yellow Plan ∞ achromatic 40X(S) 0.65 0.17 Light Blue objective ∞ 100X(S) oil 1.25 0.17 White ACCU-SCOPE ®... -
Page 17: Troubleshooting
No immersion oil used Use immersion oil with100xR objective Air bubbles in immersion oil Remove bubbles Condenser aperture is closed Open or close properly or open too much Condenser is positioned too Position the condenser slightly lower than the upper limit ACCU-SCOPE ®... - Page 18 Turn the slide over so the slide when changed from low cover glass faces up power objective Cover glass is to thick Use a 0.17mm cover glass Diopter adjustment is not set Readjust the diopter settings properly as outlined in section 4.3 ACCU-SCOPE ®...
- Page 19 Slippage of focus when using Tension adjustment is set too Increase the tension on the the coarse focusing knob focusing knobs Fine focus is ineffective Tension adjustment is set too Loosen the tension on the high focusing knobs ACCU-SCOPE ®...
-
Page 20: Maintenance
SCOPE at (631) 864-1000. This warranty is limited to the continental United States of America. All items returned for warranty repair must be sent freight prepaid and insured to ACCU-SCOPE INC., 73 Mall Drive, Commack, NY 11725 – USA. All warranty repairs will be returned freight prepaid to any destination within the continental United States of America, for all foreign warranty repairs return freight charges are the responsibility of the individual/company who returned the merchandise for repair.
Need help?
Do you have a question about the 3000-LED series and is the answer not in the manual?
Questions and answers
The camera is on & the LCD monitor is on but I do not have any image on the LCD screen
There is no specific reason given in the context for why there is no image on the LCD screen of the Accu-Scope 3000-LED series camera. Possible causes could include improper camera connection, power issues, or incorrect settings, but these are not detailed in the provided information.
This answer is automatically generated