Abus WIRELESS ALARM SYSTEM Installation Instructions Manual
Wireless alarm system
Hide thumbs
Also See for WIRELESS ALARM SYSTEM:
- User manual (14 pages) ,
- Operating instructions manual (56 pages)
Table of Contents
Advertisement
Quick Links
Download this manual
See also:
User Manual
ABUS WIRELESS ALARM SYSTEM
INSTALLATION INSTRUCTION
These installation instructions are an important product accessory. They contain important installation and operation
information. Bear this in mind if you pass the product on to others.
Store these installation instructions in a safe place for future reference.
For a list of contents with page numbers, see page 3.
For brief instructions of starting up the ABUS wireless alarm package, see page 10-91.
Advertisement
Table of Contents

Related Manuals for Abus WIRELESS ALARM SYSTEM


Summary of Contents for Abus WIRELESS ALARM SYSTEM
-
Page 1: Installation Instruction
Bear this in mind if you pass the product on to others. Store these installation instructions in a safe place for future reference. For a list of contents with page numbers, see page 3. For brief instructions of starting up the ABUS wireless alarm package, see page 10-91. - Page 2 ABUS WIRELESS ALARM SYSTEM These installation instructions are published by ABUS Security-Center GmbH & Co. KG, Linker Kreuthweg 5, D-86444 Affing/Mühlhausen. All rights including translation reserved. Reproductions of all kinds – e.g. photocopy, microfilm, or storage in computer systems – require the express written permission of the publisher.
-
Page 3: Table Of Contents
5.4 How do I adjust the contrast of the LCD display? ........................5-17 5.5 How do I connect the other contacts in the ABUS wireless alarm system? ................5-18 5.5.1 Connecting a wired sounder ..............................5-18 ... - Page 4 10.1.3 Wireless motion detector ..............................10-91 10.1.4 Wireless smoke detector ..............................10-91 10.2 Training the detectors for the ABUS wireless alarm system ....................10-92 10.2.1 Installer menu of the ABUS wireless alarm system ......................10-92 10.2.2 Allocate detectors ................................10-92 ...
- Page 5 Chapter 11 Example of an installation plan ............................11-96 Appendix A: Event Log Messages ..............................11-98...
-
Page 6: Chapter 1 Usage In Accordance With Regulations
Chapter 1 Usage in accordance with regulations The ABUS wireless alarm system is used for protecting flats and homes and small to medium business objects. If the wireless alarm system and its accessories are installed properly, it alerts you in the case of intrusion, warns you about fires, and calls for help in the event of an emergency. -
Page 7: Chapter 3 Introduction To The Abus Wireless Alarm System
Chapter 3 Introduction to the ABUS wireless alarm system Congratulations – you made the right choice! The ABUS wireless alarm system offers you professional technology and first-class quality of the specialist for domestic security, packed in a modern, attractive design, and gives you a great feeling of safety and security day after day. -
Page 8: What Is The Abus Wireless Alarm System
The ABUS wireless alarm system keeps you in touch. You can use the integrated microphone and loudspeaker to speak by telephone into the room and also to listen in to what is happening in it. For a control call, you just dial into the ABUS wireless alarm system. - Page 9 The following graphic gives you an overview of further function properties of your ABUS wireless alarm system:...
-
Page 10: How Can The Abus Wireless Alarm System Be Extended
3.5 How can the ABUS wireless alarm system be extended? The ABUS wireless alarm system is a modular, extendable security system. The following graphic shows how it can be extended: 3-10... -
Page 11: Ce Manufacturer's Declaration
Security-Center GmbH & Co. KG Linker Kreuthweg 5 86444 Mühlhausen (Germany) erklären hiermit, dass das Produkt / herewith declares that the product Typ / Type: ABUS Funkalarmanlage auch benannt / also named: RWABUV868xxA* (*xx=country code) Artikel-Nr. / Article No.: FU9010 konform ist mit den Anforderungen und einschlägigen Bestimmungen der... -
Page 12: Chapter 4 Initial Considerations
Chapter 4 Initial considerations Before starting to install your new ABUS wireless alarm system, please take the time to consider the following. You will find helpful tips for planning your system on the accompanying installation DVD. If you cannot find answers to all your questions, please contact your specialist dealer, who will be pleased to help you. -
Page 13: What Kinds Of Security Are There
Smoke detectors save lives! You operate the wireless alarm system either with the remote control provided, a wireless control panel, or a wireless key switch. The system can be controlled directly from the ABUS wireless alarm system. The system is also programmed on this keypad. -
Page 14: What Wireless Detectors Do I Need
Use a wireless operating panel here. Note that the ABUS wireless alarm system must be installed at a minimum distance of 1m to ceilings and floors to guarantee good radio communication. -
Page 15: Chapter 5 Installing The Abus Wireless Alarm System
How do I install the power and telephone connections? • How do I adjust the contrast of the LCD display? • How do I connect the other contacts in the ABUS wireless alarm system? • How are the standby batteries used? •... -
Page 16: How Do I Install The Abus Wireless Alarm System
5.2 How do I install the ABUS wireless alarm system? The ABUS wireless alarm system is mounted on the wall in three steps. You need a flat screwdriver to open the casing. A battery- powered screwdriver is best suited for drilling the holes for the fixing screws. You can then use this screwdriver to screw the fixing screws into the wall. -
Page 17: Fixing The Faceplate
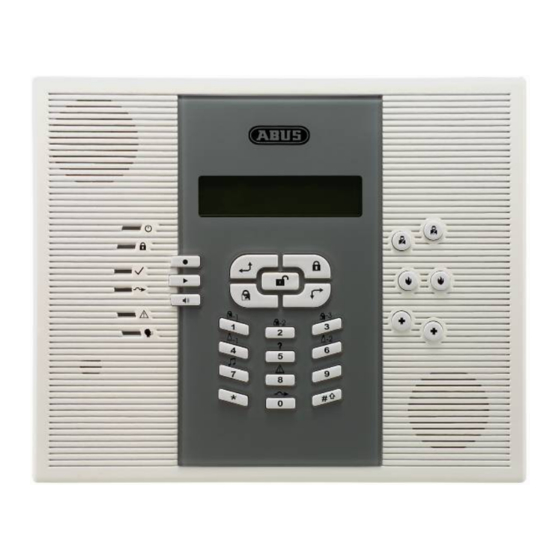
To make this setting, turn the LCD light dimmer (see number 8 on page 5-14: What is what inside the ABUS wireless alarm system?) carefully with a small flat screwdriver until you have set the right brightness. -
Page 18: How Do I Connect The Other Contacts In The Abus Wireless Alarm System
If a sounder tamper contact is fitted, connect the tamper contact of your (wired) sounder with the tamper input on the PC board of the ABUS wireless alarm system (Bell TMP / COM). This line is protected from tampering by a 2.2 kΩ resistor. This should be connected in series to the contact inside the sounder housing. -
Page 19: Connecting A Device Ground
5.5.5 Connecting a wired zone The ABUS wireless alarm system has a wired zone – Zone 33 (Z33), which can be used, for example, to connect a key switch or a panic emergency call. Connect this zone using twisted-pair cables or a 4-core cable. The following figure shows the different zone connection types –... -
Page 20: How Are The Standby Batteries Used
5.6 How are the standby batteries used? The ABUS alarm system is equipped with 6 standby batteries that maintain operation during a power failure. There are two types of battery: Rechargeable: Size AA, 1.2 V DC cells Not rechargeable: Size AA, 1.5 V DC alkaline IMPORTANT NOTE: The batteries supplied by Security-Center are rechargeable Nickel Cadmium cells with 1.2 V 800m AAA batteries. -
Page 21: What Are The Effects Of The Different Jumper Settings
5.7 What are the effects of the different jumper settings? The PC board of the ABUS wireless alarm system is fitted with internal jumpers. Configure the jumpers according to the function required as shown in this table: Jumpers on the... -
Page 22: Chapter 6 Programming The Abus Wireless Alarm System
Chapter 7 Settings in installer menu This chapter describes the options and features of the installer menu of your ABUS wireless alarm system. The following is an overview of the main menu options according to their sequence in the installer menu:... -
Page 23: System
System Under System, you make settings that affect the entire system. This is an overview of the menu options according to their sequence in the System menu: Timers, page 7-23 Control, page 7-25 Receiver, page 7-31 Clock, page 7-32 Labels, page 7-33 Tamper Sound, page 7-35 Default jumper, page 7-36 Service Information, page 7-36... -
Page 24: Timers
Timers: Quick-Key Parameter Default Range Exit/Entry delay 2 Exit and entry delay times of Group 2. Make these settings as for Group 1. Entry delay 2 45 seconds 1-255 seconds Entry delay time for Group 2. Exit delay 2 45 seconds 1-255 seconds Exit delay time for Group 2. -
Page 25: System Control
7.2.2 System Control Under System Control, you make settings that control specific functions of the complete system. NOTE: Under this menu item, it is important that you press the lozenge button before exiting so that your data is saved. If you exit the menu by pressing , your settings are lost. - Page 26 System Control: Quick-Key Parameter Default Range Bell Squawk YES/NO YES: The following signals are emitted by the external sounder to acknowledge whether you have successfully activated/deactivated the system: • One tone means that the system is activated. • Two tones mean that the system is deactivated. •...
- Page 27 YES/NO Refers to Jamming Time, which is described on page 7-32. YES: If the defined jamming time is reached, the ABUS wireless alarm system activates the sounders. (See Jamming Trouble, page 7-32.) Jamming does not trigger an audible alarm. Technician Tamper...
- Page 28 System Control: Quick-Key Parameter Default Range YES/NO Arm Pre-Warning YES: For the system, or every area for which an automatic activation function was programmed, a warning signal of 255 seconds is generated on the operating panels and the alarm system prior to activation. During this countdown, you can enter a valid user code to delay automatic activation of the system/area by 45 minutes.
- Page 29 System Control: Quick-Key Parameter Default Range IMQ Install YES/NO YES: If a zone is open when the system is activated, the system is activated but an alarm is generated when the exit delay time expires. Open zones are automatically omitted following expiry of the exit delay time. Grand Master YES/NO Authority/Partition...
- Page 30 YES/NO YES: Select this setting if an external sounder is connected to the wireless alarm system. The ABUS wireless alarm system monitors the (+) (-) connections as well as BELL TMP and COM and reports faults, events, alarms and reports. To avoid a fault in the signalling device if no sounder is connected, insert a 2.2 KΩ...
-
Page 31: Receiver
7.2.3 Receiver Under Receiver, you can make settings that control the radio receiver of your ABUS wireless alarm system. To access the Receivers menu option: Select the main menu System as described on page 7-23. In the System menu, press to go to the Receivers menu option. -
Page 32: Set Clock
0 hours 0-7 hours The wireless detectors automatically send a message to the ABUS wireless alarm system every 65 minutes. This message also contains information on the battery state and the current alarm state. The wireless alarm system can now monitor whether these messages are regularly transmitted. -
Page 33: Labels
To enter a new name: Use the buttons of your ABUS wireless alarm system to enter the letters as shown in the table below. When you press a specific button, you scroll backwards and forwards through the characters. The ABUS wireless alarm system permits a total of 75 characters for a name (letters, numbers and symbols). - Page 34 To access the System Label menu: Select the main menu System as described on page 7-23. In the System menu, press to get to the System Label menu option. You see the following on the display: 3. Select and configure the settings in the System Label menu as follows: System Label: Quick-Key Menu option...
-
Page 35: Tamper Sound
Tamper Sound In the Tamper Sound menu, you can define the sounds generated by the ABUS wireless alarm system following a tamper in a zone, the ABUS wireless alarm centre housing, the wireless operating panel, or any other device. You can also adjust the sounder volume for alarms and their acknowledgement. -
Page 36: System Default Jumper
• Enabled: The ABUS wireless alarm system can be completely reset to its original default (factory) settings by switching off and on the complete power supply and with the help of the J9 jumper. All settings, labels, PIN codes, etc. -
Page 37: Zones
Zones The Zones menu enables you to train wireless detectors for the system, program zone types, and define zone dependencies. This is an overview of the menu options according to their sequence in the Zones menu: Allocation, page 7-37 Parameters, page 7-38 Testing, page 7-48 Editing, page 7-49 Crossing, page 7-51... -
Page 38: Parameters
Delete To change the display, Deletes detectors. Confirm deletion with [Y] YES or [N] NO. press Supervision Select whether a zone is to be monitored for regular reporting by the detectors to the alarm system. Set the monitoring time in the System menu under Timers. If surveillance is active for the detector and the detector does not report in the defined time, an alarm is triggered. - Page 39 You go automatically to the next zone. Zone 33 (wired zone) Zone 33 is defined in the ABUS wireless alarm system as a wired zone. For this reason, it has two extra parameters following the Zone sound menu item that are applicable to this wired zone only: •...
- Page 40 Under Partition, you assign zones to different areas. This is necessary in larger systems to distinguish, for example, between the commercial area (shop) and the private area (home), when both are monitored by the ABUS wireless alarm system. Under Parameters, press to access the Partition menu option.
- Page 41 Zone Type When a detector triggers, it always sends a signal to the alarm system. For example: A motion sensor reacts to movement, a smoke detector to smoke, etc. So it is important to tell the system HOW and WHEN it is to react to a signal from a detector.
- Page 42 Exit(OP)/Entry Default for zone 1 Armed/internal Zone Type Quick-Key Menu option Default Selection Not used NONE Zone type Exit(OP)/Entry behaves like zone type Exit/Entry 1 except that the zone does not have to be closed at the moment of activation. However, the zone must be closed before the exit delay time expires, or otherwise there is an alarm.
- Page 43 Exit(OP)/Entry Default for zone 1 Armed/internal Zone type Exit(OP)/Entry behaves like zone type Exit/Entry 1 except that the zone does not have to be closed at the moment of activation. However, the zone must be closed before the exit delay time expires, or otherwise there is an alarm. This zone type is usually assigned to opening contacts on front and side doors.
- Page 44 I+Instant Armed (Interior+Instant) The I+Instant zone type is similar to zone type Instant. However, this zone type is not monitored for an internally activated system. UO Trigger Armed The UO Trigger zone type controls a switch output whether the system is active or inactive. For example: for temperature sensors that control a ventilator.
- Page 45 Exit Termination I+Instant Armed (Interior+Instant) A zone with the Exit Termination zone type behaves like a zone with the Exit(OP)/Entry The I+Instant zone type is similar to zone type Instant. However, this zone type is not zone type. However, the difference is that an exit delay time is ended immediately if this monitored for an internally activated system.
- Page 46 Exit Termination A zone with the Exit Termination zone type behaves like a zone with the Exit(OP)/Entry zone type. However, the difference is that an exit delay time is ended immediately if this zone is opened or closed during the exit delay time. When you enter the protected area, the entry delay time of Group 1 starts as usual.
- Page 47 Zone Sound Under Zone sound, you can, for each zone, define the alarm signal individually that is triggered when the alarm system is active. Under Parameters, press to access the Zone sound menu option. You see the following on the display: Enter a two-digit number and press Select and configure a zone signal for each zone.
-
Page 48: Zone Testing
In the Zones menu, press to access the Testing menu option. You see the following on the display: Wireless Communication Test Runs a communication test between the wireless detector and the ABUS wireless alarm system. Press . You see the following on the display: To run the communication test, trigger the detector. -
Page 49: Editing
Soak Test Some wireless detectors tend to trigger alarms more than others. The Soak Test was developed to test these detectors over a longer period without triggering an alarm. Up to 8 zones can be programmed for the Soak Test. A zone programmed for the Soak Test is omitted for 14 days while the alarm system is active. - Page 50 Editing Quick-Key Parameter Copy to a zone Copies all settings programmed for a zone (except the zone name). Press . You see the following on the display: Press the number buttons 1 to 9 to select the zone you want to copy and press to move the cursor.
-
Page 51: Cross Zone
No dependency is defined between the zones. Ordered The ABUS wireless alarm system triggers an alarm if the first zone and then the second zone triggers an alarm within the defined period. The alarm system triggers no alarm if the zones trigger in the opposite order. - Page 52 Outputs Under Outputs, you program the relay and transistor outputs of the system. You link different system events to the activation of the outputs. The following is an overview of the menu options according to their sequence in the Outputs menu: Define, page 7-52 Output A, page 7-57 Output B, page 7-57...
- Page 53 The switch output is activated if the battery of the ABUS wireless alarm system has insufficient reserve capacity and the voltage falls to 7V. 06 AC Loss Follow The switch output is activated if the power supply of the ABUS wireless alarm system is interrupted and the programmed period is exceeded. 07 Bell Burglary The switch output is activated if a burglar alarm is triggered in an area.
- Page 54 To deactivate this switch output, see the user menu under Duress Reset ([2] [6]). (This is described in the ABUS User Guide.) 09 Buzzer Follow The switch output is activated if an operating panel activates its buzzer in the selected area(s).
- Page 55 18 Bell Stay Off The switch output is activated as follows: • If the system is activated externally (AWAY), the switch output is activated as soon as the sounder is triggered in the selected area. • If the system is activated internally (STAY), the switch output is not activated if the sounder is triggered in the selected area.
-
Page 56: Outputs
Output mode An output mode has to be set for every output. This table gives an overview of the different output modes: Outputs Quick-Key Parameter Default Range Pulse N/C 05 seconds 01-90 seconds The output is closed in non-activated state. Once activated, it remains open until the set time has elapsed and then resets itself automatically. -
Page 57: Define
7.4.2 Output A Under Output A/B, you can define the outputs to be activated with the button function [4]/ [6] of the ABUS wireless alarm system. To access the Ausgang A menu: Select the Output menu as described on page 7-52. -
Page 58: Codes
Under Codes, you can define user and installer Codes, define authorities, and assign areas. The ABUS wireless alarm system also has the following Codes. Grand Master Code: Used by the system owner. This Code has authority over all others and can only be changed but not deleted. - Page 59 Authority Levels The Authority Levels menu option contains settings for the following authorities: Grand Master: There is only one Grand Master in the system. The Grand Master can carry out all available user functions. The Grand Master code is defined as PIN code user 00. NOTE: Under System Control, you can define that the Grand Master can change authorities as well as areas permitted for users.
- Page 60 7.5.2 Partition Default: Partition 1 Under Partition, you assign to user PINs partitions for which you have authority. The Grand Master is authorised in all partitions. To access the Partition menu: Select the Codes menu as described on page 7-57. Under Codes, press to access the Partition menu option.
-
Page 61: Installer
With the installer PIN, you have access to the installer menu and thus the authority to change all system parameters. The installer code defined in the factory is: [0][1][3][3] ABUS strongly recommends changing the PIN defined in the factory. To access the Installer menu: Select the Code Maintenance menu as described on page 7-57. -
Page 62: Code Length
7.5.6 Code Length Default: four digits Under Code Length, you can change the number of digits used (4 or 6) for the Grand Master, the Manager and the Master. All other PIN codes (user, Arm Only and maid) use one to six digits. To access the Code Length menu: Select the Code Maintenance menu as described on page 7-57. -
Page 63: Dialer
7.6.2 U/D Access and ID Under U/D Access and ID, you can define an access PIN and a user ID for remote servicing of the ABUS wireless alarm system. To access the U/D Access and ID menu: Select the Dialer menu as described on page 7-63. -
Page 64: Controls
Defines an access code for remote programming. The four-digit access code in the system and the software must be identical. Enter a four-digit access code. This code is stored in the ABUS wireless alarm system. You have to enter the same code in the up/download software for access to this system. - Page 65 If the system is connected to a PBX, set this option to “No”. NO: The ABUS wireless alarm system dials without waiting for a dial tone. User initiated call YES: To enable up/download programming, the user has to confirm this every time on the system.
-
Page 66: Parameters
U/D calls. 7.6.4 Parameters Under Parameters, you have further options for setting the telephone alarm transmission of your ABUS wireless alarm system. To access the Parameters menu: Select the Dialer menu as described on page 7-63. Under Dialer, press to access the Parameters menu option. - Page 67 Dialer: Parameter Quick-Key Parameter Default Range Wait 6 seconds Press followed by Wait 9 seconds Press followed by Redial wait 30 seconds 30 or 60 seconds The number of seconds between a redial of the same number. Wait 30 seconds Press followed by Wait 60 seconds...
- Page 68 Enter 00 to disable the alarm abort. Every time the zone triggers, the alarm is transmitted again. Periodic Test Defines a time in which the ABUS wireless alarm system calls the UD numbers to test the telephone connection. This feature is possible only if a PC with active software is ready to receive.
-
Page 69: Follow Me (Fm)
(See also User Functions in the User Guide.) • Call to Pager: The ABUS wireless alarm system can also send an alarm to a pager. The alarm is transmitted in the form of alphanumeric characters. (See also under Pager in the System Control menu.) Under this menu option, you define the events for which a call is made. - Page 70 Follow-Me Quick-Key Parameter Default Events restore Defines whether a new call is made if the event (from section 5.9.1) is reset. Press to select an event and press to select whether this event is to be transmitted by phone: [Y] YES or [N] NO. [01] Intruder [02]...
-
Page 71: Key-Fobs
Key-fobs Under key-fobs, you learn how to train up to eight 4-button key-fobs with rolling code to work with the ABUS wireless alarm system. With the wireless key-fob/remote control, you can activate/deactivate the system, trigger a panic alarm, and control a switch output. -
Page 72: Parameters
7.7.2 Parameters Under Parameters, you program the function and the keys of the remote control. The four buttons of the remote control can be adapted to individual requirements. To access the Parameters menu: Select the Key-fob menu as described on page 8-68. Under Key-fob, press to access the Parameters menu option. -
Page 73: Communication Test
You see the following on the display: For button 3 (small button), you can choose between the following functions: None: The button is not activated (default). Panic: The button triggers a panic alarm. Utility Output: The button activates a utility output. If you select the switch output function and confirm it with , you see the following on the display: Select a utility output with... -
Page 74: Keypads
Keypads Under Keypads, you can assign two operating panels to the ABUS wireless alarm system. The following is an overview of the menu options according to their sequence in the Keypads menu: Allocation, page 7-77 Communication test, page 7-77 To access the Keypads menu: •... -
Page 75: Siren
Siren Under Siren, you can assign 3 sounders to the ABUS wireless alarm system. You can choose between internal wireless sounders and external wireless sounders. The following is an overview of the menu options according to their sequence in the Siren menu:... -
Page 76: Allocation
7.9.1 Allocation Here you can allocate a new sounder to your system. To access the Allocation menu: Select the Siren menu. Under Siren, press to access the Allocation menu option. You see the following on the display: Press to select the type of sounder you want to train. Two types are available: •... -
Page 77: Parameter
7.9.2 Parameter Under this menu option, you can change the sounder settings. You can change the following settings: • Volume • Flash frequency (external sounders only) To access the Parameter menu: Select the Siren menu. Under Sirene, press to access the Parameter menu option. You see the following on the display: Press to select the sounder whose settings you want to change and confirm with . -
Page 78: Communication Test
7.9.3 Communication test Under communication test you test the radio communication between your sounder and the system. To access the communication test menu: Select the Siren menu as described above. Under Siren, press to access the communication test menu option. You see the following on the display: Confirm with . -
Page 79: Tamper Mute
7.9.5 Tamper Mute Under Tamper Mute, you can deactivate the tamper function of the sounder for the current programming process. This enables you to open the sounder without triggering a tamper alarm. Enable this function if you want to open the sounder case, for example to change the batteries. -
Page 80: Exit Programming
The ABUS wireless alarm system returns to the normal user display. Discard your changes by pressing to change the [Y] YES to a [N] NO on the display and then press . The ABUS wireless alarm system returns to the normal user display. 7-80... -
Page 81: Chapter 8 Programming Within The User Programming Menu
8.1 Programming voice messages Your ABUS wireless alarm system can issue system events locally and by telephone using voice messages. This greatly simplifies operating the system and enables remote control of the system by telephone. The voice message menu option is in the user menu. -
Page 82: Message Structure
8.1.1 Message structure Under Message structure, you define the sequence in which the voice messages are transmitted. To define a message structure: Select the voice message menu as described above. In the voice message menu, press to access the message structure menu option. You see the following on the display: Press to select one of the following structure types. -
Page 83: Voice Message Labels
8.1.2 Voice message labels Under voice message labels, you define names for zones, partitions, utility outputs and macro keys, and you find out how to play and record common messages. To define a voice message: Select the message label menu. In the voice message menu, press to access the message label menu option. - Page 84 Voice message: message name Quick-Key Parameter Default Range Zone message Press . You see the following on the display: Press to select a zone and then press The following options are available: Press to play the zone announcement. You hear the announcement "...
- Page 85 Message Labels Quick-Key Parameter Default Range Partition Message Press . You see the following on the display: Press to select a partition and then press The following options are available: Press to play the partition announcement. You hear the announcement over the system loudspeaker. Press to record a new text.
- Page 86 Message Labels Quick-Key Parameter Default Range Utility output message NOTE: The switch output must be defined as an FM code in order to be able to allocate a voice message to it. See also Follow User Code. Press . You see the following on the display: Press to select a switch output and then press You see the following on the display:...
-
Page 87: Test Message
FM number to which you want to send the test message. You see the following on the display: The ABUS alarm system calls the FM number and you hear the following test message: “Test Message”. Local Play Under this menu option, you can play voice messages locally over the loudspeaker of your ABUS wireless alarm system. -
Page 88: Local Announcement Messages
8.1.4 Local Announcement Messages Under this menu option, you adapt local voice announcements to your requirements. To activate/deactivate local voice announcements: Select the Voice Message menu. In the Voice Message menu, press to access the Announce msg. menu option. You see the following on the display: Press to select a local announcement, and activate/deactivated the selected announcement... -
Page 89: Walk Test
The difference between a walk test started with an installer PIN and a walk test started with the Grand Master PIN is the way your ABUS alarm system reacts to a tamper message. If the walk test is started with the installer PIN, there is only a message on the display in the case of a tamper. -
Page 90: Chapter 9 Accessories For Your Abus Wireless Alarm System
Wireless key pad The wireless key pad is also used for activating and deactivating your wireless alarm system. You can also trigger panic and fire alarms, and make a medical emergency call. You can use up to two wireless key pads. -
Page 91: Chapter 10 Brief Guide
Now plug the power supply unit into the mains socket. The wireless alarm system starts up and soon reports “System is on”. If not, check that the power supply unit is plugged in, that there is current at the mains socket, and the power supply unit plug is correctly plugged into the wireless alarm system. The fault LED flashes since the time and date have not yet been entered and the batteries are not fully charged. -
Page 92: Training The Detectors For The Abus Wireless Alarm System
10.2 Training the detectors for the ABUS wireless alarm system 10.2.1 Installer menu of the ABUS wireless alarm system • First press the star button, followed by 9, followed by 1. • You are asked to enter the installer PIN code for the installer menu. The default setting is 0133. Enter this installer PIN and confirm your input with the lozenge button. -
Page 93: Programming Zones
• With this program, the wireless opening detector starts an entry delay of 30 seconds in which your ABUS wireless alarm system has to be deactivated if it is active. Additionally, you have 30 seconds to leave the object after activating it on the keypad. -
Page 94: Exiting The Installer Menu
10.4 Exiting the installer menu All wireless components in the package are now trained. Your ABUS wireless alarm system is almost ready for operation. You just have to enter the date and time and an alarm telephone number for voice text transmission in the event of an alarm. First, exit the installer menu. -
Page 95: Triggering A Test Alarm
• Confirm the menu option phone number 1 with the Enter button. • On the system keypad, enter the number with local area code and if necessary a zero for obtaining a dial tone. To program a dial pause, enter A. You program the A with the button. - Page 96 Chapter 11 Example of an installation plan The following table provides an overview of the information your installation plan should contain: Partition Zone number Detector Zone type Name Door and window contacts Entry/exit MC front door Door and window contacts Entry/exit MC terrace door Motion detector...
- Page 97 Partition Zone Detector Zone type Name number 11-97...
- Page 98 Appendix A: Event Log Messages This appendix provides descriptions of all the Event Log messages(ver 1.2xx) EVENT MESSAGE DESCRIPTION Activate UO=X UO XX activation Actv UO=XX WB=YY UO XX is activated from key-fob YY Alarm Z=XXX Alarm in zone No. XXX Alarm abort P=X Alarm aborted on Partition X Arm:P=X WB=YY...
- Page 99 EVENT MESSAGE DESCRIPTION Foil Z=XXX Trouble in foil (Day) zone No. XXX Forced P=X Partition X is force armed Found Z=XXX Wireless zone found, zone No. XXX Func=XX C=YY Quick key function XX by user YY Home:P=X C=YY Partition X is armed in Stay(Home) mode by user YY Home:P=X WB=YY Partition X is armed in Stay(Home) from key-fob YY Jamming restore...
- Page 100 EVENT MESSAGE DESCRIPTION Restore Z=XXX Alarm restore in zone No. XXX Remote arm:P=X Partition X armed from the UD software Rmt disarm:P=X Partition X disarmed from the UD software Spec. KP=XX Special alarm from wireless keypad XX (keys 7 & 8) Spec.
- Page 101 11-101...
Need help?
Do you have a question about the WIRELESS ALARM SYSTEM and is the answer not in the manual?
Questions and answers