Abus TVAC15000 User Manual
Hide thumbs
Also See for TVAC15000:
- User manual (104 pages) ,
- User manual (182 pages) ,
- User manual (123 pages)

Related Manuals for Abus TVAC15000


Summary of Contents for Abus TVAC15000
-
Page 1: User Manual
TVAC15000 User manual Version 03/2012 Original English user manual. Keep for future use. - Page 2 The ABUS Security-Center GmbH assumes no liability for technical and typographical faults and reserves the right to make at any time modifications to the product or user manual without a previous announcement.
- Page 3 The warranty will expire for damage due to non-compliance with these operating instructions. ABUS will not be liable for any consequential loss! ABUS will not accept liability for damage to property or personal injury caused by incorrect handling or non-compliance with the safety-instructions.
- Page 4 English 7. Wireless transmission The range of wireless transmission depends on various environmental factors. The local conditions at the installation location can have a negative impact on the range. For this reason, if there is a clear line of sight between the receiver and the transmitter, the range can be as much as 200 m, but in buildings it is significantly less.
-
Page 5: Table Of Contents
English Table of contents Intended Use ............................26 Scope of delivery ..........................26 Features and functions ........................26 Device description ..........................27 4.1 Front of the monitor ........................27 4.2 Rear of the monitor........................28 4.3 Monitor connections ........................28 4.4 Camera description ........................ -
Page 6: Intended Use
English 1. Intended Use You can use this 2.4 GHz wireless monitor and the IR wireless outdoor camera with PIR for easy wireless transmission and displaying of video signals across middle to long distances. Wireless signal transmission is an advantage in all locations where cables cannot be laid: the camera transmits the video signal to the wireless monitor without the need for wires. -
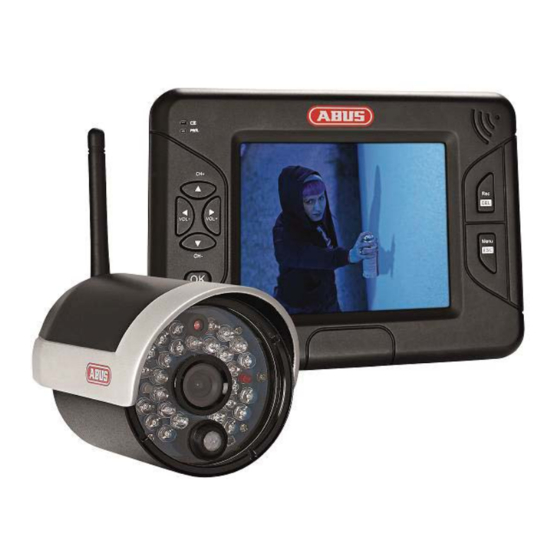
Page 7: Device Description
English 4. Device description 4.1 Front of the monitor Displays the current charge level Red: Battery low Battery display Green: Charging Off: Battery completely charged Device status display Power LED Blue: Device switched on Off: Device switched off ▲ Live view: channel change In the menu: switch between menu items... -
Page 8: Rear Of The Monitor
English 4.2 Rear of the monitor Antenna Stand 4.3 Monitor connections Power supply 5 V DC/1 A (DC, 14.5 × 4.8 mm) Output for representing the on-screen display, use the AV AV output cable supplied SD card slot Slot for using an SD card of up to 32 GB Power switch Switch monitor on or off... -
Page 9: Camera Description
English 4.4 Camera description Antenna Light sensor Fixed lens Power LED LINK LED IR LED PIR sensor Camera mount Pairing button Power supply connection 5 V DC/1 A 4.5 Cable connections Yellow RCA plug (video) Connection for transmitting the video signal White RCA plug (audio) Connection for transmitting the audio signal Jack plug... -
Page 10: Installation
English 5. Installation 5.1 Pairing the camera and monitor To connect a camera with the monitor, proceed as follows: Connect the power supply to the cameras and monitor. In the TFT monitor’s menu “Camera Setup -> Pairing” select the camera you require (1–4) and confirm your choice with OK. -
Page 11: Installing The Monitor
English Then screw the camera onto the mount and the power supply unit with the camera. Warning: Only use the antenna provided for the installation. 5.3 Installing the monitor The installed battery gives you the option of using the TFT monitor flexibly. When the battery LED lights up red, the battery needs charging Make sure that the battery is always sufficiently charged in order to guarantee no loss of recording. -
Page 12: Operation
English To display the monitor display on another device, proceed as follows: Connect the jack plug to the monitor’s AV OUT. Connect the RCA plug to the monitor as shown in the drawing. 6. Operation To switch the monitor ON/OFF, press and hold the power button for at least 2 seconds. Each time it is started, the monitor switches to live view and it selects the last view that was set. -
Page 13: Main Menu
English Motion detection alarm activated No SD card inserted Full SD SD card full Err SD SD card was not identified SD card locked SD card is overwritten when it reaches capacity SD card display SD card capacity Power supply display Camera brightness display 01:12:45 Recording time... -
Page 14: Camera Settings
English Event list: The recordings are stored in sub-folders named after the recording date. The recordings are stored as individual files with the time of recording as the file name. System setup: Quad Display = four-way display Scan Period = dwell time for sequence display Time setting = Date/time settings SD Card Format = format SD card Power Saving = energy-saving mode... -
Page 15: Record Settings
English Use the ◄► buttons to select the desired Pairing = add camera camera and confirm your choice with OK. The systems starts a 60 second countdown. During the 60 seconds, press the PAIRING button on the camera cable until the green LINK LED on the front of the camera starts to flash. -
Page 16: Event List
English Use the ◄► buttons to activate (ON) or SD Card Overwrite = SD card circular buffer deactivate (OFF) the SD card circular buffer. Confirm your selection with OK. The circular buffer is activated by default. Warning: When the memory capacity is reached, the monitor continues to record, deleting the oldest recordings on the SD card. -
Page 17: System Settings
English 6.6 System settings Use the ◄► buttons to switch the quad display Quad Display = four-way display on (ON) or off. To activate quad mode, all the cameras have to be activated. When in quad display, you can use the arrow buttons to switch directly to full-screen view for individual cameras. - Page 18 English SD Card Format = format SD card You can use this to format the SD card. The system displays the memory that is currently available (Free) and the total memory (Total). Press OK to start formatting. Confirm your selection with and cancel the operation with Warning: Format the SD card before using it for the...
-
Page 19: Maintenance And Cleaning
English System Version = This function shows you the software versions of software version of the monitor and camera the monitor and all the connected cameras. 7. Maintenance and cleaning 7.1 Maintenance Regularly check the product's physical state, e.g. check for damage of the housing. If you suspect that safe operation cannot be guaranteed anymore, disconnect the product and ensure that it cannot be used by mistake. -
Page 20: Technical Data
English 9. Technical data TVAC15000 Model number Camera Frequency 2.4 GHz Modulation GFSK Transmission power 16 dBm Sensitivity -82 dBm TV lines 400 TVL Image sensor 1/4" CMOS Resolution 640 × 480 pixel (VGA) No. of IR LEDs 27 IR LEDs Lens 3.6 mm...
Need help?
Do you have a question about the TVAC15000 and is the answer not in the manual?
Questions and answers