Table of Contents
Advertisement
Quick Links
SIDE-POWER
Thruster Systems
Installation and user's manual
GB
Installasjons og brukermanual
N
SLEIPNER MOTOR AS
P.O. Box 519
N-1612 Fredrikstad
Norway
Tel:
Fax:
+47 69 30 00 60
+47 69 30 00 70
SEP 120/215T
SEP 150/215T
w w w . s i d e - p o w e r . c o m
s i d e p o w e r @ s l e i p n e r. n o
© Sleipner Motor AS 2010
Advertisement
Table of Contents

Related Manuals for Side-Power SEP 120/215T


Summary of Contents for Side-Power SEP 120/215T
- Page 1 SEP 120/215T SIDE-POWER SEP 150/215T Thruster Systems Installation and user's manual Installasjons og brukermanual SLEIPNER MOTOR AS P.O. Box 519 N-1612 Fredrikstad Norway Tel: +47 69 30 00 60 w w w . s i d e - p o w e r . c o m...
-
Page 2: Table Of Contents
User's manual Technical specifications ............. 3 Important user precautions ............18 Planning & important precautions..........4 How to use Side-Power thrusters ..........19 Tunnel installation Maintenance & service ............20 Positioning of the tunnel / thruster ..........5 Troubleshooting ............... 21 How to shape the tunnel ends ........... -
Page 3: Technical Specifications
Sidepower tunnel Note: E wall thickness of a standard Sidepower tunnel min.: min.: Note: E wall thickness of a standard Side-Power tunnel Note: E wall thickness of a standard Side-Power tunnel min.: min.: maximum wall thickness when using other GRP, maximum wall thickness when using other GRP, max.:... -
Page 4: Planning And Important Precautions
If you are installing the Side-Power in a small room /compartment, it should be ventilated to ensure cooling of the electromotor. If the height in the room you are installing the Side-Power is limited, the Side-Power can be installed horizontally or at any angle in between. -
Page 5: Positioning Of The Tunnel / Thruster
Fig. 1 Pivot Fig. 3 point B = 10,0m A = 11,0m Fig. 2 Fig. 4 Ø Positioning of the tunnel / thruster Positioning of the tunnel / thruster Positionierung von Tunnel / Thruster Plassering av tunnel og thruster The Thruster should be as far forward as possible (Fig. 1) The Thruster should be as far forward as possible (Fig. -
Page 6: How To Shape The Tunnel Ends
Diese Schubkraft kann bei optimaler Installation bis zu 30-40% NB! A Side-Power thruster propeller does not cavitate at working NB! Selv der en perfekt avrunding ikke er mulig er det viktig å runde av NB! A Sidepower thruster propeller does not cavitate at working der absoluten Schubkraft betragen. -
Page 7: How To Prevent Drag From Tunnel Installation
Fig. 1 Fig. 2 Fig. 3 ☺ ☺ ☺ ☺ ☺ � � � � � ☺ ☺ ☺ ☺ ☺ Prevent drag from tunnel Optimaler Strömungsverlauf am Rumpf Prevent drag from tunnel Motstand forårsaket av tunnel A possible problem in sailboats or fast powerboats is that they get a Segelboote und sehr schnelle Booten können gelegentlich durch A possible problem in sailboats or fast powerboats is that they get a Et mulig problem for seilbåter eller meget hurtiggående båter er motstand... -
Page 8: Possible Tunnel Installation In Sailboats
Fig. 1 � � � � � ☺ ☺ ☺ ☺ ☺ Pos. A Pos. B � � � � � ☺ ☺ ☺ ☺ ☺ Tunnelinstallasjon på seilbåter Tunnel installation in sailboats Installation in Segelbooten Tunnel installation in sailboats Many sailboats have a racing type hull which means that it is very Segelboote weisen häufig einen Rumpf in Rennform auf, was Many sailboats have a racing type hull which means that it is very flat bot-... -
Page 9: Tunnel Installation In A Grp Boat
Fig. 1 Fig. 2 Fig. 3 Fig. 4 Tunnel installation Tunnelinstallering We recommend that a professional does the fibreglass fitting of the Sleipner Motor anbefaler at innstøping av glassfibertunnelen utføres tunnel. These instructions are only general, and do not explain in av kyndig personell. - Page 10 å gjøre glassfiberen vanntett. NB! All original Side-Power tunnels are fully waterproof when NB ! Alle originale Side-Power tunneler er vanntette ved levering! they are delivered. Så fremt man ikke ønsker en annen farge er det ikke nødvendig å påføre This means that unless you want, because of special reasons, to have an- Gelcoat, Topcoat og flere lag med primer for å...
-
Page 11: Gearhouse And Motorbracket
Fig. 2 Fig. 3 Fig. 1 Fig. 2 Fig. 1 SP125Ti Fig. 2 Fig. 3 BOATS SP 75 Ti SP125Ti CENTRELINE BOATS BOATS SP 95 Ti CENTRELINE CENTRELINE BOATS CENTRELINE TUNNELS CENTRELINE TUNNELS CENTRELINE TUNNELS CENTRELINE Ø 9mm Ø 32mm Ø... -
Page 12: Fitting Propellers
Locktite Fitting propeller(s) Montering av propeller 1. Vri propellakselen så drivpinnen (5) står loddrett. Pinnen må stå midt i 1. Push the propeller onto the shaft, carefully rotate the propeller propellakselen. until the drive pin aligns and moves into the slot/grove in the propeller hub. -
Page 13: Electromotor
Bolt tightening force (4x): 33 Nm (24 lb/ft) Bolt tightening force (2x): 33 Nm (24 lb/ft) Fig. 1 Fig. 2 Fitting the electromotor Montering av elektromotor 1. Check if the springs for the brushes sit correctly on the brushes 1. Fjern de 4 boltene i i motorbraketten. (see through the metal web around the top of the electromotor). -
Page 14: Electrical Installation
• Det anbefales å bruke Side-Power automatisk hovedstrømbryter • It is highly recommended to install a Side-Power Automatic Main place and the boats instructions should inform that this should be • We also advice to install a fuse (*D) in the positive lead for protection fällen abgeschaltet werden, ohne die übrige Bordelektrik zu be-... -
Page 15: Control Panel And Control-Leads
• When using original Side-Power equipment it is all “plug & go”. • If the drive direction of the thruster is the opposite of what expected, the blue and grey wire must be changed on the thruster solenoid. -
Page 16: Technical Wiring Diagram
Technical wiring diagram, thruster motor Koblingsskjema, trustermotor SEP120/215T SEP150/215T 1.0.0-2010... -
Page 17: Checklist For Control Of The Installation
Checklist Sjekkliste Propellers is fastened correctly to the shaft. Propellen er festet til akselen på korrekt vis. Propellers turns freely in tunnel. Propellen roterer fritt i tunnel. The zinc-anodes holding screw is tightened well with thread glue. Festeskruen til sinkanoden er festet med gjengelim. -
Page 18: Important User Precautions
Important user precautions Viktige brukerforebehold • Forviss deg om at du kjenner plasseringen av hovedstrømsbryteren • Ensure that you know the location of the main battery switch that disconnects the thruster from all power sources (batteries) so that som kutter all strøm til thrusteren, så thrusteren kan skrus av i nød- the thruster can be turned off in case of a malfunction. -
Page 19: How To Use Side-Power Thrusters
1. Skru på hovedstrømmen (skru alltid av hovedstrømmen når du ikke er the main power switch when not on board.) A Side-Power Automatic om bord i båten). En Side-Power Automatic Main Switch slås på / av Main Switch will turn on/off when the panel is turned on/off. -
Page 20: Maintenance & Service
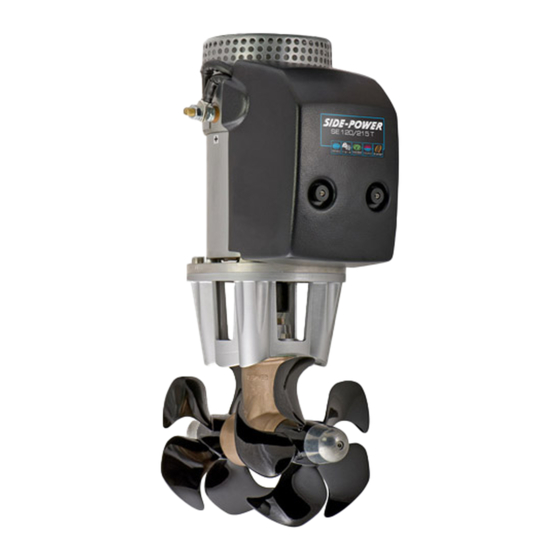
Electromotor Directional solenoids Motorbracket for holding motor and gearhouse together on the tunnel. Flexible coupling secures the electromo- tor if propeller is jammed. Changeable from inside the boat. 5-blade skew propeller for ultimate performance. Oil-filled gearhouse. Changeable zincanode protects gear- house from corrosion in seawater. -
Page 21: Troubleshooting
Trouble shooting Before seeking assistance at the help desk of your Side-Power dealer/distributor please perform these tests and make notes of all measurements to ensure that they have as much information as possible to work on. NB! All check points and solutions must be carried out after consulting the relevant information elsewhere in this manual to under- stand how the system is intended to work. -
Page 22: Warranty Statement
Warranty statement 1. The equipment manufactured by Sleipner Motor AS (The “Warrantor”) is warranted to be free from defects in workmanship and materials under normal use and service. 2. This Warranty is in effect for of two years from the date of purchase by the user. Proof of purchase must be included, to establish that it is inside the warranty period. -
Page 23: Spareparts List & Drawing
SEP 120/215 T SEP120/215T SEP150/215T 1.0.0-2010... - Page 24 SEP 150/215 T SEP120/215T SEP150/215T 1.0.0-2010...
- Page 25 SERVICE SEP120/215T SEP150/215T 1.0.0-2010...
- Page 26 SERVICE SEP120/215T SEP150/215T 1.0.0-2010...
- Page 27 SERVICE SEP120/215T SEP150/215T 1.0.0-2010...
-
Page 28: Service Centres
Tel: +385 51 704 500 Sleipner Motor AS Fax: +385 51 704 600 acy@net.hr Sleipner Motor AS • P. O. Box 519, N-1612 Fredrikstad • Norway Tel: +47 69 30 00 60 • Fax: +47 69 30 00 70 • sidepower@sleipner.no • www.side-power.com...
Need help?
Do you have a question about the SEP 120/215T and is the answer not in the manual?
Questions and answers