Table of Contents
Advertisement
Quick Links
Download this manual
See also:
User Manual
Advertisement
Table of Contents

Related Manuals for Ness D 24


Summary of Contents for Ness D 24
- Page 1 D 24 Control Panel anD Dialler InstallatIon & ProgrammIng manUal...
- Page 2 improvement.
-
Page 3: Table Of Contents
(P70e, P71e) inputs easycall dialling (P72e–P74e) outputs area Client codes (P750e–P753e) enable options (P82e) D24 lCD KeyPaD neSS raDio interFaCe QUICk StArt ProgrAmmINg raDio PrograMMing Program MoDe levels Clear radio Keys (P83e) hoW to enter PrograM MoDe Program radio Keys (P831e) -
Page 4: Features
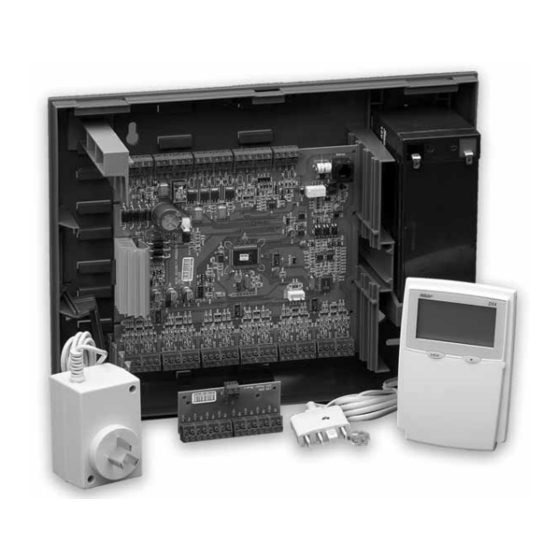
Powerful multizone commercial security 9001. • 24 fully programmable zones the ness D24 alarm control panel has been designed to provide you, the security • 30 User Codes professional, with a 24 zone hardwired (including 8 wireless zones) control panel •... -
Page 5: Installation & Power Up Procedures
Lid Tamper Switch Housing lid bolts x2 Bottom mounting Power Board Bolt Circlip hole x2 (Slotted) (Screwed to bottom of base) Bolt post Speed nut Lid Tamper switch Base Rear Tamper Switch neSS D24 Control Panel - inStallation & PrograMMing Manual... -
Page 6: D24 Main Board Wiring Diagram
© 2001 Ness Security Products D24 Main Board Wiring ZONE INPUTS 1-24 neSS D24 Control Panel - inStallation & PrograMMing Manual... -
Page 7: Wiring Examples
SRN + STROBE LIGHT SRN B The terminal block should (NOI300) be mounted inside the siren cover. ALTERNATIVE TAMPER SWITCH WIRING N.C. TAMPER SWITCH For N.C. Tamper Switches (SWI920) Colour: WHITE TAMP neSS D24 Control Panel - inStallation & PrograMMing Manual... -
Page 8: Inputs
ZOne Inputs 1–24 Installers’ tIp the ness D24 has 24 end of line monitored zone inputs. each zone input must testing Zone inputs - when be terminated with a 2K2 (2200 ohm) end of line (eol) resistor as supplied. -
Page 9: Outputs
12V device output). reset. a maximum of 3 x 12V piezo Sirens (ness Part no. noi240, noi 230, 100-238) or 2 X ness Piezo (Part no 100-172) can be connected to this output. the output is protected by an automatic reset fuse. -
Page 10: D24 Lcd Keypad
KEyPad d24 lCd KEyPad the ness D24 lCD keypad provides important visual and audible indication of the system status and is the main interface for controlling the many powerful features of the D24 system. information is displayed on a large lCD icon display which is backlit for easy night viewing. -
Page 11: Keypad Display Table
VIEW Normal User Program the keypad icons display the PROGRAM Mode history of Arming, Disarming and alarm events. Normal Siren Test TEST Press to cancel the Memory display at any time neSS D24 Control Panel - inStallation & PrograMMing Manual... -
Page 12: Quick Start Programming
Delay time ....20 seconds ......Factory default exit Delay time ....60 seconds ......Factory default Siren reset time ....10 minutes ......Factory default the client code and telephone numbers are normally allocated by the central station. neSS D24 Control Panel - inStallation & PrograMMing Manual... -
Page 13: Program Mode Levels
The current value Enter new option (address) is displayed data The keypad lights or icons will display the current value 2-4 digit Option No. 3 beeps Enter 3 beeps new value neSS D24 Control Panel - inStallation & PrograMMing Manual... -
Page 14: Master Code (P1E)
NOTe: After step 1, the new code can be entered immediately without waiting for the display to finish the ‘read back’. P028E User Code 28 P029E User Code 29 P030E User Code 30 neSS D24 Control Panel - inStallation & PrograMMing Manual... -
Page 15: Entry Delay Timers (P17E)
Installer, Remote by PC Programmable from 1 – 99 minutes FaCtOrY deFault: 10 Minutes tO prOgraM: p [Option No] e [New time] e eXaMple: To program 5 minute Siren Time: p28e 5e neSS D24 Control Panel - inStallation & PrograMMing Manual... -
Page 16: Zone Assignment (P19E-P23E)
• If any 2 Double Trigger zones, each trigger once. • A Double Trigger zone is left unsealed for longer than 15 seconds. Double trigger is suitable for zones with devices such as Pirs which self reset. neSS D24 Control Panel - inStallation & PrograMMing Manual... -
Page 17: Zone Input Response Time (P252E-P258E)
(using a metal object such as a For efficient operation, Nessensors must be attached to fixtures using screws, not adhesive tape or silicone. screwdriver blade) will cause an alarm. neSS D24 Control Panel - inStallation & PrograMMing Manual... -
Page 18: Siren Lockout (P291E-P294E)
P301e excludable Zones FaCtOrY deFault: P302e excludable tamper alarms see table P303e excludable System alarms tO prOgraM: p [30x] e [Alarm No] e P304e excludable Power alarms Toggles the option ON and OFF. neSS D24 Control Panel - inStallation & PrograMMing Manual... -
Page 19: Area Partitioning
No monitor zones. to Monitor 2. tO prOgraM: P321e assign zones to Monitor 1 p [32x] e [Zone No] e P322e assign zones to Monitor 2 Toggles the option ON and OFF. nOtes: neSS D24 Control Panel - inStallation & PrograMMing Manual... -
Page 20: Keypad Shortcuts (P33E)
1e oFF, 2e on, 3e on Single button arm/Monitor/exclude 1e on, 2e oFF, 3e on arm/Monitor via code 1e on, 2e on, 3e oFF arm/Monitor/exclude via code or 2 button (arm/Monitor/exclude + e) neSS D24 Control Panel - inStallation & PrograMMing Manual... -
Page 21: Misc. System Options (P34E)
P34e 8e ZoNe UNSeALeD WArNINg oN ArmINg. oFF: no zone unsealed warning. on: the reSet output will sound a 2 second alarm immediately on arming if arming with a zone unsealed. neSS D24 Control Panel - inStallation & PrograMMing Manual... -
Page 22: Map Zones To Output Groups (P35Xxe-P38Xxe)
Factory default setting is all zones mapped to output group 0. P380e will show all 24 zones on. This means that no zones are 24hr zones. Note: xx refers to the output group number. See the output groups table on page 24. neSS D24 Control Panel - inStallation & PrograMMing Manual... -
Page 23: Map Alarms To Output Groups (P39Xxe-P42Xxe)
17. Note: xx refers to the output group number, (can be either one or P3817e 23e 24e two digits) See the output groups table on page 24. neSS D24 Control Panel - inStallation & PrograMMing Manual... -
Page 24: Output Groups & Outputs, Defined
2. Siren B: Second siren output with the same specifications as Siren a. be mapped to an output group. 3. reSet: 12V DC output for connecting ness Sirens, piezo sirens, etc. the use of output groups 4. StroBe: latched 12VDC output for connecting strobe lights. -
Page 25: Creating Installer-Defined Output Groups
P81 [Select an output group 1–15] e [Select outputs 9–16] e ... eXaMple: to build output group 1 to include the outputs: Siren a (output 1), reset (output 3), Dialler (output 12). P80 1e 1e 3e P81 1e 2e neSS D24 Control Panel - inStallation & PrograMMing Manual... -
Page 26: Zones With No Exit Delay (P441E)
(For example, manhole cover reed to cancel the display press the e button. switch). if the icon remains on, press VIeW 7 then e. neSS D24 Control Panel - inStallation & PrograMMing Manual... -
Page 27: Client Code (P50E)
2. Enter the new client code or phone number: [new number] e the new number will be displayed. NOTe: After step 1, the new number can be entered immediately without waiting for the display to finish the ‘read back’. neSS D24 Control Panel - inStallation & PrograMMing Manual... -
Page 28: Reporting Format (P54E)
Audible Voice format is available in D24 V1.5 and later. P54e 3e CoNtACt ID formAt Contact iD format is used for reporting alarms to the central station. See page 58 for the full list of Contact ID reporting codes. neSS D24 Control Panel - inStallation & PrograMMing Manual... -
Page 29: Dialling Format (P55E)
Dial the Primary telephone number 5 times. if unsuccessful, dial the Secondary telephone number 5 times. P57e 3e rePeAt to PHoNe No 2 report to the Primary telephone number and repeat to the Secondary telephone number. neSS D24 Control Panel - inStallation & PrograMMing Manual... -
Page 30: Remote Access Options (P58E)
When this option is enabled, option 1e automatically disables. if open/Close reports are disabled, the panel will send a ForCeD oPening rePort if there has been an alarm during the armed period. neSS D24 Control Panel - inStallation & PrograMMing Manual... -
Page 31: Mapping Contact Id Channels (P61E-P64E)
[Select alarm no] e [Select code] e P6xe [alarm/zone number] e 0e p64e [Select alarm no] e [Select code] e See page 58 for the full list of Contact ID reporting codes. neSS D24 Control Panel - inStallation & PrograMMing Manual... -
Page 32: Multiple Alarm Reporting (P65E)
Mains Power Failure is enabled and configured as an alarm by the related option P41xxe 1e. tO prOgraM: p67e [time] e (Select 0–255 minutes) related OptIOns: P41E xxE, Mapping power alarms, page 23 neSS D24 Control Panel - inStallation & PrograMMing Manual... -
Page 33: Zone Reporting Abort Delay (P68E, P69E)
Programmable from 0–255 hours. enter a value between 0 and 255. a value of 0 (zero) disables test calls (factory default). test Call times commence on exit from installer program mode. neSS D24 Control Panel - inStallation & PrograMMing Manual... -
Page 34: Easycall Dialling (P72E-P74E)
IndIcatIon on lcd dIsPlay PauSe (1.6sec) area Key 6 (Flashing) * (Star) arM Key 2 (Flashing) # (hash) Monitor Key 3 (Flashing) neSS D24 Control Panel - inStallation & PrograMMing Manual... -
Page 35: Area Client Codes (P750E-P753E)
D24 by three wire serial connection. the board is designed to fit inside the D24 control panel housing. for full details of output expander operation, see page 52. neSS D24 Control Panel - inStallation & PrograMMing Manual... -
Page 36: Ness Radio Interface
SUPERVISION radiO dEviCES - OPEraTiON ALArm: any ness radio Device can operate on any zone 1–8 as programmed by P841e. the hardwired zones 1–8 continue to operate in parallel. tAmPer: radio Device tamper is transmitted by the 100-662 radio reed Switch. -
Page 37: Radio Key Programming
Select 1E - 8E radiO KEy PrOgrammiNg P83e, P831e a total of eight ness 100-664 radio Keys can be programmed. the radio Keys prOgraM MOde leVel: operate in conjunction with D24 user Codes 1 to 8 and, if monitored, are reported Installer, Remote by PC as user Codes 1–8 to the central station. - Page 38 P86e the SuPerViSion tiMe is the time allowed between radio transmissions received prOgraM MOde leVel: by the panel from any Supervised ness radio Pir (100–663, 100-691). Installer, Remote by PC the SuPerViSion tiMe setting is from 01 to 24 hours.
-
Page 39: Medical Delay (P93E)
10 seconds as a reminder. as a final warning that the Medical alarm delay is due to expire, the keypad/s will beep continuously during the final 10 minutes. neSS D24 Control Panel - inStallation & PrograMMing Manual... -
Page 40: General Purpose Timer (P94E, P95E)
Code. prOgraM MOde leVel: Installer, Remote by PC Factory default is 000000. FaCtOrY deFault: 000000 tO prOgraM: p99e [new code] e [new code] e (3–6 digits) neSS D24 Control Panel - inStallation & PrograMMing Manual... -
Page 41: Code Retry Limit (P96E)
P984e: CLeAr ALArm memorY Clears all events from the alarm memory. ProgrAm oPtIoNS SUmmArY Pages 54, 55 P985e: CLeAr DIALLer bUffer Clears all outstanding alarm messages queue in the dialler buffer. neSS D24 Control Panel - inStallation & PrograMMing Manual... -
Page 42: Arming, Disarming
O P E r a T i O N oPerAtINg moDeS the ness D24 will operate in one of the following modes: ArmeD: the system is “on” and ready to detect intrusion. 24 hour Zones (if configured) are still active. area Partitioning means the panel can be split into three separate “areas”... -
Page 43: Arming, Disarming Areas
Three beeps will sound and the selected AREA icon/s will turn OFF ...or a shortcut to Disarm all Areas Press... [COde] Three beeps will sound and all AReA icons will turn OFF neSS D24 Control Panel - inStallation & PrograMMing Manual... -
Page 44: Monitor Mode Arming
Duress alarm is number 5 in the view. SYSTEM IS CeNtrAL StAtIoN moNItoreD. Disarm by pressing... [duress dIgIt] [user Code] The panel Disarms as normal and the Duress report is sent to the Central Monitoring Station. neSS D24 Control Panel - inStallation & PrograMMing Manual... -
Page 45: Medical Alarm, Fire Alarm
24 hour Fire inputs. Fire inputs, (if enabled), are indicated by the Fire icon on the keypad. any zone can be become a Fire input by mapping it to output group 26. neSS D24 Control Panel - inStallation & PrograMMing Manual... -
Page 46: View Menu
Power alarms to view. PoWer 9: radio device battery low. (Zone indicators 1–8 will show which device) PoWer 0: radio Key battery low. (Zone indicators 1–8 will show which radio Key) neSS D24 Control Panel - inStallation & PrograMMing Manual... -
Page 47: View Memory
[slow flash] area 2 Monitor Mode Next most recent event: [slow flash] - Mains power failure. MEMORY POWER VIEW Press..etc...Up to 50 events in memory. to exit Memory mode. Press neSS D24 Control Panel - inStallation & PrograMMing Manual... -
Page 48: Excluding Zones
Power alarms Press... will be on) [pOwer nuMBer] ...etc EXCLUDE POWER The selected Power numbers will turn on. to exIt exclUde mode Press... will flash while Disarmed and Armed) EXCLUDE neSS D24 Control Panel - inStallation & PrograMMing Manual... -
Page 49: Test Mode
VIeW 7 then e. neSS D24 Control Panel - inStallation & PrograMMing Manual... -
Page 50: Monitoring
CENTral STaTiON mONiTOriNg P54e 3e enabled (Default) CENTRAL STATION MONITORING the ness D24 control panel has an on-board digital dialler which can send detailed alarm messages to a Central Monitoring Station. the digital messages can include information about the zone/s which caused the... -
Page 51: Remote Operation By Telephone
4e Enable remote AREA 1 Arm p58e 5e Enable remote AREA 2 Arm p58e 6e Enable remote AREA 3 Arm p58e 7e Enable remote AUx1, AUx2 p58e 8e Enable remote Disarm all Areas neSS D24 Control Panel - inStallation & PrograMMing Manual... -
Page 52: D24 Output Expander
Cleared on Arming, Disarming Panic / Medical or Code Entry Tamper Radio Low Battery Admin. Area Armed Follow input state Areas 1~3 Armed Mains Fail Low Battery Follows RELAY trigger state neSS D24 Control Panel - inStallation & PrograMMing Manual... - Page 53 NOTES neSS D24 Control Panel - inStallation & PrograMMing Manual...
-
Page 54: Options Summary
Handover zones zone 2 P45E Installation WALK TEST (Select zones to test) P23E Secondary delay zones none Enable Auto Zone Test P271E Single trigger zones all zones P272E Double trigger zones none neSS D24 Control Panel - inStallation & PrograMMing Manual... - Page 55 Mains Fail reporting delay 60 minutes These options are available in User Program Mode. P68E Abort Delay 30 seconds ALL options are available in Installer Program Mode P69E Abort Delay Zones none neSS D24 Control Panel - inStallation & PrograMMing Manual...
-
Page 56: Installation Record
P181E Exit Delay Time for AREA 1 Seconds P182E Exit Delay Time for AREA 2 Seconds P97E Duress prefix digit P183E Exit Delay Time for AREA 3 Seconds P28E Siren Time Minutes neSS D24 Control Panel - inStallation & PrograMMing Manual... -
Page 57: User Codes
Tick: Output Group POWER ALARMS on or off number Channel Mains power failure Backup Battery low DC supply failed Zone reference supply failed Radio Device battery low Radio Key battery low neSS D24 Control Panel - inStallation & PrograMMing Manual... -
Page 58: Contact Id Codes Table
By user iD Cancel of alarm report ssss 18 By user iD note1. if using area partition, admin area = 08, area 1 = 01, area 2 = 02, area 3 = 03 neSS D24 Control Panel - inStallation & PrograMMing Manual... - Page 59 NOTES neSS D24 Control Panel - inStallation & PrograMMing Manual...
- Page 60 this page is intentionally blank...
Need help?
Do you have a question about the D 24 and is the answer not in the manual?
Questions and answers