Ness D8x User Manual
Alarm control panel
Hide thumbs
Also See for D8x:
- Installation & programming manual (88 pages) ,
- User manual (40 pages) ,
- User manual (22 pages)

Related Manuals for Ness D8x


Summary of Contents for Ness D8x
- Page 1 Smartphone operation Ness D8x / D16x alarm coNtrol paNel User's MANUAL 7.8.2 revision...
- Page 2 Ness. Ness reserves the right to make changes to features and specifications at any time without prior notification in the interest of ongoing product development and improvement.
-
Page 3: Table Of Contents
Number programming ......23 real time clock programming ......24 monitoring, central station / audible ......25 remote operation by telephone ......26, 27 Ness accessories ..........28, 29 troubleshooting ............30 Installation record ............. 31 operatIoN SUmmary ..........32... -
Page 4: Features
NESS D8x aND D16x FEaTurES • 8 or 16 alarm zones (D8x / D16x). the battery under load every hour. • Supports up to 3 remote keypads. • 4 programmable auxiliary outputs can be operated automatically by autotime or • 56 user codes can be programmed to manually by keypad. operate by keypad pIN, radio key or access card. • Enhanced serial data input/output via rS232. Interface with third party products. • Optional Ness Radio Interface for fully • Automatic reset fuses / no glass fuses to... -
Page 5: Introduction
INTrODuCTION the Ness D8x and D16x microcomputer based When an alarm occurs, it can be reset with a 8 or 16 zone control panel is the heart of your User code or by optional radio Key or access security system to which all your detection... -
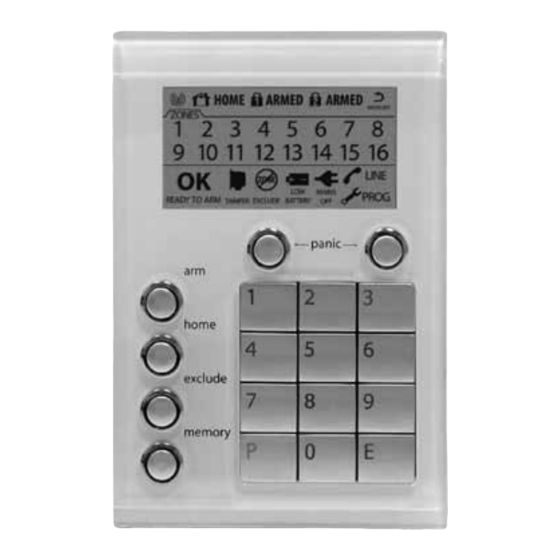
Page 6: Keypad
KEypaD the instructions in this manual relate to Ness Kpx and Saturn keypads. the Kpx keypad is used in examples throughout this manual. Saturn keypad operation is identical. refer to the Ness Navigator user's manual for operating instructions specific to the Navigator touch Screen keypad. -
Page 7: Visual Indicators
KEypaD INDICaTOrS KeyPaD DisPLay inDicators in oPerating MoDe KeyPaD icon FLasHing DisPLay Zones Zone is sealed. Zone is unsealed. Zone is in alarm. 1-8 (or 1-16) Zone/s are unsealed. ready to arm or power fault. or panel is armed. READY TO ARM or phone line fault. -
Page 8: Operation
OpEraTION this section describes the operation of a typical control panel installation. Keep in mind that your installation may vary depending on the selected options and equipment. the operating instructions which follow will cover the most common options. consult your installation company if you require further information. all control panel operations are controlled by the keypad. - Page 9 Keys and access cards and readers are optional and are not supplied with any Ness control panel as standard. Ness radio products require a Ness radio Interface (100-200) to be fitted to the control panel.
-
Page 10: Arming
OpEraTION to arM the panel by access carD or by KeyPaD by raDio Key press (If the a is enabled). rMiNg hortCUt present a card or Fob twice. press the oN button once. the strobe light will flash or press briefly. -
Page 11: Disarming
OpEraTION to DisarM the panel by access carD or by KeyPaD by raDio Key enter the premises through a Delay Zone. press [U present a card or Fob once. (if the installer has press the oFF button once. the armeD light will turn off. enabled disarming by the strobe light will flash briefly. -
Page 12: Home (Monitor) Mode
OpEraTION to arm HoMe mode by KeyPaD by raDio Key Home monitor arming by radio key must be enabled by your installer. press (If the h is enabled). oNitor hortCUt press either the oFF or press the aUx button or the oN button button once. -
Page 13: Keypad Panic
OpEraTION Panic alarm by KeyPaD by raDio Key press and hold the press star keys together. paNIc button for at least 4 sec. or press + [U note. your panel may be programmed for DoUBle preSS raDIo paNIc. to operate, press and hold the panic button until the transmit leD turns on. -
Page 14: Keypad Fire Alarm
OpEraTION Keypad MeDicaL alarm by KeyPaD press Sends a medical alarm report by dialler. (If this option has been enabled by your installer and the system is monitored by a central station). the medical alarm does not sound the sirens. Keypad Fire alarm by KeyPaD press... -
Page 15: Excluding Zones
OpEraTION How to eXcLUDe zones by KeyPaD press (If the e is enabled) xClUDe hortCUt or press + [U the exclude light will turn on. then press [Z (Enter the zone number/s to be excluded.) then press to exit exclude mode The Exclude light flashes constantly while zones are excluded. Excluded zones are automatically Included next time the panel is disarmed. If there is a problem with a detection device and Zone Exclude is not permanent. Excluded zones the zone cannot be sealed when arming the... -
Page 16: View Memory
OpEraTION Viewing the eVent MeMory by KeyPaD press (If the V is enabled). eMory hortCUt or press + [U The Memory light will turn on. press ...the most recent event will be displayed. press ...the next most recent event will be displayed. press ...and so on, up to 30 events. -
Page 17: Temporary Day Zones
TEmpOrary Day ZONES the Ness D8x and D16x have a temporary Day coMManDs Zone feature which allows easy and flexible Day (accessed from normal operating mode). Zone selection and operation. enter selection Mode. temporary Day Zones operate in addition to permanent Day Zones which are usually setup by the installer. -
Page 18: Autotime Features
OpEraTION aUto-tiMe FeatUres D8x/D16x V6 onwards features sophisticated new automation features making full use of the onboard real time clock and a set of powerful yet simple to program options. arm or DISarm aUtomatIcally at pre-programmed times of day or day of the week. -
Page 19: Autotime Operation
OpEraTION aUto-tiMe oPeration Warning PerioD (optional function - must be enabled by your installer.) When an autotime event is about to begin, your keypad (or keypads) will begin a constant slow beep as a warning that the automatic event is about to happen. the warning beeps can be programmed to start up to 99 minutes prior to the autotime event. -
Page 20: Programming
Ness D8x or D16x is a simple tiMers process using the keypad. you can also re-program the entry Delay time and exit Delay time if you need more or less to enter program mode you need to know your time to exit and enter the premises. -
Page 21: Programming Options Table
prOgrammINg OpTIONS TabLE User coDe oPtion no. KeyPaD Pin User coDe oPtion no. KeyPaD Pin p201e p229e (master code) p202e p230e p203e p231e p204e p232e p205e p233e p206e p234e p207e p235e p208e p236e p209e p237e p210e p238e p211e p239e p212e p240e p213e p241e... -
Page 22: User Code Programming
prOgrammINg programming User coDes steP KeystroKes DescriPtion coMMent enters User program mode. the program light will turn aster enter the 3 digit option number the existing user code, if PtioN for the user code being pro- any, will be displayed by the grammed. -
Page 23: Entry/Exit Timer Programming
prOgrammINg programming tiMers steP KeystroKes DescriPtion coMMent enters User program mode. the program light will turn aster enter the option number for the existing time, if any, will entry Delay time 1. be displayed by the keypad one digit at a time. or enter the option number for ...or entry Delay time 2. -
Page 24: Real Time Clock Programming
prOgrammINg programming reaL tiMe cLocK steP KeystroKes DescriPtion coMMent enters User program mode. the program light will turn aster enter the option number for the existing value, if any, one of the real time clock will be displayed by the options. -
Page 25: Monitoring, Central Station / Audible
CENTraL STaTION mONITOrINg central station monitoring is highly recommended and is the most effective method of monitoring the Ness D8x and Ness D16x control panels your alarm system. have an on-board digital dialler which can send detailed alarm messages to a central monitoring For further information about 24 hour monitoring, Station. -
Page 26: Remote Operation By Telephone
OpEraTION seqUence oF oPeration. the D8x/D16x will allow a user to call in to the 1. phone the panel telephone number and listen panel, using a standard DtmF telephone, and for the required number of rings and then remotely arm or Disarm all areas and also turn hang up. - Page 27 rEmOTE OpEraTION auDIbLE FEEDbaCK Summary OF TELEphONE COmmaNDS • The user Code is valid prepare to receive commands • Successful Arming or 3 beeps arm areas Disarming • An Auxiliary output has Disarm areas been turned oN. turn oN or pulse aUx1 • Panel is already Armed • Invalid code. Try again. 1 long beep turn oFF aUx1 • Remote AuX operation is not enabled turn oN or pulse aUx2 • An Auxiliary output has turn oFF aUx2...
-
Page 28: Ness Accessories
Ness DVrs are available in 4, 8 or 16 channel models in The Ness Quantum™ Pet Aware PIR and Pet Aware standard definition or full 1080p HD for high definition Dual have a superior ability to discriminate between surveillance and recording. - Page 29 Keys™ provide the benefits of separate oN, oFF and the Ness radio Keypad is suitable for use as a portable paNIc buttons as well as optional control of auxiliary keypad or for adding an extra keypad in areas where it outputs - all in a slim, waterproof remote control.
-
Page 30: Troubleshooting
TrOubLEShOOTINg syMPtoM PossiBLe caUse reMeDy When arming, a zone light is one or more detection device Find the cause of movement or close on or the keypad gives a long (a pIr or reed switch) may be the door or window. beep. unsealed. • 10 beeps from keypad. the mains power may be off, ...or make sure the plug pack is plugged • MAINS light is flashing. -
Page 31: Installation Record
DATE PURCHASED: DATE INSTALLED: INSTALLATION RECORD INSTALLATION COMPANY: TELEPHONE: MONITORING COMPANY: NESS D8 ALARM CONTROL PANEL TELEPHONE: NESS D16 ALARM CONTROL PANEL ZONE ASSIGNMENT TIMERS User programming options Installer programming options P26E ENTRY DELAY TIME 1 Seconds P27E ENTRY DELAY TIME 2... -
Page 32: Operation Summary
KEypaD OpEraTION Summary operation by KeypaD to arm press the panel must initially be (If the arming Shortcut is enabled) disarmed. or press + [U or press [U (If code only arming has been enabled for that user code) to DISarm press [U to disarm and/or reset alarms.
Need help?
Do you have a question about the D8x and is the answer not in the manual?
Questions and answers