Table of Contents
Advertisement
TP801/TP805/TP806 User Manual
Desktop POS Printer
TP801/TP805/TP806
User Manual
TP801
TP806
TP805
Xiamen Hanin Electronic Technology Co.,Ltd.
ADD: Room 305A,Angye Building, Pioneering Park,
Torch High-tech Zone, Xiamen, China 361009
Tel.:+86-(0)592-5885993
Fax: +86-(0)592-5885992
Web: www.hprt.com
www.hprt.com
1
Advertisement
Table of Contents

Related Manuals for HPRT TP801


Summary of Contents for HPRT TP801
-
Page 1: User Manual
TP801/TP805/TP806 User Manual Desktop POS Printer TP801/TP805/TP806 User Manual TP801 TP806 TP805 Xiamen Hanin Electronic Technology Co.,Ltd. ADD: Room 305A,Angye Building, Pioneering Park, Torch High-tech Zone, Xiamen, China 361009 Tel.:+86-(0)592-5885993 Fax: +86-(0)592-5885992 Web: www.hprt.com www.hprt.com... - Page 2 TP801/TP805/TP806 User Manual REVISION RECORDS REV. DATE DESCRIPTION Drawn Checked Approved 1.Added the warnings of using crash 2013.04.10 Chen weihua Lin yang Ren xiaowei drawer 2013.04.19 1.Added the setting of Ethernet IP Chen weihua Lin yang Ren xiaowei 1.Added the warnings of using power 2013.04.20...
-
Page 3: Table Of Contents
4.5 Connecting the Cash Drawer ................ 17 4.6 Paper roll installation ................... 17 4.6.1 Confirmation of printing paper ............17 4.6.2 TP801/TP805/TP806 installation/Change Paper ........ 17 4.7 Setting DIP switch ..................19 4.7.1 Serial interface(RS-232C) .............. 19 4.7.2 Interfaces of Parallel and USB2.0 ............19 4.7.3 The choice of auto cutter.............. - Page 4 TP801/TP805/TP806 User Manual 4.9.3 Parameters checking and resetting illustration of the Ethernet and Wi- Fi cards ....................... 24 4.9.4 Setting of Ethernet IP ................ 25 4.9.5 Wi-Fi settings ..................29 5 Interfaces signal ...................... 40 5.1 Parallel interface ..................40 5.2 Serial interface .....................
-
Page 5: Statement
TP801/TP805/TP806 User Manual Statement This manual content may be altered without permission, and Xiamen Hanin Electronic Technology Co., Ltd. reserves the rights to make changes without notice in technology, spare parts, hardware and software of the products. If more information is needed about the products, please contact Xiamen Hanin Electronic Technology Co., Ltd. -
Page 6: Important Safety Instructions
TP801/TP805/TP806 User Manual Important Safety Instructions 1. Safety warning 1) Warnings: The print head will become very hot during printing; avoid contact with the print head after printing has finished. 2) Warnings: Do not touch the printer head and connector in case static damage the printer head. -
Page 7: Pos Printer Packing-Case
TP801/TP805/TP806 User Manual POS printer packing-case Pls. check you get all in carton as pic. 1 Power adapter Power line Quick start guide TP801 TP805 TP806 pic.1 www.hprt.com... -
Page 8: Overview
1 Overview 1.1 Introductions TP801/805/806 is a thermal receipt printer with auto-cutter, featured by high printing quality, high printing speed, high stability, etc. It can be used in commercial POS system, food industry and occasions which need real-time field print receipts. -
Page 9: Specification
TP801/TP805/TP806 User Manual 2 Specification 2.1 Printer specification Model TP801 TP805 TP806 Print method Direct thermal line printing Resolution 203DPI,8dots/mm Printing width 72mm(576dots) Printing Parameter Print speed 200~300mm/s 200~250mm/s 250~300mm/s Wi-Fi Wi-Fi Interface Serial, Parallel, Ethernet, USB Print density Adjustable from level 1 to level 4... -
Page 10: Printing Media Specification
TP801/TP805/TP806 User Manual 2.2 Printing media specification 2.2.1 Continuous thermal paper specification Paper type: thermal continuous paper/thermal black mark paper/thermal label paper. Paper width: 80±0.5 mm, 57.5±0.5 mm. Paper outer diameter:Max. 83 mm. Paper roller inner diameter: paper roll mandril inner diameter 12mm, paper roll mandril outer diameter 18mm. -
Page 11: Printing And Cutting Position
TP801/TP805/TP806 User Manual 2.3 Printing and cutting position 2.3.1 Printing position Fig 2.3.1 1) L1 Paper house width:TP801/805-83mm,TP806-81±0.5mm 2) L2 Valid printing width: 80mm 3) L3 The distance between the thermal printer head and the left side of the paper house(fixed width):3.5±0.3mm 4) L4 The distance between the thermal printer head and the right side of the paper house(fixed width):3.5±0.3mm... -
Page 12: Printer Components
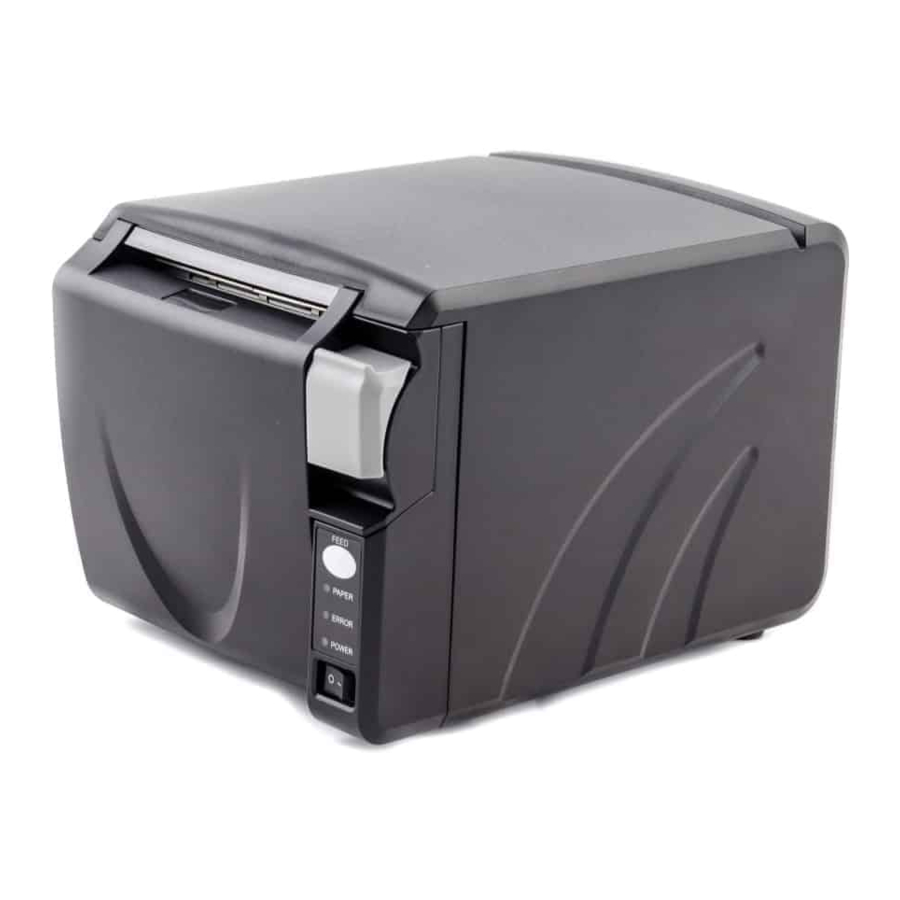
TP801/TP805/TP806 User Manual 3 Printer components 3.1 Appearance and component 3.1.1 TP801 1.Printer Cover 9.Feed LED 2.Paper Detection 10.Cover Open Button 3.Paper Mouth 11. Flexible Interface Board (Serial/Parallel/Ethernet/Wi-Fi) 4.Front Cover 12.USB Interface 5.Power Switch 13.Cash Drawer Interface 6.Power LED 14.Power Interface 7.Error LED... -
Page 13: Tp805
TP801/TP805/TP806 User Manual 3.1.2 TP805 1.Printer Cover 9.Cover Open Button 2.Paper Mouth 10.Cable cover 3.Front Cover 11/12. Flexible Interface Board 4.Power Switch (Serial/Parallel/Ethernet) 5.Power LED 13.USB Interface 6.Error LED 14.Cash Drawer Interface 7.Paper nerd end LED 15.Power Interface 8.Feed LED 16.DIP Switch cover... -
Page 14: Tp806
TP801/TP805/TP806 User Manual 3.1.3 TP806 1.Printer Cover 10.Flexible Interface Board (Serial/Parallel/Ethernet/Wi-Fi) 2.Paper Mouth 11.Rubber Pads 3.Front Cover 12.USB Interface 4.Power Switch 13.Cash Drawer Interface 5.Power LED 14.Power Interface 6.Error LED 15.DIP Switch cover 7.Paper nerd end LED 16.Waterproof Cover 8.Feed LED 17.Cable Cover... -
Page 15: Specification Of Indicated Light And Beeper
TP801/TP805/TP806 User Manual Specification of some part elements 1) Power switch Press “0” to turn off power and press “1” to turn on power supply; 2) Paper out indicator light Detect the status of paper .when warming light fast blink, it means paper will run out, you should change paper soon;... -
Page 16: Printer Packing
TP801/TP805/TP806 User Manual 4 Printer packing 4.1 Open packing When opening the package, according to the packing list to check if items are missing or damaged, if so, please contact the dealer or manufacturer. 4.2 Choice installation site and direction of printer 1) Install the printer on a flat, stable place;... -
Page 17: Connecting The Interface Cable
If you need to set the marked paper, please contact your dealer or manufacturer. 4.6.2 TP801/TP805/TP806 installation/Change Paper 1) Turn off printer power supply; 2) Flipping switch knob, open the top cover of TP805\TP806 and front cover of TP801(Like figure 4.6.1)... - Page 18 TP801/TP805/TP806 User Manual TP806 TP805 TP801 Figure 4.6.1 3) Put the paper into printer(Like figure 4.6.2) TP805 TP806 TP801 Figure 4.6.2 Notes: ► According to the paper size to adjust the paper holder; ► Make sure the end of the paper roll fit for the graphics requirements;...
-
Page 19: Setting Dip Switch
TP801/TP805/TP806 User Manual 4.7 Setting DIP switch 4.7.1 Serial interface(RS-232C) · DIP switch 1 Switches Functions Turn on Turn off Default Line feed automatic Prohibit Turn off Handshaking XON/XOFF DTR/DSR Turn off Data length 7 bit 8 bit Turn off... -
Page 20: The Choice Of Auto Cutter
TP801/TP805/TP806 User Manual Form 1—The Choice of Baud rate Baud rate Default 2400 Turn on Turn off Turn off 4800 Turn on Turn off Turn on 9600 Turn off Turn on Turn off 19200 Turn off Turn off Turn off... - Page 21 TP801/TP805/TP806 User Manual 2) Click “Install”. 3) Choice the port and type you want(the installation program will recognize the usable printer ports automatically, USBxxx is for USB port ,COMx is for serial port,LPTx is for parallel port),click “Next” to next step.
-
Page 22: The Driver Installation Instruction Of Ethernet And Wi-Fi
1) Install printer driver program just as USB installation. Click “Control Panel”→”Hardware and Sound”→”Devices and Printers”. 3) Right click “HPRT TP806” and choice “Printer properties”, click “Ports”,choice”COM1”, Click “Add Port…” button. 4) Choice “Standard TCP/IP Port” and click “New Port…” button. - Page 23 TP801/TP805/TP806 User Manual 5) Click “Next>”. 6) Finishing the writing of printer name (or IP address)and port name ,Clicking “Next >”. “Printer Name or IP Address”: Depends on the display of printer’s self-test page. “Port Name”: Users can customize the name of the port.
-
Page 24: Parameters Checking And Resetting Illustration Of The Ethernet And Wi-Fi Cards
9) Click Click “Control Panel”→”Hardware and Sound”→”Devices and Printers”. , right click “Printer Properties” of printer HPRT TP806 and choice “Ports”→“Configure Port…”, finish the setting of related parameter, click “OK”. 4.9.3 Parameters checking and resetting illustration of the Ethernet and... -
Page 25: Setting Of Ethernet Ip
TP801/TP805/TP806 User Manual Wi-Fi card parameter checking: Press the button on the interface card round hole when the printer is power on, he printer will print software edition and the TCP/IP setting information of the interface card. Wi-Fi card parameter resetting: Press the button on the communication card round hole then power on. - Page 26 TP801/TP805/TP806 User Manual 7) Click “Enter”, if the following figure is presented, you can sure that the Ethernet have been connected to the printer, if not presented, please check the connection between the Ethernet and the printer. 8) Then please input http://192.168.0.31,...
- Page 27 TP801/TP805/TP806 User Manual 9) Press “Enter”, the browser will skip to the IP setting interface, click Configuration in the left side then enter to the address modify page, 192.168.0.31 is the current IP address, see the following figure: 10) Modify the IP in the IP Address. For example, modify the IP to 192.168.0.32,see the following figure:...
- Page 28 TP801/TP805/TP806 User Manual 11) Click SUBMIT in the middle of the upper page then enter to the following webpage: 12) Click RESET in the middle of the upper webpage then enter to the following webpage: www.hprt.com...
-
Page 29: Wi-Fi Settings
TP801/TP805/TP806 User Manual 13) Reboot the printer to effect the new IP, then you can print self-test page and find the new IP address 192.168.xx.xx. 4.9.5 Wi-Fi settings Wi-Fi work mode: AP mode:when printer under AP mode, it works as an access point. - Page 30 TP801/TP805/TP806 User Manual 3) Open web browser, and enter http://192.168.0.XXX( this IP address is printed on the Wi-Fi configuration page). How to print Wi-Fi configuration page: power on the printer, long press the WIFI reset button (see below picture), then printer will print the configuration page.
- Page 31 TP801/TP805/TP806 User Manual Use Internet Explorer or other web browser to open http://192.168.0.33, input user name: admin; password: admin 5) After entering user name and password, click on OK to enter Wi-Fi setting page. www.hprt.com...
- Page 32 TP801/TP805/TP806 User Manual 2. STA mode settings 1) Click on “Work Mode” on the left-hand side, rolling down to STA mode. 2) Click on “SAVE” and below window will pop up. www.hprt.com...
- Page 33 TP801/TP805/TP806 User Manual 3) Do not click on “RESTART” button at this moment, instead click on the “STA Setting” on the left side to make more STA settings. 4) Click on “SCAN” button to search for access points For example, below picture shows there are several access points available...
- Page 34 TP801/TP805/TP806 User Manual 5) Choose the correct access point. For example: ”embedded” , see below picture. www.hprt.com...
- Page 35 TP801/TP805/TP806 User Manual NOTE: settings in the above pictures are just for examples, not for your actual on- site network settings. Please refer to your IT and network engineer for the correct network settings. www.hprt.com...
- Page 36 TP801/TP805/TP806 User Manual 6) After setting, click on “SAVE”. 7) If users want to make other changes, click on “ BACK” , otherwise click on “RESTART” button. 8) Above settings will take into effect after power off/on the printer, user could print the Wi-Fi configuration page to check whether settings have been success fully made.
- Page 37 TP801/TP805/TP806 User Manual NOTE: after changing to STA mode, access point will assign an IP address to the printer, by printing WIFI configuration page, users could see the IP address, and use it for entering WIFI setting page in the future.
- Page 38 TP801/TP805/TP806 User Manual 3) According to user’s actual needs to change network mode, SSID, IP address and other settings ( please refer to IT or network engineer for the correct settings). 4) Click on “Save” and “restart” button to confirm the settings.
- Page 39 TP801/TP805/TP806 User Manual 5) Power off and power on the printer, above settings will take into effect. Users could print WIFI configuration page to check whether setting have been successfully made. www.hprt.com...
-
Page 40: Interfaces Signal
Printer TP801/TP805/TP806 supports cash drawer interface and many other various communicate interfaces, such as Serial interface, parallel interface, USB interface, Ethernet interface (TP801/TP806 also support Wi-Fi interface). The printer has the communication board with the default USB interface and cash drawer interface, and the other communication boards with the Ethernet interface, parallel interface, RS232 interface are optional. -
Page 41: Serial Interface
TP801/TP805/TP806 User Manual Note:H indicates that signal comes from Host computer, P indicates that signal comes from Printer Figure 5.1.1 5.2 Serial interface Pin definition PIN No. Signal name Classic wire color VBUS White Green Black Figure 5.2.1 5.3 Power Supply interface definition 1) Pin definition PIN No. -
Page 42: Cash Drawer Interface Signal
TP801/TP805/TP806 User Manual 5.4 Cash Drawer interface signal 1) Electrical characteristics Driving voltage:DC 24 V Driving current:maximum 0.8 A ( In 510 ms) Drawer check signal:“L” = 0~0.5 V “H” = 3~5 V 2) Cash Drawer interface sing RJ-11 connector Figure 5.4.1... - Page 43 TP801/TP805/TP806 User Manual Serial interface definition Ethernet interface definition Signal definition PIN No. PIN No. Signal definition PIN 1 PIN 2 PIN 3 PIN 4 PIN 5 PIN 6 PIN 7 PIN 8 PIN 9 Printer TP 801 and TP806 serial interface are all compatible with RS-232 standard, with 25 pin (D hole type) socket.
-
Page 44: Troubleshooting
TP801/TP805/TP806 User Manual 6 Troubleshooting Your printer is very reliable, but occasionally problems may occur. This chapter provides information on some common problems you may encounter and how to solve them. If you encounter problems that you can not resolve, contact your dealer for assistance 6.1 Printer not working... -
Page 45: Problems Emerge During The Paper Cutting Processes
TP801/TP805/TP806 User Manual 6.4 Problems emerge during the paper cutting processes Problem description Probable reason Resolution Cutter abrasion, insufficient replace the cutter cutting Worm gear and worm wheel Replace the worm gear and worm wheel Cutter jam, the movable abrasion... - Page 46 TP801/TP805/TP806 User Manual If the auto cutter jam occurs on printer TP805 and TP806 and you cannot open the printer cover, open the cutter cover as shown on the left below. Turn the knob until the cutter blade returns to the normal position.
Need help?
Do you have a question about the TP801 and is the answer not in the manual?
Questions and answers